
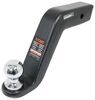
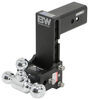
Roadmaster Direct-Connect Base Plate Kit - Removable Arms
(2036 reviews)
Price: $485.00
In Stock
Roadmaster Direct-Connect Base Plate Kit - Removable Arms
Item # RM-524434-5
Retail:$550.00
Our Price: $485.00
You Save: $65.00
Will this fit?
To see if this custom-fit item will work for you please tell us what vehicle you'll use it with.
In Stock


Need help with installation?
Locate installers near me- All Info
- Reviews (2036)
- Q & A (0)
- Videos (1)
- Photos
Roadmaster Base Plates - RM-524434-5
- Removable Drawbars
- Roadmaster
- Twist Lock Attachment
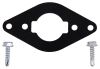
Designed for use with motor-home-mounted tow bars, the direct-connect brackets are virtually invisible, easy to mount and remove, and they eliminate the need for a quick-disconnect crossbar on your tow bar. Installs on your vehicle's frame.
Features:
- Direct-connect brackets provide attachment points for your motor-home-mounted tow bar
- Streamlined design creates supremely clean look
- No obtrusive quick-disconnect crossbar
- Hidden brackets sit even farther back than standard brackets
- Drawbars attach and remove quickly and easily
- Arms click to lock in place in brackets
- Built-in pull rings let you unlock arms so you can twist and remove them
- Computer-cut, all-steel construction provides exceptional strength
- Black powder coat finish is durable and corrosion resistant
- Simple installation - no welding required
- Custom base plates ensure a perfect fit for your vehicle
- Compatible with Roadmaster motor-home-mounted tow bars only
- Instructions and mounting hardware included
- Made in the USA
- Limited Lifetime Warranty
Note: Roadmaster direct-connect base plates will only work with Roadmaster tow bars that slide into a trailer hitch, such as the Nighthawk, Sterling, Blackhawk, Blackhawk 2, Falcon, or Falcon 2. These base plates will not work with tow bars that require a hitch ball.
The drawbars, or front arms, on this base plate kit are supremely easy to mount and remove. Just insert them into the brackets and twist to lock them in place. To remove each arm, simply tug the built-in pull pin to disengage the lock, twist the arm back and pull it out of the bracket. Once the drawbars have been removed, the remaining brackets are virtually invisible. On most automobiles, the brackets are mounted within the grille, where they remain not only unseen, but protected from scrapes and scuffs as well.
524434-5 Road Master EZ-5 Base Plate Kit
Installation Details
This Product Fits The Following Vehicles
- 2013 - 2016 Ford Fusion S Hybrid - without Adaptive Cruise Control
- 2013 - 2016 Ford Fusion SE Hybrid - without Adaptive Cruise Control
- 2013 - 2016 Ford Fusion Titanium Hybrid - without Adaptive Cruise Control


Video of Roadmaster Direct-Connect Base Plate Kit - Removable Arms


Videos are provided as a guide only. Refer to manufacturer installation instructions and specs for complete information.

Video Transcript for Roadmaster Direct-Connect Base Plate Kit Installation - 2014 Ford Fusion
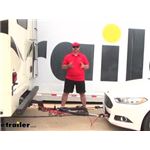
Shane: Hi, I'm Shane with etrailer.com. Today we're gonna be taking a look at . I'm gonna show you how to install Roadmaster's direct connect base plate kit on our 2014 Ford Fusion. It's gonna be one of the seven components required to flat-tow your vehicle. Let's go over those components now.One, is gonna be our base plate. It's gonna connect directly to the chassis of the vehicle, to give you that solid attachment point for your tow bar.
Second is gonna be your tow bar. It's gonna give you that solid connection point between your base plate on your towed vehicle and your RV. Third is gonna be your safety cables. These are gonna be a secondary safety device, in case your tow bar happens to fail. Fourth is gonna be your braking system.
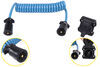
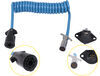
Braking system is mounted inside the vehicle, and it's gonna allow you to apply the brakes in the vehicle, while it's being flat-towed, rather than having to depend on the RV to stop both vehicles. Next is gonna be our wiring. Our wiring is gonna allow us to transfer all of our light signals from our RV to our vehicle while it's being flat-towed, so that we're safe.Our sixth component is gonna be a battery charge line. It's gonna allow us to charge our battery while we're flat-towing the vehicle, because our braking system requires a power source to work. Our seventh component is gonna be a brake light relay.
Because this vehicle, when the key is in the off position, and you push on the brake, the brake lights come on, we don't want that signal to override our turn signal, when we're flat-towing it. The relay is gonna separate that wire, so we're only getting the wire functions, or the lighting functions, from the RV.I, in my opinion, I would want to look very clean on the front of the vehicle. Some base plates, the safety chain loops are gonna stick out a little bit farther, where your removable arms feed into the base plate, they're gonna stick out a little bit. With this base plate, when you remove your arms when you're not using, or not flat-towing your vehicle, you can see here that there's barely anything sticking out. So it really, really looks good on the front of this vehicle.Another great feature about this base plate is the removable arms.
When we're not flat-towing our vehicle, we remove the arm, we can store these in our RV so we're ready to use them next time. They're easy to put on, easy to take off. We're gonna have a spring-loaded pin here, that all you have to do, is you push it in, until that pin collapses, you twist it, and it locks into place. And then to take it off, you simply pull the ring, twist it back, and you slide them out.Now as far as the durability on this base plate. As I mentioned before, it's gonna attach to the chassis of the vehicle, so we know we're gonna have a solid connection point there. It's gonna be a black powder-coated steel. So it's gonna be very durable. The welds on it, they're very thick. We're not gonna have to worry, when we're flat-towing our vehicle behind our RV, 'cause we know our base plate is gonna hold up the way we want it to. And our base plate is only gonna work with Roadmaster tow bars that are hitch-mounted. It will not work with tow bars that are ball-mounted.Now that we've gone over some of the features, we'll show you how to get it installed. We're gonna start with this panel, right here underneath our hood. We're gonna have some push pin fasteners we need to remove. You can use trim panel tool, you can use your flat head screwdriver. We're gonna pull up the center, and then we wanna pull the base out too. So if they come separated, no big deal. You can always put them back together after you get it out. We're gonna have several of these that hold this panel down.Then we're gonna set this panel aside for now. We're gonna have another push pin fastener here, three T25 Torx head bolts here, and another fastener here. Remove those.In each wheel well you're gonna have three fasteners that look like this. You're just gonna turn them, unscrew them, and then you're gonna pull the fastener and the base out.Next, we'll take a 7 mm socket. Underneath the vehicle, right in front of each wheel, you're gonna have two 7 mm head bolts, and then right across the bottom side of the fascia, you're gonna have some 7 mm bolts. We need to remove all of those, all the way over to the other side of the vehicle.We're gonna take a T30 Torx bit, we're gonna have a bolt here, here, here, here, right across the front, and then these right here that are holding on the back of this panel. We're gonna need to remove this, also.Then we'll pull our panel down. We're gonna set this aside for now. Next we're gonna reach up, and if you have fog lights, we need to unplug those before removing our fascia. This plug right here, we're just gonna push on the black tab, and we'll pull out. And make sure you look on the other side of the vehicle, to make sure there's no wiring or plugs that you need to remove over there.We're gonna go ahead and start pulling off our fascia. You just wanna make sure, when we pull it off, we pull it off really slow. There's actually two plugs that are right back here, that we're gonna need to take off. So don't just pull it off real fast. We're gonna start on the outside. We're just gonna pull out like this, work our way to the center, do the same thing on the other side, and you see our two plugs right here. These are gonna be the same type of connections, we're just gonna push, pull out on the plug, just like that. And our driver's side, one way up here at the top. Now we're gonna set our fascia in a safe place, for now.Next, we're gonna take a 13 mm socket, we're gonna have two bolts, on each side of the bottom of our radiator support. We're gonna loosen those bolts and just let our radiator support hang. There. And we're gonna take the two out on the other side.Next, on each side of our vehicle, you're gonna see a piece that sticks out from our frame, like this. There's gonna be a hole on top and a hole on the bottom. We need to open those holes up to a 1/2 inch. We're gonna do that same thing on the other side.Next, we're gonna take a tape measure on our bumper core here. Right in the center we're gonna measure back 2 inches. And mark it, just make sure we're centered here. What we're gonna do, we're gonna drill a hole here. There's already a hole on the inside, we're gonna make a 1/2 inch hole through the whole thing. So we're gonna take a small bit, we're gonna make our pilot hole here, and then we'll open it up to a 1/2 inch.To make it easier, I'm gonna use a couple different drill bits. I'm gonna start with a small one, to do a pilot hole. Just gonna go couple bits bigger, closer to the 1/2 inch.You wanna make sure, when you open up the inside hole, if you don't feel comfortable, put something to block it there, because you're running right into the edge of your radiator here. We just wanna make sure we don't damage it. For the inside, we're not gonna have to push that hard, because it's a pretty good-sized hole. Like that. And you're gonna repeat that same process on the other side.Next, we're gonna have two brackets that are gonna look like this. You're gonna have one for one side, one for the other. This is gonna be our driver's side. The flat side is gonna actually sit on top, it's gonna cover this hole, this is gonna go up behind, to meet with this hole in the back. This is gonna go to the back, these two are gonna be right out here in the front. So how we're gonna do that, I'm gonna go back like this, slide it out, and we're gonna rest it down just like that.We're gonna take our 1/2 inch by 5 1/2 inch bolt, we're gonna put some Loctite on it, red Loctite. This does not come in your kit, the red Loctite, you wanna make sure you get some of that. You can find that here at etrailer.com. You're gonna put on this large washer, we're gonna go through both sides, and then through our bracket. And then on the inside, we're gonna put on a 1/2 inch lock washer, and then a nut on the inside.We're just gonna leave them loose for now. Then we're gonna take our 3 1/2 inch bolt, Loctite, down from the top, like this, through the bottom. We're gonna put on our flat washer, lock washer, and then nut. We're gonna make sure we leave that loose for now. I got it too tight.And we're gonna take another 3 1/2 inch by 1/2 inch bolt, Loctite, we're gonna go through this hole, you can see this hole right here in this bracket, through this sub-frame. We're gonna go all the way through to the back side. Now we're gonna put on 1/2 inch lock washer and nut.And you're gonna repeat that same process on the other side of the vehicle.Next, you can see how I have marked inaudible 00:09:53, we're gonna need to cut this section out of this guard. It's pretty soft rubber. You can just use a knife. And you're gonna repeat that same thing on the other side.Now we'll take our main receiver brace, and we're gonna set it into place, line up our holes. We're gonna take our small 1/2 inch bolt, like this on each side, again, make sure you're using Loctite. We're going from the outside in, and then we're gonna finish off with a 1/2 inch lock washer and nut, on each bolt.Then we're gonna tighten and torque all of our hardware to the specifications in the instructions. You can see I'm starting with the two bolts holding my main receiver brace to the brackets. And then we're gonna tighten and torque all of our bolts that are holding the brackets down to the frame.Once you're done tightening and torquing everything, you can reinstall your radiator core support.Once you have all your hardware tightened and torqued down for your base plate, it's a good idea, while your fascia's off, to add any other additional components for your flat tow setup, like your wiring or parts for your braking system. Once you have those components installed, before reinstalling your fascia, it is gonna require a little bit of trimming, not only around your base plate, but around the components that you've installed. When you reinstall your fascia, you're just gonna reinstall it in reverse order from the way you took it off. We're gonna be moving on to the inaudible 00:11:23 wiring installation on this. We're gonna be creating a video to help walk you through that installation, which you can find here at etrailer.com.
Customer Reviews
Roadmaster Direct-Connect Base Plate Kit - Removable Arms - RM-524434-5
Average Customer Rating: 4.8 out of 5 stars (2032 Customer Reviews)
Designed for use with motor-home-mounted tow bars, the direct-connect brackets are virtually invisible, easy to mount and remove, and they eliminate the need for a quick-disconnect crossbar on your tow bar. Installs on your vehicle's frame.by: Brad03/31/2024
2013 Ford Fusion
Great tow bar, love that the car side attachments are removable so car looks normal when not being towed.
by: Bob R10/18/2016
2016 Ford Fusion
Put this item on a 2016 Ford Fusion. Fit was excellent, took some heavy duty drilling to get it on, which is to be expected. It takes a bit more cutting of the fascia than the directions state but other than that no complaints.
by: Jason10/31/2016
After a year, the product held up well and still looks as good as the day I got it.
by: John11/09/2022
I bought and self installed this on my 2021 GMC Sierra Duramax 1 year ago. Install took about 5 hours and wasn't difficult...I could problty install it in 2-3 hours after leaening the tricks. Weve towed the truck all over the USA since then (over 10,0000 miles) and it works great! I've used other brands and highly recommend Roadmaster tow systems over the competition.


by: William04/07/2024
The Roadmaster direct connect base was a perfect fit for my 2013 focus S to flat tow. We had it installed in about 3 hrs following the complete direction and pictures. I highly recommend using etrailer.


by: Richard03/10/2024
Good product. If you are reasonably handy and have some tools, you can install this yourself in a few hours. I'm a mechanic, it took me a little over 2 hours to install on my own toad. The fit is good, there are 4 holes you have to drill, otherwise it is plug and play. When you insert and twist lock the tow bar mounts into their sockets they feel a little sloppy but they are secure, and i never noticed any rattle when towing. Overall i give it a 4 out of 5 for easy install and clean look after install. Pic included of installed base plate.


by: Gary01/13/2024
Installed on my 2020 Jeep Cherokee for flat towing behind our motorhome . I wanted a tow bar connection that integrated with the front end of the Jeep and the removable arms did the trick . I had one issue with the driver side receiver bracket not lining up with the upper mount bolt hole on the Jeep, image 0547. Had to make a slight adjustment to the receiver bracket so the holes would line up, image 0551 and image 0559. The rest of the install went smoothly
I also installed the Demco braking Stay n Play Duo system , image 0565 which went in without any issues, image 6028. 7 thousand miles of towing later, couldn't be happier with the products


by: Tim L07/24/2023
This is a rock solid baseplate. Installed on a 2023 Equinox LT (AWD). I followed etrailer's videos for installation and they are spot on. We connect with a Roadmaster Nighthawk tow bar, charge line kit, smart diode lighting kit, and a Demco Stay-in-Play supplimental braking system. It is fairly well hidden when not in-use. This setup is great!


by: David02/07/2023
Exactly what I needed. Written jbstructuons were spot on and video was very helpful.


by: Charles02/02/2024
I installed them on my new RAM 1500. Works great, very heavy duty. I also modified and attached a push bumper and used the Roadmaster base plates.


by: Dennis04/03/2024
Easy install. Looks great. Apparently they have made some changes so that the video is not accurate. Install instructions though were spot on. A template for cutting the grill would be an added plus.


by: John 04/08/2023
I was very pleased with the way you handled my order. I called and was greeted pleasantly and knowledgeable about what I needed and in just a few minutes my order was placed. It arrived just as they said it would in a timely matter.
I would recommend e-trailer to anyone!
by: Jay12/30/2023
Installed on my 2020 jeep jl sport s with factory plastic bumper and plastic rock guard. Shane’s video was very helpful but I did not like how the metal plate behind the rock guard was cut away and how the rock guard had two big cut outs so I did some modifications. I cut two slots in the metal bracket and added angle brackets for extra support. As a result i did not use the supplied brackets for the rock guard. I created a template for the rock guard which resulted in two small cut outs. A lot of extra time but i am retired so time is relative. I think it looks great.


by: Gary11/09/2023
Installing on 2020 Jeep Trailhawk :
Pic #0557 : Roadmaster Base Plate Kit , Demco Supplemental Braking System , Diode Wiring Kit , Demco Battery Charge Wire Kit
Pic # 0548 ,0551 , 0559 Had to adjust the bracket plate to line up with the upper bolt holes
Pic #6028 finished install , mounted the operating unit to the top fuse box cover using automotive Velcro . Air cylinder , controller and LED light installed . Aside from the base plate bracket not lining up with the upper bolt holes I would give it 4 stars . My son in law is a master at solving mechanical issues .


by: Kerry04/30/2022
The base plate arrived on time, with excellent instructions. I went slowly because my truck is only days old and still had it done in an evening.


by: John11/01/2023
I bought this base plate kit for my 2022 Jeep Rubicon Gladiator so I could flat tow behind my class a motor home with a Roadmaster Falcon all terrain non binding tow bar. The instructions were easy to follow and went smoothly except drilling the holes. That was my fault because I was using a dull drill bit. See attached photo


by: David 01/21/2023
The bracket kit fit my 2023 Subaru Crosstrek perfectly. The instructions are excellent and the video is really useful too. I’m really pleased with this RoadMaster bracket kit and the support from eTrailer.
by: Andy05/17/2023
This kit worked out great for my 2022 Chevy Equinox. I like how it has separate side plates, which make it easier to attach the main bar. The points where it attaches to the frame seem plenty secure. It is important to watch the videos provided by etrailer as Ryan is very thorough and has good tips for installing. I would also recommend installing additional wiring while having the front end off. Overall, I was able to complete in my driveway. The hardest part was sorting out the wiring for whatever braking and tail lights you decide on. William S helped me pick all the necessary components needed for flat towing behind my Jayco RV. I am looking forward to a summer of camping and having more freedom to explore the area, now having a car.


by: Don 04/26/2024
Item works good. We pulled our ‘21 Canyon behind our RV on several trips and had no issues other than you need to put in a diode to the rear lights to keep them from back feeding.
by: Rick10/26/2023
Easiest I drive done. Works perfectly. I had some concerns if it would work on my Shelby F-150. etrailer put me in touch with Roadmaster directly who had never done one either. Said if it didn’t work I could return it. It fit with minor adjustments. Have towed a few thousand miles already. Couldn’t be happier


by: Jerry N05/10/2024
Everything went pretty good except for the reinstall of the PAD. Had to mount it on an angle because wire to short. Love it versus the crossbar I had on Santa Fe 5 speed. Also had to wire 12v outlet and emergency brake switch wiring into drivers side which was fairly easy. And 12v charging circuit for battery. My grandson Seth made it look easy.


by: Kathleen04/06/2024
Great Company Product arrived on time and the tracking information was above and beyond what I expected Product is exactly as described and of excellent quality
Would highly recommend etrailer and Roadmaster
by: Bruce07/01/2023
Well made, easy to install (provided you use one of etrailer's videos to install it!), non obtrusive. Fits well on my Jeep Wrangler. Just an overall great product!


by: Michael 11/21/2022
This is the fifth Roadmaster base plate that I have purchased. I will not use another brand as I feel it is the best for the money and Quality, installs easy as well. We just got them today and have not installed yet. so no photos sorry.
by: Michael 01/20/2024
Just took the maiden voyage with the new Motorhome and the new Tow Car or ( Toad ). After getting everything set up and installed on the coach and the dingy towing was a breeze. Hardly even noticed that i was towing a car behind me. Bought all RoadMaster equipment and purchased everything from etrailer, baseplate and towbar with the invisibrake system and all the necessary cables. Etrailer was Awesome they made sure that I had everything needed and that everything fit my vehicle.
25
2033
Show More Reviews
See what our Experts say about this Roadmaster Base Plates
- Roadmaster Invisibrake Second Car Kit and Base Plate for 2014 Ford Fusion TitaniumTo install your Roadmaster Invisibrake # RM-8700 on your 2014 Ford Fusion Hybrid you will need the Second Vehicle Install Kit # RM-98700. For base plates for your Fusion that will work with your Falcon All Terrain I recommend sticking with the Roadmaster family. It will make it easiest to connect your baseplate and tow bar. If your Fusion has adaptive cruise control, I recommend the Direct-Connect Base Plate Kit # RM-524437-5. If your Fusion does not have adaptive cruise control, then...
view full answer... - How to Adapt Roadmaster BlackHawk 2 Tow Bar To Fit Blue Ox Base Plate on a 2007 Dodge NitroThe Blue Ox Base Plate Kit # BX1976 will come with its own removable arms to fit into their baseplate. Your Roadmaster Arms # RM-524434-5 that you have are only compatible with the their baseplate for a 2013-2016 Ford Fusion. To adapt your Roadmaster BlackHawk 2 All Terrain, Non-Binding Tow Bar # RM-422 to fit the Blue Ox base plate you need the Roadmaster Tow Bar to Blue Ox Brackets Adapter # RM-031. These will replace the end connectors on your Blackhawk tow par and fit the Blue Ox...
view full answer...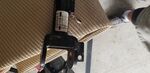
- Parts Needed to Flat Tow 2016 Fusion Titanium Hybrid Without Adaptive Cruise ControlYes, we have all the parts and information you will need to safely and legally flat town your 2016 Ford Fusion Hybrid First you will need a vehicle specific base plate kit. For your Fusion Hybrid WITHOUT adaptive cruise control you can use the Roadmaster # RM-524434-5 kit. It is designed for use with motor-home-mounted tow bars, the direct-connect brackets are virtually invisible, easy to mount and remove, and they eliminate the need for a quick-disconnect crossbar on your tow bar. Installs...
view full answer... - Will Falcon 2 Tow Bar Fit the Same Base Plates as the Falcon 5250 Tow BarThe Falcon 2 tow bar # RM-520 is compatible with the same base plates as the Falcon 5250. It will work with all Roadmaster base plates! I have included a link to a video review of this tow bar for you.
view full answer... - Recommended Flat Towing Setup for 2017 Ford Fusion Energi Plug In HybridI'd be happy to help you with that. You'll need a base plate, tow bar, safety cables, a wiring solution, a supplemental braking system and possibly a high/low adapter if the height difference between the base plate (13 inches) and the receiver on the motorhome is greater than 3 inches +/- of level. For a base plate, I'd recommend the Roadmaster direct connect, part # RM-524458-5. Direct connect base plates eliminate the crossbar, for easier hook up and a cleaner look. For a tow bar, use...
view full answer...
Do you have a question about this Base Plate?
Info for this part was:

Expert Research:
Mike L

Expert Research:
Michael H

Written by:
Lindsey S

Video Edited:
Joshua S

Updated by:
Shelly K

Updated by:
Mike S

Updated by:
Isabelle B

Updated by:
Noah M

Updated by:
Amanda K

Test Fit:
Shane H

Video by:
Michael B
At etrailer.com we provide the best information available about the products we sell. We take the quality of our information seriously so that you can get the right part the first time. Let us know if anything is missing or if you have any questions.
Product Experts Available Now!
Call 1-800-940-8924
Thank you! Your comment has been submitted successfully. You should be able to view your question/comment here within a few days.
Error submitting comment. Please try again momentarily.