
Summer Starts Here - Save up to 70%
To see if this custom-fit item will work for you please tell us what vehicle you'll use it with.


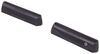
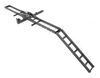
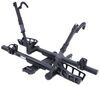
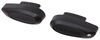
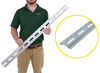
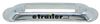
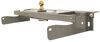
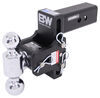
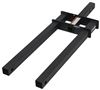
The crossbar-style hidden brackets attach to your vehicle's frame to provide attachment points for your tow bar. The visible portions of the brackets can be removed when you are not towing.
Features:
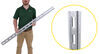
The square drawbars, or front arms, on the crossbar-style base plate kit are simple to mount and remove, easily securing with hitch pins. Once the drawbars have been removed, the remaining brackets are virtually invisible. On most automobiles, the brackets are mounted within the grille, where they remain not only unseen, but protected from scrapes and scuffs as well.

Videos are provided as a guide only. Refer to manufacturer installation instructions and specs for complete information.
Today in our 2010 Honda Odyssey, we're going to be installing the Roadmaster XL Base Plate kit, part number 1556-1. First, we've gone ahead and jacked up and removed the front wheels. Although this isn't necessary, it makes it easier to remove several of the fasteners for the lower splash guard. Next, we've gone ahead and raised the front hood. We're ready to go ahead and start removing some of the fasteners that will be necessary to remove the upper and lower fascia. Starting under the hood, we'll have 8 fasteners to remove the upper fascia.With the upper fascia loose, we can go ahead and remove it and set it aside for reinstallation later.
We can go ahead and get underneath. To remove the lower fascia and wheel well guards, approximately 20 fasteners will have to be removed. These are all pushpin fasteners of various shapes and sizes. You need to be mindful of which ones needed to go back where. With all our fasteners removed, we'll go ahead and remove the center guard and then pull back on wheel well guards to expose the screws up behind the front bumper fascia.
We can go ahead and repeat the same process on the other side.Next, we'll be ready to go ahead and remove the front fascia. To do this we'll simply pull out near the wheel well popping the fascia free on both sides. With the lower splash guard out of the way and the wheel well pulled back, we'll go ahead and lower the vehicle. We've got two more extended pushpin tabs to remove. Next, we need to go ahead and remove the air box in the driver's side.
To do this there are two fasteners that will need to be removed first. We'll go ahead and remove the fasteners and then pull down and out on the air box. We'll go ahead and set that aside for reinstallation later also.Next, we need to move them over to the passenger side and remove the windshield washer bottle. Before I do that however, I want to mark one set of lines so that I know which side it goes back into the windshield washer pump. Using a paint marker, I can go ahead and mark one side of the lines and the pump.
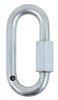
We can go ahead and remove the lines. At this time, it will cause any fluid in the washer bottle to leak out. With both lines removed and our tank drained, we can go ahead and remove the connector from the pump and into the 3 fasteners that are secured to the windshield bottle to the vehicle.We'll set the washer tank aside for reinstallation later. Next, we're going to go ahead and remove the bumper core. To do this, there are 3 fasteners on each side that need to be removed. We've got 2 underneath and one on top. This hardware and bumper core will not be reinstalled as it will be replaced by the new drawbar. We're ready to go ahead and take the long side brackets and install them inside the frame. With our 1/2 inch carriage bolt already in place for the bracket, we'll slide it back inside the frame until the carriage bolt drops through the frame and out the bottom.Then we'll get underneath the vehicle, we'll install a 1/2 inch block, 1/2 inch lock washer and a 1/2 inch nut to secure the bracket in place. We can go ahead and repeat the same process on the other side. Next, we'll use a 5/8 bolt, lock washer and fender washer that'll go through the side of the frame into our long side bracket. We can go ahead and repeat the same process on the other side. Next, we'll go ahead and bring our drawbar and put it into position up on top of the frame. We'll use new hardware to replace the manufacturer's hardware and secure the drawbar to the top for attachment points where we will remove the bumper cord earlier.Next, we'll take the 3/8 hardware provided which will be a bolt lock washer and nut and secure the drawbar to the side bracket we previously installed. There are a total of 8 attachment points to secure these two together for both sides. With all 8 of our fasteners securing the drawbar to the side braces, keep in mind that all of our hardware will be finger tight at this time. We need to install the lower brackets. To do this, remove the 4, 17-millimeter bolts securing the manufacturer's frame bracket to the cross member. We'll also loosen up where the brackets bolts to the frame through the body mount.This will allow us to install the new bracket. Our hardware will be the 5 spaces that goes between the bracket and the radiator support with a new bolt, lock washer and lock nut. Keep in mind everything we do here on the passenger side will get identically on the driver's side. Next, we'll go ahead and take the 1/2 inch, 7-inch bolts, run them up through the lower bracket into the drawbar. We'll secure the top of these bolts with a 1/2 inch lock washer and nut. Keep in mind, everything we do here on the passenger side will get repeated identically on the driver's side.With all our fasteners installed we can go ahead and tighten and torque the specifications as indicated in the instructions. We're ready to start reinstalling the washer bottle, the air box and all of our underbody trim panels. First, we'll start with reinstalling the air box. We'll just use the same mounting fasteners that we removed earlier to secure it. Next, we'll move over to installing the washer bottle. On the inner fender well attachment point, we're going to install a pipe spacer, a new bolt, flat washer and a lock washer. Next, we'll repeat the same process of using the pipe spacer for the lower attachment point near the wheel well.However it will need to be slightly relocated further out away from the engine compartment so we'll use the 2-inch self-tapping screw to secure it. The third attachment point up in the engine compartment will not be reused. With our washer bottle installed we can now go ahead and reinstall our washer lines. Keep in mind we color coded them so that they get reinstalled correctly. With that done, we can go ahead and reinstall the connector for the washer pump. Next, we're ready to go ahead and install the front fascia. However in order to completely install the front fascia, we'll need to cut out around the drawbar.To do this, we'll go ahead and set the front fascia in place, holding it with the two extended pushpin tabs that we removed earlier. We can go ahead and take our paint marker and mark out the area that will need to be cut. With the area marked out, we can now go ahead and take our rotary zip tool and cut out the lower part of our bumper fascia to allow for the drawbar to stick through. With that done, we can go ahead and start reinstalling the front bumper fascia. With the front bumper fascia reinstalled we can go ahead and start reinstalling the lower fascia on both the driver and the passenger side.Keep in mind, well be using the pushpins that we removed earlier. Next, we'll go ahead and reinstall the lower center fascia. However before we can do that, we'll go ahead and test fit it to see what needed to be cut out around the lower brackets for the drawbar. Once again, we'll use the rotary zip tool to make these cut outs. With that done, we can go ahead and install it using our pushpin fasteners. With that done, we've got one more piece of trim that need to be installed, the front fascia guard that goes in the engine compartment. Once again, we'll use the pushpin fasteners that we originally removed to secure it.Let's go ahead and insert our front arms and secure them with the hitch pin and clip. Lastly we'll show you how to attach the safety cable with the quick connect rings. We put the ring through the predrilled hole in our base plate and slide the cable into the ring and secure it. With that done that will complete the installation of our Roadmaster XL Base Plate kit, part number 1556-1 on our 2010 Honda Odyssey. .
Average Customer Rating: 4.8 out of 5 stars (973 Customer Reviews)
The crossbar-style hidden brackets attach to your vehicle's frame to provide attachment points for your tow bar. The visible portions of the brackets can be removed when you are not towing.
Great fit. Between the video and the printed instructions from road master I was able to install ot myself. Still working great.
etrailer service is and has always been stellar. My order was correct and was delivered very quickly. The only reason I made this a four instead of a five was that the rear bolt position of both base plate brackets where welded on crooked. Each small plate was at a different angle from each other. In my opinion whoever welded them wasn’t paying attention to quality control. Because I was on a time crunch for my departure on a trip and could not wait for replacements (and I needed the vehicle for local driving) I made the brackets work. Other than that the installation went smoothly and I was able to test tow my 2004 CRV a couple of times without incident.
Very impressed that they're the exact fabbed fit, and easy to install! These tow base plates are super sturdy!
Item arrived earlier than predicted after viewing a very complete tracking system. The information was very clear and precise. Good job! I am 75 years of age and installed the baseplate myself. Only a couple of minor issues. One pin would not insert. Welding blob in the way. Filed it smooth and problem solved. The video was excellent but was a bit different in that it showed a different method o rear bolt installation, however the instructions on paper showed the correct way. Reinstalling the front clip had presented some difficulty. I suggest really watching the inner fender position relative to the front clip before removal. All said all went well. The finished look is great, (see pictures). Great product!
Just completed a 6600 mile rod trip, towing the Subaru behind a motor home.
Worked great.
I've towed with it many times and Zero problems. I did find that moving the car slightly forward after stopping helps relax tension amd.make.disconnect much easier. Overall... I'd say SUPER..!!
Base plate 1910 install on 1999 Landrover disco 2
the base plate arrived fast (as does everything I have ordered from etrailer). It was a bit bent on arrival but Becky sorted me out and offered to replace it but it was easy to bend back (with a 3lb hammer).
The included instructions were great for removing the bumper but nor much else. Possibly because my Landy is a 1999 disco 2 and the pictures were of a 2002.
I have included some pictures of stuff I wish I had known. Firstly I had to loose the recovery loop on the driver side as the base plate would not fit over it. The chassis frame has steel tubes inside the bolt holes so the amount of drilling is minimal (I ordered a drill bit that they suggested but in all honesty could have opened up the holes with a file easily).
You need to oval out the aluminum crush cans before you replce them or the new bolts will not go through. The center mount bolt just needs the plastic mount for the center screw on the scoop cut out and there is a bog square hole on the top of the member (thats why you need to big square piece of steel on the top of the center bolt)
Mine was obscured by the torsion bar so I ended up dropping it to drill out the hole and get the bolt in straight.
It was easy to bolt up to the frame once everything was prepped and do yourself a favour and buy loctite red for the bolts - you don't want to be going in there again.
The bumper template was a good start but I had to reshape mine a lot particularly as the hole on the baseplate ended up halfway through the bumper and I had to do a lot of enlargement at the bottom to attach the safety wires.
The photos should make more sense of some of my description
It was easy to install, fit well and came with good instructions.
Everything looks good for us, but we have one more part that we are waiting on before we can install on the truck plus it's raining out here in Washington State. when it's time to put it all together we will take a picture and send it.
The baseplate and crossbar arrived one day earlier than expected. Directions were included which made the installation pretty easy.
I am happy with etrailers products and will buy from them again.
This base plate was installed on a 2008 Kia Spectra. The bracket is strong and not really hard to work with HOWEVER,,,,,,,,,, I am used to the BlueOx base plate which is much easier to "hook up". Unfortunately, BlueOx did not make a base plate to fit my vehicle. That is not a big problem as I'm usually not in any hurry and it only takes maybe 5 minutes longer to "hook up".
The biggest problem with the RoadMaster base plate is that due to the way it is bolted to the frame, it only allows for a 6-inch ground clearance on the front of the vehicle. I have to be very careful with any "dips" in the road, especially on cross streets. Six inches may not sound like much but since the tires are several feet behind the base plate, it reduces that ground clearance greatly. It also will not clear the concrete "stop blocks" in front of many parking spaces.
If you are not very careful and keep this in mind, you may likely bend the frame of your car when you come to one of these sudden impacts. I haven't bent anything yet but it has certainly been shocking when it hits. Most of the time, the impact will cause the base plate to scrape and lift the car to the height to clear the obstacle.
I've attached a picture with a ruler in the view.
Very easy to install and works great
Good information and prompt shipping.
Base plate is solid and install and use instructions are excellent.
Be warned that product install is drill two holes and install 3 bolts, BUT the entire front panel has to be removed and replaced. Not difficult, but time-consuming.
Seat bracket is solid and install and use instructions are excellent.
Brakemaster kit is good quality, but instructions are not as good as most Roadmaster products. Instructions for air line install are especially weak.
The hardest part of the installation is getting the grill off and back on. Of the six preexisting holes all but one lined up the sixth hole was off about a half inch but the car had hit a deer a few years ago.
My husband and I were able to install the Roadmaster base plates on our 92 Jeep Cherokee in just a couple of hours. It went on pretty much the same as the demonstration video on the etrailer web site. The minor differences were addressed in the printed instructions that were included in our package. We haven't put it to the test yet as we still need to tackle wiring for the Roadmaster Even brake system that we purchased second hand. We will be towing our Jeep with our 93 Safari Trek. Customer service provided by Marty was excellent. I will provide pictures at a later date.
Installed on a 2010 Ford Ranger Sport 2wd
Have towed over 10000 and not one issue. I did the install without one issue, picture perfect, I did use a online video to get a general idea of install otherwise I primarily used manufacturer's. . Be sure to use the recommended/ required locktite product.
Enjoy!!!
Base plate kit was fairly easy to install,all hardware was included and directions were clear! I would definitely buy another to install if ever needed. I do have a car lift making it easier,but would not be bad without,just a little harder on the knees!
This was a very simple install. This is my 4th baseplate I have bought and 2 pintle tow bars. Always excellent craftsmanship
Great product, shipping was FAST. Instructions were adequate, but minimum - this was not surprising, you have to know how to bend wrenches to install something like this yourself.
I had a factory-installed tow hook on each side that had to be uninstalled, but once you remove the front bumper shroud it is easy to remove and all the bolts are easy to remove. Once the hook was out of the way, easy-peasy!
Super nice people at etrailer. I wasn’t sure exactly what I needed and they helped me pick out the best hitch for me.
Very rugged kit with excellent instructions. A DIYer with medium mechanical skills can install. Involved removing the front bumper which was not difficult. Value for the price is very good. As always, etrailer support was also very good.
Great product and easy to use . Car tows great behind the motor home.
Great product,installation took about 3 hours,instructions were good,go step by step.works well with the roadmaster falcon tow bar.
Highly recommend E-Trailer for all of your towing accessories. Great product, great customer service!!
Do you have a question about this Base Plate?
Info for this part was:
At etrailer.com we provide the best information available about the products we sell. We take the quality of our information seriously so that you can get the right part the first time. Let us know if anything is missing or if you have any questions.


Thank you! Your comment has been submitted successfully. You should be able to view your question/comment here within a few days.
Error submitting comment. Please try again momentarily.