
To see if this custom-fit item will work for you please tell us what vehicle you'll use it with.
Thank you! Your comment has been submitted successfully. You should be able to view your question/comment here within a few days.
Error submitting comment. Please try again momentarily.
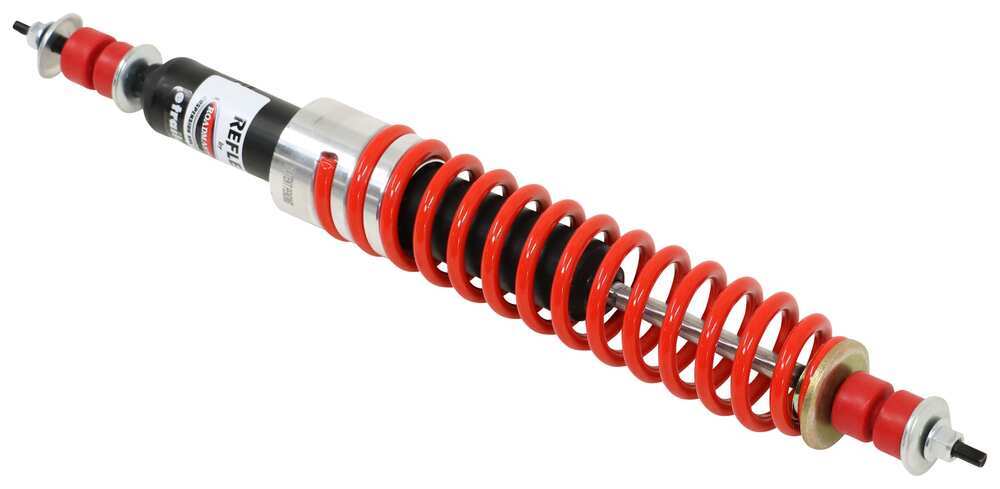
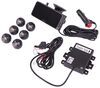
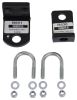
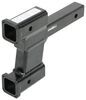
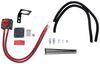
The sturdy steel spring on this stabilizer keeps your Chevrolet Express Van in line by constantly working to maintain its position. Mount it between the steering mechanism and the chassis for a tight connection that will minimize wander and correct oversteering.
Features:
A variety of things can make your vehicle veer - crosswinds, uneven pavement, tire blowout. The key to a pleasant, and safe, driving experience is learning how to deal with these situations. Roadmaster's Reflex Steering Stabilizer works to return your vehicle to center when something happens that causes it to swerve or jolt. As a result, you won't have to oversteer in an attempt to stay in line, thus minimizing road fatigue.
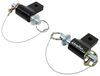
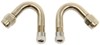
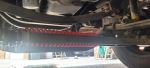
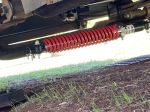
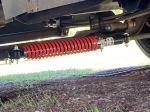
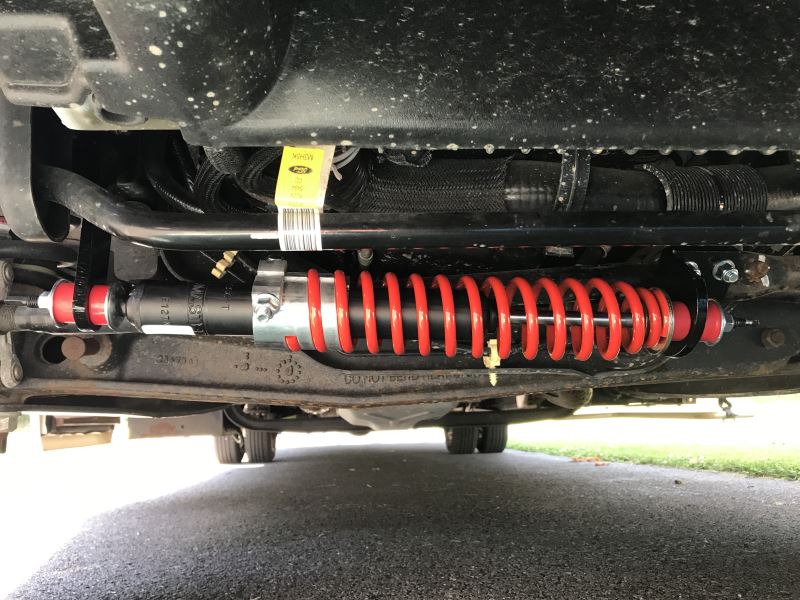
The stabilizer attaches to your vehicle's tie rod on one end and to the frame on the other. A heavy-duty steel spring runs the length of the rod, constantly working to keep steering controlled. If you steer your vehicle one way and it gets pulled the opposite way, the spring will stretch momentarily and then quickly pull back to its normal state. If you oversteer your vehicle in the same direction it is already moving, the spring will compress for a moment but then push back out to its prior state. No matter how you steer or how the frame is pushed or pulled, your vehicle will always return to center.

Videos are provided as a guide only. Refer to manufacturer installation instructions and specs for complete information.
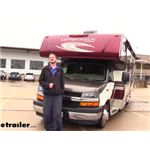
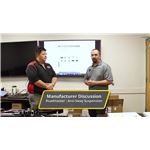
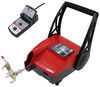
. and your 2017 Chevrolet Express van motor home. We're going to be taking a look at, and showing you how to install, Roadmaster's steering stabilizer.Before we install our steering stabilizer, we're just going to get a baseline on how our motor home drives. So we're going to go ahead and hit our test course here. We're going to start in the uneven bump section, and this is going to simulate hitting a pothole.You can see here, right already when we hit these potholes, it wants to kind of jerk our steering wheel around a little bit. And I'm sure you're used to that out there on the road at home when you're driving it.Next, we're going to be heading into our even bump section.
This is going to be simulating a parking garage, or maybe just pulling into your driveway if you've got a little hump there. With this, you're not going to notice it too much unless you're coming at it at an angle.If you hit one of those at an angle, one tire's going to hit before the other, and you might feel that jar. If you hit it straight on the steering stabilizer's not really going to make much difference in there. So you can see we're just kind of hitting them. It does still want to move our wheel a little bit here, because we're not hitting them perfectly straight.Last, we're going to go into our slalom section.
This is where we can simulate an evasive maneuver. With our steering stabilizer, if we had one installed, it would help us to return it to center. Without it right now, it's not really going to make much of a difference.So we're heading into the section now. And we can feel the motor home rocking a little bit. Our stabilizer's not going to affect the way it sways or anything like that.
You might want to look into a set of sway bars or SumoSprings if you're having issues there. Our stabilizer's really just going to help return it to center.This motor home doesn't drive too terribly bad right now. You do have to put a little effort into it. We're going to go ahead and take her back into the shop now. We're going to get our stabilizer installed, and then we'll hit our test course once again.Now that we've got our steering stabilizer installed, we're going to go ahead and hit our test course again.
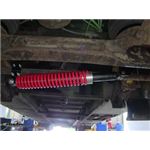
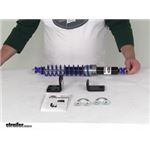
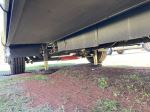
Unfortunately, due to the location of the front subframe there, it does kind of block most of the shot of the steering stabilizer, but we should be able to give you a good rundown, and you should be able to see some of it moving. You can easily see the brackets where they're attached to the tie rod, that frame piece just blocks a lot of the stabilizer.So we're going to hit the uneven section, just like we did before. You can already feel a nice difference in how much it hits the steering wheel here. You still feel it a little bit in the steering wheel, but the amount that it jars has been quite a bit reduced.This is going to add up to just a lot of energy over a long drive. If you're going for eight hours, and every time you have to hit a bump you're compensating for it, that's going to add up. It does reduce it down quite a bit to where it's just pretty minimal, where the little bit that it moved, it wouldn't even really change our direction of travel.We're now hitting the even section again. With this, I kind of noticed it just a little bit, just if we're not hitting it perfectly straight. But for the most part, with your even bumps, you're not going to notice too much of a difference.And then we're going to head into the slalom section. What you're going to notice here is that, when we go to perform an evasive maneuver, the steering stabilizer's going to help pull it back straight. So we should feel, and probably even be able to see it in the wheel, bringing it back straight.We're heading into that section now. I can definitely feel kind of like an initial burst. It wants to go back right away and the last little bit I kind of have to finish up. That's just likely because the spring's almost reached its normal position, so the last little bit, it kind of eases into if it was going to do it for us.You can see it bring it right back there. It's pretty snappy on the initial return, so it does a lot of the work for you. And that's going to make a big, big difference over a long trip halfway across the country, or wherever you're going.This is what our steering stabilizer looks like when it's installed. It attaches between your tie rod, and the frame over here next to your lower control arm on the driver's side, to provide dampening for any imperfections that you hit on the road, whether it be potholes, or if you we're driving near a campsite, maybe just some rough terrain in the grassy area to get to where you're going.The stabilizer has a gas-filled shock inside that dampens those forces for you. And it also has a spring on it here that helps return your steering wheel to center.The gas-filled shock works just like the shocks on your vehicle does. It has a restriction inside, so it doesn't want to compress, but you can see the shaft attached to the shock here. It will go inside of there, but it has resistance the entire time, which absorbs a lot of that force going down on the road, and dampens it into the shock instead of it just transferring straight up the steering wheel to you on the inside.What this means for you is that, when you're going down the road, you're not going to have to grip the steering wheel quite as tight as you did. You won't be white-knuckle driving, because whenever you hit those potholes and stuff, it's not going to jar your wheel as much as it did before.And with the spring on here, it's going to help compensate for the pothole there by bringing your steering wheel back straight. Normally you would have to do all the effort to bring your vehicle back to straight again after you hit that pothole.Now this spring here, it wants to return to this normal position. So if the wheel turns to the left or to the right due to a pothole, or even if you just turn the wheel, this spring's going to try to pull it back straight and keep it going in a straight line.All in all, this is just going to reduce the amount of energy you're going to use when driving your motor home. So once you reach your destination, you're going to have more energy and be able to spend more time with your family, doing the things you enjoy.We'll begin our installation underneath the front of the vehicle here. There's a cover here in the front that we'll need to remove so we can get access to see everything.Our steering stabilizer's going to be located behind this plastic panel here. There is an opening on the bottom, so you could put everything up underneath that way, but it's just a lot easier if we just get this out of the way. It's just two bolts, one on each side, and we'll use a 15 millimeter socket.We can set that aside, and we're going to turn our direction over here to the driver's side. So now we're underneath, and this is the lower control arm right here. We're interested in this nut right here on the other side of the bolt that's connecting the control arm.You're going to use a 15/16th socket, and you're going to need a pretty hefty size ratchet because this guy's on here pretty tight. So go ahead and get on there and then just start working it off. Once you get it loose, it's usually not nearly as bad, but the initial breaking it loose can be a little rough.After turning on this for a while, the bolt may start to spin on you. If it does, you can just use an 18 millimeter socket. You will need an extension, then you can go in the hole on the other side just to hold the bolt while you're loosening it up. And what I like to do is, a lot of times you can get into a certain spot where it'll hit the ground and that way it'll kind of hold for you so you don't have to use both hands.Now we've got our nut off there. We can take our small bracket here, and we're going to slide the small end of our bracket, the little shorter L section, over our bolt. Then we can reinstall the nut.Now that we've got that bracket loosely installed, we can go ahead and get our other bracket loosely installed. This one here is going to go onto our tie rod, which is right here connecting the two wheels together. You can see where it's attached to the steering gear right here next to it.So it's going to be located here. Our U bolts are just going to drop down over the top of it. We'll slide it on, and then each end of the U bolt's going to get a washer, followed by a locking nut. Once we get this U bolt loosely installed, we'll put the other U bolt on. And the other two holes in our bracket is going to go around our tie rod, just like this one didSo now that we've got both of them loosely installed, we're going to come back to this one, and we're going to snug it down some. This one's going to be really difficult to torque if you have the stabilizer in place.We can go ahead and get this one kind of snugged down, and then we'll get it in the position that we want it to be in once we get it kind of snugged down. I'm just checking the bracket for when starts to get snug, so I can angle it the way that I want it to be.With it loosely installed, now we can get our stabilizer into position. Your hardware does come pre-installed in the correct order. When you pull it out of the box, it's going to be like this, and this is exactly how we want to go through our bracket.We want the bracket to be between the two rubber bushings. If you look at the bushings, you'll see that there's a protrusion that's going to go through the hole. And then there's the smoother part here. This should face towards our clamp, just like we have it.So now we'll take our bushing and we'll line it up with our bracket. We can take our steering stabilizer, we're going to slide it through the bracket. We're using the end here that has the spring that's not on the spring. It's got the tube that you can see here. Then we can just re-install the nut onto our stabilizer.Okay. Now that we have it loosely installed, we can come down to the other end of our stabilizer. We'll slide our other bracket down. We're going to remove the hardware, just like we did on that side. Slide our stabilizer through the bracket, put the hardware back on, and then loosely install it over here on this side.We're just going to go back and snug them up with a 9/16th socket. Now you might notice the whole shaft is spinning, and if that's the case, which looks like it is. The whole shaft is spinning on this one. So if that starts to spin on you, then you're going to have to hold the shaft.Here at the end of our shaft, there is a kind of like a square head that we can put on to hold it, and then use a wrench to tighten it down on the nut. Sometimes you get lucky and the gun can just zip it down. Other times you have to hold it.So here I'm using a quarter inch wrench that'll slide over the flat spot on the end of the stabilizer. And then I can tighten down the nut using a wrench.When you're tightening down your bushings, you really just want to get them down to the point where they start to squish out. You don't want to make it to where they squish out past the washer.We're pretty close to where we want to be. Be just a little bit more snug, and then we'll go tighten down the other side after this one. I'm just checking to see how tight it is. We don't want to over-tight the bushings. All right. And that's pretty well squished.At this point, this is where you would want to go back with the crows foot and torque this nut down. That way it'll keep everything in line for you. But if you don't have a crows foot, your other option now is to just take the stabilizer back out of there.So we're just going to loosen this up, and then just get this one side loose. You can leave the other side attached. And then we can hold our bracket with a crescent wrench while we torque it down. Now that we've got it torqued, we can then re-install our stabilizer back into the bracket.Now we've got all the rest of our hardware tightened down, except for our U bolts where it attaches to the tie rod here. This is the most important part, because this is the adjustment that determines whether or not your stabilizer's going to be directing your steering wheel straight down the road.So before you tighten these down, it's a good idea to just double-check yourself, make sure your steering wheel's perfectly straight. And if you have a nice level garage, that's the best area to do this in, because the straighter your wheel is, the more accurate your stabilizer is going to be to return the wheel to center, right back to straight.Because you can see here, this spring is connected to the bar, so whenever it's turned left or right, the spring wants to return to this position. That's why we want to be in that neutral, straight ahead position right now. Then we're going to tighten down these nuts, and that's going to make sure that the stabilizer keeps returning to this particular position.If you have the steering wheel off to the left or to the right a little bit, what you'll notice is, when you're done, it's going to want to push the steering wheel slightly to that side. That might seem like it's causing a pull. It's not necessarily causing a pull. It's just pushing your steering wheel off to that side a little bit.You may have to loosen these up and then re-tighten them down if you do have that issue. But as long as you set everything up nice and straight like this, get everything tight and then save these U bolts for the end, you should be good to go.We're just going to go up in here with our wrench now, then tighten these down. When tightening down your U bolts, it's a good idea to go back and forth so they tighten down evenly. So after I get this one down with a couple of threads poking through, I'm going to go over to the other side and get that side about the same. Then I'll just keep going back and forth until it's all snug.Now we can go back and torque these down to the specifications found in our instructions. You will likely need a crows foot when doing so.Now we've got everything tightened and torqued down. Our installation is complete. You're ready to test drive the vehicle and make sure everything's working properly. It's a good idea to have an assistant just hop underneath before you take off, and then just turn the steering wheel from lock to lock all the way, one direction and then the other, to make sure that you've got good clearance and that it's not going to come into contact with anything.If it does look like it's going to come into contact, your assistant seems to notice it, you can loosen up your U bolts here and you can twist it around. So it can pivot on your tie rod a little bit as necessary to get it out of the way of any component it might come into contact with.And then once you've finished your test drive, as long as everything went good, you're done. But if it does have a little bit of a pull left or right, it's likely due to the steering wheel not being perfectly centered when it was tightened down.So all you need to do is just drive straight onto level ground, your garage works perfect or your driveway, and then loosen up your U bolts. That should release some tension. Then once the steering wheel's nice and straight, just tighten those back up and that'll get you to where you're going to be in a nice straight line.Also don't forget to put your cover back on once you've finished your installation. We're going to be leaving ours off for our test drive. And it's maybe not a bad idea if you wanted to, too, if you had a GoPro or something you wanted to set up. We're going to be getting some footage here. We'll be reinstalling ours before we return it to the customer.And that completes our installation of Roadmaster's steering stabilizer on our 2017 Chevrolet Express van motor home.
Average Customer Rating: 4.7 out of 5 stars (906 Customer Reviews)
The sturdy steel spring on this stabilizer keeps your vehicle in line by constantly working to maintain its position. Mount it between the steering mechanism and the chassis for a tight connection that will minimize wander and correct oversteering.
We have driven about 3,400 miles since the Roadmaster Reflex Steering Stabilizer install. I can honestly say it has made a significant difference in the handling of our Class C RV. Before installing the Stabilizer the RV steering felt like it wanted to drift one way or the other depending on road conditions. This is no longer the case. Much less work to steer.
Great Service and a pretty easy install, concidering that theres not much room to work with under a express 2500, Wheel is centered and no pull.
Thank you for the Help
My Class B Motor Home begins with a Chevy Express Extended Chassis. The front end began to shake almost uncontrollably after applying the brakes or when it hit a pothole. There was improvement after replacing all four tires and brake rotors but not nearly enough. After installation of the Roadmaster Reflex Steering Stabilizer the shaking was almost completely eliminated.
Installed and so far seems ok will find out if difference in 2weeks when we take motor Home out for first trip.
eTrailer was very helpful in determining the correct steering stabilizer for my Class C but delivered item a full week ahead of projected delivery date.
WHAT a difference. It is night and day. The RV manufacturer's make these chassis a bit unstable with all the weight and while under the chassis max we had a lot of play in our steering even after a alignment. This made all the difference in the world. I HIGHLY recommend!
Very easy to install, all parts needed were included. Stopped sway / push from the wind and tractor and trailers. Just follow the instructions.
Before I added the stabilizer my Jayco motorhome handled like a boat on the ocean but now I can drive with one hand
Still getting blown off the road when passed by an 18 wheeler

Sierra K.
11/2/2021
The steering stabilizer bar is going to help with tightening up the steering but not really help with the crosswinds on the highway. What you need is an anti-sway kit like these: https:www.etrailer.comswaybars-2016_Coachmen_Concord+Motorhome.htm?style=4500+-+Class+C+or+Emergency+Vehicle+Cutaway&furl=-pt-Rear Please note that one of them DOES NOT fit with auto chains and one does, depending on your application.
Helpful Links
Excellent product, excellent service, I am extremely pleased with how much better my motorhome handles on the road
I haven’t mounted it yet but I have to compliment the superior service that I have always received from etrailer. Fast service and good pricing and quality products!
Took about 40 minutes to install and immediately felt the difference in control!
This is a must have item for your driving comfort! No more swerving and drifting!
Really made a difference in the handling and tracking of our 24ft class C especially in windy conditions.
Easy to install and amazingly smooth driving
No more fighting to keep it centered in the road.
Have not received it
My order was delivered quickly, just like my last order. No problems !
Very fast delivery. Loved the website d esign.
First, I did have to grind off corner of the plate that mounts under leaf spring bolts. It would not lay flush so I tapered one of the edges where it met the axel a little bit till it laid flush. I did buy a 3/4 inch wrench set but with an rv, it's good to have and will possible allow me to get the 22.5 inch wheels off in an emergency. This with a good solid 3' pipe and I was able to fairly easily break the leaf spring bolts free. I used boards to ensure the fronts tires were fairly straight, laying them alongside the tires and eyeballing to see where they lined up with the back tires which are about 4 inches wider than the front outside width. I mounted the steering stabilizer and took it for a test drive and it was good the first time, no additional adjustments needed. Feels good on the road, good around turns, and even at low speeds around the driveway, I did not notice any extra effort to turn the wheel due to the heavy spring on the stabalizer. Put about 75 miles on it and it feels solid and stable though no high winds or passing semi trucks yet. But my 2007 ford f53 22000 lb chassis under a holiday rambler admiral body has always felt pretty good. Just trying to make better, next up is the new koni evo fsd heavy duty shocks coming today.
I just installed the reflex stabilizer bar this morning and it made a big difference in the way my motorhome drove.
Nick S was GREAT help. He helped me with the right stabilizer for my motor home and had it shipped the very same day. Stabilizer was installed with very little effort and it is making quite a difference in my ability to steer the motor home. I will definitely recommend etrailer to my friends.
What a difference this made. I was on the fence about this for quite a while because of the investment needed. Now that’s it’s on my 2018 Coachman Freelander 28QB sitting on a Ford E450 my only advice is don’t wait any longer, put this on as soon as possible! It took all of that steering wheel shake out. No need to hang on with a death grip anymore. The stabilizer is very easy to put on, it took me about 1 ½ hours to complete including taking the old one off. Just follow the great video and printed instructions from etrailer and you will have no problems at all.
Works great on my 1989 E350 Holiday Rambler Imperial class-C motorhome. Holes had to be drilled in the frame or else the angle would be too extreme and would likely bend the tie rod. I would probably like a little more tension on the steering wheel than it currently has but perhaps that can be adjusted? Just drove a few hundred miles through LA traffic in CA and it definitely helped reduce some stress.
Installing the steering stabilizer really made a difference. You have to be careful to have your front wheels as straight as possible. I had to make an adjustment after install as it made my motorhome pull to the right. The Ford dealer quickly made the adjustment and it really tracks straight down the highway now. It tightened up my steering as well - I'm very pleased with this product.
Easy install. Better control & less wander going down road. Does increase effort when turning tight radius corners.
Make sure it is centered & tight on steering rod.
Do you have a question about this Anti-Sway Bar?
Info for this part was:
At etrailer.com we provide the best information available about the products we sell. We take the quality of our information seriously so that you can get the right part the first time. Let us know if anything is missing or if you have any questions.


Carl B.
12/6/2021
I still feel this has helped a lot. High winds will be an issue with almost all motor homes. Under normal or 65 or less mph traffic I feel less hassle in steering.