
Summer Starts Here - Save up to 70%
To see if this custom-fit item will work for you please tell us what vehicle you'll use it with.
This custom installation kit allows you to mount a pair of DeeZee NXc running boards to your vehicle. The sturdy steel brackets are covered with a black powder coat to resist corrosion. No-drill installation with included hardware.
Features:

California residents: click here
Videos are provided as a guide only. Refer to manufacturer installation instructions and specs for complete information.
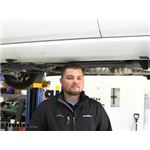
Hello, everyone. Clayton here at etrailer.com. And today I have a 2019 Dodge Durango. We'll be taking a look at and I'll show you how to install the custom running board kit by DZ.Our running board bracket kit is going to allow us to mount any DZ running board to our Dodge Durango. So you don't have to select a running board with a certain bracket. You can get the brackets and a different running board by DZ if you prefer one over the other.
Now these are going to be a steel construction. So they're going to be really strong for a long time. They do have a really nice wrinkled black powder coat finish so don't have to worry about any rust or corrosion over time as well. And this type of black powder coat finish is also going to resist rock chips.Now, this kit does include all of the hardware we need to get the brackets onto our Durango and the hardware to get the running boards onto the brackets. Now, this kit is pretty easy to install.
It's no drilling. We're just using factory holes and our pinch welds on our Durango. So we've gone over some of the features and a little bit of installation. I'll go ahead and show you just how easy it is to get these installed.To start our installation, we need to mount, we need to add our mounting bracket and our nut plate to the back of our pinch wells. How we're going to be working on the rear of the vehicle first.
There's going to be two openings back here that we're going to be working with. When we add our plate, we want our tongue facing out this way, and then we're going to be taking our nut plate inserting it through these last two holes. Then adding our small six millimeter nut onto the nut plate. With our nut hand tight, we can come back with our 10 millimeter wrench and tighten it down.We are now ready to add our lower supporting bracket. Since we have a Durango, we're going to be using this hole.
And then on our actual bracket, we're going to be using this hole right here. All we are going to do is line this up. Then we're going to take our eight millimeter bolt with our flat plate, thread it through here, and then slide our plate up into this hole like so.So as I said, we're going to thread that through like this, then we're just going to slide this up into that hole in our frame rail, just like that. And we can grab our other eight millimeter bolt and hex nut and add it up here. We want to grab our bracket and lift up, slide our bolt through. Actually, we're going to slide it through this side, slide our bolt through then add our hex nut. Now we're going to come back and tighten this. Actually, we can tighten this down hand tight and then come back and tighten this bolt down with a 13 millimeter socket. This bolt can be kind of tricky to tighten down. I had to push it up into the frame rail to get it to grab. You might have to mess up that angle depending on your vehicle to get it to tighten down.With our upper bolt tightened down, we can now come down to the lower bolt and tighten that one down as well, using a 13 millimeter socket and wrench.With that secured, we can move up to our front mounting bracket. We're going to be using these two holes here. Now we want to mount our tab facing out so we can put our bracket in or on the outside of our pinch weld, take our nut plate and slide it through. And we can grab our provided six millimeter hardware. Get that started to run it down hand tight, and then we can come back with our 10 millimeter socket and tighten down these nuts. Now we can grab our front mounting bracket and our eight millimeter nut and bolt. We can get this kind of into place.We'll slide that bolt through. Let our bracket just hang there. Get this hand tightened. We're going to be using this hole here in our frame rail. We do have a little bit different plate that we're going to be using. The front one looks like this. We're going to take our eight millimeter bolt, put it through our bracket and thread this on a little bit. We can lift this up and feed it into our frame rail. You can now come back with our 13 millimeter socket. I suggest pulling down on your lower bracket. That's just going to help keep the tension on that plate. Well, let's get it kind of tight. Make sure our bracket is straight. In this case it is. We're going to pull down then run that bolt into the rest of the way. Now we can come back and tighten down our front bolt. Again, we we're going to be doing the same steps so we're going to be using a 13 millimeter socket and wrench. Now with our brackets installed on our driver's side, we can go ahead, repeat those same processes and get our brackets installed over on the passenger side.Just a quick note. The front line here on our passenger side does have to be pulled down. You're just going to take out two 10 millimeter bolts. With our brackets installed on both sides. We're ready to install our running boards.So that's going to do it for our look and installation of the DZ Custom Running Board Bracket Kit on our 2019 Dodge Durango.
Info for this part was:
At etrailer.com we provide the best information available about the products we sell. We take the quality of our information seriously so that you can get the right part the first time. Let us know if anything is missing or if you have any questions.


Thank you! Your comment has been submitted successfully. You should be able to view your question/comment here within a few days.
Error submitting comment. Please try again momentarily.