
Summer Starts Here - Save up to 70%
To see if this custom-fit item will work for you please tell us what vehicle you'll use it with.
Thank you! Your comment has been submitted successfully. You should be able to view your question/comment here within a few days.
Error submitting comment. Please try again momentarily.
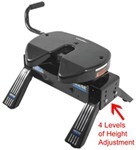
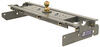
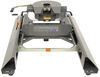
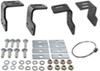
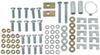
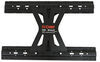
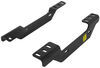
Custom brackets reduce the amount of drilling and time required to install your fifth-wheel trailer hitch. Brackets, base rails and hardware included.
Features:

Videos are provided as a guide only. Refer to manufacturer installation instructions and specs for complete information.
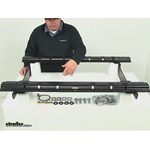
Standard 2015, Chevrolet Silverado 2500. And we take a look at and show you how to install the Reese Quick Install Custom Installation Kit with base rails for fifth wheel trailer hitches. Part number RP50066-58. Those are what our rails look like when they're installed. These are gonna sit in the bed of the truck, allowing you to mount your fifth wheel hitches to it.The custom fit frame brackets, along with the base rails, make for an easy installation and drastically cut down the amount of drilling required to get this kit installed. This kit is compatible, with the NW Patriot, Curt, Draw-Tite, Hidden Hitch, Reese, Valiant, Husky, fifth wheel hitches.Keep in mind though, it will not fit the Reese Elite Series, Signature Series, or Rally UVS hitches.
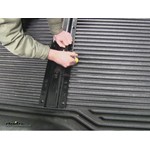
It's compatible with overload springs. Both the base rails and the frame brackets are gonna have a black powder coat finish.They're gonna resist any rust or corrosion. And the kit's gonna come with all the necessary hardware to get it installed. Now that we've gone over some of the features of this kit, let me show you how to get it installed.First thing we need to do to start our installation, is go ahead and put your rails on the bed of your truck. And we're gonna take this rear one.
We need to measure out to find out where we're gonna be mounting it. We're gonna measure from the edge of our bed, make sure you're going from the edge of the bed not the tail gate, and per your bed size.If you have a long bed, make sure you follow the instructions. Use the right measurements for that bed. I'm just gonna use a black paint marker since we have a black bed liner here. Just put a dot there.
We're gonna line up the edge of our rail, and then we're gonna measure from the side to make sure we have even distance on both sides.So we'll go from, our wheel well to the edge of our rail. And we'll just center it accordingly. So you can see what I've also done to make sure that I'm not twisted, I've gone ahead and marked out that same measurement down here at the ends. I'm gonna line up those marks with my holes.Go ahead and take my side to side measurement again to make sure I'm even on both sides. I'm just gonna go ahead and make the mark there.
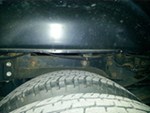
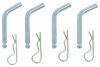
It'll help me make sure that when I put my rail back down, I'm on the correct line. Next, we're gonna need a 9/16th drill bit and an eighth inch drill bit.First, we're gonna take our 9/16th and we're gonna find our center in a hole. We're gonna go second hole in, on each end. And then you want the one closest to the front of the vehicle, which is gonna be this inside one. Now what we'll do is we'll put our eighth inch drill bit in, move our rail out of the way, finish drilling our holes.Before doing that, it's probably a good idea to go ahead and lower your spare tire. Next thing I'm gonna do, is on our frame rail, we're gonna have two holes. This one and this one. We're gonna take our pull wire, spring side. We're gonna go through the hole like that. Then we're gonna come out of this hole.Then we're gonna put space for the block. And then thread your bolt on. Push your spacer block in. We'll take our pull wire, pull our bolt out through our hole. We're gonna go ahead and leave our pull wire on for now.Now we're gonna do the same thing with this hole. Then we're gonna take our frame bracket. We're gonna temporarily put it in place. You'll know that you have the right side. You notice one side is shorter than the other. The short side, is going towards the front of the vehicle. The longer side is going towards the back.Go ahead and feed your pull wires through. Holes in the brackets. Looks like the zip tie's gonna get in the way of my bracket, and I wanna make sure that my bracket's gonna be sitting flush. So what I'm gonna do is I'm gonna cut that zip tie. I can always put one back on later.Gonna be sitting on the wiring on top there. Hold it on there like that. We're gonna sit it in place and now we're gonna check our holes in our bed before we drill them out to the correct size. We're just gonna take a little screwdriver, something like that, push it down through the hole and just make sure your holes are lined up, and make any adjustments necessary.Next, we'll go ahead and remove our bracket. I'm just gonna take it and flip it right here on the tire. Once you're satisfied with your hole location, go ahead and drill them out to the correct size. Once you have your holes drilled, go ahead and reinstall your frame brackets. Remove the pull wire. We're gonna add a conical tooth washer and make sure the teeth are facing forward the bracket.We're just gonna loosely install it for now to hold it in place. Remember to repeat that on the other side.Then we're gonna take our half inch by two inch carriage bolt. We're gonna go ahead and place it in the hole. You can slide your bracket back and forth, to line up your holes so that your bolts fall all the way through. Next, we're gonna take a spacer block. Looks like this. And what we want, is we're gonna put it up into our raised corrugation, in between our frame bracket and the bottom of the bed. So that when we tight this down, this is gonna take up that space, so we don't smash that corrugation.Go like that. Here right around the bolt. We're gonna file it up with conical toothed washer, little lock washer, and then a nut. Those finger tight. We're gonna do the same thing with this one. Now our heat shield, that's on the bottom of our bed, kinda covers the hardware here that we have dropped down. It's gonna be hard to get your fingers in there to put the hardware on, so what we're gonna do is we're gonna be trimming that. But, our heat shield for our tire, which is right here, is actually in the way to get our cutter up in that area.So what we're gonna do is we're gonna take this down. We'll use a 13 millimeter socket. We're gonna have a bolt right here. And then we'll have another one right here. Then we're gonna have a couple of clips here holding on our wiring. We're gonna unclip it from the frame rail, and then we can reinstall that after we get this cut.You can see how I have it marked. I'm just gonna cut out a little section here. Give me enough room to get my hardware up onto my bracket. Just use a cutting wheel. If you have a Dremel tool with a cutting wheel, that would work also. Once you get it cut out, we're just gonna repeat the same process we did on the other side of the vehicle.Make sure you use a spacer block then. Then for our center bolt, we're gonna use the same hardware combination. Next thing we're gonna do, is we're gonna take our unassembled fifth wheel. The legs, we're gonna put em in our slats in the front rail, put em in our slats in in our back rail. This is actually gonna give us our distance between the two.What I still want to do is I wanna make sure I'm gonna measure from the inside of our wheel well, to the outside edge of our rail. Make sure we're even on both sides so it's not twisted. Again, same hole. This hole with bracket, when you use the one closest to the cab in the center. Except on the outsides, we're gonna be using the very outside holes.We'll take our 9/16th drill bit, give us our center hole. Then we'll try the drill bits, and use our eighth inch drill our holes. Move these out of the way. Get that rail back. And then we'll finish drilling out our holes to the correct size.Now we're gonna do the same thing, except because our holes are gonna be in the corrugation, we need to put the spacer block in underneath. We're gonna do this on both ends. Put in place. Go ahead and put my rails back in. When we're done, install the rest of our hardware and then we can tie it in to work at all the specifications.We're gonna start with everything underneath the bed first. And then we'll do our frame rails last. That'll do it for look at installation on the Reese Quick Install Custom Installation Kit with base rails for fifth wheel trailer hitches, part number RP500066-58, on our 2015 Chevrolet Silverado 2500.
Average Customer Rating: 4.8 out of 5 stars (193 Customer Reviews)
Custom brackets reduce the amount of drilling and time required to install your fifth-wheel trailer hitch. Brackets, base rails and hardware included.
The installation instructions were detailed and clear. Did it by myself in about 4 hours. Inexpensive solution if you didn't get the 5th wheel prep package.
Received the product the very next day shipping was excellent. Boxes were well taped and secured and complete. This was installed on a 2011 Silverado 2500 HD with a 8 foot bed . My installation was straightforward ,followed the included directions , and it installed very easy. I only have two suggestions ,
Get the spare tire down and out-of-the-way and do whatever is necessary to get around the heat shield. I just cut a small section of mine away . I have done business with etrailer for about five years now. I use to price check and order everywhere off the Internet. I don't do that anymore because I always ended up back doing business with etrailer.com.
For four reasons ... Best price around, quality products, great customer service from a live person, well packaged products with the fast shipping
Fast shipping!! Installed on a new 2016 GMC Sierra 3500 Denali. Only issue was the exhaust heat shield.. It must be removed for easier access to install hardware. It takes about 3 hours to install with one person. Otherwise no issues. E Trailer is great to do business with!! Thank you
Installed on 2017 chevy 2500. Square washers for the 5/8 bolts were to big to fit through the acess holes in pickup frame. I had to fish them through a bigger hole further up the frame rail. Other than that, excellent products. Once I found etrailer, its the only place I shop for trailer products
I purchased the Reese dual jaw slider and install bracket kit. Everything arrived in three days in perfect condition. After watching the install video and reviewing the enclosed instructions I installed the assembly myself. It took approximately 4 hours . As you can see I also did additional steps, cutting the rubber bed mat to fit around the rails. Also undercoating the brackets to blend in the wheel wells. Etrailer is definitely the place to go for all your RV needs.
Kit was pretty easy to install. Definitely watch the video. Some of the bolts are in tight spaces. Overall very good kit. Well constructed.
Fast shipping, all good, no problems
I purchased fifth wheel hitch rails. They were worked great. We certainly put them through a strong test. Unfortunately we got stuck on a very muddy, greasy road on a hunt. The fifth wheel was leaning at an angle but the rails held! I was extremely relieved and happy that they did. Thank you etrailer.
Rail Mounting kit arrived in perfect condition, with all required attachment hardware and special bolt insertion tool. All items fit up as advertised on my 2019 GMC 2500HD std bed Sierra. Completely satisfied.

Ralph K.

1/9/2021
After a year since installation and several trips with my 5th wheel, Im still completely satisfied with this rail mounting kit, It has operated perfectly with my Andersen Ultimate Rail Mount Hitch.
Hi Carol.
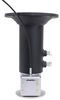
I got the package. I hope to install next week. I’m also looking to put a 5th wheel electrical plug in the bed. 2019 Chevy 3500 with the factory prep for the wiring harness. Do you have a correct fit kit to do this?

Mike L.
10/26/2018
We do offer a 5th wheel wiring harness for your 2019 Silverado 3500. Id recommend the Hopkins # 41157, which you can see by using the link provided below. The harness plugs inline right behind the 7-way installed on your trucks rear bumper, between the trucks factory harness and the existing 7-way.
Helpful Links
Custom-Fit-Vehicle-Wiring/Chevrolet/Silverado+3500/2019/41157.html?vehicleid=201913372
Great product! Everything fit as it should. Customer service was great they help the entire way even when ups lost part of the shipment!
The rail kit installation went smoothly. I did the complete installation alone just to see if I could complete it without any assistance from anyone. (The installation honestly took me about eight hours which included quite a few breaks!) The only difficult task for me was installing the two nuts and washers on the front two bolts on the LH Frame Bracket due to the tight clearance around the large diesel fuel tank on my truck. As some of other folks mentioned, removing the spare tire and exhaust system heat shield are a must for installing the rail kit this model truck. The quality of the components is excellent. My wife and I will be pulling our 5th Wheel to the Georgia Mountains with this hitch this weekend!
Frame brackets were a perfect fit and easy to install. Installing nuts on the rail's proved a little difficult on my vehicle 2018 GMC due to limited clearance over fuel tank and truck frame and exhaust shield (definitely a 2 person job). Otherwise I am perfectly satisfied with the quality of the kit and easy to follow instructions. I would recommend this kit.
Installed a Reese custom rail kit (RP50066-58) on my 2016 GMC Denali 4WD DRW. It took approximately 3 1/2 hours to get it completely installed. I had to remove the exhaust heat shield and drop the spare tire but once I did it gave me easy access to the hitch frame brackets. I found it very informative to watch the online video first and took the advise of another persons suggestion to tape over the holes in the top of the frame (it kept me from losing the nuts & washers down into the frame). I simply followed the written instructions that came with the kit and the hitch was installed with out any real issues. I will say it did come in handy to have someone to assist me with some parts of the installation (just to keep me from having to crawl in/out from under the truck to get tools etc). As a side note, if you had access to car lift it would make the installation much faster and easier. I didn't have access to one and it was a little tight but as I said it wasn't all that bad.
I would definitely recommend this product.
Rail kit was great and etrailer was great with fast and free shipping.
Only advice: I installed this kit on my 2014 Chevrolet 3500 and I would not do it again.
I'd spend the extra money and get the RP56001-53 kit...much much easier to install
If you have time and patience, it's worth the savings. Otherwise save yourself the tight quarters of trying to get to those bolts above the frame rails.
I suspect this kit was an earlier design that was or should have been superseded by the later one.
An installation of brackets are never easy due to items in the way but following the instructions made it doable
Although the Rails won't be installed until my new truck comes in mid April, I fully expect the product to be as advertised. I was recommended to your site and product by salesman from major manufacturer of the 5th Wheel Hitch currently used.

Arnold
9/22/2014
Has been a year and Product has worked out just fine !!
Easily ordered and delivered promptly
Excelent product. Made the install much easier than it needed to be. The video helped a lot. Access to some of the bolts were very difficult (ones above the gas tank). Dropping the spare tire made it easier. Biggest problem was removing the heat shield as on my truck the darn Torx screws stripped. I ended up cutting most of the heat shield off. Bottom line, this is a great product, very heavy duty and very versatile.

Jason W.
6/12/2014
Still working great.
after getting the right fifth wheel suport kit for my 2017 chevy 2500 hd the insulation went in just as they say in the instructions thanks again etrailer for providing a product and service
Excellent product. Installation of washers and nut on front passenger rail under bed a little difficult. Probably worth the extra cost to buy the outboard brackets and longer rails. Removal of spare tire required.
Laura E.
11/8/2016
Thanks for your review, Ron. We note that removal or lowering of the spare tire is only temporary.
ordered this with the titan reese hitch
package came quickly and intact via ups
easy to install; great instructions and on-line video

Gary K.
10/23/2017
Both good, happy with the product
This was a nice product easy to install.
The hitch works good the only thing is it is hard to unlock because the jaws are tight. Other than that had no problems.
Mike L.
12/28/2018
If the jaws are difficult to unlock, youll want to make sure the hitch has been lubricated according to the operating instructions. Also, if the fifth wheel and the hitch arent both level, the pin box may be applying some force to the jaws, causing them to bind. Moving the vehicle a bit will usually allow the hitch to unbind.
Great install kit. Directions and video were very well explained. The install went well. Will say another set of hands made it easier. Would highly recommend.
Glenn B.
4/22/2014
Its been a year. The hitch has worked very well
Do you have a question about this Fifth Wheel Installation Kit?
Info for this part was:
At etrailer.com we provide the best information available about the products we sell. We take the quality of our information seriously so that you can get the right part the first time. Let us know if anything is missing or if you have any questions.


Steve A.
9/17/2020
Excellent