

How to Connect the 12 Volt Power Lead to a 7-Way Connector on a 2004 Chevrolet Silverado
Question:
the battery charge lead 1: oclock on my recently installed 7-way trailer connector is dead. I want to be able to maintain charge to my trailer battery. I saw a thread here regarding an 08 silverado where theres a taped wired on the harness to be connected to one of the posts just underneath of the underhood fuse box. But when I looked at mine, I could not find the taped wire nor the stud just under the fuse box. What do I need to do to get this lead on the 7-way 12v live and be able to maintain charge to my trailer battery. Help please
asked by: Ricardo S
Expert Reply:
If your truck did not come with a factory installed 7-way trailer connector, then there is probably no 12 volt power lead connected to the 7-way. The wires that you mentioned for the 2008 Silverado will not be present on your 2004 Silverado. GM changed the tow package wiring after 2006 on their trucks and SUVs, so if your truck came with a tow package and a 7-way connector, the 12 volt power lead should already be hot. Since it is not hot, it will need to be hard wired.
To complete this connection, you will want to run a length of 10 gauge wire, # 10-1-1, from the 7-way connector to the engine compartment. There are two ways for you to connect this wire. One method is to attach the wire to the positive terminal of the vehicle battery via a 40 amp circuit breaker, # 9510.
The second method is to attach the wire to the forward-most positive terminal on the fuse block. If you attach the wire to the fuse block, you will need to insert a 40 amp fuse in the slot closest to the terminal. If this terminal and fuse slot are already used, you can simply run the wire to the positive battery terminal via the 40 amp circuit breaker.
If there are no additional wires hanging out of the back of the 7-way connector, you will want to take the connector apart and attach the 10 gauge wire to the terminal in the 11 o clock position when looking at the back of the connector (see photo).
I have attached a general wiring diagram for hard wiring a 7-way connector and brake controller if you are attempting to install a brake controller. If the connections have not already been made, there will be two additional connections at the under hood fuse block that you will need to make to power the brake controller and brake output circuit.
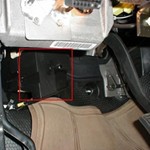
You will see a blue and red wire next to the fuse block on the cab side. The blue wire has a plug on it and the red wire has a ring terminal. The red wire will connect to the closest positive post and a green 30 amp fuse is needed in the location nearest the positive post to power the brake controller. This will provide power to the brake controller.
The blue wire will need to be cut from the connector, connected to a length of 10 gauge wire and ran to the 7-way connector at the rear of the vehicle. This wire will connect to the terminal in the 7 o clock position.
If you need to make the connections for the brake output circuit and the 12 volt power lead, I would recommend purchasing the Brake Controller Wiring Kit, # 5506. This kit comes with 25 ft of duplex wire, butt connectors and ring terminals to make all of the necessary connections. The only additional parts that you would need would be the 30 and 40 amp fuses, found at any local automotive store, or a 40 amp circuit breaker.
I have attached an FAQ article that further details the installation for you to check out.


Products Referenced in This Question

Wiring Kit for 2, 4, 6, and 8 Brake Electric Trailer Brake Controllers

- Accessories and Parts
- Trailer Brake Controller
- Installation Kits
- etrailer
more information >
40 Amp In-Line Circuit Breaker - Perpendicular Mount Bracket

- Accessories and Parts
- Wiring
- Circuit Breaker
- 40 Amp
- Pollak
more information >
Product Page this Question was Asked From
Tekonsha Prodigy P3 Trailer Brake Controller - 1 to 4 Axles - Proportional

- Trailer Brake Controller
- Proportional Controller
- Electric
- Electric over Hydraulic
- Automatic Leveling
- Under-Dash Box
- Dash Mount
- Up to 4 Axles
- LCD Display
- Up to 360 Degrees
- Tekonsha
more information >
Featured Help Information
Instructions
Miscellaneous Media

Continue Researching
- Article: Brake Controller 7- and 4-Way Installation Kit (ETBC7)
- Article: Brake Controller Installation: Starting from Scratch
- Article: Trailer Wiring Diagrams
- Article: Towing a Trailer? Let's Talk About Brake Controllers
- Article: Wiring Trailer Lights with a 7-Way Plug (It's Easier Than You Think)
- Article: Installing an Electric Brake Controller on 2007-2013 GM Full-Size Truck or 2007-Present GM SUV
- Article: How to Install a Brake Controller on Chevrolet / GMC 1999-2006 Pickups
- Q&A: What is the Difference Between a 4-Way and 7-Way Trailer Connector
- Q&A: Does the Tekonsha P3 Trailer Brake Controller Turn Off or Stay On All the Time
- Q&A: Parts Needed To Install A Brake Controller On A 2023 Freightliner Cascadia
- Q&A: Suspension Enhancement Recommendation for 2019 Toyota RAV4
- Q&A: How Does Brake Controller Install on Freightliner S2RV Chassis
- Q&A: Parts Needed to Add 7-Way & Brake Controller on 2023 Kia Sportage
- Q&A: Wiring Configuration for Tekonsha Prodigy P3 Trailer Brake Controller 90195