

Installing Tekonsha Prodigy P2 Brake Controller in 1998 Jeep Grand Cherokee
Question:
Hello, Ive installed a 118349 kit, and am in the process of installing a Tekonsha P2 controller w/ wiring kit ETBC7 I think thats the one. The installation videos are a huge help but the one Ive been watching is for a 79 F250 with 2 brake wires, I have a 98 Grand Cherokee that appears to have a 7 wire connector and am at a loss as to where to go from here. It almost seems like the best method would be a T connector like I did with the taillights in line with the vehicles brake connector, only I contacted the dealer and they couldnt help me. Can you offer any advice? Thank you so much for your time
asked by: Charles R
Expert Reply:
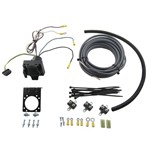
It sounds as if you already have the T-1 installed, you would simply plug the 4 pin connector of the T-1 into the connector on the 4 pin to 7-way adapter that was included in the ETBC7 kit. Once this connection is made, the lighting portion of the install is completed. The adapter has four additional wires that will need to be installed. The white wire should be grounded to clean metal on the vehicle, like a frame member. The purple wire is usually used to power the reverse lights on the trailer. If the trailer does not have reverse lights, this circuit need not be installed. Just tape off the end of the wire and bundle it up out of the way. The blue wire on the adapter would connect to the white wire in the jacketed cable included in the kit. The black adapter wire connects to the black wire in the cable. The jacketed cable would then be ran to the engine compartment. Take care to avoid anything that is hot like exhaust components or pinch points like the suspension. Many times there will be an existing wiring harness that runs to the front of the vehicle that you can zip tie the cable to. The black wire in the cable will attach to the positive battery terminal using the 40 amp breaker included in the install kit.
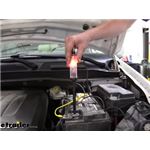
Next, mount the brake controller in the vehicle. I would recommend installing it under the dash to the right of the steering column, within easy reach of the driver. There will be four wires exiting the rear of the controller, three of which will run through the firewall to the engine compartment. The white wire will ground to the negative battery terminal. The black wire will attach to the positive battery terminal via either the 20- or 30-amp breaker included in the kit. (The instructions with your brake controller will tell you which breaker to use). The blue wire will attach to the white lead in the jacketed cable you ran from the back of the vehicle. The red wire from the controller will attach to the brake stoplight switch that is located at the top of the brake pedal. This switch will have several wires exiting it, in order to locate the correct one, you will need a circuit tester like part # PTW2993. Use your tester to check each wire until you locate the wire that only shows current when the brake pedal is pressed. Once the correct wire is found, use a quick splice to tap the red brake controller wire into that circuit. You should be good to go at that point.


Products Referenced in This Question

Product Page this Question was Asked From
Tekonsha Prodigy P3 Trailer Brake Controller - 1 to 4 Axles - Proportional

- Trailer Brake Controller
- Proportional Controller
- Electric
- Electric over Hydraulic
- Automatic Leveling
- Under-Dash Box
- Dash Mount
- Up to 4 Axles
- LCD Display
- Up to 360 Degrees
- Tekonsha
more information >
Featured Help Information
Instructions
Miscellaneous Media


Continue Researching
- Article: Brake Controller 7- and 4-Way Installation Kit (ETBC7)
- Article: Brake Controller Installation: Starting from Scratch
- Article: Trailer Wiring Diagrams
- Article: Towing a Trailer? Let's Talk About Brake Controllers
- Article: Wiring Trailer Lights with a 7-Way Plug (It's Easier Than You Think)
- Article: Installing an Electric Brake Controller on 2007-2013 GM Full-Size Truck or 2007-Present GM SUV
- Q&A: What is the Difference Between a 4-Way and 7-Way Trailer Connector
- Article: How to Measure for Trailer Hitch Drop
- Q&A: Parts Needed To Install A Brake Controller On A 2023 Freightliner Cascadia
- Q&A: Parts Needed to Add 7-Way & Brake Controller on 2023 Kia Sportage
- Q&A: Wiring Configuration for Tekonsha Prodigy P3 Trailer Brake Controller 90195
- Q&A: Does the Tekonsha P3 Trailer Brake Controller Turn Off or Stay On All the Time
- Q&A: Comparison of Tekonsha Prodigy P3 and Primus IQ Brake Controllers
- Q&A: My Vehicle has a 4-Pin Trailer Plug, but Trailer has 7-Pin Trailer Plug