

Hardwiring Installation of a Brake Controller on a 1998 Chevy Blazer
Question:
I'm wondering if the 1998 Blazer has the input adapter under the driver dash to attach the Tekonsha Prodigy or if I have to hardwire it. If I have to hardwire it, to what wires do I attach to? I have found the heavy blue and red wires near the fuse block under the hood. Thanks so much.
asked by: Scott D
Expert Reply:
On your 1998 Chevy Blazer, you will have to hardwire the vehicle to install a Tekonsha Prodigy P2, # 90885. Hardwiring a vehicle may seem like a difficult task, but it really is not too hard. I can guide you through the process.
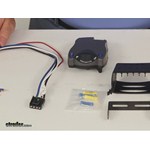
You will need three items in order to install the brake controller. First, you will need the brake controller itself. Second, you will need a 7 and 4 Way Installation kit, # ETBC7. Last, you will need Draw-Tite Wiring, # 18252.
First of all, you will need to install Draw-Tite Wiring, # 18252. You will need access to the taillight wiring to install this harness. Using the included circuit tester, you will need to find the functions of the taillight wiring. Turn the key on (starting the Blazer is not necessary) and turn on the left blinker. With the tester, find the wiring that causes the tester to blink with the turn signal. Attach this wire to the yellow wire on the harness. Next, move on to the right turn signal and find the wire that flashes with the signal. Attach this wire to the green wire on the harness. Then, turn on your lights and find the wire that carriers a constant signal. Attach this wire to the brown wire on the harness. The white wire on the harness is the ground. Attach it to an existing ground point or attach to the vehicle frame. You can route the 4-pole anywhere at the back of the vehicle.
Next, you will need to install the 7 and 4 Way installation kit, # ETBC7. This kit allows for a 7 or 4 pole connection at the rear of the vehicle. It plugs into the 4 way you just installed and connects to the brake controller and vehicle battery.
If you are fairly experienced with automotive or electrical projects, this should not be too hard. I will provide a brief outline here.
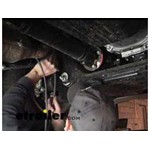
Starting with the ETBC7 kit, after installing the 18252, ground the 7-Way white wire onto the vehicle frame. Connect the black wire in the grey duplex cable (included with the ETBC7 kit) to the black wire on the 7-Way. Then connect the white wire from the duplex to the blue wire on the 7-Way. Next, you will route the duplex cable under the vehicle to the engine compartment.
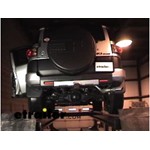
Next, mount the brake controller where you will have easy access to it using the bracket and screws provided. I have included a link to the instructions below.
Last is to make the connections from the brake controller to the vehicle. On the duplex cable, now under the hood, separate the white brake wire from the 12-volt black wire. The white wire gets routed through the firewall, under the dash, into the vehicle. This wire connects to the blue wire from the brake controller. The black wire gets connected to the positive battery terminal via a 40 amp circuit breaker. Mount the circuit breakers under the hood or dash then route the black hot lead to the 40 amp breaker via ring terminals, and then to the positive battery terminal.
The black wire on the brake controller connects to a 20 or 30 amp circuit breaker (see the brake controller instructions for which circuit breaker to use) and then to the positive battery terminal. Route the brake controller white wire to the negative battery terminal. From the wires connected to the brake switch at the top of the brake pedal, find the wire carrying a signal only when the brake pedal is engaged. You will need a circuit tester like # PTW2992, or the one that came with the 18252 harness. Connect that wire to the brake controller red wire. I have also included 2 videos that show the installation of an ETBC7 kit.
That is pretty much it. I have included an FAQ on wiring a brake controller from scratch that contains a little more detail.


Products Referenced in This Question
4-Way Flat Trailer Connector w/ 72" Harness, Circuit Tester and Wire Taps

- Custom Fit Vehicle Wiring
- Trailer Hitch Wiring
- No Converter
- 6 Feet Long
- Universal Fit
- 4 Flat
- Tekonsha
more information >
Universal Installation Kit for Trailer Brake Controller - 7-Way RV and 4-Way Flat - 10 Gauge Wires

- Accessories and Parts
- Trailer Brake Controller
- Installation Kits
- etrailer
more information >

Product Page this Question was Asked From
Tekonsha Prodigy P2 Trailer Brake Controller - 1 to 4 Axles - Proportional

- Trailer Brake Controller
- Proportional Controller
- Electric
- Electric over Hydraulic
- Automatic Leveling
- Under-Dash Box
- Dash Mount
- Up to 4 Axles
- LED Display
- Up to 360 Degrees
- Tekonsha
more information >
Featured Help Information
Instructions
Miscellaneous Media


Continue Researching
- Article: Brake Controller 7- and 4-Way Installation Kit (ETBC7)
- Article: Brake Controller Installation: Starting from Scratch
- Article: Towing a Trailer? Let's Talk About Brake Controllers
- Article: Trailer Wiring Diagrams
- Article: How to Choose the Right Trailer Hitch Class
- Article: How to Install a Brake Controller on Chevrolet / GMC 1999-2006 Pickups
- Article: Most Popular Wheel Bearings
- Q&A: Brake Controller Recommendation for a Truck with Air Brakes and a Trailer with Electric Brakes
- Q&A: What is the Difference Between a 4-Way and 7-Way Trailer Connector
- Q&A: What is the Difference Between a Class II and a Class III Hitch?
- Q&A: Parts Needed To Install A Brake Controller On A 2023 Freightliner Cascadia
- Q&A: Parts Needed to Install 7-Way/4-Way on 2024 Kia Telluride with LED Taillights
- Q&A: How do I Tell if the Brake Controller is Bad
- Q&A: Lift Kit Options For A 2015 Winnebago Micro Minnie 1706FB