


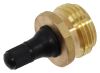
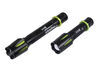
Use this blow-out plug to remove water from your RV's water lines before putting your RV in storage for the winter. Screw plug into your RV's city water inlet and inject air through the threaded valve to blow out any water in your plumbing.
Features:
California residents: click here
Videos are provided as a guide only. Refer to manufacturer installation instructions and specs for complete information.
AJ: What's up, everybody. It's AJ with etrailer.com. Today we'll be checking out this blow-out plug from Valterra and this one's going to be half plastic and half brass. So you can see it's got the brass fitting here. And then the bottom part that actually screws into your city water connection here is plastic. You can easily just twist it in there, get it nice and tight.
In that way, what this is for, is you can blow out the lines in your rig and you want to do that, of course, before you winterize it, blow all the water out of the pipes. That way you can put some antifreeze in there after it and let it sit for the winter, or I recommend doing it every time you come back from a long trip because you don't want that water sitting there and being stagnant.Your pipes go up and down. Sometimes the pipes come down to kind of a loop area. The water is going to sit down in there and after a couple of days, it gets stagnant and if it's in longer, it can even grow algae. So you don't want that in your pipes when you're going to shower or you're drinking water or anything like that.
So it's good just to go ahead and blow it out after every time. Before you start running air through your lines, there's a couple of steps you have to go through to make sure your rig is ready to do that. We're going to walk through that together and go step by step on what you to need to do. First step, is you want to go ahead and find your freshwater tank lever here. Ours is located down there.
I'm going to pull this handle and let as much water out as we can. That way there's less in the lines.I'm just going to pull this and just watch it drain. All of a sudden, most of the water out. That way when we hook up the compressor we'll just blow out a little bit of the extra water and we'll be good. Our next step is we're going to go ahead and throw the switch for the bypass, the water heater.
Now why we're doing that is we don't want to pump a bunch of water into the water heater, or if you're getting ready to winterize it, you don't want to pump a bunch of antifreeze into your water heater. So flipping that switch bypasses it, and we're good to go. Now, ours is down here. Here you can see, I flipped that switch up now. And so we're good to move on to the next step. Now we're going to open our valves because if we're going to pump a bunch of air in through the lines, we don't want to blow up the lines if there's nowhere for the air to go. So we're going to start with the sink. You're probably going to get some water coming out. We'll let that drain.You can see it's already slowing down and we're going to go through one by one and go through all the valves. So we're going to the sink in here, sink in the bathroom, we going to turn on the shower and even flush the toilet. And with the hot and cold, you go ahead and throw the other one too. Just let all the water out of both lines. Another thing to do just to be safe before we put air through the lines is go ahead and step down on the pedal of our toilet here. That way it would release anything else in there before we add air. Now there's two different approaches for this. You can open up all the valves at once and blow out the lines. We're going to do them one by one. So remember the sink is open. Now we can attach our compressor, which I went ahead and lower the PSIs, the 30. That way there's not too much air going in there. We're not going to blow up any lines or anything like that. We want to be safe and careful with that too.I'm actually surprised about how much water is still coming out that we're leftover in the lines. We already pulled the tank, drained it all the way down. This just shows you, you don't want this water just sitting there in your lines. I already went back and closed the valves in our kitchen sink. Now we're going to come here to the bathroom sink and open these up. It's like there's not a lot is coming out this time. We got most of it in the kitchen. Next up is the shower. Same as before. Just open up both of these valves all the way. Let's see what happens.With the line's all blown out. I'm just going to come back to our freshwater tank and close the valve. So it really is that easy to clear out your lines. That's why I suggest getting the habit of doing after all your trips. You don't want any of that stagnant water in your lines, sitting there, that's going to cause trouble later on. And if you're going to buy one of these fittings, you might as well use it. This one I can say, after I installed it and we pumped air through it, there was no noises. I didn't hear any leaking. I didn't feel any air coming out of the sides. So that's good. It means it's going to not be nice and hold up. The half plastic and half brass is a good combination on our fitting. And it's the mid grade version of what Valterra offers.I'm going to show you a couple of other ones they make, just so you can kind of get a better idea of what I'm talking about. With the all plastic one first, it's got a rubber cap on it, so it doesn't thread on there, like the one we showed you earlier and it's all plastic. So it gets the job done. It doesn't let any air leak, but like I said, it's plastic. So I'm afraid if I drop it, it could crack or break easier or just wear over quick over time and much like everything else with the rig, I've been going with brass. So they do have a brass option to fall in line with everything else because I know this is going to hold up a lot better. If I drop it, no worries. It's not going to break. And it still got that thread on cap, just like your bike tire or your car tire. And I'm confident this is going to hold up. That does it for a look at the Valterra Blow Out Plugs. I hope this helps..
Average Customer Rating: 4.9 out of 5 stars (8 Customer Reviews)
Use this blow-out plug to remove water from your RV's water lines before putting your RV in storage for the winter. Screw plug into your RV's city water inlet and inject air through the threaded valve to blow out any water in your plumbing.Product arrived in excellent shape exactly what I needed. Never had a problem with ordering from Etrailer. Great service as always and tracking info spot on
Product delivered timely and in expected order.
In order to blow out the water lines in our trailer last year before a winter cold snap, I had to make up a coupling for an air tank hose that I could attach to our trailer's city water inlet fitting. The one that I came up from assorted parts and materials in my garage worked, but I sure wouldn't want to have let anyone see it! When I stumbled across this one, I was impressed with its simplicity and reasonable price. I haven't used it yet, but I can tell after a careful examination that it will last for many years and save me a lot of time every time I need to purge our trailer's water lines before winter storage.
I hope it works with my battery operated air pump
Worked very well to blowout water lines.
Just the same good service. Wish others would follow your example. Will get pics once it warms up so I can get the lites in
PT
Worked great
Info for this part was:
At etrailer.com we provide the best information available about the products we sell. We take the quality of our information seriously so that you can get the right part the first time. Let us know if anything is missing or if you have any questions.


Thank you! Your comment has been submitted successfully. You should be able to view your question/comment here within a few days.
Error submitting comment. Please try again momentarily.