
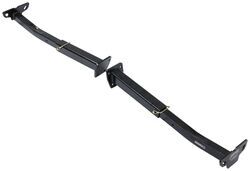
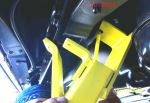
TorkLift Camper Tie-Downs - Custom Frame Mount - Front
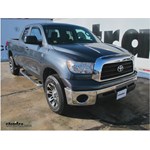
TorkLift Camper Tie-Downs - Custom Frame Mount - Rear
Part Numbers: TLT2304,TLR3500
Our Price: $853.16
Thank you! Your comment has been submitted successfully. You should be able to view your question/comment here within a few days.
Error submitting comment. Please try again momentarily.


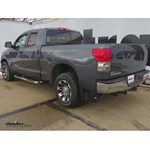

TorkLift Camper Tie-Downs - Custom Frame Mount - Front
part number: TLT2304
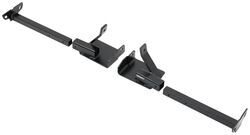
Get the safest and most comfortable ride while hauling your camper with tie-downs that mount on the frame of your pickup. Great for your truck's looks: remove the arms from the brackets and you'll hardly know that the brackets are there.
Features:
- Creates attachment points for securing your camper to your truck bed
- Requires turnbuckles (sold separately) to attach camper to tie-downs
- Ensures excellent handling by distributing camper's weight evenly and lowering its center of gravity
- Avoids a top-heavy setup that would be vulnerable to strong winds and sway
- Remains virtually invisible beneath your vehicle
- Remove the arms and you'll hardly know the brackets are there
- Adjusts for simple, secure connection to camper
- Extend arms out from truck body to clear bowed sidewalls and fenders
- Choose between 2 anchor holes to get the best angle for a secure hold
- Made of black powder coated steel to resist corrosion
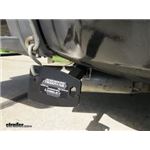
- Mounts tight to your vehicle's frame - minimal loss of ground clearance
- Uses pre-existing holes in the frame - little to no drilling required
- Includes 2 front tie-downs and installation hardware
- Made in the USA
- Lifetime warranty
A Safe Ride is a Comfortable Ride
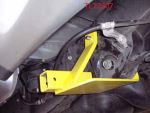
If you're looking for the best tie-downs for your camper, frame-mounted is the way to go. The frame is the most solid part of your entire vehicle, so it just makes sense to attach your camper to something that's not going to warp, bend, or twist. Even more importantly, the camper's center of gravity will sit lower and its weight will be spread across the entire bed. This avoids a top-heavy load perched on top of your bed rails that's liable to sway and get pushed around by crosswinds. The camper's not going to shift or slide around while you drive; it's going to stay put, and your truck is going to handle just like it does without a camper.
Quick Tip: If you have a plastic or spray-in bed liner, it's important that you use a rubber mat under the camper to eliminate any sliding or bouncing.
Don't Ruin Your Truck's Looks
Frame-mounted tie-downs are also a great pick for preserving your truck's good looks. The brackets install on the frame, tucked nearly flush with the underside of the vehicle. Remove the arms from the brackets when you're not hauling your camper, and the brackets will be barely visible.
Custom Fit, No-Drill Installation
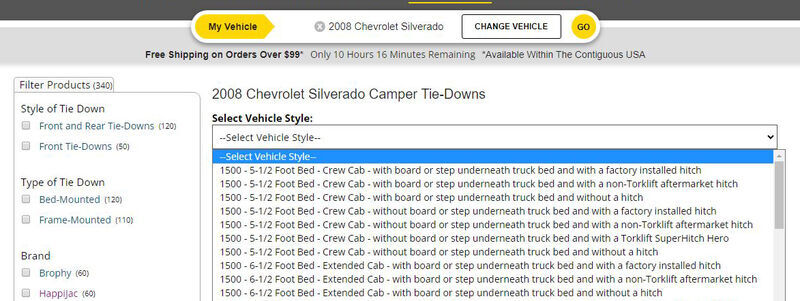
Completely custom to your vehicle, the tie-downs attach to exisiting holes in your frame so that there's little to no drilling and no need for any modifications. Because they're custom, you'll want to use our in-house application guide to make sure you get the exact right model. The tie-downs you need might be different depending on what type of hitch or other accessories you have.
Securing Your Camper
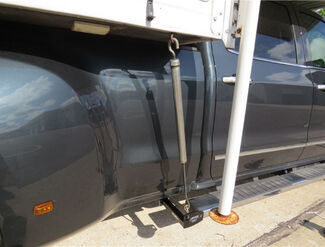
Once the tie-downs are installed, use a set of turnbuckles (sold separately) to secure the camper to the tie-downs. The shank on each arm has 2 pin holes so you can choose how far out they extend, that way the turnbuckles can reach the anchors on your camper without making contact with your truck. Tighten the turnbuckles to the correct level of tension (not too tight!).
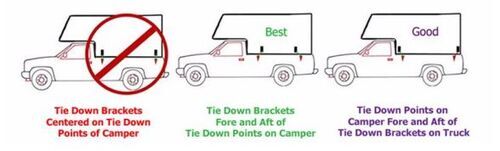
Make sure the anchor points are offset from the tie-downs instead of lined up with them so that they will hold your camper from multiple angles. This is important for keeping your camper from shifting. Two holes in the attachment plate of the tie-downs let you find the best angle for you camper anchors.
T2304 Tork Lift Truck Camper Tie Down - Front Frame Mount - Custom Fit
Replaces 30842
Item # TLT2304
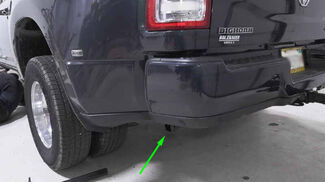
TorkLift Camper Tie-Downs - Custom Frame Mount - Rear
part number: TLR3500
Get the safest and most comfortable ride while hauling your camper with tie-downs that mount on the frame of your pickup. Great for your truck's looks: remove the arms from the brackets and you'll hardly know that the brackets are there.
Features:
- Creates attachment points for securing your camper to your truck bed
- Requires turnbuckles (sold separately) to attach camper to tie-downs
- Ensures excellent handling by distributing the weight evenly and lowering the center of gravity
- Avoids a top-heavy setup that would be vulnerable to strong winds and sway
- Remains virtually invisible beneath your vehicle
- Remove the arms and you'll hardly know the brackets are there
- Adjusts for simple, secure connection to camper
- Extend arms out from truck body to clear bowed sidewalls and fenders
- Choose between 2 anchor holes to get the best angle for a secure hold
- Made of black powder coated steel to resist corrosion
- Mounts tight to your vehicle's frame - minimal loss of ground clearance
- Requires drilling into the frame
- Includes 2 rear tie-downs and installation hardware
- Made in the USA
- Lifetime warranty
A Safe Ride is a Comfortable Ride
If you're looking for the best tie-downs for your camper, frame-mounted is the way to go. The frame is the most solid part of your entire vehicle, so it just makes sense to attach your camper to something that's not going to warp, bend, or twist. Even more importantly, the camper's center of gravity will sit lower and its weight will be spread across the entire bed. This avoids a top-heavy load perched on top of your bed rails that's liable to sway and get pushed around by crosswinds. The camper's not going to shift or slide around while you drive; it's going to stay put, and your truck is going to handle just like it does without a camper.
Quick Tip: If you have a plastic or spray-in bed liner, it's important that you use a rubber mat under the camper to eliminate any sliding or bouncing.
Don't Ruin Your Truck's Looks
Frame-mounted tie-downs are also a great pick for preserving your truck's good looks. The brackets install on the frame, tucked nearly flush with the underside of the vehicle. Remove the arms from the brackets when you're not hauling your camper, and the brackets will be barely visible.
Custom Fit
Because they're custom, you'll want to use our in-house application guide to make sure you get the exact right model. The tie-downs you need might be different depending on what type of hitch or other accessories you have.
Securing Your Camper
Once the tie-downs are installed, use a set of turnbuckles (sold separately) to secure the camper to the tie-downs. The shank on each arm has 2 pin holes so you can choose how far out they extend, that way the turnbuckles can reach the anchors on your camper without making contact with your truck. Tighten the turnbuckles to the correct level of tension (not too tight!).
Make sure the anchor points are offset from the tie-downs instead of lined up with them so that they will hold your camper from multiple angles. This is important for keeping your camper from shifting. Two holes in the attachment plate of the tie-downs let you find the best angle for you camper anchors.
R3500 Tork Lift Truck Camper Tie Down - Rear Frame Mount - Custom Fit
Replaces 39114 and R3502
Item # TLR3500
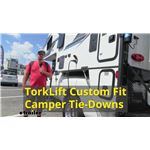
Video of TorkLift Camper Tie-Downs - Custom Frame Mount - Front


Videos are provided as a guide only. Refer to manufacturer installation instructions and specs for complete information.


Video Transcript for TorkLift Rear Frame Mounted Camper Tie Downs Installation - 2008 Toyota Tundra
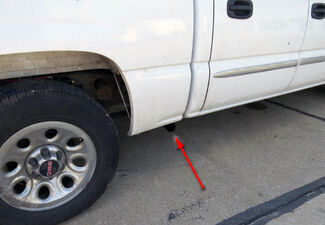
Today on our 2008 Toyota Tundra we're going to be installing the Torklift custom frame-mounted camper tie downs. This is for the rear. Part number is TLR3500. inaudible 00:00:11 see our camper tie down once you get in place. It's going to be adjustable from the setting it's at out to a wider setting just depending on the width of our camper, and when not in use can be completely removed to give us a very clean factory-style look. It's not going to hang down.
As you can see, it's tucked up here above our exhaust, above the bottom of our frame hitch, so we've really got no issues with bottoming out, getting it snagged up on anything. Really cool. Our arms, we can just set these aside for when we need them. Each one's going to come with a label to indicate the passenger rear, driver rear, driver front, passenger front. That way there's no confusion if after a long winter we can sometimes forget exactly how that camper or that tie down system works.
Just throw them on. We're going to have two of the tie down brackets. We're going to have two of the frame brackets. We're going to have all the hardware that we need to get these installed. As you can see, this one has installed right to the factory receiver hitch. These also are going to install right into the frame rather then what we used to see a lot of we're the bed-mounted tie downs.
So they'd be right on the cap of the bed and it really brings that center of gravity where it's held down to the middle of the truck, whereas now we're bringing that pull down or that force all the way down here to the bottom directly into the frame, giving us a nice, sturdy, stable ride for our camper. To begin our installation we're first going to determine where we're going to be mounting the permanent portion of our tie downs. Here on the side of the receiver hitch there's a nice flat spot. We're going to bring this right up as high as we can and as far back as we can. Now as you're putting these up into place just make sure that you don't have any interference behind, like in our case here we've got a metal plate on that backside that runs on an angle here, so we'll be setting it just inside of that, make sure it sits nice and flush. Then we'll just go through and mark the center of each of our four holes.
Then we'll repeat that process for the other side as well. You can see our mounting locations there. Now let's go through and drill each of our four holes out. We'll start with the pilot bit. Just want to use a little small-diameter bit. Be careful as you're doing this that you don't have any wires or any fuel lines or anything like that on the backside. Then we'll just run it on through. Now let's just continue on and drill out our other three. We've got the four done on this side. Now let's grab our bracket again and just verify our hole locations, make sure they're pretty close to being in the center of that bracket. All those look good. Let's go over to the driver side and get those pilots. Now with all eight of those drilled out let's step up to our next drill bit and drill it out. Now ultimately we're going to drill these out to a 7/16" hole. You could go right to a 7/16" bit and try to get it through there but it's a good idea to step up gradually. In our case today we're going to use three different bits. We've already got our small holes drilled, our pilot holes. We'll start with an intermediate bit now, drill those out, and then right to our 7/16. We got the four of those done. Now let's go over there to the passenger side and take care of those as well. Now for the top rearmost hole we're having issues getting a full-length drill and drill bit in there so we're just going to lower the spare down a little bit, allow us to slide that over slightly so we can get a good clean angle on it while we drill out our final hole. The final hole we're going to drill all eight locations is going to be 7/16. Just keep that in mind. Just pull that out and should give us the room we need now. While I've got the tire down I'm going to go ahead and drop that same one on the other side just to get it out of the way. With those two drilled out let's go ahead and raise that tire back up and get it out of the way. Now with all of our holes drilled we can just throw our drill away and hope we never have to use it ever again. Now we're going to grab the bracket, place one of our 3/8 bolts through it. Just place a couple through here now and then inside once we have them in place we'll slide on our flat washer, then a little lock washer, and then we'll have our nut. We'll be able to thread that right down on as well. We just need to do that for all eight locations. We'll have four on each side of course. We'll do these loosely for now. We're just going to get everything started. Once we've got it started we can tighten our stuff down. Now here on the passenger side let's go ahead and through that same process. Each one's going to get the same flat washer, lock washer, and nut. Now we'll get them all tightened down. We're going to use the torque specs that are listed in your instruction manual. Look into that. It's going to give you the exact torque specification to set them to. With those all torqued down let's add our extensions. Now for putting our arms in place, you see how this tapers down towards the rear and it's a little narrower We want that to face the rear of our vehicle. We'll then just slide the arms right in and we're going to have the choice of a longer set of holes or a shorter set of holes to line up with the pinhole in the bracket we just installed. You can see there that's at its widest point where this is going to stick out the furthest from the vehicle. Next setting's going to be narrower, brings it in a little bit tighter to the vehicle. It's just depending on the style of camper you're going to be using. We'll be able to adjust that. Now another nice thing is they're going to give you your driver's rear and passenger side rear labels. We can mark these and we won't have to look up which one goes where every time we got to load up the camper. We'll just apply those into place. Now let's head over, get the passenger side put on. This side's also going to be fully adjustable. We'll have the two settings there to pick from. We'll just slide this into the second one so it matches up with the other side there. Apply our identification sticker so we know what's what. That's really all there is to getting these installed on your vehicle: drilling a few holes, bolting them on. Now we're ready to throw the camper in the back. We'll be able to get it tied down securely. We can head right on down the road. With everything secure that's going to complete today's installation of the Torklift rear camper removable tie downs, part number TLR3500, on our 2008 Toyota Tundra. .
Customer Satisfaction Score:
98% were satisfied with this product
2% of customers were not satisfied
- Wrong item was ordered
Customer Reviews
TorkLift Camper Tie-Downs - Custom Frame Mount - Front - TLT2304
TorkLift Camper Tie-Downs - Custom Frame Mount - Rear - TLR3500
Average Customer Rating: 4.7 out of 5 stars (3192 Customer Reviews)
Get the safest and most comfortable ride while hauling your camper with tie-downs that mount on the frame of your pickup. Great for your truck's looks: remove the arms from the brackets and you'll hardly know that the brackets are there. Get the safest and most comfortable ride while hauling your camper with tie-downs that mount on the frame of your pickup. Great for your truck's looks: remove the arms from the brackets and you'll hardly know that the brackets are there.by: Amos06/23/2020
I originally ordered the incorrect rear Torklifts camper hold downs for my truck. However, I called etrailer and explained my error. They not only helped me pick the correct ones, they sent them out that day. I haven’t installed the rear TC hold downs yet. I was most impressed with the free shipping both ways with no questions asked! I was issued an RMA and the refund came quickly. Very good customer service in an age when there often isn’t any service , let alone great service. The front mounts fit perfectly!


by: Richard E07/28/2017
Installed on a Curt 2 1/2 receiver just put on my F350 SD Supercab Diesel SRW 4x4. This bracket does fit this truck with the Curt receiver. I found a little oil on the drill bits and a reamer to remove the last bit of metal from the holes in the receiver helped mount the brackets.


by: Scott02/24/2022
Easy to install. Good quality construction. Great customer care when I ordered the incorrect version - was well handled.
by: Patricia 09/21/2023
Delivery was fast. Works perfectly for our Lance slide-in camper.
by: eddyjames08/24/2016
looks good, easy to install and replaced the torklift tie downs used on factory hitch, now I have a 20,000 lb trailer hitch with 2,700 GTW also. and camper is secure.

Edward J.

8/25/2017
Fantastic, just like they were claimed to do
by: Matt 03/30/2023
Super easy to install, I recommend using some masking tape on the hitch to mark where you want to install these.


by: Kent03/11/2020
Nicole at etrailer was sharp and the products - 5 stars for her
The Torklift instruction pictures are poor - look like they have been copied 100 times.
Front brackets were fairly straight forward - but had to remove a skid plate and loosen the fuel tank to install the drivers side.
Rear brackets needed to drill holes. T L should provide a drill template.
Haven’t used with the camper yet.
by: Sean09/26/2021
The front tie down mounts did not fit my 2008 Toyota Tundra SR5 5.7 L V8.The problem is that the bump stops attached to the rear cab mount bolts are in the way. That is something that cannot be removed permanently to accomodate the tie downs. The arm that bolts higher on the frame needs to be bent at a greater angle to fit both the frame and the cab Mount bushing.The rear fit perfectly.
by: Curt M.07/17/2019
Both the product and the service are top notch. I ordered the front and rear tie-downs for a 2006 Silverado. The easy to follow instructions made it easy to install the customized tie downs. We have been on the road several times since I installed the tie downs and all the miles I've traveled were with confidence that my camper was secure.
Oh, the other great feature is that they are removable when not in use.
Thank you etrailer!
by: Jon 01/02/2022
After reviewing my options to hold a 3500lb trailer on my truck. I decided these were the only option. They are more expensive then the other options that bolt to the body and the bumper, But much more secure.
The install was fairly easy, Customer service from etrailer was awesome. When not in use they are barely visible. Great product, worth every penny!
Thanks again
by: Brian03/01/2019
Part of an order I made for camper tie-downs. Great product and it shipped extremely fast!
I always go to e-trailer first when looking for truck towing or other truck accessories. The customer service and speed of shipping really can’t be beat.
by: Richard02/27/2022
Solid, easy to install. etrailer is the only site i even look at now.
by: Philip02/14/2019
These safety downs are easy to install, and are a huge safety bonus. The interlocking pin prepares truck for winter in a few seconds. E-trailer, in this case
Julie, answered all questions, very professional, and was a big help , Thanks
by: Joseph 07/29/2023
Very fast and affordable shipping to AL ASKA!
by: Clifford02/11/2022
Worked perfectly! Just as advertised. Great product!
by: Jared12/21/2021
yeehoo! fast and what i wanted. Originally when I bought these via mechanic they were listed as TLR 35. Some computer systems delete extra zeros, but 3500 and 35 are the same.
by: Grant10/01/2020
They perfectly and I received them really quick for no additional cost. Will definitely keep etrailer on my list for any truck or trailer needs.
by: Daniel09/28/2022
They hold on well so that campers doesn’t fly off.
by: Garey02/13/2022
Perfect fit to the truck. Easy install. Exactly what was needed.
by: Brian08/15/2019
Extremely pleased and satisfied with the customer service I received. When there was a problem with getting my product they contacted me on Sunday and took care of all my needs. Thank you so much.
by: Bill 08/20/2021
This is a great product easy to install works super good
by: John05/16/2022
They fit perfect, fast and easy
by: Marie-Josée05/28/2024
by: Daniel08/15/2023
25
2452
Show More Reviews Ask the Experts about this Camper Tie-Downs
Do you have a question about this Camper Tie-Downs?
- Will TorkLift Camper Front Tie-Downs On 2010 Toyota Tundra Fit 2008 Toyota Tundra
- The front tie-down for the 2010 Tundra you asked about is part # TLT2307, and the front tie-down for the 2008 is part # TLT2304.
I have attached a photo of each on e of the tie-downs and you can see they are designed differently and would not work as you wish.
The rear tie-down, part # TLT3304 is the same for both trucks you mentioned and there would be no problem moving those from the 2010 to your 2008.
view full answer... - Recommended Camper Tie-Downs for a 2008 Toyota Tundra with Step Bars
- In regards to frame mounted camper tie-downs, so long as the steps/boards don't extend past the cab then you'll be fine. It's hard for me to make an exact recommendation without more info on the truck but the TorkLift Custom Frame-Mounted Camper Tie-Downs part # TLT2304 and part # TLT3304 for example are a great option for models with a 6-1/2' bed. They can be paired with the TorkLift Locking FastGun Turnbuckles for Frame-Mounted Tie-Downs part # TLS9529-2-LK to complete your setup.
I
view full answer... - Rear TorkLift Camper Tie Downs for 2007 Ford F-350 with 8 Foot Bed and Aftermarket Hitch
- For the 2007 Ford F-350 8 foot bed with an aftermarket (but non-TorkLift) hitch installed and no step or board beneath the bed, the correct rear camper tie-down kit is the TorkLift # TLR3500. For the front kit you will use part # TLF2011.
I have attached a sample install video below that you can also check out.
view full answer... - Aftermarket Hitches Compatible with TorkLift Rear Camper Tie Down TLR3500
- If your 1999 Dodge Ram 3500 is an 8-foot bed without a board or step underneath truck bed and with a non-Torklift aftermarket hitch, then you will use TorkLift rear camper tie-down kit # TLR3500 that you referenced.
All aftermarket trailer hitch fits for the long bed with standard/step bumper are shown on the linked page. Among these are Class III hitch # 75101 from Draw-Tite, Class IV hitch # 14001 from Curt, and Class V hitch # BWHDRH25132.
view full answer... - Correct Torklift Turnbuckles For A 2020 Ford F-350 6.75' Bed Supercab
- Hello Joe. I can definitely help get you set up with Torklift Camper Tie Downs for your 2020 Ford F350. Does your truck have a trailer hitch installed on the back? If so, was it installed from the factory or aftermarket? Let me know because that will determine the correct rear tie downs. The # TLF2022 front tie downs will be correct for your truck. The rear tie downs will be determined by the type of trailer hitch on your truck.
The # TLR3500 are for trucks with a non-Torklift brand aftermarket
view full answer... - Rear Tie-Down Recommendation for My 2006 Ford F-350 Super Duty
- When determining if rear Torklift tie-downs are available for your 2006 Ford F-350 Super Duty, it truly depends on your bed length, what hitch model you have installed (if any), or if you have a board/step underneath your truck.
For example, if you have a 6-3/4' bed with a non-Torklift aftermarket hitch with a board or step underneath your bed, the rear Torklift tie-downs you would need are the # TLR3500.
In order to determine if any are available for your 2006 Ford F-350, feel free
view full answer... - How do Torklift # TLR3500 Rear Camper Tiedowns Attach to 2012 Toyota Tacoma
- The Torklift # TLR3500 rear tiedowns would mount to holes drilled in the side plate of your aftermarket hitch. The front tiedowns, part # TLT2303 would mount to the truck frame. If you click the provided links, you an see the installation instructions for both the front and the rear tiedowns.
The video linked showing the # TLR3500 being installed on a 2008 Tundra would also apply to your Tacoma. The tiedowns aren't a completely vehicle specific item, given part numbers will fit many
view full answer... - Installing Frame-Mount Camper Tie-Down On 1984 Chevrolet C/K Pickup Truck
- We do not have a custom tie-down kit for your 1984 Chevrolet pickup but I may have a solution for you.
I called my contact at TorkLift and they told me that you can look under the front of yoru truck bed near the cab and see if you have a 4x4 inch space available, you can install part # TLR3500. You would need to drill through the 4x4 space on your frame to mount the tie-downs for your camper.
For the rear you can use the same tie-downs but you will need the same 4x4 inch space
view full answer... - Custom Rear Camper Tie Downs For A 2005 Toyota Tacoma With Aftermarket Hitch
- If your 2005 Toyota Tacoma is 2WD you can use the TorkLift Custom Frame-Mounted Camper Tie-Downs # TLR3500, or if you have 4WD, you can use the TorkLift Custom Frame-Mounted Camper Tie-Downs # TLR3500.
However, both of these kits will require drilling into the frame, but the 2 Rear tie-down inserts, frame brackets, and necessary hardware is included.
view full answer... - Recommended Camper Tie Downs for 1999 Toyota Tacoma
- For your 1999 Toyota Tacoma, you will want the TorkLift Custom Frame-Mounted Camper Tie-Downs - Rear # TLR3500 to go with the front # TLT2306. This is a confirmed fit for your vehicle as long as you don't have the factory trailer hitch receiver.
You may also be interested in the TorkLift Basic SpringLoad Turnbuckles for Camper Tie-Downs - Qty 2 # TLS9000. The spring loaded barrels minimize the stress on your tie-down points yet are sturdy to allow you to firmly tighten them down.
view full answer... - 2008 Toyota Tundra In Bed Camper Tie Down Recommendation
- For your 2008 Toyota Tudra 6.5' bed you want the TorkLift Custom Frame-Mounted Camper Tie-Downs Front part # TLT2304 and rear part # TLR3500. These are designed specifically for your truck and will provide excellent tie down locations for your in bed camper.
The TorkLift AnchorGuard Derringer Turnbuckles for Truck Camper Tie-Downs part # TLS9020 really make loading and unloading very easy.
view full answer... - Correct TorkLift Truck Camper Tie Down Kit for 2003 Chevy Silverado 2500HD with Aftermarket Hitch
- For the 2003 Chevy Silverado 2500 with 6-1/2-foot bed, without step and with a non-TorkLift aftermarket hitch installed our Fit Guide does show part # TLR3500 as the rear tie-down along with part # TLC2202 as the front. Please refer to the linked page.
view full answer... - Recommended Camper Tie Downs for a 2017 Chevrolet Silverado 3500 With an Aftermarket Hitch
- I did some research and it looks like for your 2017 Chevrolet Silverado 3500 you can use the TorkLift Camper Tie-Downs # TLC2220 for the front it you have a 6 1/2' bed or the TorkLift Camper Tie-Downs # TLC2219 if you have an 8' bed.
And for the rear you'll just need the TorkLift Camper Tie-Downs # TLR3500. Finally, you'll just need a set of turnbuckles # TLS9529-2-LK to secure the camper to your tie downs.
view full answer... - Is Drilling Needed on 2011 Ford F-350 Short Bed to Install Front TorkLift Camper Tie-Downs
- I checked directly with TorkLift for you, and verified that you do NOT have to drill into your 2011 Ford F-350 short bed to install the TorkLift Custom Frame-Mounted Camper Tie-Downs - Front # TLF2012.
Then to complete your set up, the correct tie-downs for the rear will depend on if you have a factory hitch on your 2011 Ford F-350 or an aftermarket hitch.
- Factory OEM Hitch: TorkLift Custom Frame-Mounted Camper Tie-Downs - Rear # TLF3006
- Aftermarket Hitch: TorkLift Custom
view full answer... - Will The TorkLift Frame-Mounted Camper Tie-Downs Fit On My Ford F-250
- Yes. The TorkLift Custom Frame-Mounted Camper Tie-Downs # TLR3500 is confirmed for the 1997 Ford F-150 and F-250 Light Duty 8 Foot Bed - without board or step underneath truck bed and with a non-Torklift aftermarket hitch.
The TorkLift tie-downs are designed to be mounted to your frame for better weight distribution and to lower the center of gravity.
Here is a link to our turnbuckles as you will need these if you do not have some already.
view full answer... - Recommended TorkLift Frame-Mounted Camper Tie-Downs for 2007 GMC 2500 With Aftermarket Hitch
- Yes, you are correct. For a 2007 GMC Sierra Classic 2500HD Crew Cab with 6-1/2' bed and Class V Curt Trailer Hitch Receiver, # C15302 installed, the TorkLift Custom Frame-Mounted Camper Rear Tie-Downs, # TLR3500 will fit.
For front, use TorkLift Custom Frame-Mounted Camper Tie-Downs # TLC2205.
view full answer...
TorkLift Accessories
Fit to this rack on your 2007 Toyota Tundra
Info for these parts were:

Expert Research:
Mike L

Expert Research:
Adam R

Expert Research:
Jeffrey L

Written by:
Lindsey S

Video Edited:
Jacob T

Video Edited:
Dustin K

Video by:
Kathleen M

Test Fit:
Randy B

Updated by:
Wilson B

Updated by:
Michael B

Updated by:
Isabelle B

Updated by:
Amanda K
At etrailer.com we provide the best information available about the products we sell. We take the quality of our information seriously so that you can get the right part the first time. Let us know if anything is missing or if you have any questions.


Product Experts Available Now!
Call 1-800-940-8924
Scott
3/24/2023
Still working great after a year. No issues.