
To see if this custom-fit item will work for you please tell us what vehicle you'll use it with.
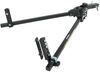
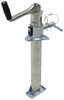
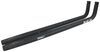
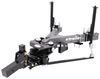
2,500-lb Load leveling capacity. Custom helper springs install above your Ford F-150's rear factory leaf springs to reduce sway and prevent sagging when towing or hauling heavy loads. Silent Ride urethane bushings prevent rattling.
Features:
Specs:
Note:
Hellwig Leaf Spring Comparison

California residents: click here
Videos are provided as a guide only. Refer to manufacturer installation instructions and specs for complete information.
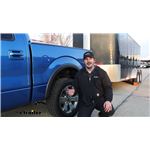
Hi everyone. Aiden here with etrailer. Today we're gonna be taking a look at, and later we'll be showing you how to install these Hellwig Pro Series helper springs on our 2011 Ford F-150. So the first thing we wanna do before we check out some of the features is how it performs. The springs are not installed right now. This is completely stock, and I wanna see the ride height of the truck without any weight loaded on here.
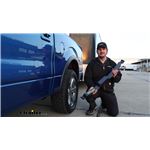
So the trailer is lifted off of the ball right now, and right here, the ground to the top inside edge of the wheel well is right at 40 inches. So what I'll do is I'll load up our trailer, I'll put it down on the ball, and we'll see how much that drops down. We're gonna be loading this up with pretty much the maximum tongue weight that the truck can handle. So it should put it through a pretty good stress test to see how much it drops, and with some weight now on the truck, that same measurement we'll see is now 38 inches. So we've got two inches of drop with that load on the ball.
So honestly that's not too bad. At this point, we're gonna take it inside the shop, we'll have a bit of a time jump where we do the install, fill it for you guys, and we'll see how it performs after the install. And then we'll take it around our test course, and see how it feels inside the truck too. But I imagine we should see a little bit of that ride height returning. And with a bit of a time jump, we're ready to now test the new suspension enhancement.
So I'll lower the trailer back down on, we've got a GoPro rolling underneath so we can kind of see what's happening as it lowers down and starts adding weight to the truck. And we'll take the same measurement we did before. Alright, we've got the trailer loaded up. It felt like it dropped about the same amount, but looking at the measurement, that tells a different story. We're sitting about a half inch taller than we we're before, so honestly not that much of an improvement in terms of ride height, but that's not really what this is for.
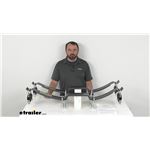
If you want to bring yourself back to a normal ride height, airbags are probably your best bet for that. Where I think this is going to make the biggest difference is driving. So we're gonna take it through our bumps course, and just see how it feels whenever I drive around, and after driving around with it, I'd say it performed pretty well. You can definitely tell there's weight back here, and I'd expect that, because we're pushing the maximum tongue weight of this truck. But what I can compare it to is something like a Timbren. It was a lot more mild than I was expecting it to be, because with Timbrens, those things are a rough ride. Once they engage, they push back hard. And if you're really pushing the weight limits of your truck, then maybe that's a good thing, but it's also not the most comfortable ride when they do engage. This I would describe as just more mild. It helps correct whenever I hit a bump, and it did feel like it was helping to assist that factory suspension, but it wasn't so aggressive about it. So that's easily something you could adjust to. If you wanted to make it more aggressive, you can tighten down those U-bolts a bit more. But for me, it was a nice middle ground, and it provided the support that I wanted to see. So the idea behind these springs is that they become a maintenance free-enhancement for your suspension, allowing you to get more support on maybe some bumpier, heavier loads, and still let your truck ride at a normal ride height, and bring it back to that factory ride height quicker, rather than maybe hitting a big bump with a heavy trailer, and your truck and trailer taking a long time to correct before, again, you just hit another bump. So it's gonna smooth out the ride quality, hopefully bring you out a little bit more level, and do things like align your headlights, and improve the contact that your front tires are making on the ground, because we're sagging less. Now, because these work in tandem with your factory leaf springs, it's also going to help reduce the stress on those, helping your factory suspension components last a little bit longer, and not having them flex near as much, because they have those helper springs helping them out, and reducing the amount that they have to work. These Hellwig Springs have a 2,500 pound capacity. Now that doesn't increase the capacity of your truck, that's just what the springs can handle. So keep that in mind. And they are somewhat adjustable. And what I mean by that is during the initial install process, there's gonna be some outer U-bolts that you tighten down a certain amount. Tighten them down more, and you're gonna apply more preload, essentially causing these to engage a bit quicker, and helping out with those heavier loads a bit quicker. Don't thread them in as much, and you're not gonna fuel it as much. It's gonna be more true to factory ride quality and better for the lighter loads. We've got ours set right in the middle right now, so after continued use, we can reevaluate and see what we need to do, but chances are you're gonna set it, and maybe change it once to fit your needs a bit better after towing with it for a little bit, and probably just leave it there. This isn't like an airbag where you've got that on-demand filling or letting out air pressure to accommodate for a wide range of different trailers. This is for your one trailer and truck combination that you can set and really dial it in, because with an option like a SumoSpring or a Timbren, you're stuck with just that one setting. And if it doesn't quite work for your truck and trailer combination, you're gonna find yourself in a pinch where it just doesn't work super well, whereas with this, if it doesn't work out at the gate as we want it, we can adjust it a bit, and fine tune it from there. And perhaps the best part about this is that the installation process is really straightforward. You can make it a lot easier for yourself by taking off your wheel and tire, giving yourself much more room to work, but it is possible to do it on the ground without it. You might just need to jack the truck up a bit to make some more room for yourself. But we'll show you what it looks like on the ground, removing that wheel and tire, so one, you can see a bit better, but two, I really do think that's gonna be the easiest way to do it. So let's walk through the process inside right now. Now to start off your installation, I always like to lay the parts out, and just make sure, one, I have everything, and that nothing's damaged, and it makes it a lot easier to approach the install this way, because it's a really simple setup with all the hardware here. You're gonna have two of these springs, a shorter one and a longer one with these small divots in the top. So the larger one will be our upper, and this part here with the Hellwig sticker and with the hole in the back is going to be slightly longer. So this is going to be towards the tailgate end of our truck. The other side will be towards the cabin, and then again, it'll be in this orientation with the bigger one up top. Then we've got our U-bolts. The shorter offset ones are gonna be for the inner part of the spring here, and they're gonna be oriented so that they angle down and in towards the axle, just like that. And then the longer straight U-bolts will sit in these cleats on the ends of that upper spring. So far so good, and we'll have these rubber isolators that will sit between the leaf spring on the truck and between the Hellwig spring right there. The U-bolts will pass down through just like that to reduce rattle. Now reason we're showing this all on the tabletop right now is 'cause we do have a limited space underneath. I think it's a little easier to visualize up top what we're doing before we take it to the vehicle. The only other thing is that every single U-bolt will have this plate underneath, underneath the factory leaf spring, and then they'll each get a flat washer and a nut. And then eventually, once we have all the adjustments and tightening done, we'll come back through with a second nut on everything, and that'll just get wrenched tightened to basically prevent that first one from backing off. Now at this point, if you want to, I think it's gonna be a good idea to jack the truck up, give yourself a little more room to work, get those tires off the ground. Of course, be sure to chalk the front wheel, put on your parking brake, and get some jack stands so you're extra safe, and we can take off the wheel to give ourselves more room to work. So the first thing you need to do with your wheel off is get that spring pack in there, trying to just keep these neatly aligned with one another, but it doesn't need to be super precise right now. And this is one of the main reasons why we took that wheel off, because this is quite long, but it's good to feed the back end in first. You can kind of fish it around. And there we go. We have a sway bar, a rear sway bar from Hellwig installed right now, and that's giving us a little bit of trouble, but it still clears just fine. It's just one obstacle we had to work around. So yours might go in a little bit easier, because you don't have that in the way. Get it roughly centered right now, and we'll make some more precise adjustments in just a second. So all we need to do is loosely install our U-bolts for now. I'm gonna start in the center and go to the outer ones last. And again, just follow that same hardware combination we went over on the table there. So drop that U-bolt down through, underneath we'll get these crossbars, flat washers, and a hand-tightened nut for now in all locations. I'll try to keep my hand out of the way as we're doing this. Also just watch out for some obstacles, but that's why we're doing this loosely right now, because we might have to scoot the whole pack backwards to avoid this right here. So for the outer U-bolts, we're gonna first slide in that rubber isolator. Like I said, it's gonna sit between the new spring and your old leaf spring, the factory one, not that we're getting rid of the factory ones, we're just adding to it, and that U-bolt needs to feed through. So clearance again may be a little bit of a concern, but we'll get that lined up as best we can, and add the crossbar underneath. Now this one's sitting too close, I can tell that right away. The end of the spring from the factory here is gonna hit that crossbar. So I need to take the whole assembly and slide it towards the front, so it's out of the way a bit more. So that's why we left everything loose so that we can make these types of adjustments on the fly if we needed to. Once you're happy with it, go ahead and add those crossbars, and start to loosely bolt it in place like we did before. Once all the U-bolts are loosely installed, and you verified that front to back your spacing is correct, and you're not gonna be making any contact with other obstructions or the tips of the leaf springs, then you're good to snug down these middle four nuts. (tool whirs) And once you've done that, you can come back through and torque those middle ones to the specifications in your instructions. Don't worry about the outer ones right now. Just get these middle ones torqued down first. Now if you don't have a torque wrench, you can find one here at etrailer, or you can typically check one out from local auto parts stores, or rent one. And it's a good idea to just kind of go back and forth so that we're evenly tightening this down too, and not just totally snugging down one of the U-bolts on one side and then going to the other. So I'm just gonna bounce back and forth here until I'm fully torqued on all hardware. I will repeat that for the remaining hardware. Now these outer ones actually don't get torqued, because in theory, we could just tighten this up and crush down that rubber isolator up top and flex this out, and get it really flat. But that would kind of defeat the purpose of the helper spring. Instead, what we're gonna do is measure out on the bottom how much thread we have poking out. And on my install today, I am aiming for one inch. This is basically the amount of preload that we're applying to the spring. So the more you tighten it down, the more preload we have. You want it to not exceed two inches or more. So you can go up to two inches, that is, but don't exceed it. So I'm aiming for one inch, because it's kind of in the middle of the road. If we find that it's riding too rough, we can loosen it up. Or if we find that it's not performing how we would expect, we could tighten it up and apply more preloads. So just go back and forth, and get them all lined up to one inch if that's what you choose to do as well. (tool whirs) And of course, just go back and forth, because you want both of these sides to match. So the last thing we need to do underneath the vehicle is add our jam nuts. Like I said before, these will go on every location where we had a bolt or a nut, that is, and just follow it up. So it'll just get wrenched tightened up against the existing one and prevent that from backing out. So on the center ones, it's gonna prevent that torqued one from loosening, and on the outer ones, this is going to prevent those nuts that apply our preload from backing out as well. So just grab your wrench, tighten it up until it kind of binds up, and prevents it from turning. Once all the jam nuts have been installed, you're done. You can put your wheel and tire back on, if you removed it in the first place. Lower your vehicle back down safely, and you're ready to hit the road. But that'll do it for our look at and installation of these Hellwig Pro Series helper springs on our 2011 Ford F-150. Thanks for watching.
Average Customer Rating: 3.6 out of 5 stars (5 Customer Reviews)
2,500-lb Load leveling capacity. Custom helper springs install above your vehicle's rear factory leaf springs to reduce sway and prevent sagging when towing or hauling heavy loads. Silent Ride urethane bushings prevent rattling.Directions not the best got very confused putting it on watched a lot of you tube videos they were not that good either. I did have problems with my nuts stripping on the foward u-bolts on both sides fwd of the axle. I did torque the nuts with a calibrated torque wrench. Not sure if it was caused by me or the poor directions. Reached out to the manufacturer he said never heard of that before and said he would send new hardware. I am out of state in a rv park will see what happens when I reinstall. Oh had to cut it off in a Safeway parking lot on my way to TX
Easy enough to install but the kit needs locknuts! Also a better example of how to adjust properly!
everything went like clockwork - thanks for your help. Will do more business in the future.
Easy install on 2015 NV2500. No noticeable difference in unloaded ride quality. Van is level for towing my RV.
Info for this part was:
At etrailer.com we provide the best information available about the products we sell. We take the quality of our information seriously so that you can get the right part the first time. Let us know if anything is missing or if you have any questions.


Thank you! Your comment has been submitted successfully. You should be able to view your question/comment here within a few days.
Error submitting comment. Please try again momentarily.