
To see if this custom-fit item will work for you please tell us what vehicle you'll use it with.
Thank you! Your comment has been submitted successfully. You should be able to view your question/comment here within a few days.
Error submitting comment. Please try again momentarily.


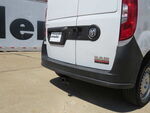
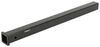
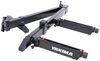
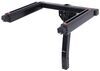
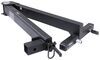
This fully welded trailer hitch receiver bolts onto your vehicle's frame with no welding required. Matte black, powder coated steel is durable and corrosion resistant and creates a rugged look.
Features:
Specs:
The sturdy steel construction is protected with a matte black finish for added durability. This unique powder coating gives etrailer hitches a carbide-like appearance and a rugged look that sets them apart from traditional glossy hitches. In addition to being rust and corrosion resistant, the tough matte coating hides dirt, scuffs, and dings better than a glossy finish.
At etrailer we're committed to the products we sell, and to our customers. Our experienced and knowledgeable staff are available via both phone and email to address your questions and concerns for the lifetime of your hitch. The technicians at etrailer perform hitch installations on a daily basis, making them a valuable resource for do-it-yourselfers. The one-on-one, personal service you'll receive comes straight from an expert in the towing and automotive field. We've installed it, we've wired it and we've towed with it, so whatever your question, we can answer it.

Videos are provided as a guide only. Refer to manufacturer installation instructions and specs for complete information.
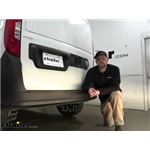
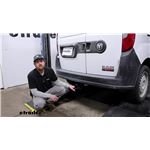
Hey everybody. Ryan here at Etrailer, today, on our 2018 Ram Pro Master City. We're gonna be showing you how to install the etrailer.com class three, two inch trailer hitch receiver. But before we do that, why don't we check it out and make sure that this is right hitch for you. When it comes to the Pro Master City, you know, generally speaking, a lot of people are using these for work, right, specifically a lot of people out there in the service industry. So, having a hitch on a vehicle like this just makes sense.
It's gonna allow you to do a lot of different things, whether you need to pull a smaller trailer around or maybe even if you have some extra equipment or gear and wanna use a cargo carrier. Having a hitch back here is going to allow you to get those things done. With this being a class three hitch, it is gonna have that two inch by two inch receiver tube opening. Very common size, a lot of different stuff will work with it. We have had a few people inquired out, using smaller accessories, like the inch and a quarter by an inch and a quarter ones.
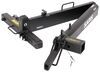
If you happen to have that already and you'd want to use it, you can always get an adapter or a reducer that'll allow you to do that. So, just wanted to mention that, but at the end of the receiver too, we are gonna have a reinforce collar for a little bit of extra support, and it is going to use that standard of five eighths pen and clip. Keep in mind though, pen and clip doesn't come with the hitch. If you need one, not really a big deal. You can always grab it right here at Etrailer, and the safety chain openings are gonna be a loop style and give us plenty of space to use just about any sized hook that hard trailer might have.
As far as the hitch's weight capacities go, it's going to have a 350 pound maximum gross, tongue weight rating, and that's gonna be the amount of weight pushing down on the hitch. So, decent number and just to kind of give you an example, you'll be able to use a lot of different types of cargo carriers and things like that. As far as the hitch's maximum gross trailer weight rating goes, that's gonna be 3,500 pounds, and that's gonna be the amount of weight pulling on the hitch, so weight of your trailer plus anything that you might have on it. I do always like to suggest, though, it's never a bad idea just to grab your Rams owner's manual. That way, you can make sure your Pro Master City can pull that much weight safely.
And with that said, if you are gonna be pulling a trailer around, you're gonna want the lights to work on it, you know That way, everyone around you knows what's going on. And to accomplish that, you can always look into some trailer wiring. Now I'm gonna give you a couple of measurements and you can use these to help figure out which hitch monitor accessories to get. From the ground to the top inside edge of the receiver tube opening, that's gonna be about 12 inches. So chances are pretty good if you are gonna be pulling a trailer around, you're gonna need to get a ball mount that has a rise and a shank. From the center of the Hitchman hole to the edge of the rear bumper, that's gonna be about three inches and you can use that measurement to help figure out that if any folding type accessories you might have can be stored in that upright position, without hitting the back of your ring. Just to kinda compare this hitch to some of the other ones available, it's kinda tough to say which one I would go with, you know, with a hundred percent certainty and I say that because they're all pretty close. They're all very similar in terms of how they're gonna look, where they're gonna sit, how they go on, the weight capacities and everything. Honestly to me, I am a little partial to the Etrailer one, really just because of I think it looks a little bit better in terms of the finish and kind of blends in. Looks a little more factory, but that's just my opinion. So, other than that though, hitch that you really can't go wrong with, you know It's gonna get the job done. And in terms of getting the hitch installed, really not too bad. You do have to remove your back plastic bumper here, but everything's pretty easy to get to and get it off. Once it is off, everything's wide open. You should be able to bolt it up with no issues, really. So speaking of installation, why don't we go ahead and put the hitch on together, now. So to get our installation, we're gonna be here at the back of our Pro Master City and since the rear plastic bumper needs to come off, we're gonna start with these three fasteners here along the bottom edge. So we're gonna pull those out using a T-30 torch bit. Now if we move to our wheel well liner, along this edge, we're gonna have four fill up side screws. We'll pull those out. I wanna mention from this point on, anything we do to one side of our vehicle, we're also gonna do to the other side 'cause it'll be set up the same way. Once we have these out, there's also gonna be another Phillips side screw just along this bottom edge, here. So along this bottom edge here, this is that last screw I mentioned. It's also gonna have a Phillips head on. So what you can do now, come back to your wheel well and since we have it loose, you can take the panel and just kind of push it out of the way. And this might be kinda tricky to see, but in the corner here, where our bumper faysha meets the quarter panel, there's gonna be a fastener that's running up. So the head of it's gonna be on the bottom side and we're gonna remove that as well, again, using a T-30 torch bit. So now at this point, what we can do is get our taillights removed and we'll open up our doors. That way, we can get access to the fasteners when we come in. To get the lights out, we're gonna have three large, Phillips head screw type fasteners along this inside edge. So if you open up your door about halfway, get access to 'em, we'll go ahead and just get 'em removed. So once some fasteners are loose, a lot of times, you can start to kinda work this light out and pull it towards you. If it wants to get hung up a little bit, which is normal, looks like I'm getting it released actually, though. If it does want to get hung up, you can always use a plastic trim tool like this, just kinda pry in there to help pop it free. Once we have it free, though, we're gonna need to disconnect it. So there's a connector plug there and then the center, you can push down on it, pop it out, set our light off to the side, do the same thing to get the other one out. Once the tail light's out, that's going to expose a T-30 torch bit fastener right there on each side of the vehicle. So we'll go ahead and get that pulled out. Now what we can do along our bumper here, kinda underneath our weather stripping, we're gonna have a total of four T-30 torque spit fasteners. Gonna just work our way down and get all of them pulled out. Now, the next set of hands, you can actually get our faysha off. So I put some painters tape here along the seam, just so it doesn't get scratched up or anything. You're gonna start in the corner and kinda work your way back. And if these are getting stuck, what you can do is take a small flat head or something and kinda pry in there and put down on the connectors, these tabs. That'll help us get released. We should be able to just kinda work our way around. Let's slide it down and it looks like over here on the passenger side, we're gonna have an electrical connector, can push down on it. If it comes off the body, not really a big deal. Then we're gonna push on this tab here, looks like they're on both sides actually, and release it. We can set our faysha to the side somewhere outta the way. Now, we can get our bumper beam removed. So on each end of it, we're gonna have three 15 millimeter head bolts that we need to pull out. So, grab my socket here and I already have the other side bolts off. So get this one out. We should be able to remove our beam and set it to the side for now. So the way this is gonna work, if you take your hitch and lay it flat, the holes in the hitch are gonna line up with the holes in our bumper beam. So essentially, this is just gonna set on top of it there, and then we'll lift this whole assembly up as a unit and you're just gonna use that stock hardware that we removed that was originally holding our bumper beam on. That's what we're gonna use to run through the beam, through the hitch, and into the back of our vehicle to keep it secure. So we'll grab our hitch, graze it into position, bumper beam. Get that lined up, what we talked about, we'll grab our factory hardware. Get at least one started on each side hand tight. That way, everything will support itself while we work on the rest of the bolts. So once we have all the hardware in place and hand tight, we'll come back and snug it down. So with all the hardware snug, now we need to make sure to come back with a torque wrench and properly tighten it down to the amount specified in the instructions. If you don't have a torque wrench, you can always grab one here at Etrailer or a lot of times, go to your local auto parts store and they'll have one there available that you can rent. Now with the next set of hands, we can get our faysha back into position. Don't forget to plug in any of your electrical connectors, there. I'll work this up in position and reinstall it the opposite way that we removed it. And that'll finish up our look at and our installation of the etrailer.com trailer hitch receiver on our 2018 Ram Pro Master City..
Average Customer Rating: 4.6 out of 5 stars (20 Customer Reviews)
This fully welded trailer hitch receiver bolts onto your vehicle's frame with no welding required. Matte black, powder coated steel is durable and corrosion resistant and creates a rugged look.
After watching the video my installation skills kicked in. It was extremely easy to install my hitch receiver. This saved me a lot of money. Thank you for such a great product.
always great customer service and great products with etrailer!
Fast delivery, knowledgeable staff, item as described.
Works great,very satisfied
Holy awesome customer service! I made an oops and got the wrong hitch and I returned it and got my hitch just a couple days later! It was my bad and the lovely customer service rep was on top of it! Would definatly recommend this buisness!
Pretty goo stuff very hardly hitch
videos are very helpful. Shipping box much worse for wear but all parts arrived
Seems to be very quality workmanship and finish.
Great products and service

Brooke M.
3/21/2023
Uh oh, your review is blank! If you had any comments you would like to add, I am all ears.
Do you have a question about this Trailer Hitch?
Info for this part was:
At etrailer.com we provide the best information available about the products we sell. We take the quality of our information seriously so that you can get the right part the first time. Let us know if anything is missing or if you have any questions.


Jenny N.
11/30/2023
Oh wow. What I will do is have Customer Service reach out to make sure nothing is missing.