
Summer Starts Here - Save up to 70%
To see if this custom-fit item will work for you please tell us what vehicle you'll use it with.


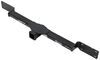
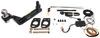
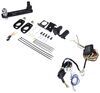
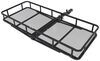
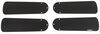
Fully welded vehicle trailer hitch is strong and durable. Draw-Tite's Tested Tough guarantee ensures that this hitch exceeds industry standards. The combination of an e-coat base and a powder coat finish provides excellent rust protection.
Features:
Specs:
Draw-Tite's Tested Tough program provides testing standards far superior to those outlined by the Society of Automotive Engineers (SAE), the go-to source for engineering professionals.
Each Draw-Tite trailer hitch receiver undergoes extensive fatigue testing and static testing with the ball mount that is either supplied or recommended for use with that particular hitch, thus ensuring results that are applicable to real life use. Fatigue testing is also conducted on hitches rated for use with weight-distribution systems.
In addition, Draw-Tite performs static testing on a simulated automobile, as opposed to the rigid fixture used for SAE testing, resulting in a more true-to-life scenario.
At etrailer.com we're committed to the products we sell, and to our customers. Our experienced and knowledgeable staff are available via both phone and email to address your questions and concerns for the lifetime of your hitch. The technicians at etrailer perform hitch installations on a daily basis, making them a valuable resource for do-it-yourselfers. The one-on-one, personal service you'll receive comes straight from an expert in the towing and automotive field. We've installed it, we've wired it and we've towed with it, so whatever your question, we can answer it.

California residents: click here
Videos are provided as a guide only. Refer to manufacturer installation instructions and specs for complete information.
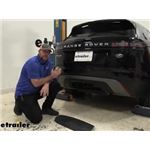
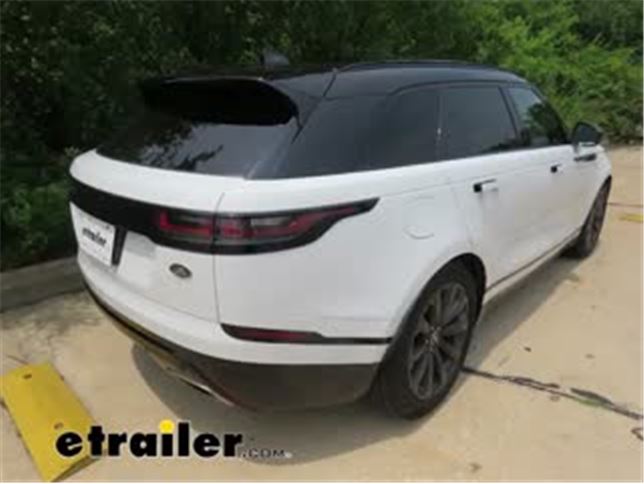
Today on our 2018 Land Rover Range Rover Velar, we're gonna be taking a look at and showing you how to install the Draw-Tite's Class 3 2-inch trailer hitch receiver. And this is what our hitch looks like when it's installed. That's right, it's completely hidden behind the fascia so you're not gonna be able to see it whatsoever when you're not using it. So you can maintain that complete factory look. When you already to use it, the panel here at the back is removable. We can simply loosen up the fasteners on bottom and that'll drop out of the way, revealing our hitch behind it.
This hitch is a class 3 2-inch by 2-inch receiver, so it's gonna be great for all of your towing needs, whether you're wanting to get some work done with it, like use a small utility trailer and maybe move some stuff around like a lawn mower from place to place, or maybe you're wanting to use it to bring some things with you for the weekend, like a camper, maybe a boat, jet ski, or maybe you need to get some gear out of your vehicle. You could put a cargo carrier or a bike rack on the back as well to bring along some items. Your accessories will secure to the hitch using any 5/8 inch hitch pin and clip. Now, one doesn't come included with the hitch, but we've got plenty available here at etrailer, and you can get locking ones as well so you can protect your investments when they're installed. On bottom, we've got hoop style safety chain loops.
With a very large opening that should accommodate just about every shape, size, and style of safety chain. The little one has no problem and neither does our big guy on here. And this hitch offers a 900 pound tongue weight, which is the force going down on top of our receiver. And that's gonna be more than enough for a cargo carrier, fully loaded up to the max, the largest ones that we even have here, at etrailer, you could max out on this hitch, as well as a four bike rack. You could have it fully loaded up as well with all that tongue weight at your disposal.
It also offers a 6,000 pound gross towing capacity, which is how much it can pull behind it. So if you have a camper, a smaller camper, you should be able to bring it with you. Some smaller boats and stuff should be no problem as well. And you could get some work done, 6,000 pounds is quite a bit of weight. So you can even potentially pull another vehicle with this as long as it's a smaller vehicle.
And now as always, I recommend that you verify in your vehicle's owner's manual and ensure you don't exceed any of its towing capacities. Now I've got some measurements for you to help you when deciding on your accessories. From the center of our hitch pin hole to the edge of our rear bumper here, it looks like we're right at about six inches. And that's important when determining if your accessories will contact the bumper when inserted, and if they can be placed in the upright storage position without contacting the bumper. And from the ground to the top inside edge of our receiver tube, we're measuring right at about 17-3/4 inches. And that's important when determining, if you need a drop or rise or raise shank on any of your accessories. Now that we've covered some of the features of our hitch, why don't you follow along with me in the shop and we'll get it installed together. I will tell you this one here is a bit bigger of an install to other vehicles that are out there. So you do wanna give yourself some time. This might be a Saturday project for you to tackle. We'll begin our installation here at the back of the vehicle with the lift gate open. We'll be removing the covers next to the tail light assembly on each side. To do this, we'll use a plastic trim panel tool. We're just gonna get behind the plastic cover here with our trim panel tool. We're kinda just prying it away. And we can just kinda rock it out of there like that. We'll also be removing the one on the other side. We can remove the single bolt that holds our tail light assembly in after removing that cover out of the way. We're gonna use a T30 Torx to do it. Once we removed the bolt, the whole tail light assembly will come straight rearward. We'll gently lift it aside, and then we can disconnect the electrical connector located underneath. We'll press on the release tab there, and then just pull it off. Released tabs had little button there in the center. We'll get the other side removed the same way, but while we're back here, we also have one bolt that we want to remove. And that's located right here next to where our tail light used to be. We'll use a 10 millimeter socket to remove that. We'll also be removing that bolt on the other side. Next, we'll need to remove the plastic trim piece that goes across the top here. And we're gonna remove this by just pulling upward and you can see there's kind of a tab right there. I'm pushing in with my trim panel tool while popping up to get that to come off. And we're just gonna continue this working our way down, just repeating that step until we get this whole trim piece off of here. Once we get all those popped up, that's gonna reveal fasteners underneath. There's gonna be four of those total going across. To remove these, we'll take a screwdriver and we're just gonna go in the open slot here on one side. And we're just gonna pry up the center there. Once you pry up the center, we can then pry the whole tab out. We'll repeat that with the remaining three to get all of these removed. We're now underneath the vehicle and towards the center here, we're gonna have three bolts that we're gonna remove that attached, part of our fascia here to the bottom of the vehicle. We'll use our 10 millimeter socket to do so. Once you removed those three bolts, if we go slightly towards the rear, from where those we're located, we'll see that there's three plastic screws here on the bottom. We're gonna use a large screwdriver to remove those. And once we loosen them all up, we'll just kinda rock our panel out and pull that aside. We're now on the passenger side, on our fender liner here, just behind the rear tire, there's a trim piece here we're gonna remove. Then towards the top, we're gonna have two Torx screws. We're gonna remove using a T20 Torx socket. Once we get our Torx screw removed, we'll switch it over to a Phillips head bit. And just on the inside here behind the tire, there's gonna be two screws, we'll use our Philips head for. Once we've got all the fasteners removed, we can just kinda roll it away. We're kinda rolling it down in towards the inside of the vehicle to get it off the lip there and we can set that aside. We'll be removing the one on the other side the same way. Below the trim piece we just removed, we follow our fender liner down. There will be two more bolts. They're pretty far down here. You can see, kinda see one down here at the very bottom down there. And then there's one right under where the fabric kind of folds under. You're gonna find one there as well. We'll remove these with our Phillips bit to get these completely detached, get our fender liner completely detached from our fascia. Once you get those pieces removed on each side, if we peel back the fabric fender liner here There's gonna be a bolt inside that we'll need to remove. You'll need a little bit of an extension on a Phillips bit to get that out of there. You might even be able to get a little stubby screwdriver in there as well to get this out. Once you get the bolt removed here behind your fender liner, if we follow the fender liner down, keep working that back out of your way there. You're gonna have another one towards the bottom. This one's gonna be a little bit harder to see, and it's gonna be a little harder to get to, but it's about right down here towards the bottom. And then we'll go over to the other side and get them removed as well. We can now start to peel our fascia back. We're gonna start on the driver's side here, right here at the top. We're just going to kinda just peel the fascia outward. And as we're peeling it outward here, we're kind of working our way down, peeling it out. You'll notice we've got some electrical connectors located back in here. So we're just gonna reach around the panel here until we find the tabs on our connector and we're gonna get those disconnected. We can press the release on the other side and get it disconnected. We'll also wanna disconnect this one down here, and both of these connectors are still attached to the inside of the vehicle there. So you'll want to take a trim panel tool and just pry those off of it. So now we've got our connectors disconnected on this side. We've got it released back to about where our lift gate opening is. We're gonna go over to the other side and we're gonna get it released to this point as well. Once you've got both sides released, if we come here to the center and we've got a couple of bolts here in the middle that we'll wanna remove. We'll use our Phillips bit and our fascia now should be fairly well released for us to go ahead and take it off of there. So now we've got each side popped off, we've got all of our fasteners removed here, we're in the center. We can support it in the middle and we're just gonna kinda walk it back on one side until it just kinda falls off of there. And we're just gonna gently work our way back. And then we'll set this aside where it's not gonna get damaged. Now with our fascia out of the way, you'll find a sensor here in the middle. We're gonna unplug that. We're gonna use our screwdriver to press in on the release tab. And then we can just kinda push the connector back there to get that disconnected. We're now gonna go ahead and remove this panel. We need our wiring kinda stay behind here. So we're just gonna take our trim panel tool and we're gonna pop each one of these off of here. Then we can get the whole panel, plastic panel here out of the way by removing the nuts. There's gonna be a total of seven, two on each side, with three in the middle. We'll use our 10 millimeter socket to get those off. Once we've got all the fasteners loose, we can just slide this off and set it aside. Next we'll need to lower down our exhaust so we can get our bumper beam out. There's actually bolts that run vertically up into the bottom that are above our exhaust. So in order to proceed, we'll need to do that. We're gonna take a strap. We're gonna put it in place here on bottom, hooking it on each side and then just pulling it up. And that way, when we go to lower the exhaust down, it'll prevent it from coming down too far causing any damage to the exhaust. Our exhaust is attached with three hangers. You'll have a total of three on each side. They all look just like this. Spray a little bit of spray lubricant on it, that will make it slide off of there easier. And then we can just push the hanger off of there. We can usually push it in either direction, whichever one you find easier. And I'm just using my pry bar to just push on it. With our exhaust strap down on the passenger side, we need to get our heat shield out of the way. There are two bolts on the top here that we're gonna remove with our 10 millimeter socket. And then towards the outside of our heat shield, you can kinda see it here on the outside, there's the bracket where the bolt goes through. You're gonna have another bolt right there. Once we get all of our bolts out of the way there, we can take this heat shield. We're just kinda slide it out of there. That'll expose the bolts here on the bottom of the frame that we need to get off. There's gonna be three of them here and we'll use an 18 millimeter socket to get those removed. We'll use a 21 millimeter socket to remove the four bolts located on each side of our bumper beam. And what I like to do with these is when removing these I'll take the top outside one, whichever one's the easiest one to get to and I'm just gonna thread that in there and turn just like that. So that way, when I'm removing the other side, I know the bumper beam can't fall off. Something's gonna catch it there. So now we've got all those bolts removed. We're gonna support it at the center, take out that safety bolt that we had in there. And then we're gonna slide our bumper being rearward. And it is gonna be stiff because we've got that, this is a tow hook attachment where it slides into the frame there. It's gonna be a little tight. That'll just kinda rock out of there. I need to twist it back and forth. And that's why we had to take the heat shield down on this side was to get those vertical bolts out, so we'd get this whole beam removed. We're not gonna be reinstalling this beam. So we can just set this aside, but you do wanna save your bolts 'cause we're gonna use those to get our hitch attached. We can go ahead and get the heat shield re-installed now. It'll be easier with our hitch out of the way. It only had to come off so we can get those bolts removed. We're not reinstalling those bolts because we're not putting the bumper beam back in place so we can work our heat shield back in. And then you get the hardware for that re-installed. So now we're gonna grab our bumper beam. We can get it into position. I've gone ahead and taken two of the bolts and set them on the back of the vehicle here. So that way, they're ready for me. You can go ahead and get one started in there. And once we get one started on each side, the bumper beam will hold itself up, making it easier to install the rest of your hardware. Now that we've got all of our hardware loosely installed, we can just tighten it back down with our 21 millimeter socket. And then we'll just torque our hardware to the specifications outlined in our instructions. And now at this point, we can just reinstall our components in reverse order of how I removed them. We're not gonna be installing the whole bumper beam that we removed. That is gonna stay permanently removed, our hitch replaces it and the rest of our components here should go right back into place. Don't forget to raise your exhaust back up before reinstalling your fascia. And that completes our installation of Draw-Tite's Class 3 2-inch trailer hitch receiver on our 2018 land Rover Range Rover Velar..
Average Customer Rating: 5.0 out of 5 stars (9 Customer Reviews)
Fully welded vehicle trailer hitch is strong and durable. Draw-Tite's Tested Tough guarantee ensures that this hitch exceeds industry standards. The combination of an e-coat base and a powder coat finish provides excellent rust protection.Fit great.

I had it installed by U-Haul. It works perfectly. If fits really discretely and hides behind the bumper cap when not using it.
Fit my Range Rover Velar, saved me tons of money not having to go to dealer…
Good hitch well made
Great job.
Do you have a question about this Trailer Hitch?
Info for this part was:
At etrailer.com we provide the best information available about the products we sell. We take the quality of our information seriously so that you can get the right part the first time. Let us know if anything is missing or if you have any questions.


Thank you! Your comment has been submitted successfully. You should be able to view your question/comment here within a few days.
Error submitting comment. Please try again momentarily.