Draw-Tite Max-Frame Trailer Hitch Receiver - Custom Fit - Class IV - 2"

Will this fit?
To see if this custom-fit item will work for you please tell us what vehicle you'll use it with.
Thank you! Your comment has been submitted successfully. You should be able to view your question/comment here within a few days.
Error submitting comment. Please try again momentarily.
- All Info
- Reviews (19)
- Q & A (0)
- Videos (2)
- Photos
Draw-Tite Trailer Hitch - 76076
- 2 Inch Hitch
- Class IV
- 7700 lbs GTW
- Concealed Cross Tube
- Draw-Tite
- 770 lbs TW
- Custom Fit Hitch
Fully welded vehicle trailer hitch is strong and durable. Draw-Tite's Tested Tough guarantee ensures that this hitch exceeds industry standards. The combination of an e-coat base and a powder coat finish provides excellent rust protection.
Features:
- Custom-fit trailer hitch lets you tow a trailer or carry a bike rack or cargo carrier with your vehicle
- Computer-aided, fully welded steel construction ensures strength and durability
- Tested Tough - safety and reliability criteria exceed industry standards
- Easy, bolt-on installation - no welding required
- Installation instructions included
- Uses existing hardware from your vehicle
- Lifetime technical support from the experts at etrailer.com
- Black powder coat finish covers e-coat base for superior rust protection
- Sturdy, square-tube design
- Ball mount, pin and clip sold separately
Specs:
- Receiver opening: 2" x 2"
- Rating: Class III
- Maximum gross trailer weight: 7,700 lbs
- Maximum tongue weight: 770 lbs
- Not rated for use with weight distribution systems
- Limited lifetime warranty

Draw-Tite Tested Tough
Draw-Tite's Tested Tough program provides testing standards far superior to those outlined by the Society of Automotive Engineers (SAE), the go-to source for engineering professionals.
Each Draw-Tite trailer hitch receiver undergoes extensive fatigue testing and static testing with the ball mount that is either supplied or recommended for use with that particular hitch, thus ensuring results that are applicable to real life use. Fatigue testing is also conducted on hitches rated for use with weight-distribution systems.
In addition, Draw-Tite performs static testing on a simulated automobile, as opposed to the rigid fixture used for SAE testing, resulting in a more true-to-life scenario.
etrailer.com Technical Support
At etrailer.com we're committed to the products we sell, and to our customers. Our experienced and knowledgeable staff are available via both phone and email to address your questions and concerns for the lifetime of your hitch. The technicians at etrailer perform hitch installations on a daily basis, making them a valuable resource for do-it-yourselfers. The one-on-one, personal service you'll receive comes straight from an expert in the towing and automotive field. We've installed it, we've wired it and we've towed with it, so whatever your question, we can answer it.
76076 Draw-Tite Class 3 Trailer Hitch Receiver - Max-Frame
Installation DetailsThis Product Fits The Following Vehicles
- 2017 - 2024 Audi Q7
California residents: click here
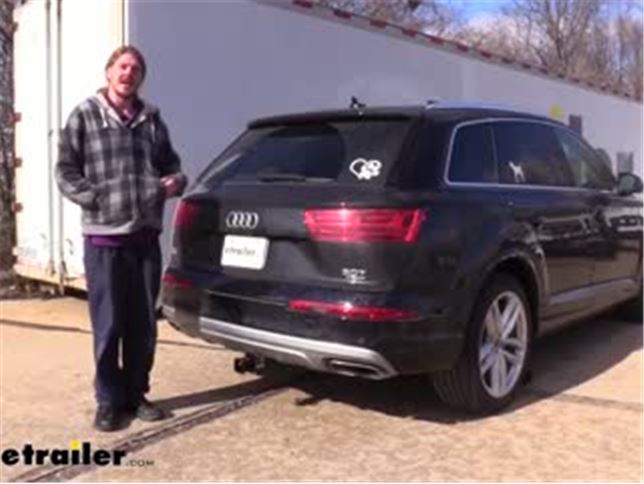

Videos are provided as a guide only. Refer to manufacturer installation instructions and specs for complete information.
Video Transcript for Draw-Tite Max-Frame Trailer Hitch Installation - 2018 Audi Q7
Hi there Audi owners. Today on your 2018 Audi Q7, we're going to be taking a look at and showing you how to install Draw-Tite's class 3, 2-inch trailer hitch receiver. And this is what our hitch looks like when it's installed. The cross tube is going to be hidden behind the bumper, so you're only will see the receiver tube here at the back. It's a class 3, two inch by two inch receiver, so it's going to be great for all of your towing needs, whether you want to place a bike rack in, hit the trails, or if you want to hook up a small trailer and take some equipment with you to the campsite. It uses a 5/8 inch, hitch pin and clip.
One doesn't come included with the hitch, but we have plenty available here @etrailer.com. You also notice that there's a small hole just to the rear of our hitch pin hole, and that will allow us to use a J-pin, which is similar to our hitch pin, but wraps around and presses against whatever is in the receiver acting as an anti-rattle device.We have other anti-rattle devices also available here @etrailer.com, if you want to use a different style. On the bottom, we have hoop style, safety chain loops with a very large opening that should accommodate just about every shape, size, and style of safety chain. It features a 770 pound ton weight, which is the force going down on top of the receiver, which is going to be more than enough for a four bike platform rack fully loaded up with four bikes, or even the largest cargo carrier that we have here in @etrailer.com, fully loaded up to the max. It also features a 7,700 pound gross towing capacity, which is how much they can pull behind it.
And that's more than enough for a pop-up camper, if you want to bring a boat with you to the campsite for the weekend, this hitch should handle it with no problem.Now as always, I want you to verify in your vehicle's owner's manual and ensure you don't exceed any of its towing capacities. Now I've got some measurements for you to help you when deciding on accessories, from the center of the hitch pin hole to the edge of the rear bumper, it measures about four inches. That's important when determining if any of your folding accessories can be placed in the upright storage position without contacting the bumper. And from the ground to the top inside edge of the receiver tube, it measures about 12 and a half inches. This is important when determining if you need a drop, a rise, or a raised shank on any of your accessories.
Since it is so low, I do recommend that you get a raise shank on any of your accessories. Now that we've gone over some of the features, let's go over the installation together to get us the confidence to do it at home. We'll begin our installation at the wheel well, and either the driver or passenger side, there are two screws here we're going to remove using a T25 Torx socket.And then if we go down just underneath, there are two more that we'll also need to remove using the same size Torx bit. We can then start to peel back the fender liner. And this is going to reveal another Torx bolt here on the inside that we'll need to remove.
We'll repeat the same process over on the other side. There's also four underneath that we'll need to remove as well. We'll use the same size Torx bit. Once we've got those out, we can peel down on the bottom here and there are going to be two more screws underneath that we'll also need to take out.We'll then need to gently pry back the trim piece here to excess some screws underneath. Now this piece is quite difficult to remove, so we're going to be using a plastic trim panel tool to assist us because it will pop out of here, but you want to make sure you get good surface area behind it with your tool before you pry out so we don't damage anything. Because these clips are very snug holding it in there. Just continually work your trim panel tool underneath, prying outward, working your way along the clips. It is going to be difficult, but just gently work your way there, and they will start to break free.We've got the one out there, so there's just another one higher up. So we just going to keep working our tool up, pulling and prying until we get it released. We only need to go this far to access these two screws there, and we'll remove those with the same T25 Torx socket that we've been using. We'll then do the same thing over on the other side. Now that we've got all our components removed, I've gone ahead and opened the lift gate, and then we can start peeling our facia off. We're going to start on one side, by peeling it to the fender back, working our way towards the center.Once we get this side popped out, down to the corner here, we are going to head on over to the other side and do the same thing. Man that's awfully tight. Now that we got that side worked over to the corner, we're going to come over to the other side and do the same thing. When working the facia off, sometimes it can get stuck on the tabs and we don't want to just keep pulling harder and harder because we can potentially break the tabs, so you can trim panel tool to work it down and work it off as you're heading down. You may need an extra set of hands with this as it is pretty long and the clips are very tight and once one goes, it's possible that the whole fender can just come off all at once and you want to be prepared and supported. Once you've got it pop loose like that, we want to make sure we disconnect all the electrical connectors located on the inside.There are going to be several actual connectors and the amount that's going to be there is going to vary depending upon the trim package options that you have on your vehicle. For some of the electrical connectors, I recommend putting a screwdriver in between so you can rotate it to move the tab to disconnect it. Once you have all of your electrical connectors disconnected, we can set our fascia aside where it won't get damaged. We'll then need to remove the bumper beam behind our facia. There's four bolts on each side that we're going to remove using an 18 millimeter socket. The first bolt that I take out, I like to do the top one because it's easiest to get to.And then I don't want to take this one all the way out. I'm going to leave one just like this on each side, take the rest out in that way we've got one here that just can't tight that we can take out that'll keep our bumper up from falling while we're taking the rest of the hardware out. Now with all the bolts removed, except for the last couple that we just left in there to support it, to keep it from falling. We'll just take those out and then we'll slide our bumper beam off. And we're just going to set it aside for now.We can now put our hitch into position. It's going to go right where our bumper beam used to be. There are a couple of studs that you can hang the hitch from, but you don't want to just let go of it because the weights going to want to kind of twist it and it's going to fall off like you see there so we're going to keep it supported. You can just use the studs to help support some of the weight. And then we'll grab our bumper beam, plank it up, do the same thing by resting it on the studs. And then if we can get one bolt loosely started on each side to hold it up.Now with one on each side, the hitch and the bumper will hold itself up. We can just kind of push them up. We want to make sure that the stud does line up through the hole there. We don't want to accidentally tighten our hardware down for it's pressing up against the stud, we want to make sure that that's around it. And we're just going to loosely install the rest of our hardware. We're then going to push everything up, double check those small studs to make sure they line up, and then tighten down our hardware. I'm going to do one on each side just to make sure it doesn't move. And then go back and tighten the rest out.We can then go back and torque all of our hardware to the specifications found in our instructions. We'll now need to trim out our facia for our receiver to pass through the bumper there. But before you trim it out, I did go ahead and mark it here, but you'll see that there's an antenna that runs along the bottom here. So we'll want to pop this out of its cavity. So just gently work your way down little tab you're going to kind of push them a little bit to release some of the tension and then just pull the antenna up. And we really just need to do this far enough to get the antenna out of the way. Now I've gone ahead and marked it out, but you can also find this template in your instructions. We're going to cut it out using a cutoff wheel.You could also use some snips, but due to the strange shape of the various cavities here, it could be difficult with some snips. We've got most of it cut there. There's a few spots here where we're going to have to hit a little harder with our dremmel. And it might be easier on some of these parts to maybe take your dremmel and run it down this way to trim off this high part here just to make it easier to cut. Once you've got that cut out, we can go back with the razor knife or a file and just clean up any of the rough edges here.Once we've got all the bars and everything knocked off, we can then go re-install our facia in reverse order how we removed it. Just remember to put your antenna back in the clips after you work it around the receiver. Now with an extra set of hands, we'll put our facia back in place. Make sure that you plug in all of your electrical connectors before doing so. There are several connectors, and again, depending on the options that you have, you may have more or less connectors than what we have here. Now we've got all of our electrical connectors back in place. We can work our facia back into place, keep an eye on that antenna down there. And then once you've got it all lined up, you can just start snapping it back into place.And now we're back underneath again. We're going to poke our antenna back down inside the clips that we had removed it from. You can see that it's going to work along the back side of our hitch here. And then we can just continue reinstalling our hardware in reverse order of how we removed it. And that completes our installation of Draw-Tite's class 3, 2-inch trailer hitch receiver on our 2018 Audi Q7.
Customer Satisfaction Score:
90% were satisfied with this product
10% of customers were not satisfied
- Arrived Damaged
- Defective
- Wrong item was ordered
Customer Reviews
Draw-Tite Max-Frame Trailer Hitch Receiver - Custom Fit - Class IV - 2" - 76076
Average Customer Rating: 4.1 out of 5 stars (19 Customer Reviews)
Fully welded vehicle trailer hitch is strong and durable. Draw-Tite's Tested Tough guarantee ensures that this hitch exceeds industry standards. The combination of an e-coat base and a powder coat finish provides excellent rust protection.I received the hitch fairly quickly but unfortunately it did not fit my 2018 Audi Q7. The alignment was off by a 1/2 inch on both sides. The hitch itself is about 1 inch short overall. It simply does not fit. The only reason Im giving 2 stars is that customer service was good, they are sending out a replacement hitch and I am returning the defective one to them. Sucks that the first one didn’t fit, hopefully the 2nd one will fit correctly.
I'm giving 3 stars because of the design of the chain attachment point - by making those two flanges vertical instead of horizontal the overall bottom of the trailer hitch is lower than the hitch on my minivan (which has horizontal flanges). I'm really puzzled why they would design like this. Not the end of the work of course but I have a drop off at the end of my driveway so I can't drive up with my Yakima bike rike installed.
The video of instruction was great...although it took 2 hours by myself to install! Two suggestions based on my experience:
1) Whem removing the trim pieces around the wheel well the back section is connected using some tricky male+female rivets (as opposed to the the simple rivet design used towards the front). I'm attaching a picture to show what they look like so that you know what your trying to remove/disassemble.
2) I followed the instructions for size of the cutout in the bumper...but ended up having to make about 3/4 deeper to have everything fit properly.

No-problem installation and fit perfectly to my Audi Q7 frame. A good value and I saved $600 by installing it myself! I easily handles my 5500 lb boat/trailer combo.

As soon as I find the time I promised my wife I would take it off! The design is poor at best with the chain hooks pointed down it makes the hitch too low and it drags on everything! I also not been able to get the foot sensor for the back hatch to work after installing it. Your tech said it would but I have not had any success. Like I said, I will be taking it off as soon as I get time.
First hitch I received was defective and the bolt pattern didn't match up to my Q7. After several long discussions with customer service (with multiple people) I had to mail back my Hitch and wait for a new one to be mailed out. This process took 3 weeks before I got the new one. The new hitch fit great. 3 generous stars for average customer service.
So happy my draw title hitch arrived on time. The transaction was effortless and customer service was top notch. Unfortunately my hitch has some bare spots that were either not painted or possibly rubbed down to bare metal. I think it’s unlikely this damaged happened during shipping as the box arrived without significant damage.

We put this on our Audi Q7 mainly for bike rack. It is strong and would be fine for pulling a trailer. It also was over $1,000 cheaper then getting one from our Audi dealer. I had a independent body shop put mine on for me. He charged $200.00
This hitch worked out great. It's a pretty involved and time consuming install since the entire rear bumper cover needs to come off. Taking my time, I was able to complete the job myself. My prior experience in doing projects like this was extremely helpful.
The instructions were clear with great photos.
I used an air cutoff tool to remove the section of the fascia. I also used a dremel to do some final trimming after I had the bumper cover back in place.
I'm really pleased with how this install worked out.

Still working great. A little rust inside the receiver tube but functioning well. Staying tight to the car frame. Pulling a 6500 pound boat.
Hitch received in excellent condition, ahead of schedule, and fit without issue. This was a more involved install and the video instructions nailed it. While still a little time consuming, the install was straightforward thanks to the video.

Great hitch and reasonable install.
Had it installed by local shop $450 great product!

Andrew

4/29/2021
Awesome. Solid and reliable.
Fast shipping and hitch bolted right up!

one side didn't fit right but overall was relatively easy to install ( would be helpful to have a second pair of hands) .. installed and using .. overall happy
called in my order and had excellent customer service and delivery was sooner than expected and hopefully it fits as ordered
Part was an exact fit. Relatively easy to install. A quality piece.
Solid as expected
See what our Experts say about this Draw-Tite Trailer Hitch
- Trailer Hitch Recommendation for 2023 Audi Q7For your 2023 Audi Q7 the hitch I would recommend the Draw Tite hitch part # 76076 as it has the best towing capacities and also is mostly hidden since only the hitch opening hangs below the rear bumper. If you preferred something totally hidden we also have the Stealth hitch part # 391AUDQ818 which has a detachable lower hitch opening that you can remove when not in use so you can't see it at all. This is a more expensive option though.
view full answer... - Options for Sway Control on a Hitch That Cannot Use Weight DistributionWe definitely have some options available for your 2021 Audi Q8. With your trailer sitting right at 24 inches tall and the hitch sitting at 17 inches, I am going to suggest going with 7 inches of rise. The Curt Ball Mount for 2" Hitches # C45448 will have the needed 7 inches of rise and will also be able to handle up to 12,000 pounds. The Curt 2-5/16" Hitch Ball # C40008 will then attach to this ball mount. You will also need a pin and clip, like the C21500, if you do not already have...
view full answer...
Do you have a question about this Trailer Hitch?
Info for this part was:


At etrailer.com we provide the best information available about the products we sell. We take the quality of our information seriously so that you can get the right part the first time. Let us know if anything is missing or if you have any questions.





Victoria B.
2/19/2020
The other traditional trailer hitch available for your 2018 Q7, the Curt Trailer Hitch # C13277, is designed with safety chain hooks that are horizontal rather than the vertical hooks featured on this hitch. The Steath Hitches Trailer Hitch # 391AUDQ716T is designed with a removable and interchangeable receiver and ball mount and tow hooks located higher up on the hitch to maintain your vehicles ground clearance.
Helpful Links
Trailer-Hitch/Curt/C13277.html
Trailer-Hitch/Stealth-Hitches/391AUDQ716T.html