
To see if this custom-fit item will work for you please tell us what vehicle you'll use it with.
Thank you! Your comment has been submitted successfully. You should be able to view your question/comment here within a few days.
Error submitting comment. Please try again momentarily.


Fully welded vehicle trailer hitch is strong and durable. Draw-Tite's Tested Tough guarantee ensures that this hitch exceeds industry standards. The combination of an e-coat base and a powder coat finish provides excellent rust protection.
Features:
Specs:
Draw-Tite's Tested Tough program provides testing standards far superior to those outlined by the Society of Automotive Engineers (SAE), the go-to source for engineering professionals.
Each Draw-Tite trailer hitch receiver undergoes extensive fatigue testing and static testing with the ball mount that is either supplied or recommended for use with that particular hitch, thus ensuring results that are applicable to real life use. Fatigue testing is also conducted on hitches rated for use with weight-distribution systems.
In addition, Draw-Tite performs static testing on a simulated automobile, as opposed to the rigid fixture used for SAE testing, resulting in a more true-to-life scenario.
At etrailer.com we're committed to the products we sell, and to our customers. Our experienced and knowledgeable staff are available via both phone and email to address your questions and concerns for the lifetime of your hitch. The technicians at etrailer perform hitch installations on a daily basis, making them a valuable resource for do-it-yourselfers. The one-on-one, personal service you'll receive comes straight from an expert in the towing and automotive field. We've installed it, we've wired it and we've towed with it, so whatever your question, we can answer it.

California residents: click here
Videos are provided as a guide only. Refer to manufacturer installation instructions and specs for complete information.
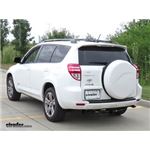
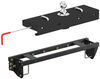
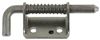
Speaker 1: Today in this 2012 Toyota RAV4 we'll be having a look at and showing you how to install the Draw-Tite Class III trailer hitch receiver, part number 75235.Here's what the hitch looks like installed. One of the first things you'll notice about this hitch is that we have a lot clearance around the receiver, which makes this a great hitch to use with bike racks and cargo carriers, which is what we found that many of our customers are purchasing hitches for, for the RAV4.On the side of our receiver you'll find two pin holes. The larger diameter one here, that's our industry standard 5/8th of an inch diameter hitch pin hole to secure your hitch mount accessories. You can pick up a pin and clip separately on our website as part number PC3. Closest to the rear, this smaller hole is for our J-Pin stabilization device. And what that does is take away some inaudible 00:00:45 shape play and rattle inaudible 00:00:47 what is inserted in your receiver.
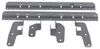
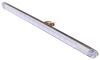
We have one of those available on our website as well. On the end of our receiver here, you find this nice collar that's welded on. Not only does it give us a finished look, but it does help improve the strength of the receiver opening.Now one unique feature that this hitch has that sets it apart from others out there is that we have a bracket that's welded onto the hitch, and this serves as an attachment point for any trailer wiring that we may need. You can pick up adaptor brackets that will bolt onto this to hold your wiring options. We have several different wiring options available for you on our website as well.Welded on the bottom of our receiver are our plate style safety chain loops.
And what's nice about these is they have a really large opening. So if you have a large safety chain hook like this one on your trailer, you don't have any problem getting it on there or removing it.This hitch features a 675 pound max ton weight rating, which is the amount forcing down, and a 4500 pound max gross trailer rating, which is the amount it can pull. It does support the use of weight distribution, but when you're using that on your trailer, the numbers don't change. They stay the same. As always, you want to make sure you consult with the owners manual of your RAV4 and not exceed what the vehicle's rated for.
You want to go by which ever number's less.Now for a few measurements to better assist you in choosing any hitch mounted accessory you may need such as a ball mount, bike rack, or a cargo carrier. You're looking at about a 12-1/2" from the ground to the top of the 2" receiver opening, about 4" from the center of the hitch pin hole through most part of the back bumper, and about 8" from the center of the hitch pin hole through most part of the spare tire carrier mounted on the hatch.Now that we've gone over some features, we'll show you how to get it installed. To begin our install, we need to figure out if our vehicle has a factory appearance panel on the driver side. It'll be a plastic panel here that you'll have to remove. In our case we don't have it, so we don't need to worry about that.
If we have a panel and we have it removed, underneath that we'll find bolts for our tow hook. We need to remove these. It's a 17 millimeter socket to remove both of these bolts.Now just forward of our forward attachment hole, we'll have a sticker here that covers the frame inaudible 00:02:58. We need to remove this sticker. Now there's a couple ways you can do this. You can try peeling it off. Sometimes they come off easy. Or you can take a utility knife, poke in the middle, and then you can just tear off around a well nut and frame. Now on the passenger side of the vehicle, we need to remove the back one and the one that's closest to the front.Now we'll point out the attachment points. We'll be utilizing all three well nuts on the driver's side frame in this area here. And on our passenger side with our tape removed, we'll be utilizing these two well nuts here. Our hardware's going to work like this. We'll have a bolt and a conical tooth washer. The teeth will face away from the head of the bolt towards the hitch, and we'll secure our hitch into place with this hardware.Now I need an extra set of hands. We'll grab our hitch. We'll raise it up over our exhaust on the passenger side and we'll secure it with our hardware. Once we have one bolt started the hitch will support itself and you can get your other hardware started. With all of our hardware in place now, we use an 18 millimeter socket to tighten it. And now we'll torque all of our hardware to the amount specified in the instructions.That will complete our look at and showing you how to install the Draw-Tite Class III trailer hitch receiver, part number 75235 on this 2012 Toyota RAV4.
Average Customer Rating: 4.8 out of 5 stars (1238 Customer Reviews)
Fully welded vehicle trailer hitch is strong and durable. Draw-Tite's Tested Tough guarantee ensures that this hitch exceeds industry standards. The combination of an e-coat base and a powder coat finish provides excellent rust protection.This whole process couldn't have been easier. I ordered the hitch and about an hour later ordered a bike rack to go into the hitch. An hour after that, I decided I wanted a 4 bike rack, instead of 2. Cathy T was super helpful in cancelling/placing my new order and knew exactly what she was talking about while suggesting the proper lock. Everything arrived right on time and was really easy to install. I do suggest using ramps to raise the vehicle a bit, although it wouldn't have been necessary. Also, it doesn't hurt to have a few cold beverages nearby, and a buddy to help when needed. Seriously though, this was pretty simple to do and it's going to be super functional and I think it even looks pretty good. The prices were fair, shipping was fast, install was easy, and Cathy T was great. A+ for everyone involved. Thanks!
Great product. It was as easy to install as was stated, IF, you have the proper tools and the car lift. I had to do it at ground level. It took me an additional 15 minutes to figure out how to do it right.
I had to lift the RAV4 about 6 inches to get under it with plenty of room. (See photos) I sprayed the bolt holes with WD-40 to ease the threading. I used two jack stands to steady the receiver. After inserting the first bolt, the rest went smooth. Glad I did it instead of paying the rv place to install it. I did have to trim the plastic cover on the driver's side before putting it back on.

Greg

2/27/2022
I have an Intech Chase and pulled it up and down mountains without any issues to the receiver. I will check the torque on the bolts before headed out this years just fire pace of mind. Otherwise, still a great buy.
DID NOT FIT! Even though the website promised it would fit my 2011 toyota rav4, when the trailer hitch came, it did not fit. I tried for hours to line up the holes that you tighten the bolts through with the holes in the frame and they would not. My car has never been crashed and nothing is wrong with the frame. This means that the manufacturing of this product is so bad that it wouldn’t even fit my car. In the end, only 3 of the 5 bolts would fit in the trailer hitch, the remaining 2 would not fit because the holes to put them through the trailer hitch did not line up with the frame holes. We ended up having to buy a grinding tool set and grind the holes until they were far enough over to fit the bolt. Even doing this, only one of the missing bolts could fit, so I am left with a trailer hitch that only has 4 out of 5 bolts it needs to be attached due to some poor quality control. The photo I attached shows the misaligned hole in the trailer hitch. The bolt below it was the hole that we had to grind to expand in order for the bolt and the hole in the frame to line up.
Dear etrailer,
May I begin to say that the moment I placed my order, in less than thirty minutes Herb (cs@etrailer.com) immediately wrote me back with a confirmation, tracking link, and a friendly thanks. Next, I watched the installation and wiring video twice that you provide on your website while waiting for the unit to arrive. Outstanding for I felt as if I had a personal teacher as I watched. I also found out by watching that I needed a tool to remove the rear door panel which I did not have. Again, nice job. It's always annoying when you find out as you are installing that you need some "special tool" if you know what I mean. So I went to my friendly Auto Zone and picked one up. I then watched as my new trailer hitch moved across the a few states to show up three days later at my door. The same day it arrived Patrick Breedlove wrote me an email stating I should have received the hitch and if there were any questions, give him a call. So, before even starting to install, I felt I had your company and the personnel covering my back. Because I watched the video, I literally installed the hitch in about 30 minutes. Then installed the custom wiring harness in about an hour for I wanted to make sure the power wire was secure and I had to lay on my back...in the stones. Slowed me down a bit. So, may I say if there was a rating greater than "EXCELLENT", you would have it! Awesome people, product, and service!
God bless you all and keep it up!
Kirk C.

Kirk C.
2/21/2015
Can you believe that I received an email from a person at Etrailer asking if the Draw-Tite trailer hitch I purchased over a year ago is still performing to my satisfaction. Yes, it has been over a year since I installed my hitch on my Rav4. It has proven to be a very good product. No rust, no chipping, lights continue to work and the harness is durable. I would recommend this company and hitch to anyone considering one. Awesome company, service, and now follow up!
I ordered the Draw-Tite hitch receiver primarily for a bike rack. The receiver is for a 2016 Toyota RAV4 Hybrid. I was concerned that the receiver might not fit on my vehicle because the vehicle is a new year and model, but the receiver fit perfectly. I was also concerned that the receiver would detract from the rear look of the vehicle because it is not a factory hitch receiver, but the receiver looks great - actually better than I anticipated. I am very pleased with the receiver and with etrailer in general. Etrailer's customer service is top-notch.

Darin S.
3/12/2017
Thanks for the follow up. The hitch is still great.
I haven't used it yet, so my review is based on shipping and mounting experience.
The hitch came in a torn box and the hitch doesn't have any additional packaging (like plastic wrap or whatever). Because of this the hitch got scratched during its transportation. So I had to buy paint and spray out damaged places to prevent rust.
The rack has pretty decent instructions on multiple languages, which is good and has all the necessary hardware.
During the mounting everything went pretty good, even though I was doing it alone. except for one hole. I don't know whether I did something wrong, or the geometry of the hitch wasn't perfect, or geometry of my car, but I struggled to align a mounting hole with a car hole to be able to secure with a bolt. And yes, I tried to lose other bolts to adjust the position, but it didn't help.
Also since my car is pretty old, I had to repair threads in advance, to avoid problems during the actual installation. I would recommend that everybody should try to use a bolt without the hitch to check a thread in every hole before installation.
Long story short - it is a decent hitch for the price. The steel is thick and painted very well. 4 stars just for packaging and my straggling with 1 bolt

Alex
6/30/2020
Its been a year since I installed the hitch, and I must admit that I am pretty happy with it. No rust, works like a charm!
Instructions and video are very good.
I installed it by myself. Went smoothly and easily. The directions say the bolts are 19mm but they were actually 18mm which was great because I didn’t have a 19mm socket. The main reasons I bought this brand/model was because of the maximum tongue weight , where the tow chains connect to (not right under hitch pin) and it reuses the tow hook attachment.
Dc
1/13/2019
It has been one year since I installed the hitch. I use it on my 2013 Toyota RAV4 for a cargo hitch to haul my snow blower to my parents and in-laws house when it snows. It works as it should and still looks great!

I originally bought this product for my move cross country but decided to just load up the essentials in my car and ship the rest out later instead of hauling a trailer. Pros I can definitely say about this hitch: Easy assembly!
I did this all by myself after watching the installation video and referencing it a few times after. Same with the wiring system. I would recommend if you have someone to help you, it goes faster. I was under the SUV holding one end up with my legs and hips while my arms fastened the other end because I was by myself. It's definitely easier if you have someone else to hold up the other side while you work. Honestly I think the hardest or most time consuming part was tearing apart the inside of my car in order to access the hook ups by my brake lights for the wiring system to hook up.
The few times I tested it and practiced driving and parking with it with one of my dad's trailers, it's definitely sturdy and handles weight well although I did notice that the heavier the trailer when it hits pot holes or uneven places in roads it jerks the car quite a bit. Then again I wasn't on the freeway with it at the time, but more back roads and less well kept than a main freeway or highway. Even on the curves of the roads though, not much sway side to side which was nice to notice, especially with a long trailer.
I would love to get more opportunities to use it especially for moving or trip purposes.
Fit perfectly! Installed in less than 1hour and that included looking at the video 4 times!
It came with free shipping through UPS without a scratch!
My wife and I can now use our old bike rack and take the bikes to trails across town (ATL).
Highly recommend!

Matt M.
9/17/2018
Still love it! Works as expected! Thanks for the follow up!
All I can say, is WOW. This hitch is outstanding quality for a more than reasonable price. Very solid and easy to install. Total install time was less than 30mins. I used a strong cardboard box to help leverage the hitch while i secured the bolts in place. +1 for having online video to help facilitate in quick and easy install.

Brandon
9/11/2019
Still awesome, no problems at!!! Wouldnt buy from anyone else.
At a very reasonable price point, the Draw-Tite trailer hitch meets expectations. Thanks to etrailer.com, the installation was seamless. The hitch is mainly used with a Yakima bicycle rack. Installed on a RAV4, the black hitch paint color and position make it aesthetically appealing and somewhat stealthy. I suppose it also helps that the color of my vehicle is black.
After 3 years exposed to all seasons, there are signs of rust around the hitch receiver. Having the car parked on my driveway, exposed to the elements along with salted NY/NJ roads - perhaps the most logical explanation. Regardless, the unit still performs well.
My etrailer.com DrawTite hitch arrived early 9/6/2018. The box and hitch were fine. I am a senior citizen and usually attempt DIY installations but I know that a lift would be the easiest method for installation. I took my RAV4 and hitch to my local tire / auto maintenance shop for the install. A Youtube video for the 2018 Toyota RAV4 was very helpful and easy to follow. It took less than 15 minutes with a little help from me installing the bolts while the auto mechanic held the hitch in place. Everything went well. For product … I rate it a 5 (great quality) … price also a 5 (excellent price) … We’ll be using the hitch for our bicycle rack.
Chuck S.
Great product with a great price! The 675 lbs tongue weight is a blessing. Much beefier then the other Class 3 hitch offerings offered here. I used to have a U-Haul class 3 hitch but it wasn’t up to the task with my set up. I upgraded to this one for the extra tongue weight rating to carry my spare tire and Wilco rack, and to also tow occasionally. This hitch is very strong, does not flex and has lasted two winters now with no rust or corrosion around the bolts. Easy to install and looks great when done :)
Very nice 2" trailer hitch. Was easy to install this hitch on my 2017 Toyota RAV4 with another set of hands to assist installation. My RAV had more than enough ground clearance for me to install this hitch without having to lift the rear end of my vehicle. I was a little concerned about post-installation ground clearance before installing this hitch as it appears to hang low, but as you can see in the picture, the bottom of the hitch still sits higher than my exhaust pipe; so no hitch rubbing as I back out of the driveway and off my steeply sloped curb.
INSTALL TIP: the plastic cover on the left side of the vehicle gets removed as part of the installation instructions; you CAN reinstall the plastic cover by trimming off the piece that comes in contact with the left side of the hitch. I included some pictures of my installation for reference. The plastic cover was easily trimmed with a simple hand hacksaw. I felt much better putting this plastic cover back on, rather than leaving off. I would recommend this be a part of the installation instructions so people buying this hitch can see how simple and quick this trimming actually is. My guess is that most people would reinstall. All-in, just 40 minutes to complete the full installation! Very happy and I would recommend this hitch without any reservations!
Wow! am I ever glad I found etrailer.com!!! I went to Uhaul to look for a hitch for our new Toyota RAV4 and they wanted $400 installed. I went to the Toyota dealer and they wanted $800 plus labor to install. The dealer told me it is a very complicated procedure to install. I watched the video on etrailer one time, took the instructions to the garage and within 45 minutes I had installed the new Draw-Tite hitch that looks much better than the Uhaul hitch. As a first time installer I was also able to preform the "complicated procedure" of cutting the plastic under tray to fit perfectly around the hitch in under a minute. So for $xxx and less than an hour I have a great hitch for my bike rack.
I purchased this for my 2017 Rav4 Hybrid. I watched the video, very clear instructions, but be warned it's not QUITE as easy to install as in the video, especially if you don't have some of the specialized tools. That said, I was able to knock it out successfully in about 2 hours, including finding the 3 bolts the dog carried off while I was under the Rav4... Watch the video and do what they say and you'll be fine. Here are a few things I found that weren't clear in the video. First, when removing that plastic cover on the driver's side (first step), the plastic clips are pretty cheap. I broke the head off of one and had to man-handle the thing to get it off. Be careful not to break the heads and it will go quicker. Next, those bolts holding the tie-down hook are in REALLY tight, and there's not much room to get leverage using a standard size socket wrench. I was able to break them free eventually but it was tough. The right tool would help here... My biggest snag was getting the exhaust off of the rubber support. I thought I had some WD40 but turns out I didn't, so it would probably be easier if you use that like the video says. Also the rod that the rubber sits on has a knob on the end that is larger than the hole (so it doesn't come off of course), but this makes it hard to get the rubber off the metal rod. I was sure I was going to tear it but just push hard it will make it over the knob. I actually used a weeding tool to push it off. Once I got the exhaust free it was smooth sailing. When positioning the hitch and getting the first bolts in don't even try to do it yourself (I did...); an extra set of hands is definitely needed. Also the instructions say to use a 19mm socket for the mounting bolts, but the bolts I got were actually 18mm. Don't think that matters. All in all installation was not too bad!
Excellent trailer hitch. Heavy duty construction, really over-kill for our little RAV4, but that is a plus. Bolt holes lined up perfect. Installed in less than an hour.
Aj
3/12/2017
My wife loves having that hitch on her RAV4! No regrets. Happy wife happy life! *
Fit perfectly on our 2015 Rav4. It was easy to install and barely noticeable on the vehicle after it was installed. I use it to tow a small trailer and for a hitch mounted bike rack. Works great for both applications. The instructions were also written very well and easy to follow. I will be back to etrailer for future purchases.
This review is a little about the hitch, but more about the installation process in hopes of helping others and saving them some additional money.
First of all, we bought two hitches: 1) 2004 Toyota Sienna = Draw-Tite Max-Frame Trailer Hitch Receiver - Custom Fit - Class III - 2" - Item # 75237 and 2) 2007 Toyota Rav4 = Draw-Tite Max-Frame Trailer Hitch Receiver - Custom Fit - Class III - 2" Item # 75235.
Both frames arrived in excellent condition despite one of the boxes being damaged in shipping. They are obviously well built and meant to fit the specified vehicles. etrailer.com understands how to match vehicles and hitches. Both hitches fit perfectly and no alterations were needed for the hitches. We just finished installing them yesterday and look forward to using them with our new bike rack.
Installation hints:
1) Make sure you have everything (tools, lubricant, brush, etc) ready and organized before you try to install your hitch. In my case, I was missing some tools I thought were in the garage and had to make other arrangements. The installation time in the etrailer videos (extremely helpful) is only accurate if you have everything prepped and you don't have any problems with the weldnuts (see #2 below). The actual installation is surprisingly straightforward and could be completed in close to the estimated time.
One item you will need, that you might not have, is a torque wrench. Here's the first money saving tip, check with your local auto parts store, to see if they participate in a tool loaner program. Basically, you pick up the tool from their store and pay a deposit (which is the price of the tool), use it, return it, and get your deposit back. While many guys are looking for excuses to buy more tools, I opted to borrow a torque wrench as I don't see myself needing one in the future. If I do, I know where to borrow one :)
2) If your vehicles are a bit older, or if your vehicles operate in wet or snowy areas, there's a very good chance the vehicle weldnuts (threaded inserts - this is where the bolts will thread into) will have dirt, grime, and rust built up in the inserts. I strongly recommend taking the time to make sure your bolts will go into the weldnuts before you mess with the hitch installation.
The weldnuts on our 2007 Rav4 were in great shape and only required me to spray in some lubricant (Sea Foam Deep Creep) and clean out with a wire tube brush (Nylon Tube Brush - 1/2" Item # 814092 etrailer.com). If I hadn't done this simple step, I wouldn't have been able to get the bolts to thread. Once I did this, the install was simple. I didn't spent much time doing this.
Our 2004 Sienna was a different story. Besides being 3 years older, it also came from an area with more snow and they likely salted/treated the roads which contributed to the problem. Using the lubricant and brushing out several times was not sufficient to get the weldnuts clean enough. The good folks at the auto parts store listened to the description of the issue I was facing in this installation project. The gentleman helping me said something like, "It sounds like you need to chase the threads to clean them out. We have a thread restorer kit in our tool loaner program." (see two screen shots from their website). I knew what a tap was, but hadn't heard of a thread chaser. I was able to use the thread chaser to clean out all of the junk built up in the weldnuts. In my case, this was a major project as they were in bad shape. I was also being cautious as I didn't want to mess up the threads. Some of the weldnuts required me to go part way in with the thread chaser, bring it out and clean it, relubricate the weldnut and chaser and go again several times. Some of the weldnuts were less problematic. In short, if you run into this issue, see if you can borrow this kit. The thread chaser is designed to be used with a socket and socket wrench. Always start the thread chaser by hand to ensure it isn't cross threaded. Once you're certain it's in the correct way, start slowly with the socket wrench or a drill with socket adapter. The instructions that come with your hitch will provide the specs on the bolts. In our case it the bolts were M12 x 1.25 (I think M12 has to do with the diameter of the bolt and 1.25 refers to the thread pitch (or spacing).
3) Torquing the bolts to spec. The bolts are in an awkward place to work with and torquing them to specification can be a challenge. The Rav4 process went well and I was able to complete this step on my own. Perhaps I was worn out while working on the Sienna or having trouble with the torque wrench, but I finally gave up to seek help. I didn't want to break the bolts! I ended up stopping by the shop which services our vehicles and they torqued to bolts to spec. Because we take our vehicles there on a regular basis, they didn't charge me to take care of the 6 bolts.
In conclusion, if you prepare for the install by getting everything ready and your weldnuts are in good shape, this is not a difficult installation project. One of our hitches had 6 bolts and one had 5 bolts. Not rocket science. If your weldnuts are full of junk, try the steps I've mentioned above. Good luck.
We decided to order from Etrailer because of all the great reviews we read about the quick shipping, great customer service and product quality. We wanted a hitch for my 2016 Toyota RAV4 and it was easy to find the exact one that works for the model I have. Our order shipped quickly and arrived within 4 days. We watched the video ahead of time and also used the directions as a reference when needed. The install was easy and the hitch works perfectly for the bike rack we bought for it! Excited for future biking adventures with our new hitch!
I am pleased with our Draw-Tite MaxFrame 75235 trailer hitch, as of current we are only using it for the bike rack and hitch rack. Plans for a small tent trailer in the works and confident it will meet expectations. Install was very easy and instructions were straight forward. 2016 Toyota RAV4 Hybrid
It took some time to find all the tools (realized after I finished installation that this website provides alternate suggestions instead of purchasing an ‘exhaust removal plier’).
After having all the sockets and pliers ready, the instructions are clear on what needs to be done. If you’ve never touched a car part, change your own oil, or seen a mechanic take a part some portion of your vehicle, I suggest you get your car and hitch to a professional.
It took myself and two other friends to help me to life the hitch and install the bolts (included in box) into the sockets. It takes some thought to make sure you’re holding up the hitch correctly, but what you get in the box prepares you well to complete the installation. The hitch is strong and heavy, so some help goes a long way to install this in less than an hour.
I’m very happy with how it looks and how the instructions helped me install the hitch below my 2016 RAV4 and I look forward to using the hitch for some additional storage or bike rack.
Like many other reviews state, the holes did not all line up with my vehicle. (see photo) I had to attempt to install and remove the hitch three times, using a hydraulic jack and some 2x4’s to spread attachment points apart about half an inch to get all the holes to finally line up. It would seem they just slap these together and throw them out the door with zero quality control.

Victoria B.
12/6/2019
Trailer hitch manufacturers construct hitch arms out of a mild steel, which allows the hitch to flex. This is important so that the hitch can move with the rest of your vehicle without the steel cracking and compromising the integrity of the hitch. Because of the design, the hitch arms can also flex a bit in shipping and warehousing. Using a jack and some wood pieces is a great way to correct the flex in a trailer hitch. I have linked a help article with some additional tips.
Helpful Links
I needed a hitch receiver from my rav4 with only a couple days left before my trip. Adam from etrailer got me set up with exactly what I needed, and got it shipped to me very quickly.
Any items I've bought from etrailer have always been quality, and no exceptions with this hitch receiver. Installation was fairly simple (I did it by myself, and without lifting the vehicle). The videos explaining how to install with every single year model of the rav4 so you can know exactly what to do.
Etrailer customer service is the best I've seen from ANY company, and their website is top notch.
The trailer hitch was really easy to install- it took me and a friend about 15 minutes to put it in place. It was a little unwieldy for one person due to size and weight, but didn't require any special tools to install it other than a socket wrench and torque bar. I bought the hitch to install a bike rack on my SUV.
Info for this part was:
At etrailer.com we provide the best information available about the products we sell. We take the quality of our information seriously so that you can get the right part the first time. Let us know if anything is missing or if you have any questions.


Tommyb
6/28/2018
Thanks for the follow up. Ive since traded that vehicle in and got a truck with a factory hitch. I was, and still am very happy with my experience with etrailer and will use your business again in the future.