
Summer Starts Here - Save up to 70%
To see if this custom-fit item will work for you please tell us what vehicle you'll use it with.
Thank you! Your comment has been submitted successfully. You should be able to view your question/comment here within a few days.
Error submitting comment. Please try again momentarily.
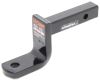
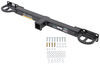
This fully welded, corrosion-resistant vehicle trailer hitch receiver is perfect for your light-duty towing needs. Draw-Tite's Tested Tough guarantee ensures that this hitch exceeds industry standards. Drawbar sold separately.
Features:
Specs:
Draw-Tite's Tested Tough program provides testing standards far superior to those outlined by the Society of Automotive Engineers (SAE), the go-to source for engineering professionals.
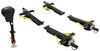
Each Draw-Tite trailer hitch receiver undergoes extensive fatigue testing and static testing with the ball mount that is either supplied or recommended for use with that particular hitch, thus ensuring results that are applicable to real life use. Fatigue testing is also conducted on hitches rated for use with weight-distribution systems.
In addition, Draw-Tite performs static testing on a simulated automobile, as opposed to the rigid fixture used for SAE testing, resulting in a more true-to-life scenario.
At etrailer.com we're committed to the products we sell, and to our customers. Our experienced and knowledgeable staff are available via both phone and email to address your questions and concerns for the lifetime of your hitch. The technicians at etrailer perform hitch installations on a daily basis, making them a valuable resource for do-it-yourselfers. The one-on-one, personal service you'll receive comes straight from an expert in the towing and automotive field. We've installed it, we've wired it and we've towed with it, so whatever your question, we can answer it.

California residents: click here
Videos are provided as a guide only. Refer to manufacturer installation instructions and specs for complete information.
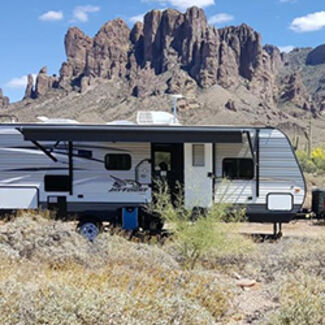
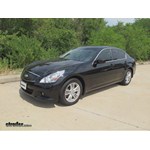
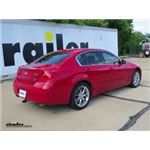
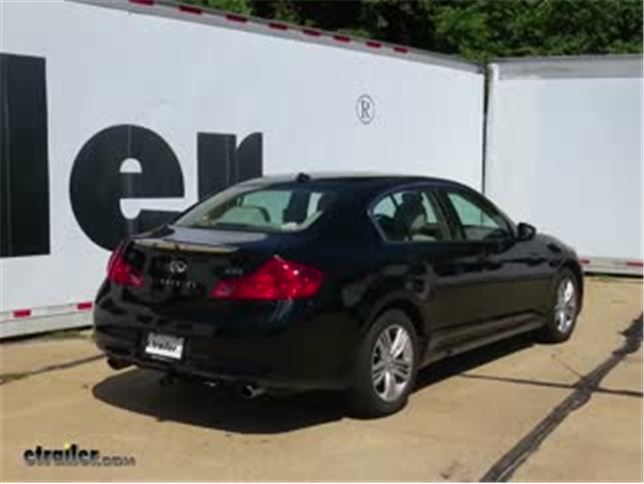
Today on our 2013 Infinity G37, we're going to review and install the Draw-Tite Class I 1-1/4" receiver hitch, part number 24831. This is a light-duty hitch. A couple of examples you would use this would be a really small trailer, maybe 4' x 6' size, or a two-bike rack setup. Right off the bat, you can tell that there's not much sticking out. Everything is mostly hidden behind the bumper. This is going to be our 1-1/4" opening right here.
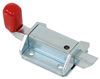
Very simple tube design with a ring-style safety-chain loop right here. This will work with a wide-variety of safety chain links that are out there. This uses a 1/2" hitch-pin hole, so we use a 1/2" diameter hitch pin or your favorite locking hitch pin. Also, there is a little safety design feature built into the hitch. If we look down into the center, there's a little punch right here.
This keeps you from accidentally putting in Class II accessories or ball mounts, which are rated for higher than what the hitch can handle. Our hitch is rated for 200 pounds of tongue weigh, which is the weight that is pushing down on the hitch, and 2,000 pounds of pulling weight. You also want to double check with your owner's manual to figure out exactly what your vehicle's capable of pulling and carrying. Next, we'll go ahead and give you some measurements that will help you at selecting some of those accessories, such as a bicycle rack or a cargo carrier. From the center of the hitch-pin hole to the outside edge of the bumper will be about 2-1/8". From the top of the receiver opening down to the ground will be about 11-1/2". Now we'll go ahead and show you how we installed the hitch. Our first step is to go ahead and actually mark the bottom edge of our license plate and the frame.
We need to do this because we're going to drill two holes behind the license plate, and we need to make sure we don't come down too low and that the license plate doesn't hide them. To help us do that, I'm just going to use some painter's tape. You can use electric tape, but, of course, it wouldn't show up on our black vehicle. That'll be my mark. Now we can go ahead and remove our license plate. Now we'll go ahead and drill out our holes.
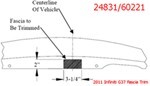
Our hitch is going to line up with this bolt here and the one down here. You can peel this back a little bit and give you a general idea where the hole's at. It's going to be a straight line down from here, and it's going to be above our tape here. We can just line it up. I'm using a step bit, but you can use a hole saw or use a 3/4" drill bit to make your access hole. You want to make it big enough to where you can install this piece of hardware, eventually, inside there. We're going to repeat this same process for a hole that'll be located right here. Now let's go underneath the vehicle. We have to remove this panel right here for now. We'll go ahead and remove two plastic push-pin fasteners here, and there'll be some hardware that we'll use the 10mm socket on to remove elsewhere on the panel. To remove our plastic fasteners, put a flat-blade screwdriver in the notch, kind of twist it and work out the center. Then you can grab the center and pull it out. Now we need to go underneath the vehicle and do some trimming here. We need to find the center of the vehicle and the bumper fascia. Basically, I just slide down the center of the license plate here and on down and made me a mark. We need to make a cut a little over 3" wide. Actually, the wider the better, because there may be some variance in the body work. I'm just going about 1-1/2" on both sides. Then we need to go up 2", which is just right below this edge right here. This is on the very bottom, so, unless you crawl underneath the vehicle, you really won't see this. You can cut this using a razor knife with a fresh blade. We'll go ahead and score it. I'm going outside my lines, so this'll be a little bit bigger than what's specified. It never hurts to have a inaudible 00:04:28 working room. Then we'll keep increasing the pressure until we cut through. With some good tin snips, you can accomplish the same thing. Actually scoring the plastic and then going back with the tin snips works out really good too. Once that's scored, we can flex it up and break the plastic. Let's move back up to the center of the bumper, and let's go ahead and remove these four bolts. We'll be using a 12mm socket. Now this plate can be removed. On some models, you'll find out that actually the top edge here is actually welded in place as well. Very easy to break lose if you have to. The bottom's always loose, so you pull out the bottom, work it back and forth until the welds break. You'll probably have to pull the bumper cover back a little bit to give you some more working room. On this one, we didn't have to worry about that. We'll just lower it out of the way and out the bottom. Now we can go ahead and install our hitch. This whole assembly right here will fit up behind the bumper cover here, and also this will use part of a tow hook. If we look here, it'll sit on top of the tow hook, so it'll be in the proper spot. We'll pull back the bumper cover and work it into place. As you put it into place, you want to make sure this crossbar fits over this tab. It kind of gets in the way a little bit as you put it up in there. While we're here, let's go ahead and put our hardware onto the tow loop here. I want to take the body carriage bolt that comes with the hitch. We're going to drop it through the hitch and down like that. It'll fit into the square. We'll push that on down through the tow loop, then we'll add the provided block, lock washer, and nut. This is all 1/2" hardware. Now we'll go ahead and install the rest of the hardware that comes with the hitch. This bolt we showed you earlier will go through this hole and through the top here as well. This will require a 13mm socket to help guide it into place. We'll lift the hitch up. You want to loosely install all four of these bolts. With all the hardware loosely installed, take a few moments to make sure it fits the way you want it. You have a little bit of movement left and right but not much. We'll go ahead and hand tighten the bolts. Then we'll torque the bolts down as specified in the instructions. Now I can move on to reattaching our appearance panel on the bottom here. This will require some trimming, so the best bet is to just to go ahead and hold it up into place as close as possible. We'll line up this hole with the preexisting hole here, and we can see what we need to trim out. We just make a mark right here to leave this tab, come down a little bit and over clear to the back side of the hitch, and back up. This will give us a rough idea. We'll cut it out and make another test fit if we need to make any more alterations. We'll use the tin snips one more time. This is on the bottom, so we don't have to worry about the cut being all that clean. Once you're satisfied with the cut you've made, then we'll go ahead and just slip it back underneath this part here and reinstall the original fasteners. That'll finish it for Draw-Tite Class I 1-1/4" receiver hitch, part number 24831, on this 2013 Infinity G37.
Average Customer Rating: 4.7 out of 5 stars (62 Customer Reviews)
This fully welded, corrosion-resistant vehicle trailer hitch receiver is perfect for your light-duty towing needs. Draw-Tite's Tested Tough guarantee ensures that this hitch exceeds industry standards. Drawbar sold separately.
So well designed and engineered.Instructions and video make the install confident and a breeze to complete.I use it for my Rockymount bike rack to haul the 70 pound Rad Rover 6 Ebike with a 2012 Infinity G-37. Can't imagine Nissan considered mounting a trailer hitch to this car but it works perfectly and is very unassuming. What it would have cost to have a hitch installed, and the price and installing it myself has to be considered. Etrailer has figured it all out.
Installed on a 2008 G35x Sedan: Installation was easier than I expected, took about 1 hour total.
Product feels Solid and is not too noticable when installed. I'm no real handy man but was able to to get this installed pretty quickly.
Be prepared to make some minor cuts to the plastic bumper panel, two holes behind the licence plate to access the bolts which fasten the hitch and a 3.5" x 2" cut underneath where the hitch reciever extends from. I found a dremel worked perfectly for making the cuts. I also used painters tape to ensure I didn't drill beyond where the rear plate would cover.
Thankfully, no other drilling or cutting is required as the holes for the bolts already exist on the bumper frame.
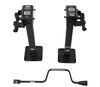
Simply remove an aluminum spacer from the bumper frame by removing the 4 bolts pictured, slide the hitch up through the bottom and place the aluminum spacer back over the hitch. Use the bolts that came with the hitch as they are much stronger than the pre-existing bolts, and your done!
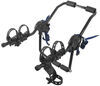
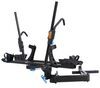
*Shown with a Thule Doubletrack Platform-style 2 Bike Rack For 1-1/4 & 2" Hitch recievers
This went on our 2012 Infiniti G37x pretty easily. I haven't actually mounted the bike carrier on it yet, but I was happy that the installation went pretty smoothly.
I put a horizontal piece of painters tape along the bottom of the license plate before I took it off so I would be sure not to extend the holes too far down such that they would be visible. This added an extra bit of confidence the process.
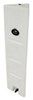
The instructions don't give specific locations for holes to drill to access the lower bolts that you have to remove. See the attached pictures: the hole on the left was placed better than the hole on the right. If doing it again, I'd aim for the center of the holes to horizontally align with the bottom edge of the rectangular dimple in the bumper fascia. Vertically the holes alight with the bolts that are visible when you remove the license plate. I'd also use a 7/8" or even 1" bit: the 3/4" hole was a bit tight for my sockets. That combined with being off just a little bit on the right hole meant that I had to extend the right hole a bit with a utility knife.
I cut the bumper fascia and the under tray with my Sonicrafter, which made it super quick and easy. You could do it with a utility knife but it definitely would be more work.
The other trick I did was that I used a bit of double-sided tape to stick the aluminum fascia support to the hitch while getting the whole works wedged into place. That's the only somewhat difficult part: you have to pull back on the fascia while maneuvering the combination of the hitch and support plate into place. An extra set of hands would have been useful, but I managed it by myself. Just be careful to not pinch your fingers between the fascia and the hitch like I did.
Trimming the under-tray is required and some idea of the right cut-out would have been helpful, but was not present in the instructions. See the attached photos to get an idea of the area I cut out. It's a little bigger than need be, but not by too much.
I'm a little concerned that the hardware (bolt, nut, washer, plate) for attaching the hitch to the tow loop is bare steel. Maybe it's really stainless steel and will be fine, but I'm considering spraying it just to help keep it from becoming a mass of rust. Sprayed black, it would blend in better under the car too as it is visible from the rear.
All done, none of the trimming is visible, and the hitch seems like it belongs there.
Easy install, fits perfect. I've installed several hitches that attach to the chassis, but this design is much easier to install by yourself without a lift. Have yet to actually set up my rack but don't see any foreseeable issues.
The hitch fits well and is barely noticeable on the car. Installation was easy after watching the install videos on the website. I decided to remove the rear bumper for the install so that I only needed to trim the bottom of the bumper cover and the plastic shield underneath the spare tire well. I also took a page from other reviewers and painted the bolt and silver tab black before installing. I'm looking forward to using a bike rack to haul my bike around and, in time, using a cargo carrier. The hitch will expand the usefulness of my car.
Working well with the Curt 2 Bike Platform Rack. Easy installation given the great video instructions! Pleasantly surprised it arrived early.
Installation video was great but the bolts were a bit different than the ones in the instructional videos. Had to do additional cuts but everything worked. Paired it with a 2 bike rack all for under $150 for my specific car. Fast shipping and great deal!
Installation video and written instructions made install a snap. Very solid / secure mounting.
I was able to install the hitch this weekend and am very happy with the look of the final product on my car. It's understated yet gets the job done. Installation was super straight forward and now I can finally haul my bike with me.
I was pleased with how easy this was to install in my driveway. In total I spent only about an hour for both the hitch and the wiring harness. The instruction video on your website was Very helpful. Shipping took less than a week. Super excited to be able to pull my jetski in the comfort of my Infiniti G 35 and not have to use my old truck anymore. The price was also good, and thank you for the free shipping!!

Bryan

1/19/2018
Everything still works great. Very happy with my purchases
Worked great on my 2013 Infiniti G37xS Sedan. Took me under an hour to install (while watching videos), and works great. My main use for the hitch receiver is a bike rack, but I have also used it to pull a small trailer.
Naveed
5/23/2022
After a year, its continued to work perfectly with no issues on the installation or the quality of the product. Would once again give it 5 stars for the capability it added to my sedan.
As always, it is a pleasure to do business with you. The hitch arrived in great shape and the shipping time was fantastic.
The hitch itself was easy to install, and your video of an installation of this hitch was well done and a big help.
The only thing that could have made this installation easier would be a hoist!
THIS WORKED WELL. I USED IT FOR A BIKE RACK WITH TWO BIKES.
Fit easily on my 2008 Infiniti G35X. No issues other than with the car itself (it's a bit rusty from age). The installation video was invaluable for installing the hitch - everything worked exactly how they said it would. Would absolutely recommend this part and anything else from etrailer.

Phil M.
7/14/2020
Still working great! The action on everything isnt quite as smooth as when it was brand new but I can easily attribute that to the dirt buildup on it. Everything still seems solid and I use it multiple times a week.
the hitch it self is good and sturdy but when I went to torque
the bolts one of them snapped. So I didn't trust the rest of them so I had to remove the bumper and drill out the the broke one and did the same with the rest of them and put bigger bolts to hold on the hitch. Nice hitch, sucky bolts. I haven't wired it up yet because I ran out of time removing the bumper and drilling it out and going to the hardware store getting new bolts and washers and nuts. But I will let you know how it goes when I'm done.

Jenny N.
3/17/2022
It is not typical that the hitch bolts will break however if the hardware does need to replaced you will want to make sure that it is grade 8 hardware that is being used.
I bought this for a 2010 Infinity G37x. I bought it to put a bike wrack on because I was moving from Chicago to Seattle, and I drove the whole way with a bike wrack and 3 bikes. It held up well, and was pretty easy to install.
A helpful note for other G37 owners. This applies EXCLUSIVELY to the 2010 variant of the G37(x) sedan. If you wanted the nice trailer hitch installation video they have here (which was very helpful), you'll notice the hitch gets bolted on between the bumber and a block of metal. In the video (w/ a 2011 G37) the metal piece just comes right off. However, if you have a 2010 G37, that piece is welded on at the top. This was very challenging, but there is a trick to removing it.
Since it is only welded at the top, you can pry the bottom away from the bumper frame. After very little prying, the weld will snap off clean. And you will have the piece separate just like in the video. Don't waste time trying to remove the weld, just pry it off. I used a hammer and a wooden doorstop wedge that I pushed in after using a flat head to give myself a bit of space. After I pried it past an inch of separation or so, it became weak and a few times back and forth and it came right off. I hope this helps someone, because it was a nightmare for me at the time, and it was hard to pinpoint any good info on this because most of the reviews I read were from post 2010 G37 owners and they never mentioned anything about it being welded.
This hitch fit my G37 perfectly, the 'how to install' video was super helpful. It was just a bit involved as I had to grind through a weld to remove a plate but it was pretty simple and felt good to accomplish. I've used this hitch exclusively for my Thule bike carrier and it's been flawless.
This trailer hitch is relatively easy to install as long as you have a couple of additional instructions. Make sure you have a 3/4" or 7/8" hole-boring drill bit. This is the easiest and most professional way to drill the two holes you need to access the two bolts that are hidden under your license plate. Mark the bottom edge of your license plate before you remove it with a pencil and drill these two holes just above that line to ensure that they will be completely hidden when you replace the plate. For cutting the 3-1/4" X 2" piece of the lower trim, I suggest you take a piece of masking tape to mark a straight line between the center of your license plate and the center of that place on the trim. Mark the center and then put rows of masking tape that cover more than the area to cut so you have a mark-able surface to trace out the piece to be removed. Mark the 3-1/4" x 2" (actually doesn't need to be quite 2"...could be 1-3/4" to make a closer fit). Double check all measurements and then carefully cut out the trim. I also suggest using a multi-tool (which can be found at Harbor Freight for about $30) to cut this piece out as it vibrates instead of reciprocates...giving you much better control to make a factory-like cut. Ok...those are my two tips. Overall good and looks nice once installed.
This turned my G37 sedan into the Bike hauling vehicle I needed. I carry two bikes on a Kuat rack using this hitch with an average weight of 60lbs total.
Instillation was easy as I did it myself. Took about an hour start to finish. I was also able to install it with the car still on the ground!
The etrailer website made it fast and easy to identify this hitch for my car. Tamara and George were helpful by phone and email to verify items in stock and whether expected delivery date would meet my need. Everything I ordered arrived quickly in good shape. I watched the etrailer installation video twice, then installed my hitch myself in about 40 minutes. It was easy to do on the ground, no lift needed. I do still need to take it to my local mechanic to torque the bolts properly before use since I don't own a torque wrench. The hitch itself is as expected, the etrailer experience was a cut above most online buying experiences. I'll be back for more. Thanks!
This hitch was a 'snap' to put on - except that the factory had spot welded the aluminum facia support to the aluminum bumpser in 3 spots on the top. By prying the support away from the aluminum internal bumper and moving it back and forth 3 or 4 times, I was able o break the aluminum welds and remove the support plate - then reinstall with the hitch bewteen the Facia support and bumper.
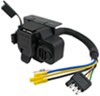
I haven't installed the wiring yet and am dissapointed to know that I need to run a + and + wire all the way to to the battery under the hood. Seems there should be a 'hot' wire in the trunk or below the trunk where the fuel pump wires are ?
Bought this to tow my trailer and a small boat. Installed very easily, just exactly like the directions said. Fit like a glove. Hard to find a hitch to fit a G35 but this one did.
This hitch gets 5 stars from me because of the tremendous customer service that I got from etrailer.com. I received an email right after ordering notifying me that shipping had been upgraded at no additional cost to me. Then AFTER I had received the package, I got ANOTHER email from etrailer linking me to information about the product as well as a video on how to install the hitch ON MY CAR!!! Tremendous customer service and communication. Thank you for making the video because THAT is what made the installation easy.
I have to say that I'm glad that etrailer sent me these emails because their installation video is what I used to install the product. The instructions that the manufacturer included with the product were pretty horrible. It broke down to one page and nothing was in any logical order. It was etrailer's video that made it clear what was to be done. Again, kudos to etrailer.com!!!
On to the product. It looks like Draw-Tite makes a solid product. The weight indicates its sturdiness, build quality is high, and everything lined up perfectly. No extra cutting or wallowing was necessary. I installed everything at right at an hour, and that included having to mess with the stupid Infiniti fastening clips on the bumper fascia. They actually wasted my time.
Overall I'm happy with the receiver and its solidness, but I'm even more happy with the customer service I got from the guys at etrailer. WOW!
Trailer hitch for 2007 Infiniti G35 SedanLet me start by saying that the customer service and fast shipping by etrailer.com is outstanding. The installation instructions were great and the fit and alignment of the hitch to every hole was perfect. I was a little concerned about having to cut a piece from the actual bumper, but the piece to be trimmed is not visible and by being careful and trying the hitch for fit as the cuts were being done, made for pretty much a "factory look".
I use the hitch to mount my bike rack and have not had a problem.
This is my second hitch purchased from etrailer.com and I recommend them all the time.
Do you have a question about this Trailer Hitch?
Info for this part was:
At etrailer.com we provide the best information available about the products we sell. We take the quality of our information seriously so that you can get the right part the first time. Let us know if anything is missing or if you have any questions.


Scott C.
6/3/2015
It carried the bikes around just fine last year. I confess I havent actually had to use it yet this year but will be shortly.