
Curt Trailer Hitch Receiver with Standard Drawbar - Custom Fit - Class II - 1-1/4"
(1 reviews)
Price: $265.91
Curt Trailer Hitch Receiver with Standard Drawbar - Custom Fit - Class II - 1-1/4"
Item # C121153
Retail:$444.95
Our Price: $265.91
You Save: $179.04


- All Info
- Reviews (1)
- Q & A (0)
- Videos (3)
- Photos
CURT Trailer Hitch - C121153
- 1-1/4 Inch Hitch
- Class II
- 3500 lbs GTW
- Concealed Cross Tube
- CURT
- 350 lbs TW
- Custom Fit Hitch
Perfect for light-duty towing, this custom, vehicle trailer hitch receiver features fully welded, gloss powder coated steel construction. Standard drawbar included.
Features:
- Custom fit is designed specifically for your vehicle
- Precision, robotic welding maximizes strength and improves fit
- Bolt-on installation - no welding required
- Complete hardware kit and installation instructions included
- Lifetime technical support from the experts at etrailer.com
- Gloss black powder coat finish over protective base coat offers superior rust resistance
- Sturdy, square-tube design
- Standard drawbar included
- Pin and clip sold separately
- Assembled in the USA
Specs:
- Receiver opening: 1-1/4" x 1-1/4"
- Rating: Class II
- Maximum gross trailer weight: 3,500 lbs
- Maximum tongue weight: 350 lbs
- Limited lifetime warranty
etrailer.com Technical Support
At etrailer.com we're committed to the products we sell, and to our customers. Our experienced and knowledgeable staff are available via both phone and email to address your questions and concerns for the lifetime of your hitch. The technicians at etrailer perform hitch installations on a daily basis, making them a valuable resource for do-it-yourselfers. The one-on-one, personal service you'll receive comes straight from an expert in the towing and automotive field. We've installed it, we've wired it and we've towed with it, so whatever your question, we can answer it.
12115 Curt Class 2 Trailer Hitch Receiver
45017 Curt Standard Ball Mount - 6-1/4" Long
Replaces 120873 and 120903
Installation Details


Video of Curt Trailer Hitch Receiver with Standard Drawbar - Custom Fit - Class II - 1-1/4"


Videos are provided as a guide only. Refer to manufacturer installation instructions and specs for complete information.


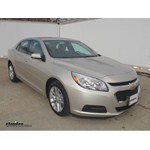
Video Transcript for Trailer Hitch Installation - 2014 Chevrolet Malibu - Curt
Today on this 2014 Chevrolet Malibu, we're going install part number, C12115 from Curt. All right, this is what the hitch looks like once installed on the car. Next, we'll give you some measurements to help you out in selecting some accessories, such as a bicycle rack or a cargo carrier. From the receiver opening down to the ground will be about 11 inches. From the center of the hitch pinhole to the edge of the bumper will be about 3 inches. Now we'll go ahead and show you how the hitch is installed. We're going to remove a bolt on our exhaust hanger bracket, this vehicle is only a single exhaust so just remove the one bolt on the driver's side. Then the bolt on the other side will help hold the exhaust up.
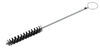
On the passenger side there's not a bolt to remove. But on that side we do have to use the hex nut that's welded in place - clean up the threads first. You'd want to use your favorite spray lubricant and then a tube brush, like part number 814092. We'll check to make sure that the bolt threads in, in this case we dont have a problem with it, but the older the vehicle is, the more dirt and debris will collect in the threads and you'll have to clean it out. We'll go ahead and show you how to hardware this before we install it.
We have our bolt and our lock washer, it will go through a bracket and then that bolt will eventually go through the frame assembly and then handle nut will go on the other side and on the inside of the frame assembly. Let's go ahead and take it apart, and go ahead and put it in place on the frame. You want to get an extra set of hands to help hold it up. The hitch will mount on the backside of the end panel, or in other words, it's going to sit over the nuts that are welded in place. We'll take our conical toothed washer and nut and run through the hitch and then through the nut. Now on our driver's side we'll go ahead and install a new nut on the other side of the bolt.
Again we want to leave this where we can move the hitch, front to rear and rock it back and forth. Okay, now there's a bracket that attaches to the suspension sub-frame, it reaches underneath the exhaust. We have our bolt and our lock washer, it'll go through our bracket, and then that bolt will eventually go through the frame assembly, then the handle nut will go on the other side. Let's go ahead and take it apart, and go ahead and put in place on the frame. Take our bolt and our lock washer with our bracket, through our frame and then into the handle nut.
Again we'll leave everything loose. Now we'll install our center section. We'll go ahead and take our hardware, which will be a carriage bolt and we'll go ahead and push it through. Then underneath we'll get the flanged nut. We'll do these one at a time working our way around, until we have all the hardware loose and installed. Now to help us line up the holes we're using our alignment tool to help get the rest of our hardware in, this is where it pays off to make sure you have everything as loose as possible to help line up the holes. Now with all our pieces installed and our hardware loose and installed, we'll go ahead and tighten down the bolts, take up the slack. We'll start off with the small bolts on the end of the frame. We'll tighten down the bolts first. As added security, we'll go ahead and torque down the nuts on the other side. Then our four carriage bolts in the middle of the hitch, we'll go ahead and tighten down those. Then our bolts going to our hanger bracket, and the bracket going to the sub-frame of the suspension. Then we'll torque the bolts down as specified in the instructions. Okay, with that and our hardware fully installed, that'll finish it. There you have it for part number, C12115 from Curt, on our 2014 Chevrolet Malibu. .
Customer Reviews
Curt Trailer Hitch Receiver with Standard Drawbar - Custom Fit - Class II - 1-1/4" - C121153
Average Customer Rating: 4.0 out of 5 stars (1 Customer Reviews)
Perfect for light-duty towing, this custom, vehicle trailer hitch receiver features fully welded, gloss powder coated steel construction. Standard drawbar included.by: Bill M.09/13/2019
Installation was straight forward and hitch preformed well. Trailer wiring was easy.
Both fit my Canadian model Malibu LT with out any problems.
Hitch doesn't snug up under the car quite as well as I would have liked.
When you look at my car you definitely know there is a trailer hitch on it.
1
1
See what our Experts say about this CURT Trailer Hitch
Info for this part was:

Video Edited:
Zack K

Video Edited:
Jacob T

Video Edited:
Chris R

Written by:
Lindsey S

Expert Research:
Michael H

Updated by:
Laura H

Updated by:
Wilson B

Updated by:
Kristina F

Updated by:
Isabelle B
At etrailer.com we provide the best information available about the products we sell. We take the quality of our information seriously so that you can get the right part the first time. Let us know if anything is missing or if you have any questions.
Product Experts Available Now!
Call 1-800-940-8924
Thank you! Your comment has been submitted successfully. You should be able to view your question/comment here within a few days.
Error submitting comment. Please try again momentarily.