
Curt Trailer Hitch Receiver with Standard Drawbar - Custom Fit - Class II - 1-1/4"
(3 reviews)
Price: $207.13
In Stock
Curt Trailer Hitch Receiver with Standard Drawbar - Custom Fit - Class II - 1-1/4"
Item # C121083
Retail:$328.95
Our Price: $207.13
You Save: $121.82
In Stock
Thank you! Your comment has been submitted successfully. You should be able to view your question/comment here within a few days.
Error submitting comment. Please try again momentarily.


- All Info
- Reviews (3)
- Q & A (0)
- Videos (3)
- Photos
CURT Trailer Hitch - C121083
- Class II
- 1-1/4 Inch Hitch
- 3500 lbs GTW
- Visible Cross Tube
- CURT
- 350 lbs TW
- Custom Fit Hitch
Perfect for light-duty towing, this custom, vehicle trailer hitch receiver features fully welded, gloss powder coated steel construction. Standard drawbar included.
Features:
- Custom fit is designed specifically for your vehicle
- Precision, robotic welding maximizes strength and improves fit
- Bolt-on installation - no welding required
- Complete hardware kit and installation instructions included
- Lifetime technical support from the experts at etrailer.com
- Gloss black powder coat finish over protective base coat offers superior rust resistance
- Stylish, round-tube design
- Standard drawbar included
- Pin and clip sold separately
- Assembled in the USA
Specs:
- Receiver opening: 1-1/4" x 1-1/4"
- Rating: Class II
- Maximum gross trailer weight: 3,500 lbs
- Maximum tongue weight: 350 lbs
- Limited lifetime warranty
etrailer.com Technical Support
At etrailer.com we're committed to the products we sell, and to our customers. Our experienced and knowledgeable staff are available via both phone and email to address your questions and concerns for the lifetime of your hitch. The technicians at etrailer perform hitch installations on a daily basis, making them a valuable resource for do-it-yourselfers. The one-on-one, personal service you'll receive comes straight from an expert in the towing and automotive field. We've installed it, we've wired it and we've towed with it, so whatever your question, we can answer it.
12108 Curt Class 2 Trailer Hitch Receiver
45518 Curt Standard Ball Mount - 6-3/4" Long
Replaces 120003
Installation Details


Video of Curt Trailer Hitch Receiver with Standard Drawbar - Custom Fit - Class II - 1-1/4"


Videos are provided as a guide only. Refer to manufacturer installation instructions and specs for complete information.


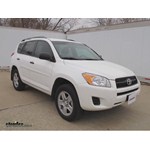
Video Transcript for Trailer Hitch Installation - 2011 Toyota RAV4 - Curt C12108
Today on our 2011 Toyota Rav-4 well be installing the Curt trailer hitch receiver in a Class II with an inch and quarter opening, part number C12108. Heres what the hitch looks like installed on our vehicle. Now well go ahead and give you a couple measurements in helping you choose some accessories for your hitch, such as a ball mount, a bicycle rack or a cargo carrier. From the center of the hitch pin hole to the outermost edge of the bumper is approximately three inches. Now youll notice that this vehicle has a spare tire on the rear hatch. From the center of the hitch pin hole to the outermost edge of the spare tire cover is a little over six inches.
From the top of the opening in the receiver to the ground is about 13 inches. Now lets go ahead and install our hitch. To start with well need to remove the tow hook located over here on the drivers side. To remove this tow hook well need to take out these two bolts here. We will not be putting the tow hook back up, nor will we be reusing the hardware.
Once we have the tow hook down and out of the way, then well need to remove a cover that covers another existing weld nut. To do this you can simply use a razor knife and cut the cover off. Its just a sticker that covers up the threads. The hardware that well be using then at these two locations to install our hitch will be an M-12 bolt and a half-inch conical tooth washer, making sure that the teeth face towards the hitch when installing. So well be using the rear most location and then the forward most location as our mounting locations.
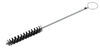
Over here on the passengers side well need to uncover both of the existing weld nuts that were going to be using. Theres actually a total of three over here, so well again use the rear most location and the forward most location. Youll simply just take your razor knife and uncover the existing weld nut. Now, if for some reason (02:00) the covers have already been removed from the existing weld nuts they might need to be cleaned out. To do this you can use a nylon tube brush, which is part number 814092 and a little bit of spray lubricant.
In our case, though, all of the existing weld nuts we're already covered up still, so all of our threads are clean.Next were going to need to remove the rearmost exhaust hanger that will allow the muffler to tilt down just enough to let us slide our hitch into place. To do this well use a large pry bar and a little bit of spray lubricant. Now that weve pointed out the two mounting locations over here on the passengers side, well again be using the M-12 hex bolts and the half-inch conical tooth washers on these two locations as well, so all four mounting locations will use the exact same hardware. Now well go ahead and raise our hitch up into place and well begin by putting one set of hardware in on each side to hold the hitch up. Once the hitch is held up into place we can go ahead and put the other two locations in. Well then center the hitch up and then tighten down the hardware. Once the hardwares been tightened down well then torque it to the manufacturers specification. Now that the hardwares been torqued to the manufacturers specification all thats left to do is put the exhaust hanger back on and were ready to go. That will complete our installation of the Curt trailer hitch, part number C12108 on our 2011 Toyota Rav-4 (04:00). .
Customer Reviews
Curt Trailer Hitch Receiver with Standard Drawbar - Custom Fit - Class II - 1-1/4" - C121083
Average Customer Rating: 5.0 out of 5 stars (3 Customer Reviews)
Perfect for light-duty towing, this custom, vehicle trailer hitch receiver features fully welded, gloss powder coated steel construction. Standard drawbar included.by: Joe Swider02/24/2014
The quality of the trailer hitch for my RAV4 is outstanding as were the people at etrailer that I worked with. The installation took about twenty minutes and I wasn't in a big hurry. Thank you etralier for a job well done.
Joe
by: Paul F03/11/2017
Bought two items for our Rav 4. Both did exactly what etrailer said they would...bolted right on, fit perfectly, good quality and great price. Very pleased. Thanks etrailer...job well done!

Paul F.

3/11/2018
Awesome trailer hitch. Simple to install, sturdy, and good quality. We use it for a bike carrier. Thanks for providing a product you said would perform.
by: ardell08/11/2014
The hitch fit perfectly although one of the holes in the frame of my Rav needed to be worked (repeatedly screwing the bolt in and then backing it out, applying wd-40 and oil each time) . Eventually I got it but this was no fault of the Curt trailer hitch which, again, fit perfectly. Thanks.
3
3
See what our Experts say about this CURT Trailer Hitch
Info for this part was:

Video Edited:
Zack K

Video Edited:
Jacob T

Video Edited:
Chris R

Written by:
Lindsey S

Expert Research:
Jameson C

Updated by:
Laura H

Updated by:
Wilson B

Updated by:
Kristina F

Updated by:
Isabelle B
At etrailer.com we provide the best information available about the products we sell. We take the quality of our information seriously so that you can get the right part the first time. Let us know if anything is missing or if you have any questions.
Product Experts Available Now!
Call 1-800-940-8924
Joe S.
2/24/2015
This is the way it is. Im old, handicapped and I have some health issues. I think it took me about twenty minutes to install this product. I have used the hitch to pull my fishing boat about thirty times and nothing came loose. The hitch preformed flawlessly. Thank you for a job well done Joe