
Perfect for light-duty towing, this custom, vehicle trailer hitch receiver features fully welded, gloss powder coated steel construction. Euro-style drawbar with 1-7/8" hitch ball included.
Features:
Specs:
Note: All non-trailer loads - bike racks, cargo carriers and so forth - should be supported with stabilizing straps. Failure to properly support these loads will void your hitch warranty from Curt.
At etrailer.com we're committed to the products we sell, and to our customers. Our experienced and knowledgeable staff are available via both phone and email to address your questions and concerns for the lifetime of your hitch. The technicians at etrailer perform hitch installations on a daily basis, making them a valuable resource for do-it-yourselfers. The one-on-one, personal service you'll receive comes straight from an expert in the towing and automotive field. We've installed it, we've wired it and we've towed with it, so whatever your question, we can answer it.

Videos are provided as a guide only. Refer to manufacturer installation instructions and specs for complete information.
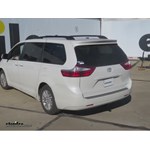
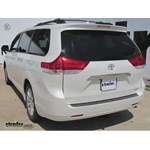
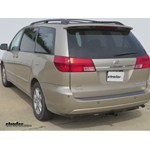
Today on our 2015 Toyota Sienna, we will be taking a look at and installing the Curt Custom Fit Class 2 Trailer Hitch Receiver, part number C12065. Here's what our Curt Custom Fit Class 2 Trailer Receiver Hitch is going to look like once it's installed on the back of the vehicle. It's going to have that rectangle tube design and it's going to be nice and sleek against the back end of the vehicle, curving back slightly at each end of the vehicle kind of with the curves and shape of the Sienna. Now, it's going to have that black powder coat finish that's going to help prevent any rust and corrosion. It's going to be a high gloss, so it's going to look really nice, as well as the fully welded design, it's going to add extra strength and durability over a long period. Now it's going to have that 1 1/4 by 1 1/4 receiver tube opening, offering a 350 pound tongue weight capacity and 3,500 pound towing capacity. That's going to be your trailer with all of your items on it. Located here is going to be a half inch pin hole that's going to be so you can attach all of our accessories.
Now that we've seen what it looks like, let's go ahead and get a few measurement and I'll assist you in selecting hitch accessories. From the top of the receiver tube to the ground is going to be about 10 7/8 inches. From the center of the pinhole to the outer most edge of the bumper, it's going to be about 3 1/2 inches. These measurements should assist you in selecting hitch accessories such as ball mounts, bike racks, and cargo carriers for your new Class 2 Receiver. Now let's go ahead and see how it's installed. First thing we're going to want to do is remove the under body panel. There's going to be some 10 millimeter bolts that we're remove first.
Now this panel will need to be trimmed and reinstalled later. Go ahead and remove the big Phillip screws next. These are going to be like big Phillips nuts that secure to studs in the bottom panel. Next we will have some push fasteners located along the front. Pop out the center and remove them.
I want to get those Phillips nuts one more time and we'll pull down as we're unthreading them to disengage them. We'll se the panel off to the side. Now we'll go ahead and take a little spray lubricant to lower down our exhaust. Where we're going to spray that lubricant is going to be on the exhaust hangers. There's going to be one located here on the end of the tail pipe. That spray lubricant will help to let it slide off easier.
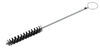
Go ahead and use a pry bar, just to peel them back. Once we have it slid back, we can go ahead and pull it down. Go ahead and repeat that on the other two up here. Just remove the one, right on the right hand side of our muffler. Now on the inside of the frame, we're going to see some covers. These are going to be some sticker covers that they have from the factory, and we're going to remove the back two, so this one here, this one here, and the very last one here down on the end. We'll leave this one in place. We'll take out these plastic plugs. We're just going to peel down and peel them out. These are going to be covering up our existing weld nuts in the frame, and if you don't have these, then make sure that you clean out your weld nuts before you get started. Using a wire brush or a tube brush. That way you make sure you get a nice clean connection. Now we'll go ahead and repeat the same process on the passenger side with the same attachment points. This is the hardware we'll use to secure our receiver hitch. We're going to have a bolt and a conicle tooth washer. Make sure that you have the conicle teeth towards the receiver hitch going through the receiver hitch and into the existing weld nuts located int he frame. Now we'll go ahead and get an extra set of hands to help us raise our hitch into place. We'll put one bolt in each side, just to hold it in place while we get the rest of the hardware in. Raise it up where you can see the existing weld nuts and attach them. Thread them in by hand first to make sure that you don't cross thread the weld nuts. Now we'll go ahead and attach the rest of the hardware. Now let's go ahead and tighten down our hardware. Now we'll torque them down to manufacturer's specifications. Repeat this on both sides. Now that we have it all torqued down, we'll go ahead and re-secure our exhaust. We'll start with that back hanger first, next to the muffler. If you need to, move it up again to assist you in sliding on the exhaust isolators. Also a good tool that might come in handy is going to be a large flat blade screwdriver. Now down here on the bottom side, you will have that plastic panel that we removed at the beginning. Now if you choose to, you can turn that to the instructions, or you can also choose to leave it off and return the full panel back to the customer or put it in your garage. That will do it for our review and installation of the Curt Custom Fit Class 2 Trailer Hitch Receiver, part number C12065 on our 2015 Toyota Sienna.
Info for this part was:
At etrailer.com we provide the best information available about the products we sell. We take the quality of our information seriously so that you can get the right part the first time. Let us know if anything is missing or if you have any questions.


Thank you! Your comment has been submitted successfully. You should be able to view your question/comment here within a few days.
Error submitting comment. Please try again momentarily.