


Perfect for light-duty towing, this custom, vehicle trailer hitch receiver features fully welded, gloss powder coated steel construction. Standard drawbar included.
Features:
Specs:
At etrailer.com we're committed to the products we sell, and to our customers. Our experienced and knowledgeable staff are available via both phone and email to address your questions and concerns for the lifetime of your hitch. The technicians at etrailer perform hitch installations on a daily basis, making them a valuable resource for do-it-yourselfers. The one-on-one, personal service you'll receive comes straight from an expert in the towing and automotive field. We've installed it, we've wired it and we've towed with it, so whatever your question, we can answer it.

Videos are provided as a guide only. Refer to manufacturer installation instructions and specs for complete information.
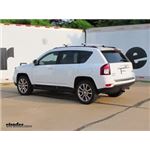
Today on our 2016 Jeep Compass we're going to take a look at, then show you how to install the CURT custom fit class two trailer hitch receiver. This offers the 1-1/4" by 1-1/4" opening. Its part number is C12057. Here's what our hitch is going to look like installed. As you can see, we keep most of our rear fascia appearance here. That crosstube's going to be completely hidden in behind there.
Really all we've got visual is going to be our receiver tube opening that's going to come out here to our 1-1/4" by 1-1/4" opening. You can see that nice flush-looking reinforcement collar here at the end. See it's tucked up underneath the rear of the bumper here so we're not going to have to really worry about hitting our legs on it or anything like that. Got the round steel stock-style safety chain connection points. Plenty of room there to make connections with. We're going to have our 1/2" diameter pinhole here on the side.
This is what we're going to use to attach all of our accessories. Now with this being a class two hitch, it's going to work out really well for just about any use. Towing capabilities are really good on it. Your bike racks, cargo carriers, things like that, they do design them for an 1-1/4". They'll go in there.
You won't have any problems carrying even some heavier loads with it. The tongue weight rating that the hitch offers is 300 pounds. That's the maximum downward force that we can put here on our receiver tube opening. It offers a 3,500 pound gross trailer weight rating. That would be the total weight of your trailer and anything that you we're to load up on it. Now it doesn't have a weight distribution rating, so if you're going to be using any of the cargo carriers or the bike racks, they do recommend that you use a stabilization strap.
If you're using a wheeled load, something like a trailer, that wouldn't be required. You do want to check the owner's manual on the Compass of course, see what it's tow ratings are. You will go off of whichever of those are the lowest. Now a few measurements that will come in handy when it comes to picking out your ball mounts, bike racks, or even hitch cargo carriers will be from the ground to the inside top edge of the receiver tube opening we've got about 14-1/4". Then from the center of our hitch pinhole to the outermost edge of our bumper it's about 6. Now to begin our installation we need to take out a small area of the fascia here just to allow for the shank of the hitch to rest in place there. We need to first mark our center, which is going to about 7" from the outside. Outside of these rivets, it's 14. If you split that, that's about 7. Then we're going to make our marks here from that center mark. We need to go about 2-3/4, so we'll be about 1-3/8" from each side here. Now we're going to measure up from this rear edge rearward here. We need to go 2-9/16", which is just about 1/16" past this bend. We're just going to use that bend for reference. Cut right along that edge. We can always take out more if we need to. Then we'll mark it out as squarely as we can for it being on a curved surface here. Now we'll begin trimming this out. Now we could always take out more, so we'll err on the side of too little first. Now we can use a razor blade here. You can also use a rotary tool to cut this out. It's just a pretty soft material, so it's easy enough to do by hand. Now as an option you can lower down the exhaust. I recommend doing it. It just gives you some extra room to work. Going to use a little strap to give us some support up here in the front. Then we'll remove a couple hangers here in the rear. Now here on the driver side it's up on the front corner of the rear exhaust section here. It's going to be on the opposite side or closer to the rear here on the passenger side. Little bit of spray lubricant there usually makes these pretty easy to pop off. Just a pry bar or a big screwdriver in behind them. That should be good. Now it's time to get our hardware pre-positioned. You can see we're going to take the long bolts we need to place a flat washer on. Then in our frame rail there are going to be holes that pass from the outside to the inside. Going to place a bolt in each one. You'll see where it comes out here in the inside of the frame rail. Then we're just going to push them back to where they're sitting even. We'll go over and do the same thing for the driver side. Those attachment points will be in the exact same location. Now we'll grab a 10mm socket, and we're going to just pull this heat shield down temporarily. It's held in place with four fasteners. We can set that aside. Now we're going to slide our hitch up into position, take that side plate and go right up through the opening that we created. We'll just rotate it up and in. Once we have it up in position, we're just going to slide our bolts in on each side. That will help hold it there for us. Looks like our cutout looks really good. You can see it clears just a little bit there. Sits right on top, and we're not really forcing the fascia up. I'd leave it right where it's at. It's time to grab our flange nuts and get those threaded on. Now the flange nuts are going to thread on the bolts on the inside of the frame rail here. Get that done on both sides, then we'll snug those down. Now as we snug these down we want to do it even from side to side. We're going to use a 19mm or a 3/4" ratchet and wrench. Now we'll look in the instructions there. We're going to see the torque specifications for our hardware. We want to get all of them torqued down appropriately. Get our bolts torqued down. Let's get our heat shield puck back into place. We want the edge that drops down to be over on the driver side. We can line up our bolt holes. We'll just push it back up on there. Then we'll resecure it with the nuts. Now we'll raise our exhaust back up. These hangers should slide back together pretty easily. If not, you can always spray them with a little more lubricant. Now we'll remove our strap. With our exhaust back in place, that completes the installation of the CURT custom fit class two trailer hitch receiver, part number C12057, on our 2016 Jeep Compass.
Info for this part was:
At etrailer.com we provide the best information available about the products we sell. We take the quality of our information seriously so that you can get the right part the first time. Let us know if anything is missing or if you have any questions.


Thank you! Your comment has been submitted successfully. You should be able to view your question/comment here within a few days.
Error submitting comment. Please try again momentarily.