
Curt Trailer Hitch Receiver with Standard Drawbar - Custom Fit - Class II - 1-1/4"
(4 reviews)
Price: $229.88
In Stock
Curt Trailer Hitch Receiver with Standard Drawbar - Custom Fit - Class II - 1-1/4"
Item # C120383
Retail:$367.95
Our Price: $229.88
You Save: $138.07
In Stock


- All Info
- Reviews (4)
- Q & A (0)
- Videos (2)
- Photos
CURT Trailer Hitch - C120383
- Class II
- 1-1/4 Inch Hitch
- 3500 lbs GTW
- Concealed Cross Tube
- CURT
- 350 lbs TW
- Custom Fit Hitch
Perfect for light-duty towing, this custom, vehicle trailer hitch receiver features fully welded, gloss powder coated steel construction. Standard drawbar included.
Features:
- Custom fit is designed specifically for your vehicle
- Precision, robotic welding maximizes strength and improves fit
- Bolt-on installation - no welding required
- Complete hardware kit and installation instructions included
- Lifetime technical support from the experts at etrailer.com
- Gloss black powder coat finish over protective base coat offers superior rust resistance
- Sturdy, square-tube design
- Standard drawbar included
- Pin and clip sold separately
- Assembled in the USA
Specs:
- Receiver opening: 1-1/4" x 1-1/4"
- Rating: Class II
- Maximum gross trailer weight: 3,500 lbs
- Maximum tongue weight: 350 lbs
- Limited lifetime warranty
etrailer.com Technical Support
At etrailer.com we're committed to the products we sell, and to our customers. Our experienced and knowledgeable staff are available via both phone and email to address your questions and concerns for the lifetime of your hitch. The technicians at etrailer perform hitch installations on a daily basis, making them a valuable resource for do-it-yourselfers. The one-on-one, personal service you'll receive comes straight from an expert in the towing and automotive field. We've installed it, we've wired it and we've towed with it, so whatever your question, we can answer it.
12038 Curt Class 2 Trailer Hitch Receiver
45503 Curt Standard Ball Mount - 7-13/16" Long
Installation Details


Video of Curt Trailer Hitch Receiver with Standard Drawbar - Custom Fit - Class II - 1-1/4"

Videos are provided as a guide only. Refer to manufacturer installation instructions and specs for complete information.


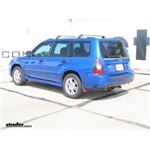
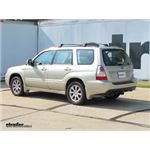
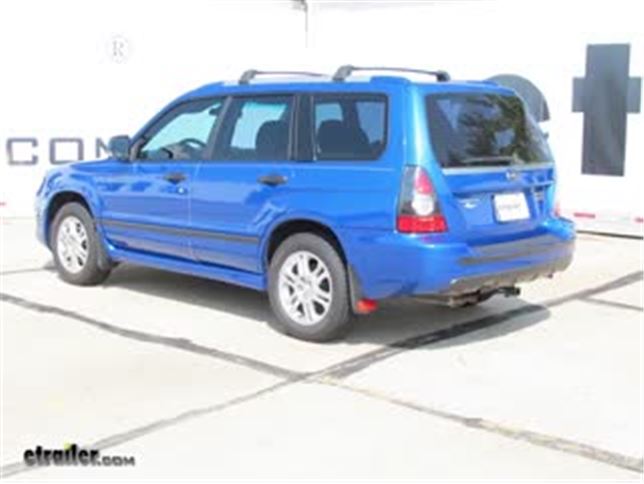
Video Transcript for Trailer Hitch Installation - 2008 Subaru Forester - Curt
Today on our 2008 Subaru Forester, we're going to take a look at and also show you how to install the Curt Custom Fit Class II Trailer Hitch Receiver, offering the inch and a quarter by inch and a quarter opening. The part number is C12038. This is what your hitch is going to look like installed on your vehicle. Got our cross tube, runs over. Now this attaches right into the frame bracket here. This is going to go up and over the exhaust. So it gives you a nice, clean look, and you see our inch and quarter by inch and a quarter receiver tube opening here.
Nice flush looking reinforcement collar around the end of it. Safety chain connection points are going to be nice and easy to get to. They're plenty big enough to get just about whatever size chain you want to connect it. And if you look right in there, we've got our half inch diameter pinhole. It's what we're going to use to secure all of our items with. Looks like we've got plenty of room for whatever accessory you might choose, whether it's a locking hitch pin, anti-rail device, or just a regular hitch pinning clip.
You just want to be sure it's rated for Class II use. Now the Class II bike racks are very versatile. These will allow you to carry cargo carriers, small trailers, bike racks, things like that. It's going to have a 350 pound tongue weight capacity. So that's the maximum downward force that we can put here on the receiver tube opening, and it offers a 3500 pound gross trailer weight rating. That would be the total weight of your trailer and anything that you might load up on it.
This hitch is not rated for use with weight distribution. Curt also recommends the use of a stabilization strap anytime you're going to be hauling non-wheel loads. That would be something like a cargo carrier or maybe a bike rack. Now, we definitely want to take a look at the owners manual on our Forester. We want to see what it's tow rating is and we'll go off of whichever of those numbers are the lowest. Now a couple of measurements that are helpful in selecting ball mounts, bike racks or hitch cargo carriers, would be from the ground to the inside top edge of the receiver tube opening. We've got about 13 and a quarter inches.
Then from the center of our hitch pinhole to the outer most edge of our bumper. It's about 5. Now to begin our installation, we need to get a few things removed. We'll start here on the driver's side. You've got the rear exhaust hanger. We're going to pry that off. We'll be removing the bolt and and also the bracket, holding it in place. Then if we come forward on the car just a little bit, there's going to be four more bolts there holding that tie-down bracket down. We'll get those out of the way, as well. Now for the larger bolts, we're going to use a 17 millimeter socket. Now the two bolts on the side that go kind of out towards the outside of the vehicle, those are a little smaller. We'll need a 14 for those. Now that we've got enough room just to remove this bolt, which also uses a 14, we can go ahead and do that. We're going to be re-attaching that hanger anyway. There's no real sense in fighting with it. Spin that down out of the way, and then we'll take out those two remaining bolts there. Now that evaporation canister needs to come down. We've got nuts here to take off, two on the back side, one on the front here. For these, we're going to use a 12 millimeter socket. Now we can let that hang down just a little bit and give us room to get into the three bolts we'll be removing here. Now here on the passenger side, we're using one, two, three attachment points to the hitch. These being a little bit rusted up and that, we're going to clean them out. We use nylon tube brush, part number 814092, to free those threads up of any dirt or debris that might be in there. Do the same thing for our driver's side. Now if we come here to the middle, hitting the trunk pan area, we've got a push pin fastener here. Then the nut and the bolt can get out of the way. The idea is to pull the center of this fastener out. Once that's out, the whole thing can come out. Now for these, we'll need a 10 millimeter. This one's not going to be in the way, so we'll just thread that back in. Now with an extra set of hands, we're ready to get our hitch raised up into position. You kind of want to guide it up over the exhaust there. Then on our passenger side, we need to get . See how the hitch will fit right into that hanger bracket location We want to get that in there, and then I'm going to start the bolt further to the rear here because it's easier to get in place. That's about three or four good turns. Now, we'll just align the bracket with the weld nut there. Put that up through there. Thread it in. Now with one started on each side, we'll just let our hitch rest there in position and get the rest of our hardware in place. We're replacing the three larger bolts we removed here on the passenger side, and the four on the driver side. Now we'll take a quick look, just to be sure we've got our hitch centered there. You'll have a little bit of play left and right, so we'll get that squared up. Then we'll snug down those bolts and torque them to specification. Now we'll get our evap canister slid back up into position. We're going to secure it with the nuts we removed when we took it down. Now we'll take the bolt for our exhaust hanger and place that through. Rotate it up into position. Then we'll be putting our clans nut here on the outside. Now we want to torque our bolt here down, as well. And that's going to complete our installation of the Curt Custom Fit Class II Trailer Hitch Receiver, part number C12038, on our 2008 Subaru Forester.
Customer Reviews
Curt Trailer Hitch Receiver with Standard Drawbar - Custom Fit - Class II - 1-1/4" - C120383
Average Customer Rating: 4.8 out of 5 stars (4 Customer Reviews)
Perfect for light-duty towing, this custom, vehicle trailer hitch receiver features fully welded, gloss powder coated steel construction. Standard drawbar included.by: Stan S.08/13/2013
This is a solid, strong hitch which is hidden when not in us. Easy install.
The hitch is designed to sit above the muffler which makes it unlikely to hit the tailpipe or rattle and allows for aftermarket mufflers. It has been silent and unnoticeable after the install on my 2006 Forester.
Attachment bolts came off the car with a bit of WD-40. I used a two foot pipe over the ratchet handle for leverage. I recommend increasing force gradually to loosen the bolts, not hammering, because you could crack the weld on the nuts that are attached to the frame.
I used a small floor jack to lift and position the hitch against the car. The bolts (17mm heads, not the 12mm listed in the instructions) are tricky to start and thread even without the hitch. After starting a bolt on each side of the hitch, I needed to compress the hitch against the auto's underside and move it slightly to line up all the holes. The hitch metal is thick which made it difficult to start the bolts, even though the holes lined up correctly. Grease helps and perseverance furthers.


by: Bruce J.08/12/2013
This Curt Trailer Hitch fit perfectly on my Subura Forester. The installation was simple, I removed the existing bolts and installed the hitch in less than a hour. An impact tool would have made the installation easier, but using my ratchet and sockets (17mm & 14mm) with a long extension made the job easy enough. My wife held one end while I started a bolt on the other, then I was able to complete the rest of the installation without any further help. One person could install this hitch but an extra hand for ten minutes eliminated the need for a jack or wood blocks. The wiring harness I ordered was a snap to hook up, no tools needed. The employee's at etrailer are the best, my order was filled and sent to me in less than two days. I have used etrailer before and I plan on using them every time I need parts or supplies.
by: Will01/07/2018
The product arrived quickly and was as ordered. It installed mostly pretty easily. However, there was a cutout on the left bracket that was to allow a bolt head of the exhaust system to fit through but it did not line up correctly so that the exhaust was vibrating against the hitch. I had to uninstall and reinstall twice, increasing the size of the cutout to finally allow the exhaust to not hit the hitch.
by: Harold H06/19/2016
It fits perfectly, no drilling no cutting.
I installed inthe evening topull a small utility trailer the next morning.
4
4
See what our Experts say about this CURT Trailer Hitch
Info for this part was:

Edited by:
Dan D

Written by:
Lindsey S

Video Edited:
Jacob T

Video Edited:
Dustin K

Updated by:
Wilson B

Updated by:
Kristina F

Updated by:
Isabelle B
At etrailer.com we provide the best information available about the products we sell. We take the quality of our information seriously so that you can get the right part the first time. Let us know if anything is missing or if you have any questions.
Product Experts Available Now!
Call 1-800-940-8924
Thank you! Your comment has been submitted successfully. You should be able to view your question/comment here within a few days.
Error submitting comment. Please try again momentarily.