
Brake controller activates trailer brakes in proportion to deceleration. LED screen shows settings and diagnostics. Features 3 boost levels. Automatically levels when mounted within 90-degrees in the vertical plane.
Features:
[NLA]I-Command Trailer Brake Controller, Proportional, 1 to:Specs:
[NLA]I-Command Trailer Brake Controller, Proportional, 1 to:Videos are provided as a guide only. Refer to manufacturer installation instructions and specs for complete information.
Today we're going to be taking a look at the Draw-Tite I-Command Proportional Trailer Brake Controller. This controller is going to activate the trailer brakes in proportion to your vehicle's braking action, it's going to automatically adjust the trailer's braking based on deceleration of the towed vehicle, and it activates immediately, so there's no pausing like when using time-delayed brake controllers. This unit's also going to automatically level. The brake control will automatically acquire the proper level setting, it's also going to automatically adjust as you travel up or down hills. A few unique features about this system. As you can see here, we have the easy to access buttons, we're going to have the boost setting right here on top and it says 'Boost' right here on the disc plate, so that way we know these button go with that setting. On this side we're going to have the gain control, and it says 'Gain' right there so we know that these buttons are associated with that control.
The boost setting is going to let you adjust the aggressiveness with which the brakes are activated, so this is setting is great in situations where you're hauling heavier loads or your trailer weight is significantly more than your vehicle weight. It's going to be available in three settings, you're going to have Boost 1, Boost 2, and Boost 3. It's going to allow you to get full power output faster by pressing the plus buttons right here, or the minus buttons to achieve maybe a smoother braking action. You can get full output power faster by pressing the plus button to increase the activation speed, and then you can achieve smoother braking by pressing the minus button to supply power gradually. Located right here at the front is going to be the easy to read digital display. This is going to be an LED display, it's going to show the controller activity.
The unit is short-circuit protected. On this side you're going to have the gain setting, this is going to establish the maximum amount of power available to the trailer brakes. As the gain increases, and you just the plus or minus buttons to do that, so it's very easy to adjust, but as that increases what that means is more power is going to be available to the brakes when the brake peddle in the vehicle is pressed or when the manual control is used. We do have the built in slide bar manual override right here at the front, very easily accessible. Gain is going to be shown from zero to ten, with zero being the minimum and ten being the maximum. That simply represents a percentage of the full power.
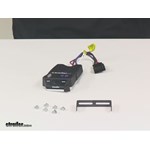
It's a quick and easy installation, your mounting bracket and hardware are included, and then it's going to be able to plug into a vehicle specific brake control adapter. Those are sold separately and can be used for certain applications to help reduce installation time. Again, this is designed for trailers with up to four axles or A-brake assemblies. It's designed for use with electric brakes only. When mounting this, you can mount this anywhere from -20 degrees nose down, anywhere to 70 degrees nose up in the vertical plane.
You want to make sure this is parallel with the direction of travel, but anywhere in between those indicators that I gave you, -20 degrees nose down or 70 degrees nose up, this is still going to be fully functional. All the leveling, the sensor inside, that's going to be functional as long as you stay within those increments, or those measurements of negative 20, 70 degrees nose up. Really nice design, it's a nice small compact unit as well. Here at the widest part it's only going to measure about 2-3/4" wide, and then the overall length is going to be about 4-1/4", and then the depth or the thickness is only 1-1/8". It's going to be covered with a unlimited lifetime warranty. Now what I want to do is I just want to show you how easily that display can be read. I'm just going to hook up a couple of wires here today just to send some power to it, I'm going to hook up a ground power then the power wire, and then we thumb through some of the settings and you can get an idea for how easy it is to read and how easy it is to see that display. NC is going to stand for Not Connected, but it's still going to allow us to kind of go through. We have our gain setting, you can see how that easily adjusts with a simple press of the button, and again you can go all the way up to ten, you can hold it down, which is going to allow you to adjust quicker, all the way up to ten. Then you can press individual to make finer adjustments, or you can hold it down and it's going to go all the way down to zero. You can adjust to anywhere in between that setting, really nice design. You're also going to have the manual override right here, which for me it's just saying I'm not connected, which is correct since I'm just feeding off a power box. Then you're going to have your boost setting. You're going to have Boost 1, Boost 2, Boost 3, then just the B shows you that you're in the boost settings, then you have 1, 2 and 3 to choose from. That's going to do it for today's look at the Draw Tite I-Command Proportional Trailer Brake Controller.
The controller seems very nice, and the instructions that came with it were perfectly good.
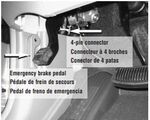
It was a bit of confusion in that the four wires coming off the back of the controller go into a 4-pin connector, but since my vehicle did not have trailer brake capacity from the factory, there's nothing to connect that to. And the universal trailer brakes kit I got from etrailer (which was great!) gave instructions for butts placing to those various wires. no real big deal, I just had to cut the wires and get rid of that connector but it would have been kind of nice to have the matching connector to terminate my universal kit wiring into so I could unplug the controller if I ever want to.
The controller's instructions did appear to make reference to a supplied pigtail connector, which is maybe the part that I'm expecting to have in the kit, but it wasn't supplied.

Great brake controller works like it is supposed to bought because it senses how much you brake and the boost settings make it better for different trailer weights. Recommend to anyone buying a aftermarket one
Hooked up the brake control with a vehicle specific adapter eliminating the chance for incorrect wiring or shorting of wires. Tried it out immediately after install & worked as designed. Using this to control the electric brakes on my popup camper pulled by a Tacoma.
Installation pix (3) as installed in 2020 Subaru Ascent... as you requested.
Final assembly.. controller mounted and harness wrapped in white tape
Bracket mounted in Subaru Ascent dash. Must drill hole in pretty leather but solid plastic base underneath is sufficient for solid mounting.
Trial installation ....Harness wired into Subaru pigtail for testing and adjusting the brake controller. Initial wiring used wire nuts before final installation where I used "butt connectors"
For info:
1. Dealer clueless on need for brake controller but offer a $600 tow (hitch) package that includes hitch (2" receiver) and 7 pin and 4 pin connectors. Those connectors are wired properly to provide alternator charging to trailer battery, brake lights, turn signals and trailer lights...just does not activate electric trailer brakes which they claim
2. Subaru hitch installation also includes brake controller pigtail (in plastic bag in glove box)
3. Subaru brake controller wiring plug under the dash, hidden behind a wiring bundle that was taped with pink tape. I understand the 2 high end Ascent models have this wiring connector included but dealer unaware. Google posts provide good, generic information on this wiring location but they recommend a larger brake controller which I felt was too big for he location I selected... thus I selected a smaller controller.
If this was your profession, this kit from etrailer and the Subaru connector and pigtail would allow for installation in less than an hour.
Super easy to install. I did have to reference two different videos while installing everything, but went in easy enough. I installed this with the ETBC7 wiring kit as well, and it all looks great. I haven’t tested it on a trailer yet, but so far everything looks to be in working order. Here are links to the two videos I watched. One video shows installing the brake controller with factory 4 pin connector and wiring in the cab by the emergency brake, and the other shows the install without the factory wiring.
https://www.etrailer.com/tv-brake-controller-2009-toyota-tacoma.aspx
https://www.etrailer.com/tv-brake-controller-install-2008-Toyota-tacoma.aspx
Thanks to etrailer The brake controller installation was a breeze, really just a plug and play. Once installed, the I command trailer brake controller worked as advertised. The video on etrailer made the setup and operation pretty straight forward and painless.
This has been the best and easiest purchase during my short journey of outfitting my 2008 Nissan Titan SE to haul a 27 ft camper.
This has been the easiest install. If you're not mechanically inclined like myself no worries at all. It takes literally 5-10 mins to locate your quick connects and attach it to the dash. Once connected it automatically does everything else for you. You receive a set of directions just make sure you read them first and save yourself some money and do the install yourself.
Once the camper was connected to the truck it was automatically detected. Can't get any easier than just connect and go.
I would recommend strongly on purchasing this trailer brake connector/quick connect along with using this company. The shipping was extremely fast and communication was great prior to its arrival.
I replaced my much older, time delay brake unit with this proportional brake controller. The Drawtite I Command unit was easy to install and set up. If you have an “older” time delay brake controller, do yourself a favour and get this (or similar) proportional brake control unit. The braking is so much smoother and can be easily adjusted to suit the weight of the load you’re pulling, and also if you need more brake power for better control on steep hills. When you first set the unit up and turn it on, don’t make the mistake I made, and think it’s not working when “00” shows up on the screen when you apply the brakes and the vehicle isn’t moving. Because the controller is a proportional unit, the vehicle had to be moving in order to work.
I received fantastic customer service from Joshua at etrailer, who was happy to answer stupid questions I had (why isn’t my unit working lol), and he matched my vehicle set up perfectly with this unit when I told him what I was towing. He didn’t oversell me on a unit I didn’t need. etrailer has always been fantastic in the past, and I’ll continue to get my related products through them, on this alone.
Thanks again for helping me out Joshua.
THE CONTROLLER MOUNTED EASILY AND PERFORMED AS STATED. I'VE BEEN CONTENT WITH THE DRAW-TITE DELAY STYLE CONTROLLER I USED FOR 30 YEARS BUT THE PROPORTIONAL STYLE 5535 IS A MUCH BETTER CONCEPT. IT ACTS LIKE THE TOW VEHICLES BRAKES BY APPLYING MORE BRAKE THE HARDER THE BRAKES ARE APPLIED. I'VE ONLY USED IT ON ONE TRIP ON DRY ROADS WITH NO HARD STOPS SO IT MAY REQUIRE SOME TWEAKING THE MORE I USE IT.
I TOW AN ENCLOSED 24 FOOT CAR TRAILER AND SET THE CONTROLLER MID RANGE ON BOTH SETTINGS AS MY STARTING POINT.
Never knew there was a difference... Timed Delay is what I had, with this new Progressional trailer brake controller, my tow vehicle brakes smooth and the trailer does as well. Mounting was extremely easy using a portion of one of the "cubby Holes"
5th gen 4runner. I pulled the center dash unit out in about 5 minute after watching a YouTube video. Cut a hole in the back of the small cubby next to the USB outlet and this unit fit perfectly in there. Secured with double sided tape to the bottom of the cubby. The adapter cable reached right up to the back of this unit. Plugged in and it's ready to go.
Very easy installation in about twenty minutes. Connected effortlessly using the wiring adapter. Works great with the trailer.
Ordered this for my 2008 Toyota Tundra to be able to pull a 25 foot travel trailer. This has been the easiest install. It takes literally 5-10 minutes to locate your quick connects and attach it to the dash. I mounted it as close to the middle console to help keep it away from my knee and legs. I used a black magic marker to blend the screws into the black frame. Once connected it automatically does everything else for you. I would recommend strongly on purchasing this trailer brake connector/quick connect along with using this etrailer. The shipping was extremely fast and communication was great prior to its arrival.
I watched a YouTube video on my truck to make it even easier to install.
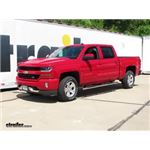
Excellent product....easy installation and operation....in 2013 Chevy Silverado 1500 4x4....
Just did the install on this in my 2006 Nissan Xterra. Super easy. Plug and play with the wiring harness I bought with it. Haven’t used it yet but we pick up our 22 foot travel trailer tomorrow so it’ll be used soon enough!
Just installed this on my 2018 Ram 1500. Came with the plug and play connector #3024P. Super easy to put together. Just plug one end of the adapter to the controller and the other to the existing wires under the dash and you got power! Then screw it into the dash wherever you feel necessary. So easy a toddler could do it!
Awesome product good price. Loved install videos. The only suggestion would be a recommend page at check out. My trailer brake controller need a pig tail wiring harness.
Product works and works well. Wiring harness plugged in perfectly. Little Nissan Frontier tows a heavy dump trailer and stops with ease.
Brake controller installation in my 2015 Ram 1500 quad cab Tradesman was extremely easy with the factory harness adapter.
Fast shipping, easy install, work good, recommended.
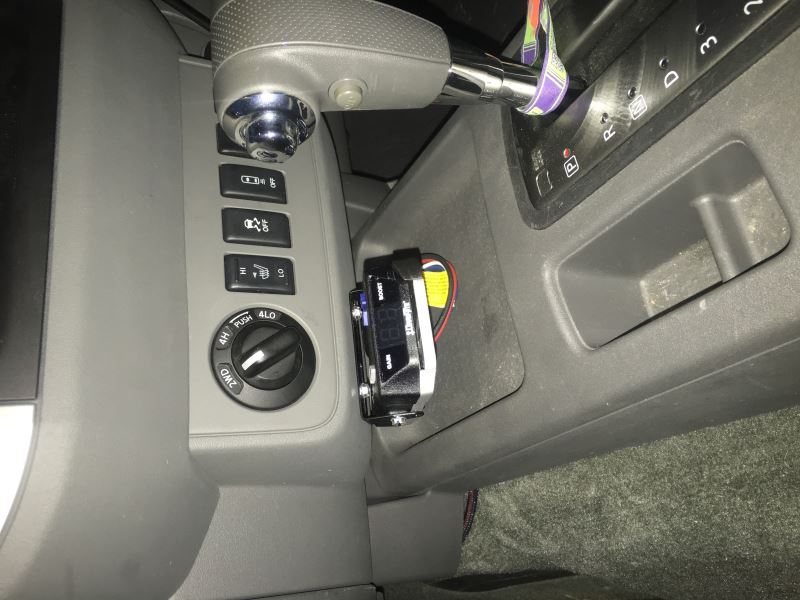
With 2007 Lexus GX470 doesn't have any where to mount the controller so I put it on a middle near shifting handle.
Works great on my Avalanche towing a 4000 # travel trailer. 10 min install with the wiring adapter.
The product was exactly as described. Very easy to install. Mine sits at a pretty good angle and works perfectly. So far I have used it on a 28' camper trailer & a 26' camper trailer.
Really small!
Installed easily in my 2015 Frontier with factory tow package. Easy to see easy to use! I am using it for a single axle 16 foot V-nose trailer.
Buy this one it works well and will fit just about anywhere.
Mounted up with no issues whatsoever and the etrailer.com installation videos helped tremendously. Very clean install.
Bought this cause I have used before in the other trucks. Real easy and simple to use. Installation is easy. Wish the wires were longer but I was able to splice wire in to make the plug reach
Do you have a question about this Trailer Brake Controller?
Info for this part was:
At etrailer.com we provide the best information available about the products we sell. We take the quality of our information seriously so that you can get the right part the first time. Let us know if anything is missing or if you have any questions.


Thank you! Your comment has been submitted successfully. You should be able to view your question/comment here within a few days.
Error submitting comment. Please try again momentarily.