
To see if this custom-fit item will work for you please tell us what vehicle you'll use it with.
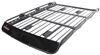
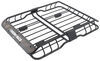
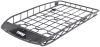
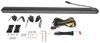
Haul gear above your Toyota 4Runner's roof with this tough platform rack. Dovetail design simplifies mounting accessories, provides more personalization, and helps keep the rack at a low profile. Works with a variety of overlanding accessories.
Features:
Specs:

Videos are provided as a guide only. Refer to manufacturer installation instructions and specs for complete information.
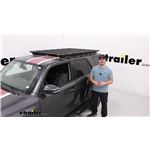
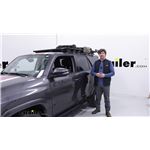
Hi everyone, Aidan here with etrailer. Today we're gonna be taking a look at and we'll be showing you how to install this ARB BASE platform rack on our 2017 Toyota 4Runner. This is going to be a custom fit platform rack for your roof. Platform racks are a great way to really expand the function of your vehicle because, much like a roof rack, you can use it to mount cargo to or other accessories and carry extra stuff with you. But where a platform rack really excels is decking your vehicle out. And this one is no different than the competition.
You've got tons of different options to choose from where you can mount up things like your recovery tracks, off-road jacks, a shovel mount, and then even maybe something like a fuel can holder or a propane tank holder. Really the options are limitless, and you can kind of spec this out to fit your needs. So if you're looking for a blank canvas to basically deck out and mount up a ton of accessories to fit your adventures, this can do that. The thing you've probably noticed by now is that the raised rails that we're once on the roof of your 4Runner are gone. This is going to be a full replacement for those.
Now, don't worry, this is actually a really simple replacement because there's factory holes that your race rails utilize, so it's really easy to get these removed, and this only utilizes those pre-existing holes. We're not drilling new ones and we're making no permanent modifications to our 4Runner. So if you want to keep this and eventually put them back on, you can. With all that in mind, what sets this option from ARB apart from the competition, say, like a Rhino-Rack Pioneer Rack, or maybe a Front Runner platform rack I would compare this most closely with the option from Front Runner. I actually installed one on my videographer John's car, and he's been running with it for a couple weeks or a couple months now, and he really likes his, it's a very similar install, and they make options that cover 3/4 of the roof like this or the full roof.
The main difference that I see between the two is that this option from ARB uses a different method for attaching accessories. The Front Runner platform has tracks in all of these main platforms and utilizes standard M8 hardware to attach those accessories. Very standardized hardware that you can find at any hardware store, or if you pick up Front Runner accessories, that's how they will attach. Whereas this option from ARB utilizes their dovetail system. So on the edge of every bar, you'll see this dovetail and the accessories will sort of bite onto that dovetail and clamp on that way.
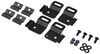
So it's a really unique way of attaching. I kind of like it. I think it's pretty neat because it makes it pretty easy to attach those accessories. My only problem with it is it's not very universal, so you're gonna have to utilize that. There's no slots in these bars, and they're otherwise solid. So if you need to mount something up, you have to use that dovetail. As far as capability goes, this is going to be able to carry up to 385 pounds, and that's pretty impressive. Just keep in mind that your vehicle is going to have its own roof capacity and make sure you just go by the lowest rated component. But knowing that this bolt into the roof, you are gonna get a more secure fit compared to something that just clamps onto your old raised rails. And all throughout you've got an aluminum construction which keeps things pretty lightweight. The only steel part here is your main mounting bracket along the side that serves as your connection point from the platform to the roof. A couple 4Runner specific things about the fitment here that I like. This kit comes with a wind deflector, which is going to match the curve of the roof quite nicely and help limit the wind noise that we experience going down the road. The overall height added to our roof really isn't that insane. I mean compared to our original raised rails that we're there, you don't sit that much higher. You really just need to watch out for your accessories mounted on top. Around the back on our 2017 4Runner specifically, we're getting great clearance with our antenna. It's pretty close, but it's something to watch for if you actually have a later model year because, with this facelift that happened around 2017, that antenna changed and older model years might have clearance issues. And the last thing is our hatch clearance. It does again come close to those brackets, but we've got more than enough room to be comfortable here and not ever make contact or limit the function of our vehicle's back lift gate. Do you wanna learn any more about the ARB platform or the accessories that can go with it, be sure to check out our full reviews for the platform and for those accessories, and you can find the right ones for you. As far as things go for our 4Runner today though, the only thing left to show you is how it installs. And I know I mentioned before, it's actually a pretty easy process. So we'll walk you through that. You can see what it looks like right now. And the first thing you need to do for your install is remove those raised rails on your 4Runner because this platform will be replacing them. So grab yourself a plastic trim panel tool. You can find those here at etrailer if you don't have one yourself. But this tool's gonna be really helpful because we don't wanna cause any damage to our vehicle. So on the raised rail, there's these plastic caps and a rubber base. We're gonna try to get our tool in between that rubber base and the plastic cap. It's a little easier said than done, but if you can kind of wedge that in there and pry up a bit, you should hear a small click. There's gonna be two clips, one towards the right side, one towards the left. So do your best to then shimmy that tool on over, release that other clip, and then you can just kind of pry this off and set it to the side. Repeat that for the other three locations. Once those covers are removed, each spot is gonna look the exact same with two factory bolts holding this rail down. So four in total for each rail. Grab yourself a 12-millimeter socket and a wrench, just unthread them. The final thing to do is just lift this off of the roof. Those bolts are really the only thing holding it in, so pretty easy overall. Maybe a good idea to go up there and clean off some of the surfaces because dust and dirt can get trapped underneath them. This one doesn't look too bad, but I'm still gonna clean it off. These rubber pads, your Allen head screws, and these washers that have a small rubber insert in them, and then the angled bracket here that has the nut plate up top, the two holes on the bottom that should line up with the factory holes that our old rails utilized. So what we can do is pass those screws through the plate, pass the rubber pad through those so it's on the very bottom acting as a buffer between the metal plate and our roof, and then just drop this down into those existing holes on our roof from the old rails. Come back with a 6-millimeter Allen to tighten those down. Just going evenly back and forth so you don't snug one side down completely, and then the other. When all the roof brackets are assembled, we need to turn our attention to the ground and getting the platform set up. Flip it upside down and find the side rails for the proper sides. So what I mean by that, let me flip this over. We've got our BASE Rack logo, that's going to be facing the outside of our 4Runner and towards the front of the vehicle. So I know that this is my driver's side. But when I flip it upside down, it's gonna be over here by me. Then I just need to see where it lines up on the underside of the platform. All the brackets that these tabs have with the four holes, they're gonna line up with a slat. So empty, mounting, empty, mounting, empty, mounting, empty, is kind of how it's gonna go. And the ones that serve as our mounting locations will have those plates with the studs poking up through them. So let's show you how to set that up. Each of these plates is gonna have kind of a unique shape. In the middle here, there's some ridges that poke up. We're gonna feed our bolt heads in through the part that pokes up so that they sit level with the head of those carriage bolts and flip it upside down like that. In this configuration, it'll fit down into that track and twist to make sure it doesn't come back up. So once you have all three in, set your bracket down on top of it and make sure all of those three line up from here to here to here and secure it loosely with a flat washer, if I could get it to line up, and the provided lock knots in your kit for all six hardware locations on each side. We're gonna go back through with a 13-millimeter socket and tighten those lock nuts slightly. I want it snug enough that it's not gonna move around on me too much, but loose enough that I can still move it by hand to make some side to side adjustments before we bring it to the roof. Make sure these brackets are side to side, spaced appropriately. And the way you do that is by first measuring the distance between those threaded holes up on top of our roof. Those brackets we attach that kind of have the angle to them, measure between those threaded holes side to side and that needs to line up with these slotted holes on our bracket that are kind of pointing up towards us right now. So I'm gonna measure from side to side here and make sure it lines up. And it's important to note that your front measurement and your back measurement are gonna be slightly different because your roof does taper in slightly towards the rear. So measure both and make whatever adjustments you need. That's why we left things loose. As you're doing this though, just make sure that you don't pull one side all the way over and not adjust the other. You want this platform to be centered on the roof. So when you're happy with how everything's sitting, just go to the edge here and measure from the bracket to the outer edge of the platform and make sure that measurement lines up on both sides to ensure it's centered. Grab an extra set of hands. We've got Ethan here to help lift us onto the roof, and we're just gonna kind of start from the front of the vehicle and work our way over. It's gonna be a bit of a heavy lift, so just be careful. And maybe consider folding your mirrors in. So set it down on top, lining up those tabs as best you can. Grab your remaining hardware, just a screw with a flat washer and the included tool to tighten it up. And you might need to just lift up a little bit, get it started by hand, and just do that for all four corners. Once all of your hardware is in and tightened down, I always like to give things a shake test to make sure that there's no loose pieces around the whole platform and it all moves as one solid unit. And after that, we're done. You ready to load up any accessories you may have and hit the road. So that'll do it for our look at and installation of this ARB BASE Rack platform rack on our 2017 Toyota 4Runner. Thanks for watching.
Info for this part was:
At etrailer.com we provide the best information available about the products we sell. We take the quality of our information seriously so that you can get the right part the first time.


Thank you! Your comment has been submitted successfully. You should be able to view your question/comment here within a few days.
Error submitting comment. Please try again momentarily.