
Front Runner Slimline II Platform Rack - Ditch Mount - Low Profile - 53-1/2" x 56-1/8"
Item # FR38FV
Our Price: $1,299.00
Confirmed to Fit
2012 Ram 2500
Crew Cab
Will this fit?
To see if this custom-fit item will work for you please tell us what vehicle you'll use it with.


- All Info
- Q & A (0)
- Videos (3)
- Photos
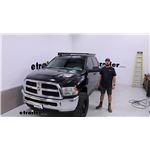
2012 Ram 2500 - Front Runner Slimline II Platform Rack - Ditch Mount - Low Profile - 53-1/2" x 56-1/8"
- Platform Rack
- Complete Roof Systems
- Front Runner
- Black
- 53L x 56W Inch
Made for the adventurer, this platform rack's large, flat surface lets you carry all types of cargo and gear. Installs in the ditches of your Ram 2500's roof - drilling required. Works with many Front Runner accessories.
Features:
- Rugged platform rack lets you carry cargo and gear on the naked roof of your vehicle
- Large, flat surface accommodates more diverse loads than traditional crossbars or roof baskets
- Perfect for overlanding, camping, and road trips
- Modular slats let you customize your rack for your specific needs
- Add slats (sold separately) for full deck space or more mounting points
- Adjust or remove slats for access to your sunroof or moonroof
- Integrated T-slots in slats and frame fit various roof rack accessories (sold separately)
- Compatible with axe holders, kayak carriers, storage boxes, and more
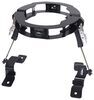
- Extra low profile design with included wind fairing is exceptionally aerodynamic
- Makes it easier to load and unload cargo
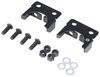
- Custom installation in the ditches of your vehicle's roof - drilling required
- Rugged construction is designed for outdoor use and tested in extreme conditions
- Durable aluminum frame with black powder coat finish is rustproof
- L-shaped rear and front slats increase the strength of the entire rack
- Assembly required
Specs:
- Platform dimensions: 53-1/2" long x 56-1/8" wide x 2" tall
- Weight: 65.48 lbs
- Limited lifetime warranty
Note: You should never exceed your vehicle's maximum roof load capacity. Check your owner's manual for weight limits.
KRDR011T Front Runner Slimline 2 Platform Roof Rack - Aluminum - Custom Fit
Installation Details Alternate Instructions


Video of Front Runner Slimline II Platform Rack - Ditch Mount - Low Profile - 53-1/2" x 56-1/8"


Videos are provided as a guide only. Refer to manufacturer installation instructions and specs for complete information.


Video Transcript for Front Runner Slimline II Platform Rack Installation - 2013 Ram 2500
Hey guys, it's Jake here with etrailer. Today we have my 2013 Ram 2500 and we're gonna be taking a look at and I'm gonna show you how to install the Front Runner Slim Line II low profile platform rack. Adding this platform to your roof is going to allow you to add, put luggage up there, store different stuff, put accessories up there if you wanna haul a bike or maybe put a cargo box up there, whatever. Whatever you want to add to your roof, you should be able to mount anything you want onto this platform. The only other option for mounting anything to the roof of your Ram 2500 is going to be a set of roof bars. And I do not like how the roof bar's attached to the Ram because they're going to clamp through the door jam and or on the inside, just on the inside here.
And I just don't like how it's not really a finished look. This is gonna stay on here permanently 'cause it's gonna bolt to the top of your roof. Now the way the system's gonna differ from your standard roof bars is that you're gonna have more than just two roof bars to deal with. You're gonna have seven in total. If you include the two end ones, you're gonna have T-tracks in the tops of all four of your rails all the way around.
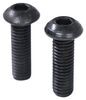
There's many different front runner accessories that'll mount to this rack, but if you want to mount any accessories you already have, all it'll take is an M8 bolt so you can get yourself a bag of them from your local hardware store. It drops right down in here and then you slide it to wherever you want in your rack and then add an M8 bolt wherever you're gonna need that. I will say it may take some reconfiguring of the accessories that you already have. If you have a bike rack or something like that, that it's T-mount track accessible, you may have to switch to these M8 bolts rather than use the T-track bolts. The rack's gonna have an entire aluminum construction so you don't have to worry about rust or corrosion.
The other thing about this is that because it's one big flat surface up there, you do have options to be able to put extra slots in here. So we're missing every other slot. You could purchase those separate and add essentially six more slats in there and make it one solid platform. A lot of people like to do that 'cause then it gives them even more options to be able to mount stuff up there. The thing I like about this is that if you wanted to build out an overlaying rig with your 2500, you can most definitely do it with this style of rack.
They also have bed racks available that you can add on and that gives you so much mobility to be able to put maybe a spare tire up here if it's too big to fit underneath your truck or if you wanna put the spare tire on your bed rack. That's what we're gonna be adding next to this truck is we're gonna be adding the platform rack from front runner. The powder coat finish on here is very, very strong. We've got a couple of racks on some people here that work here at etrailer and they are definitely proving themselves, the paint job is not going anywhere. They've been on their racks, they park outside all the time through a couple of winters now they've been on there for about three years and the paint job still looks like the day we put it on. Now as far as the installation goes, the install is pretty simple and straightforward. It will require you to drill eight holes in your roof. That is kind of worrisome for a lot of people. I wasn't too worried about it because you're just putting riv nuts into those holes. The bracket here on the side is custom fit to the side of your Ram or to the roof of your Ram. So it does make for a very clean installation when you get it finished. But with that being said, let's go ahead and jump into it. To begin your installation, we're going to be mounting up our side rails so that our platform can sit on top of it. What you'll need to remove is this trim molding up in this gap 'cause that's where the feet for our side brackets are gonna mount. We need to start from the front, work our way to the back with a flathead screwdriver and remove this trim piece. Now we'll take that ditch molding, we're gonna set it on a table or a flat surface and we need to measure out to 35 1/2 centimeters or 355 millimeters. It's gonna have millimeters in your instructions, but our seamstress tape that we have here are more commonly known is gonna have centimeters. So we'll have 35 1/2 centimeters, 51 centimeters, and we'll come down all the way down to 111 1/2 centimeters and then 127 1/2 centimeters. Now we've got our marks. We're just using airline tubing cutters, which we have on our website. For this job, because it's so important that you get these nice and straight. A pair of scissors would probably butcher this pretty good. You can also just use a razor blade and a knife like this and cut straight down on the seal. It's just these happen to have a little platform built into it. So you can get that cut nice and straight. Now we're gonna measure 39 centimeters from the edge of our cab here right after our windshield. Up to this point we put a little mark there. I'm gonna take my indent maker here and you wanna be in the center of this rail. We put a little divot there and then we'll start with a quarter inch drill bit and we're gonna move up to just below a half inch. Before I punch through this roof all the way, we want to be sure to protect our headliner and any wiring underneath there. I know for a fact I just had this headliner down last week. I know there's a lot of wiring under here, so if you don't have a drill stop, just put a good wad of electrical tape on here. Just run the electrical tape on there with the drill running and that will be enough to keep this drill bit from puncturing any further than that three quarters of an inch I have it marked off there. Now, we're gonna take one of our blocks for that our feet set on and we're just gonna verify this is how we'll get the rear hole. So I've got it centered up there. I'm just gonna take my marker again, mark the center there. Then we can get our second hole drill. Once you have these two holes drilled out, we can increase our size of our drill bit to the final size sweetie. Now we're gonna take the riv nut tool that comes in your kit. I've already got one in, I just wanna make sure that everything went smoothly for that first one. But we'll take our second one. We're gonna kind of test fit it in there. We know it's gonna fit down through the hole, so we'll take some black silicone. We're gonna put it all around the hole, a little bit inside of the hole, wouldn't hurt either. Basically we just wanna seal up around that edge. And we'll take our riv nut, push it down through the hole and we're gonna start drawing this bolt up. If you have any issues with the riv nut tool that comes with your kit, you can use a normal riv nut tool to put these in place. Now we're gonna take one of our side rails, set it up in place, get it lined up with the front holes, And then you want to take a marker and mark the center of these two holes back here. And that's where we need to drill our rear holes. Now, we're gonna drill those same holes that we did on the front set in the same series that we did. The only thing I learned from doing the front now on the back is this stuff is really sticky from where we pulled that rail up. I just put some electrical tape to help minimize the amount of metal shavings that get stuck to that stuff. So we'll go ahead and drill these out. Before we put our top rail in place, we're gonna clean out this groove, 'cause we're gonna need to restick that this rail cover back on here. So we'll just clean it off with some alcohol. And then I'm actually gonna be using some double-sided tape. It's this foam tape. This stuff is really, really strong. This goo here, if the truck wasn't so old where the truck's 11 years old right now, if it wasn't so old you could probably peel that up and stick it right back down. But I just don't trust this stuff to keep those pieces back in place. So we'll go ahead and get this cleaned up the rest of the way. Clean up our rubber pieces and then we'll put those back. And when you put these plastic pieces in, you wanna put a little bead of black silicone around each of the riv nuts so that it creates a waterproof barrier so that we don't get any water down through those three nuts. I will take smaller hex bolts that come in our kit, put a lock washer on and then a flat washer. And we're gonna thread these down through our rack side rails and into those riv nuts. Now with an extra set of hands, I've got Aiden helping me here. You wanna lift it up into place and this is gonna be very difficult 'cause my truck's pretty tall, but we've got a ladder on that side for him to go up. I'm just barely tall enough to be able to reach it. We're just gonna set it loosely on top of our side rails here until we can get the bolts in place. We're gonna have these small hex bolts in our kit. You'll see these top rails, how they have this little hole in them, essentially this is how we're gonna slide these bolts in, but on the underside, so there's a hole just like this on the underside of our rack. We'll slide it up into the hole, turn it till it slides through the track and we'll slide it over. I've got all my bolts pre restarted over here, so we'll just want to pull 'em over so they all line up with these slots on the end. If you need to reposition your hands, you can do that. Just slide 'em in until you get 'em all lined up. Just like that. With our top rack in place, we don't have the nuts on the bottom of those bolts yet, but we can make our final adjustments and our side rails. I just pulled both of my side rails all the way back so I know they're even on both sides. And then we'll take a 10 millimeter socket and get these snug down. And we're gonna take a flat washer and a nylon lock nut and threaded onto each one of the bolts we installed underneath this rail. You want to tighten down all 14 of those nuts that we screwed on to the bottom of our bolts for our slats. And then we'll come back with the plastic nut caps and it's just a decorative touch so that if they start to age over time, start to lose their color a little bit. These plastic caps will look good for much longer time. So we'll go through, put all those on and then they just push into place. And then we also have caps for each of our bolts that go down into our truck roof. We'll go and put those caps on too. When installing your wind deflector, if you have a sunroof, you'll want to use the low profile wind deflector. If you do not, like on my truck, you'll want to use the taller one. Well guys, hopefully this information helped you decide whether or not the Front Runner Slim Line II low profile platform rack is right for you and your Ram 2500.
0
0
See what our Experts say about this Front Runner Roof Rack
Info for this part was:

Video Edited:
Joshua S

Video Edited:
Jonathan Y

Video Edited:
John S

Video by:
Chris R

Video by:
Charles A

Updated by:
Wilson B

Edited by:
Daron K

Written by:
Alex H

Test Fit:
Jacob H

Installed by:
Aidan B
At etrailer.com we provide the best information available about the products we sell. We take the quality of our information seriously so that you can get the right part the first time. Let us know if anything is missing or if you have any questions.
Product Experts Available Now!
Call 1-800-940-8924
Thank you! Your comment has been submitted successfully. You should be able to view your question/comment here within a few days.
Error submitting comment. Please try again momentarily.