
Custom Fit Roof Rack Kit With Y06130 | Y06153 | Y63TR
Item # Y22VD
Our Price: $733.80
Will this fit?
To see if this custom-fit item will work for you please tell us what vehicle you'll use it with.
In Stock


- All Info
- Reviews (26)
- Q & A (0)
- Videos (3)
- Photos
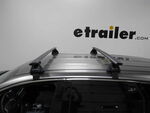
Yakima Roof Rack - Y22VD
- Aero Bars
- Crossbars
- 44 Inch Bar Space
- Yakima
- Black
- Flush
- 2 Bars
This aerodynamic, flush-mount roof rack lets you carry gear and cargo on your vehicle while maintaining a clean, factory look. Crossbars work with channel-mount and clamp-on accessories. Installs on your vehicle's naked roof.
Features:
Yakima BaseLine FX LG:- Integrated crossbar and tower system lets you carry cargo and accessories on your vehicle's naked roof
- Flush design provides a streamlined, factory look - no crossbar overhang
- JetStream crossbars with top channels accommodate channel-mount and clamp-on accessories
- Push-down rubber strips in top channels allow for easy attachment of channel-mount accessories
- Sleek towers with matte finish are weather resistant
- Custom installation to your vehicle's naked roof with Yakima BaseClips
- Aerodynamic, lightweight aluminum crossbars resist corrosion and reduce wind noise
- Yakima Same Key System (SKS) lock cores (sold separately) deter theft
Yakima BaseClip 130:
- Custom-fit mounting clips and pads allow you to mount BaseLine towers on your vehicle with a naked roof
- Padded, stainless steel clips provide secure grip on your door jambs
- Snap onto DropHooks inside towers
- Protect door jambs from scratches and abrasions
- Powder coated for durability and rust resistance
- Molded rubber pads fit the contours of your roof
- Clip onto bottoms of towers
- Protect roof from scratches and abrasions
Yakima BaseClip 153:
- Custom-fit mounting clips and pads allow you to mount BaseLine towers on your vehicle with a naked roof
- Padded, stainless steel clips provide secure grip on your door jambs
- Snap onto DropHooks inside towers
- Protect door jambs from scratches and abrasions
- Powder coated for durability and rust resistance
- Molded rubber pads fit the contours of your roof
- Clip onto bottoms of towers
- Protect roof from scratches and abrasions
8006130 Custom Base Clips and Pads for Yakima Base Line Towers
8006153 Custom Base Clips and Pads for Yakima Base Line Towers
8000167 Yakima Base Line FX LG - Roof Rack Cross Bar for Naked Roofs
Video of Custom Fit Roof Rack Kit With Y06130 | Y06153 | Y63TR


Videos are provided as a guide only. Refer to manufacturer installation instructions and specs for complete information.


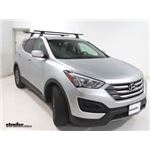
Video Transcript for Yakima CoreBar Steel Crossbars Installation - 2016 Hyundai Santa Fe
Today on our 2016 Hyundai Santa Fe, we're going to be taking a look at and installing the Yakima BaseLine Roof Rack System with CoreBars. That consists of the 60" Yakima CoreBars, part number Y00422, the BaseLine Towers, part number Y00146, and the BaseClip Fit Kits for Hyundai Santa Fes, part number Y06130 and Y06133. This heavy duty, yet quiet, roof rack system maximizes the carrying capacity of your Santa Fe. The aerodynamic teardrop shape controls air flow to minimize wind noise and vibration. These steel crossbars are going to allow you to attach a wide variety of accessories to your Santa Fe's roof, such as bike racks, boat carriers, and roof mounted cargo baskets. The BaseLine towers are going to support our CoreBars and the BaseClips are going to provide a custom fit to our Santa Fe. For more security, you could pick up the Yakima Same Key System Lock Cores with part number Y07204. It's an easy installation. We'll go ahead and show you that now.
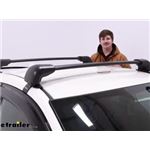
I've already got the front one installed on my Santa Fe. Let's go ahead and do the rear together. The driver and passenger side install the same way. Let's do the passenger side. First thing we'll do, let's go ahead and grab out baseline tower. Then, I'm going to grab our CoreBar adapter, and we're going to snap this in place.
We'll just take our two thumbs and push it down until we hear two clicks just like that, so it's going to be in there nice and solid. Then, let's go ahead and take off the cap here. I'm going to squeeze in on both sides and remove that. Then, we're going to pull out on this little door here. Now, let's grab our CoreBar attachment. When we put this on we want to make sure that it's facing the same way so it can easily slide on to our CoreBar, so we're going to put it on in this direction.
We're going to set it right on top, and then we're going to hold it in place, turn over our BaseLine tower, and we're going to tighten up that bolt through there. We'll grab our included Yakima tool. We're not going to tighten this down all the way just yet. Just get it started. With it loosely installed, let's go ahead and slide it on.
Then, we're going to turn the whole bar over. Now, once we've got it slid on, we'll need to refer to our instructions on the measurement between the two. We've got a little arrow on our bar here. That's going to be our center. Then, I'll just tighten it down. Now, we'll need to refer to our instructions on which one of the three tilt settings we need to be at. Then, we can just tighten it down. What we need to do is listen for three clicks with our included Yakima tool. There's two and one more. With that tightened up, let's go ahead and flip it back over, and we're going to close our little door. Then, we're going to open up our second door here. We'll grab our clip, and I'm going to slide it in place underneath, so it kind of hooks into place. Then, we can turn it back over and adjust our angle. Now, our angle gauge is going to be located right here, so once again we'll need to refer to our instructions. As you can see, we need to choose one of the three. Then, we can just tighten it down. Again, we're going to be listening for three clicks. Now, let's install our pad. It's got a little arrow located in the center. We'll need to make sure that it's facing out. We're just going to be clip it in place here. Just give it a good push, make sure it snaps in to both sides and that it can still move. Now, let's put on our end cap. Now, let's set it in place. You want to be sure and open up both doors. Then, I'll just gently set it in place. Now, we'll need to refer to our instructions once more to set the distance between our two bars. Once we've done that, we can locate the screw here. We'll take our included tool, and we're going to tighten this down. Now, as we do that you can see how it's drawing in our clip. Once it makes contact, we're going to come underneath here and tighten this down until the bottom makes contact. Then, we're going to do the same for the other side. Once we've repeated the same process on the other side, we'll make our way back over here and we're going to torque it down to the three clicks. We'll do the three clicks to this one as well. We'll close up the door and we'll repeat the same process for the other side. With everything torqued down, we can go ahead and replace our cover. With that done, we're all set. It looks great. That's going to complete our look and installation of the Yakima BaseLine Roof Rack System with CoreBars on our 2016 Hyundai Santa Fe.
Customer Reviews
Custom Fit Roof Rack Kit With Y06130 | Y06153 | Y63TR - Y22VD
Average Customer Rating: 4.9 out of 5 stars (26 Customer Reviews)
This aerodynamic, flush-mount roof rack lets you carry gear and cargo on your vehicle while maintaining a clean, factory look. Crossbars work with channel-mount and clamp-on accessories. Installs on your vehicle's naked roof.by: David08/28/2020
2019 Toyota Highlander
I have not bought car roof racks for decades--back when there were those very useful rain gutters. So I was shocked with the high prices. But what you get today is much more carefully engineered with a complicated construction. This Yakima version even comes with a manual 3.5 mm hex driver which turns out to be a torque wrench too. You use it 16 times, torquing to its limit, in installing the two cross rails on the four towers. Years ago you installed the towers where you wanted them on the rain gutters and adjusted the cross rails by sight. No more. You must go on line to Yakima. You must get the precisely engineered dimensions for your exact vehicle. You even adjust the towers for the roof slope and any toe-in of the roof line. Pay attention to the precise instructions. The result is very solid. I wish that I had more space between the cross rails. There is room for another 6 or 8 inches given where the door openings on my 2019 Toyota Highlander are spaced. But then the rear base clips would be different and that logistics would add yet more to the price. I am confident that I can secure a 4 X 8 sheet of plywood on the cross rails. And I will find my vehicle in the mall parking lot easier with those good looking rails. While I am happy with the end product, I wish the vendors had given more explanation of the fixed dimensions of today's installations. That would have helped make my on-line shopping less frustrating. Part of the problem is that Yakima and Thule do not provide cross rails for my LE Highlander's existing tower bases. And I could not get 60 inch cross rails on any of the versions that fit my LE's bases.
by: Bill12/13/2016
I want to thank the staff at eTrailer for their outstanding support. After my roof rack order got off to a shaky start the customer service staff stepped in and made it right; 100% RIGHT. I cannot thank them, and eTrailer, enough. Regarding the roof rack itself, I have now installed it and can vouch that the installation was a breeze. All parts fit and the instructions were correct. For the record, this is not my first purchase from eTrailer (I've bought hitch items from them before) and it won't be my last. They have ALWAYS given great service, their web site works, their products and descriptions are good, etc., etc. Thank you!
by: Richard04/06/2023
Arrived as part of a set of components for a roof rack and kayak carrier. I liked that etrailer had a guide to get the right components to fit my car's make and model year. This baseclip set arrived quickly, but the set for the rear of the car that arrived with them were obviously returns that had not been inspected. That set was missing parts, requiring follow-up calls to arrange for a new replacement for the incomplete set, and about a week's delay in getting the rack up on the car.
by: Ian 07/02/2023
Mazda
Solid build quality and easy installation on my '21 Mazda CX-5.
by: Greg 06/07/2023
Nicole was beyond helpful!!!
by: Juan04/07/2023
Exactly what I need, and good Track information. Thank you!
by: Whitney 05/27/2021
Excellent customer service, decently quick delivery, and the only store that I've found on the entire internet that sells these clips. Last company let me purchase them, then told me a week later they were out of stock, so it was nice to get these in the mail from etrailer as ordered!
by: Cami03/10/2018
The roof rack has been awesome! It has been really handy to be able to attach our bike rack attachment, kayak bars or traveling cargo carrier. My only complaint is that the end caps fell off somewhere along one of our many adventures and looks a bit disheveled. Other than the appearance it has been very versatile and we love it!
by: Eric05/31/2022
Mazda
The roof rack came packaged nicely and the instructions were simple to follow. I installed it in about an hour and we have already used it this past Memorial Day weekend. My wife loves the way it looks on her Mazda. Much better than the factory rack
by: Henry05/29/2022
Yakima clips provided a perfect fit for my
car. The roof rack is now solidly attached.
Also impressive was etrailer great
customer service
by: Shawn M12/05/2020
Installed on my wife's car and she loves it. Even bought kayak attachment and it works great.
by: Sean 01/08/2022
Works great with baseline towers
by: Dawn08/05/2022
Pleased
by: Karen11/17/2023
Great!
by: Anthony06/10/2020
Great product. Easy to build.
by: Mark 04/22/2023
by: Brenda 05/31/2023
by: Jack 08/17/2022
by: Derek 09/05/2023
by: Paul 06/01/2023
by: Janet 08/23/2021
by: Grant 02/01/2024
by: Nathan07/09/2022
by: Jim 07/06/2022
by: Charles 08/11/2021
25
506
Show More Reviews
See what our Experts say about this Yakima Roof Rack
- 2023 GMC Acadia Roof Rack and Cargo Box RecommendationsThe absolute best roof rack for your 2023 GMC Acadia with the bare roof is the Yakima BaseLine FX because it has a nice factory look but is also more robust so you get a great looking system that's also stronger. Here are the parts you'll need: - BaseLine FX Crossbars # Y59UV - Fit Kits # Y06138 and # Y06132 - Lock Core Kit # Y07204 (optional) If you were planning on using this for a cargo box then I highly recommend the Yakima SkyBox NX 18 # Y45AV. I really like this box because it...
view full answer... - Can the Yakima BaseLine Crossbars Handle the Weight Capacity of a Roof Top Tent The weight capacities listed on cross bars like the Yakima BaseLine FX Roof Rack for Naked Roofs # Y59UV are the dynamic capacity, meaning while the vehicle is in motion. When you're parked and using your tent, the weight capacity is easily going to double or triple because the weight will be static over the axles. So with that being said, the BaseLine crossbars will easily be able to handle the weight of the two adults and the roof top tent. It's also worth mentioning that most, if...
view full answer... - Recommended Roof Rack for a 2024 Volvo S90 w/ No Rails To add a roof rack to your 2024 Volvo S90, that does not overhang the side of your roof, you will need the following parts: Yakima BaseLine FX Roof Rack for Naked Roofs - Aero Crossbars - Aluminum - Black - Qty 2 item # Y59UV BaseClip Fit Kit for Yakima BaseLine Roof Rack Towers - Qty 4 item # Y06124 This aero bar roof rack system has a 165 lbs capacity. I recommend adding the Yakima Same Key System item # Y07204 to prevent theft.
view full answer... - Recommended Roof Rack and Kayak Carrier for a 2003 Toyota RAV4Lucky for you, Yakima does make a set of crossbars that are designed to work with vehicle's that have a bare roof like your RAV4. Check out the Yakima BaseLine FX Roof Rack for Naked Roofs # Y59UV with the BaseClip Fit Kit for Yakima BaseLine Roof Rack Towers # Y06185. These crossbars measure 44 3/4" long, has a 165 lb dynamic weight capacity, and has an integrated top channel for roof mounted accessories. Since you also are looking for a way to transport some kayaks, I'd recommend checking...
view full answer... - Length/Width of Yakima BaseLine FX Roof Rack Crossbars For 2019 Hyundai Santa Fe w/ Bare RoofHi John; great choice going with the Yakima roof rack for your 2019 Hyundai Santa Fe with a bare roof, and the crossbars themselves are 2-3/4" wide x 1-1/8" tall for the Yakima BaseLine FX Roof Rack # Y59UV. That should allow you to clamp any accessory on them as they are standard size crossbars. To complete the set up for your' 19 Santa Fe you'll also need the BaseClip Fit Kit # Y06151 and # Y06154.
view full answer... - Recommended Roof Rack For A 2018 Mazda CX-5You will not remove the plastic strips on your 2018 Mazda CX-5 when you install a roof rack that is compatible with your vehicle. Aesthetics aside, none of the roof racks I have installed on the naked roofs of my personal vehicles have ever leaked. I do like the Inno option: Inno Aero Crossbars - Aluminum - Black - 42" Long and 45" Long - Qty 2, part # INXB108-115 Inno Flush Feet for Aero Crossbars - Naked Roofs - Qty 4, part # INXS200 Custom Fit Kit for Inno XS200, XS250, and INSUT Roof...
view full answer... - Roof Rack Recommendation to Carry Thule Pulse Box on 2018 Toyota HighlanderIn order to carry the Thule Pulse Large Rooftop Cargo Box # TH615 on your 2018 Toyota Highlander you will need crossbars that are perpendicular to your vehicle body so that the box can be parallel with the vehicle body. I really like the Yakima JetStream roof rack system because the crossbars are higher quality with that aero-style design and the legs have adjustments so you get the best fit possible. I'm guessing you have a naked roof but in the event that you do have the flush mount rails...
view full answer... - Roof Rack for Snowboard Carrier Recomendation 2017 Subaru Legacy with Naked RoofFor your 2017 Subaru Legacy with a naked roof you will first need to install a roof rack with crossbars that run from side to side so that you can mount a snowboard rack. Since you like Yakima their round bar roof rack that consists of part numbers # Y00409, # Y28TR, # Y03536, # Y06145, and # Y06130 would be where you would want to start. Then depending on how many boards you want to carry we have a couple options. We have the part # Y03095 which will carry up to 2 board or the part #...
view full answer... - Equipment Needed to Carry Roof Cargo Box and 4 Pairs of Skis on 2013 Hyundai Santa Fe SportIf you used the Thule SnowPack ski carrier, part # TH7324 that can carry 4 pairs of skis or two snowboards and the Thule Pulse # TH615 with its 16 cubic foot capacity, you'd need roof crossbars that have at least 57 inches of space. If your Hyundai Sport has a bare roof, you can install a Yakima Roof Rack that would offer plenty of space for the ski rack and cargo box mentioned above. The rack would consist of the following parts: 66 Inch Long RoundBars, part # Y00410 BaseLine towers,...
view full answer... - Ski Rack and Roof Rack Recommendations for a 2018 Subaru LegacyHow you transport is really up to you. Your 2018 Subaru Legacy is still extremely new, so fits are being added all the time, and Subarus have a reputation for being incredibly flexible. If you want to go with the full rack, or have other possible items to carry like bikes, kayaks or cargo, I recommend using a Yakima roof rack system. This has the added benefit of letting you use a wide variety of accessories and adds a more rough and tumble look to the car. To add this kit to your vehicle,...
view full answer... - Recommended Roof Rack for a 2023 Mazda CX-5 to Use the Thule Hullavator Pro Kayak CarrierIn order to use the Thule Hullavator Pro # TH898 on your 2023 Mazda CX-5 you will need to have a roof rack with crossbars that extend 4"-8" past the roof rack feet. If you have a roof that has no existing crossbars or rails, I recommend the 2023 Mazda CX-5 Roof Rack by Yakima which consist of the: - Yakima HD Crossbars # Y01156 - BaseLine Towers for Yakima Crossbars # Y28TR - HD Bar SL Adapter # Y03541 - BaseClip Fit Kit # Y06130 - BaseClip Fit Kit # Y06154 If you have flush mounted...
view full answer... - Are Two Different BaseClip's Needed for a Yakima Roof Rack on a 2023 Maxda CX-5 with Naked RoofYes, the two different BaseClip's are correct for your 2023 Mazda CX-5 with naked roof. The BaseClip Fit Kit for Yakima BaseLine Roof Rack Towers # Y06130 is for the front bar and the BaseClip Fit Kit for Yakima BaseLine Roof Rack Towers # Y06154 are for the rear bar. The rest of the roof rack kit is the: - Yakima HD Crossbars # Y01156 - BaseLine Towers for Yakima Crossbars # Y28TR - HD Bar SL Adapter for Yakima BaseLine # Y03541 This will allow you to use the Thule Hullavator Pro Kayak...
view full answer... - Yakima Jetstream Roof Rack for Use with Thule Hullavator TH898 on 2018 Toyota HighlanderThe Thule Hullavator load-assisted kayak carrier # TH898 will directly mount onto just about any roof rack bar shapes, including round, square, aero, elliptical, most factory crossbars, and most crossbars with top "T-slot" channels. Yakima Jetstream bars will work fine so long as they are long enough. The most important compatibility requirements for mounting the Hullavator are that the cross bars extend out past the rack legs and by no less than 4 -inches and that they be at least 24-inches...
view full answer...
- Roof Rack Recommendation for a 2022 Kia Seltos with Bare RoofFor the best roof rack for your 2022 Kia Seltos with a bare roof, I recommend the following setup: - Yakima JetStream Crossbars # Y00425 - BaseLine Towers for Yakima Crossbars - Naked Roofs # Y28TR - BaseClip Fit Kit for Yakima BaseLine Roof Rack # Y06130 - BaseClip Fit Kit for Yakima BaseLine Roof Rack Towers # Y06132 - (Optional for extra theft-deterrence) Yakima Same-Key Lock Cores # Y07204 With the Yakima JetStream crossbars, you will have an extremely aerodynamic roof rack system...
view full answer... - Recommended Yakima Roof Rack for 2013 Hyundai Santa Fe SportThe Yakima Baseline/JetStream roof rack system that is a confirmed fit on your 2013 Hyundai Santa Fe Sport with a bare roof consists of parts # Y00426, # Y28TR, # Y06130 and # Y06150. This is a great rack that provides you with an aerodynamic system which will also not interfere with your sunroof. You can refer to the linked installation for illustration of how this rack installs. If you let me know what you plan on using the rack for I'd be more than happy to make another recommendation...
view full answer... - Recommended Roof Rack System For 2015 Mazda 3 For a Roof Top TentI would be happy to recommend a roof rack for your 2014 Mazda 3 5 Door Hatchback for carrying a 165lb Roofnest Rooftop Tent. If your Mazda 3 has fixed mounting points on the roof I recommend the Yakima Roof Rack System which uses 50" Yakima JetStream Crossbars # Y00425, SkyLine Towers for Yakima Crossbars # Y53TR, and Landing Pads # Y00248. If your Mazda 3 does NOT have fixed mounting points then I recommend the Yakima Roof Rack System which uses 60" Yakima JetStream Crossbars - Aluminum...
view full answer... - Roof Rack Recommendation for a 2019 Toyota Highlander with a Bare RoofThanks for reaching out! It looks like at one point Thule did have a fit kit for the bare roof on your 2019 Toyota Highlander but that went away and so I'm guessing the expert that answered that question got confused - you are correct that they are wrong though. For your Highlander I recommend going with the Yakima equivalent that uses clamps to secure to the door jamb: 60" JetStream Crossbars - # Y00426 BaseLine Towers - # Y28TR BaseClip Fit Kit - # Y06130 Lock Core Kit - # Y07204 (optional) The...
view full answer... - Correct Yakima Fit Kit for 2019 Mazda CX-5 with Naked RoofThe correct Yakima fit kit for a 2019 Mazda CX-5 with naked roof is the BaseClip Fit Kit for Yakima BaseLine Roof Rack Towers part # Y06130 for the front and part # Y06154 for the rear.
view full answer... - Can I Use My Rhino-Rack On My 2018 Hyundai Tucson With A Naked Roof, If Not Are There Other OptionsI can definitely get you set up with a roof rack that fits your vehicle. Unfortunately, Rhino-Rack does not offer a naked roof rack fit your vehicle. I do have a roof rack that I can recommend for you. It will consist of the following items: Round 48" CrossBars for Yakima Roof Rack System (QTY 2), part # Y00408 BaseLine Towers for Yakima Crossbars - Naked Roofs - Qty 4, part # Y28TR RoundBar SL Adapter for Yakima BaseLine, SkyLine, TimberLine, and RidgeLine Towers - Qty 4, part # Y03536 BaseClip...
view full answer... - Correct Yakima BaseClip Fit Kits For 2016 Toyota CorollaI checked with Yakima for you, and found the correct BaseClip Fit Kits for your 2016 Toyota Corolla, which are the following: - BaseClip Fit Kit for Yakima BaseLine Roof Rack Towers # Y06170 - BaseClip Fit Kit for Yakima BaseLine Roof Rack Towers # Y06130 The # Y06130 will be for the front and the # Y06170 will be for the rear of your Corolla.
view full answer... - Determining Correct Rhino-Rack Fit Kit For 2015 Mazda 3To install the Rhino-Rack Roof Rack System for fixed mounting points you will first need to verify that your vehicle has fixed mounting points, and you or the installer of your choice will need to drill the holes in the rain gutter trim to access the fixed mounting points of your 2015 Mazda 3. I attached a picture from the instruction manual for the Rhino-Rack Fit Kit # DK410 that is confirmed to fit the 5-door Model that has fixed mounting points, which goes over how to add a hole to...
view full answer...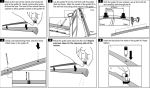
- Will the Yakima SteelHead Roof Mounted Bike Carrier Fit Aero Crossbars on a 2017 Toyota HighlanderIn order to use the Yakima SteelHead Roof Mounted Bike Carrier on your 2017 Toyota Highlander you would need to install a round bar system like the Yakima Roof Rack System part # Y00408, part # Y53TR, part # Y03536, and part # Y00242 if you have flush side rails or the Yakima Roof Rack System part # Y00409, part # Y28TR, part # Y03536, and part # Y06130 if you have a bare roof. If you want to keep the roof rack you have now then I recommend selling the SteelHead and buying the Yakima...
view full answer... - Recommendation on a Yakima Roof Rack and Cargo Carrier for a 2016 Mazda CX-5 Naked RoofYour 58 inch Yakima Round Bars, # Y00409, will fit your 2016 Mazda CX-5 as long as you use the correct towers and hardware to install on your Mazda's roof. The towers you will need are the Yakima BaseLine Towers # Y28TR as the Q Towers have been discontinued. You will also need the Round Bar SL Adapters # Y03536, BaseClip Fit Kits # Y06130 and # Y06132. The Yakima SkyBox 18 Cargo Box # Y07336 will work great with this roof rack but we'll need to check to see if the 57" front bar to rear...
view full answer... - Can Yakima SkyRise Tent be Used with 2018 Mazda CX-5 AWDThe Yakima SkyRise Tent # Y07436 will work great on your 2018 Mazda CX-5 but you will need a roof rack with at least a 165 lb capacity. If the roof of your 2018 Mazda CX-5 has flush rails that run front to back you'd want the Yakima Jet Stream rack part numbers # Y00425, and # Y64AR, # Y39AR If you have a naked roof you'd want the part numbers # Y00425, # Y28TR, # Y06130, and # Y06154. If you have rails that run front to back that are raised up you'd want the Malone rack part # MPG215....
view full answer... - What Roof Rack do You Recommend for My 2014 Mazda 6 with a Sunroof?Yes! You can definitely install this roof rack to your 2014 Mazda 6 with a sunroof: - Yakima JetStream Crossbars - Aluminum - Black - 50" # Y00425 - BaseLine Towers for Yakima Crossbars - Naked Roofs # Y28TR - BaseClip Fit Kit for Yakima BaseLine Roof Rack Towers # Y06130 - BaseClip Fit Kit for Yakima BaseLine Roof Rack Towers # Y06132 - Yakima Same-Key Lock Cores # Y07204 Although, it is important to make sure you have enough height on the roof rack for the sunroof to operate. While...
view full answer... - Recommended Rack For 2016 Toyota Highlander For A Thule Hullavator And Rear Loading Kayak CarrierIn order for you to carry two kayaks, one on a Thule Hullavator, part # TH898, and the other a rear loading kayak carrier, you will need longer crossbars. Your crossbars will also need to extend between 4" - 8" beyond the tower, foot, leg of your roof rack. You will not be able to use a factory roof rack with a Thule Hullavator. If your 2016 Toyota Highlander has flush rails, your recommended roof rack will consist of the following: Thule WingBar Evo Crossbars - Aluminum - Black -53"...
view full answer... - Recommended Aero-Style Roof Rack for a 2018 Mazda 3I recommend going with the Yakima JetStream roof rack system for your 2018 Mazda 3. These are aero-style bars that are made of aluminum so they are not only lightweight but they also have excellent corrosion resistance. The reason that I like the JetStream bars over other aero bars is that they are designed so that you don't have to remove or cut the rubber strips on the top and bottom which help cut down on the wind noise. If you have the fixed mounting points on your roof then you need...
view full answer...
- Roof Rack With Wide Crossbars for 2019 Mazda CX-5 With Naked RoofWe do have a great solution for a roof rack with wide crossbars on your 2019 Mazda CX-5 with a naked roof, but due to the way the Rhino-Rack bars mount, we cannot confirm you can use bars wider than the recommended 46 inches. Instead, the best option is to use a roof rack from Yakima, which uses 50 inch crossbars and fits your '19 CX-5. The rack is made up of the following parts: - Yakima JetStream Crossbars # Y00425 (Black) - BaseLine Towers for Yakima Crossbars # Y28TR - BaseClip Fit...
view full answer... - Roof Rack Recommendation for 2016 Toyota Highlander LE Plus for Carrying Thule HullavatorWhat you will need to attach your Thule Hullavator # TH898 on your 2016 Toyota Highlander with a naked roof is roof rack. I can help you with that. Since Thule doesn't have any fits for your vehicle you will need to go with a Yakima Roof Rack as their crossbars are also compatible with the Hullavator. For that you will need the part numbers # Y00409, # Y28TR, # Y03536, and # Y06130.
view full answer... - Roof Rack Confirmed to Fit a 2022 Toyota Corolla Sport With Bare RoofWe do have a roof rack system using a fit kit that fits your 2022 Toyota Corolla Cross with bare roof. 2022 Toyota Corolla Cross Roof Rack by Yakima - Yakima JetStream Crossbars # Y00428 - BaseLine Towers for Yakima Crossbars # Y28TR - BaseClip Fit Kit for Yakima BaseLine Roof Rack Towers # Y06154 - BaseClip Fit Kit for Yakima BaseLine Roof Rack Towers # Y06153 I am not entirely sure what you mean by hand grips on the top of the doors. But this roof rack system will fit all models of...
view full answer... - Recommended Roof Rack for 2021 Hyundai Sonata with Panoramic Moon RoofBecause your 2021 Hyunda Sonata has the panoramic sunroof, any compatible roof rack system will utilize the door jams and surround to mount to the vehicle instead of the actual roof. This will give you some options for your 2021 Hyundai Sonata, but unfortunately we don't have any photos of anything installed as of yet. With that said, I recommend using the Yakima Roof Rack system for 2021 Hyunda Sonata that uses the following parts: Yakima CoreBar Crossbars - Steel - Black - 50" Long...
view full answer... - Is Thule Compass Compatible with 50 Yakima CoreBar Roof Rack on 2011 Toyota CamryYes, you can use the Yakima 50" CoreBars # Y00421 with the BaseLine Towers # Y28TR and Fit Kit # Y06123 and # Y06153 on your 2011 Toyota Camry with the Thule Compass # TH890000. These are all compatible with each other and Yakima has confirmed that the 50" bars will work on your Camry. Thule doesn't have a length requirement for the Compass, you just need to make sure that your kayaks don't exceed 130 lbs combined and that neither of them are wider than 36" for them to fit. Attached are...
view full answer... - Roof Rack Recommendation and Load Assist Kayak Carrier for 2021 Kia SorentoThe Yakima ShowDown Kayak or SUP Carrier # Y04081 is 42" long so that means your crossbars will need to be at LEAST 84" long to load 2 of these on your vehicle. Unless you plan on taking flight with your 2021 Kia Sorento I don't recommend using wing-sized crossbars, but instead using an alternative load-assist. I recommend checking out the Malone DownLoader and TelosXL Load Assist # MPG114MD-351XL and then picking up an extra DownLoader Set # MPG114MD so you can carry 2 boats. Then for...
view full answer... - Round Bar Roof Rack For A 2022 Toyota HighlanderWe have exactly what you need for your 2022 Toyota Highlander. The Round CrossBars for Yakima Roof System # Y00409 are perfect for your Highlander. These bars are 58" in length, and the capacity varies depending on the application. These bars do not come with endcaps, the endcaps # Y8007026 are sold separately. To complete these bars, you'll need towers # Y28TR, round bar adapter # Y03536, and a fit kit # Y06153. You'll want to check your owner's manual for your vehicle and make sure...
view full answer... - Recommended Roof Rack for 2020 Chevy Traverse Without Side RailsFor your 2020 Chevy Traverse, if you don't have the factory installed raised side rails, then you absolutely can still add a roof rack but it will use a custom fit kit. My recommendation for a naked roof is: Yakima JetStream Crossbars # Y00426 BaseLine Towers # Y28TR BaseClip Fit Kit # Y06153 There is not a rail system to add to your roof, so this is the best option and is rated for 165 lbs.
view full answer... - Can Canoe And Bike Be Carried On Q Tower Roof Rack On 2008 Toyota CamryThe Yakima roof rack designed to fit the top of your 2008 Toyota Camry has a 100 lb weight capacity. You will want to keep that in mind as well as making sure you do not exceed the roof weight capacity for your Camry. You can check the owner's manual or with your dealership to find that capacity. The crossbars that are included with the roof rack are 58 inches long. Depending on the distance between the roof rack legs you may have the room you need to be able to put a bike carrier on...
view full answer... - How To Use Yakima Round Crossbars on a 2011 Toyota CorollaIn order to use Yakima Round Crossbars like part # Y00408 on a 2011 Toyota Corolla you'll need the following: Yakima BaseLine Towers part # Y28TR Yakima Round Bar Adapters part # Y03536 Yakima BaseClip Fit Kit part # Y06144 Yakima BaseClip Fit Kit part # Y06153
view full answer... - Availability of BaseClip Fit Kit for Yakima Roof Rack 144 b57-5 and 153 b73-5The first part number you mentioned is our part # Y06144 and the second is # Y06153.
view full answer... - Does Thule Offer a Roof Rack for a 2021 Toyota HighlanderI do have an option for you but there are currently no Thule roof rack fits for a 2021 Toyota Highlander. Instead, the best option at this time would be the Yakima CoreBar Crossbar System which consists of part # Y00422, part # Y28TR, part # Y06153, and part # Y06132. This system uses aero bars which create less wind noise and have a greater range of compatibility with rooftop mounted accessories.
view full answer... - Roof Rack Recommendation for a 2019 Chevy TraverseThere are parts of roof racks that can be used for other vehicles but there isn't really a "one-size-fits-all" roof rack. For your 2019 Chevy Traverse I recommend checking out the Yakima JetStream roof rack which has a custom fit application with adjustments in the legs to give you a really nice fit. Here are the parts you'll need: 60" JetStream Crossbars - # Y00426 BaseLine Towers - # Y28TR Fit Kit - # Y06153 Lock Core Kit - # Y07204 Attached is an installation video of this kit on a...
view full answer... - Recommended Roof Rack for 2022 Toyota HighlanderFor your 2022 Toyota Highlander with no existing rails I recommend the Yakima JetStream Roof Rack System. For this rack you will need the # Y00426, # Y28TR, # Y06153, and # Y06132. This rack uses the JetStream crossbars which are extremely quiet and low-profile. The feature a lightweight aluminum construction and accommodate most accessories that use T-slots or clamp around bars. If you would like to keep your rack secure, I would also recommend adding the Yakima Same Key System (SKS)...
view full answer... - Roof Rack Recommendation for a 2022 Toyota HighlanderI recommend going with the Yakima JetStream roof rack for your 2022 Toyota Highlander: 60" JetStream Crossbars - Black # Y00426 BaseLine Towers - # Y28TR BaseClip Fit Kits - # Y06153 and # Y06132 Lock Core Kit - # Y07204 (optional) I really like the JetStream system because the adjustability in the BaseLine Towers means you get the best fit possible and the crossbars will be level with the ground instead of having a little tilt that would happen from the contour of your roof. If you...
view full answer... - Roof Rack for a 2019 Chevrolet Traverse with a Naked RoofThe side rails would have come from the vehicle manufacturer. We do not have roof rack kits that will include side rails. However, you can still get a roof rack for your 2019 Chevrolet Traverse, even without rails. You can use the 2019 Chevrolet Traverse Roof Rack by Yakima which consist of: - Yakima JetStream Crossbars # Y00426 - BaseLine Towers for Yakima Crossbars # Y28TR - BaseClip Fit Kit for Yakima # Y06153 (x2)
view full answer... - Roof Rack Recommendation for 2021 Toyota Highlander with Naked RoofSo we don't have a way to add flush rails to your 2021 Toyota Highlander but we do have great roof rack solutions that fit your naked roof like the Yakima JetStream roof rack part numbers # Y00426, # Y28TR, # Y06153, # Y06132. This is a really nice rack that is easy to install, very secure, and also very quiet due to the shape of the crossbars.
view full answer... - What Do you Recommend for 3 Kayaks, Exterior Storage, and 12 Fishing Rods?I have a solution for you. For 2 of your kayaks, your fishing rods (maximum of 12), and a covered 18 cu. foot cargo box, I recommend the Malone Ultimate Angler MegaSport Trailer with Saddle Style Carriers - Fishing Rod Tubes - 1,000 lbs # MPG550-AU. The reason why you should go with a trailer as opposed to a hitch cargo carrier and a roof rack is because those options will not allow you to transport all the accessories you want to transport. The great thing about having the Angler MegaSport...
view full answer... - Recommended Roof Rack for a 2023 Kia Sorento w/ a Naked RoofTo attach a roof rack to your 2023 Kia Sorento, with no roof rails, you will want the roof rack by Yakima and it includes the following parts: Yakima HD Crossbars - Aluminum - Black - 55" Long - Qty 2 item # Y01156 BaseLine Towers for Yakima Crossbars - Naked Roofs - Qty 4 item # Y28TR HD Bar SL Adapter for Yakima BaseLine,Towers - Qty 4 item # Y03541 BaseClip Fit Kit for Yakima BaseLine Roof Rack Towers - Qty 2 item # Y06175 BaseClip Fit Kit for Yakima BaseLine Roof Rack Towers -...
view full answer...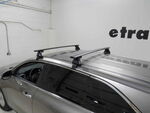
- Recommended Roof Rack and BIC Sport TOUGH-TEC SUP Carrier For 2020 Toyota HighlanderI recommend the Yakima JetStream Crossbars part # Y00426 with the BaseLine Towers for Yakima Crossbars part # Y28TR, fit kit part # Y06153 and part # Y06132 for the 2020 Toyota Highlander. The Yakima JetStream are aerodynamic bars to cut down on wind noise and have a t-track to mount accessories like a SUP board carrier. I recommend the Lockrack Stand-Up Paddle Board Carrier part # LR54FR which has racheting arms so you don't need to worry about tie downs. The Lockrack mounts in the t-track...
view full answer...
- Yakima Roof Rack Recommendation for 2015 Volkswagen Passat and 2018 Kia SportageThere are some Yakima roof rack components that can be used on both a 2015 Volkswagen Passat and a 2018 Kia Sportage but they vehicles are pretty different so they'd take different fit kits and bar lengths. For the Passat you'd need the following: # Y00409, # Y28TR, # Y03536, # Y06137, and # Y06125 For the Sportage you'd need: # Y00408, # Y28TR, # Y03536, # Y06125, and # Y06153 The two components that fit both are # Y28TR and # Y03536.
view full answer... - Is There A Better Roof Rack Solution For A 2011 Toyota Corolla Than My Yakima Q-TowersThe aftermarket roof tracks, such as the Rhino-Rack RT-Style Roof Rack Tracks - Rivet Mount - 39-3/16" Long - Qty 2, part # RRRTS534, are not test fit for vehicles. The rack manufacturers recommend that you to a garage that specializes in aftermarket body work to do the installation. It will be up to the shop you take your 2011 Toyota Corolla to determine whether or not the Rhino-Rack RT Style Roof Rack will fit your vehicle. If you get the OK for the Rhino Rack tracks you will need these...
view full answer... - Roof Rack Recommendation for a 2019 Chevrolet Traverse LSI have excellent roof rack options for your 2019 Chevrolet Traverse LS that will accept a variety of roof mounted accessories, both track mount and clamp on. For this, I really like the Yakima JetStream System because they are aerodynamic, lightweight, and have a sleek look. The aerodynamic shape is going to reduce wind drag and noise which is not something most think about when looking at a roof rack. The correct parts for you will vary if you have a bare roof or raised side rails. I have...
view full answer... - Recommended Roof Rack For A 2022 Toyota Highlander XLEIf your 2022 Toyota Highlander has flush mounted rails that run from the front to the back of the vehicle then I recommend the following parts: Yakima HD Crossbars - Aluminum - Black - 55" Long - Qty 2 # Y01156 SkyLine Towers for Yakima Crossbars - Fixed Mounting Points, Flush Rails, and Track Systems - Qty 4 # Y53TR HD Bar SL Adapter for Yakima BaseLine, SkyLine, TimberLine, and RidgeLine Towers - Qty 4 # Y03541 Landing Pad 27 for Yakima SkyLine And Control Towers - Qty 4 # Y66VR If...
view full answer... - Parts Needed to Add Yakima LockNLoad Platform to 2020 Toyota HighlanderYes it is possible to add the Yakima LockNLoad Platform to your 2020 Toyota Highlander. You will need to start by adding a roof rack. Choose one of the following based on your roof style: Naked Roof - Yakima JetStream Crossbars # Y00426 - BaseLine Towers for Yakima Crossbars # Y28TR - BaseClip Fit Kit # Y06132 - BaseClip Fit Kit # Y06153 Flush Rails - Yakima JetStream Crossbars # Y00426 - SkyLine Towers for Yakima Crossbars # Y53TR - Landing Pad 28 for Yakima SkyLine And Control Towers...
view full answer... - Best Roof Rack For 2025 Toyota Corolla Cross WIth Bare RoofThe best roof rack for your 2024 Toyota Corolla Cross with a bare roof is from Yakima, and consists of the following part numbers: - Yakima JetStream Crossbars - Silver # Y00428 or Black # Y00425 - BaseLine Towers # Y28TR - BaseClip Fit Kit # Y06153 - BaseClip Fit Kit # Y06154 I really like the Yakima brand due to how quiet the bars are; they have what are called "WindRidges" on top that control the flow of the air both over and under the bar, which minimizes both vibration of the...
view full answer...
Do you have a question about this Roof Rack?
Info for this part was:

Edited by:
Daron K

Written by:
Alex H
At etrailer.com we provide the best information available about the products we sell. We take the quality of our information seriously so that you can get the right part the first time. Let us know if anything is missing or if you have any questions.
Thank you! Your comment has been submitted successfully. You should be able to view your question/comment here within a few days.
Error submitting comment. Please try again momentarily.