
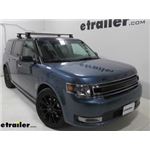
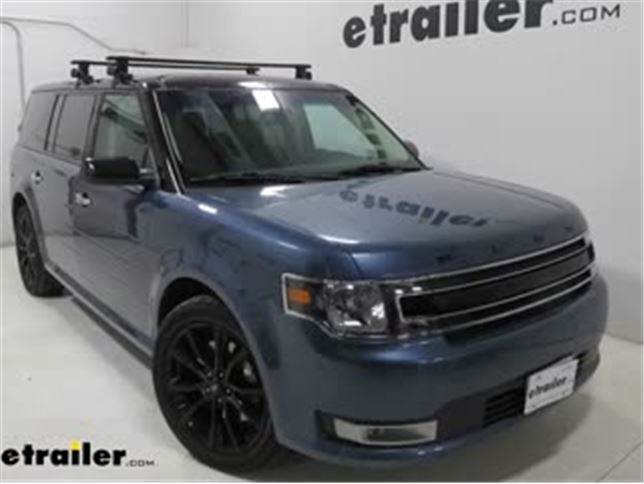
Custom Fit Roof Rack Kit With INK263 | INXB160 | INXS250
Item # IN37RV
Our Price: $485.96
Confirmed to Fit
2014 Ford Flex
Will this fit?
To see if this custom-fit item will work for you please tell us what vehicle you'll use it with.


- All Info
- Reviews (130)
- Q & A (0)
- Videos (3)
- Photos
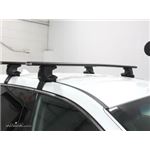
Inno Roof Rack - IN37RV
- Crossbars
- Aero Bars
- 2 Bars
- 63 Inch Bar Space
- Inno
- Black
- Overhang
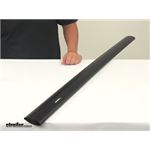
Low-profile, aerodynamic crossbar lets you build an aftermarket roof rack for your vehicle. Aluminum bar has a T-slot that lets you mount channel-mounted carriers and accessories. Rubber strip in T-slot keeps out dirt and won't need trimming.
Features:
Inno Aero Crossbar - Aluminum - Black - 63" Long - Qty 1:- Low-profile crossbar lets you build a roof rack for your vehicle
- Pair with Inno feet (sold separately) to create a complete roof rack
- May also require a custom fit kit (sold separately)
- Elliptical shape helps to create an aerodynamic system with no need for a fairing
- Integrated T-slot makes it easy to slide channel-mounted carriers and accessories onto the bar
- Clamp-on accessories conveniently wrap around bar
- Flexible rubber strip keeps out dirt and allows for simple mounting in T-slot
- Press down on strip and slide accessories into slot - no trimming required
- Plastic coating on strip allows T-bolts to slide easily along channel
- Bottom channel allows easy installation to Inno roof rack feet
- Simply clip the foot into the crossbar and slide it along the channel
- Lightweight aluminum construction is durable and rustproof
- Internal extrusion provides exceptional bar strength
- Glass-blasted powder coat finish resists corrosion, scuffs, and scratches
- Matte black color
Inno Custom Fit for XS200, XS250, and INSU-K5 Roof Rack Feet:
- Custom-fit clamps and pads let you install Inno roof rack feet on your vehicle with a naked roof
- Works with XS200, XS250, or INSU-K5 feet
- Pairs with 4 feet and 2 crossbars (sold separately) to create a complete roof rack
- Clamps are designed specifically to fit the curves of your doorjambs
- Mount to roof rack feet with bolts
- Molded pads are custom designed to fit the contours of your roof
- Protect your roof surface from scratches and abrasions
- Press onto the bottoms of your roof rack feet
Inno Through Feet for Aero Crossbars - Naked Roofs - Qty 4:
- 4 Feet let you mount Inno Aero crossbars on your vehicle's naked roof
- Pair with 2 crossbars and a custom fit kit (sold separately) to create a complete roof rack
- Through design helps create an extended-length roof rack that maximizes carrying capacity
- Torque tool included to secure feet to your roof
- Easy, slide-on installation to channels in bottoms of crossbars
- Locking covers secure system to your roof
- Also secure T-slot-mounted accessories to your crossbars
- 2 Keys included
- Durable, weather-resistant AES plastic construction
K263 Inno Fit Kit Hooks for Flush, Through, and INSU-K5 Stays
XB160 Inno Aero Aluminum Load Bar - Black - 63" Long - Qty 1
XS250 Inno Aero Bar Through Stays for Bare Roofs - Qty 4
Video of Custom Fit Roof Rack Kit With INK263 | INXB160 | INXS250

Videos are provided as a guide only. Refer to manufacturer installation instructions and specs for complete information.


Video Transcript for Inno Roof Rack Installation - 2018 Ford Flex
Today, in our 2018 Ford Flex, we're going to be doing a test on the Inno Square Bar Roof Rack System.We'll be using part numbers INB147 for the 58 inch long black steel crossbars, and part number INSUT for the Inno feet for the square crossbars. Part number INK263 for the customer fit kit.This Inno roof rack system's going to allow us to carry roof mounted accessories on our Ford Flex. Things like bike racks, kayak carriers, roof boxes, and much more.It has the traditional square bar design. Now, these aren't going to be as quiet as an aero style. Like anything we put on a roof, it's going to make a little bit of noise. If you'd like to keep that down to a minimum, you can pick up a fairing to place on the front crossbar.Now, as I said in the intro, the bars are 58 inches long.
When mounted, we've actually got about 49 inches of usable space. That's more than enough room to put a few accessories. They're going to work with your standard clamp on accessories.The crossbars are held in place by four Inno feet. These are designed perfectly to work with our naked roof on our Flex. That way they don't harm or scratch that room.
The hooks that secure our roof rack system to the inside of the door jam also offers some protection. They're rubber coated, and they, too, are custom fit to work with our Flex.This roof rack system also includes locks. That way no one can remove it from our roof. This is a step up compared to other roof rack systems, where you have to pick up separate cores. This includes them, so you don't have to pick up any other parts.
You can see here how it even covers our hardware. That way, it cannot be tampered with.When using this roof rack system, if you have the sunroof option, I'd like to point out that you still have full operation of that.This roof rack system has a weight capacity of 220 pounds. That's a step up, compared to other roof rack systems. You're going to be able to carry a lot more accessories on this system without worrying about the weight. You do, however, want to check with your vehicle's owner's manual, to see if your roof can support that much weight.Now, I'll give you some dimensions.
This may help up when carrying accessories, or pulling and out of your garage. From the top of the roof to the underside of the square bar is about two inches. From the top of the roof to the top of the square bar is about three inches.Now that we've gone over the features, I'll show you how to go ahead and get in installed. We've already got our front crossbar in place. Let's show you how we did that.Per our instructions, we measured over from the two doors to center, on both sides, and got our placement. The rear one installs the same way. Let's go ahead and get started.I've already got one of my feet installed on the bar here. Let's do the other side together. We'll grab the other foot, and we're going to do some assembly. What I want to do is, we'll grab our hook. We're going to set it in place, on top of the bolt there. Then, we'll grab the locking bracket. Put that over top. Then, we'll take the large, square nut and start threading that on.We'll do a couple threads. We just want it loosely installed, like so. Then, we'll take that locking bracket. Set it over. We'll be sure that the opening is facing up, as you see it here. Then, we'll take our large nut and thread that on a little bit. We don't want to thread it on all the way. We want it loosely installed, like so.Now, before you put the foot in place on the bar, it's important that the ridges on the square bar are facing up. The way you slide it onto the square bar is you press down on the bolt here, where my thumb is. It releases the grip here. As we push down, you can see that move. From here, we can take it, while holding it down, and slide it in place. Then, as we let go, it grips and is locked in.Now, we need to take a measurement and make sure that our feet are in the correct position on the square bar. We can grab our included tape measure and, what we need to do first, is find the center of the crossbar. The nice thing is about the included tape, is that it finds the center of the bar for us. It's actually labeled. We'll zero it at the end of the bar, here. We'll stretch it out until we find the part number of the actual square bar, which is located right here. The part number is INB147. So, the arrow here marks our center.Now, you can do this a few different ways. You can mark it with a pen. I like to use my finger nail. Just give a little . Just apply a little bit of pressure, and then we've got our mark.From here, we can turn our tape measure around, place the zero on the center, and, per our instructions, we need to be 630 millimeters to the front of the foot, here. We can adjust our foot out. We're all set. We can repeat the same process with the other foot. Then we can put our end cap on. Just push it in place, like so. Then, we'll put on our base pad. it only goes on one way. Once you've got it lined up, just push it in place. Just like that.Once it's assembled, we can go ahead and set it in place on our Flex. We'll want to gently set it in position in the general area. With it set in place, we need to take one last measurement. Per our instructions, we need to measure 500 millimeters from the center of our two doors to the center of the hook. We can take our included tape. It is measured in inches and centimeters. So, 50 centimeters converts to 500 millimeters. We'll set 50 between our two doors and we'll measure to the center of our fit hook. Once we've got it in place, we'll want to be sure and check the other side, as well.Now we can start tightening them down. As we talked about before, we want to be sure that our locking bracket is facing upwards. If it has fallen down, you can just turn it back up, just like that. Then, we'll start turning that nut until it raises our fit hook up to make contact with the inside of the door. We want to do that for both sides.Now we can take our included tool and tighten them the rest of the way down. It's important that you alternate between the two sides. Do a few turns here, then a few turns to the other side. The nice thing about this included tool is it is a torquing knob. It's going to prevent us from over tightening and under tightening. Once we tighten it up to the correct torque setting, it will click.Once everything's torqued down, we can go ahead and take our locking cap. Make sure that it's facing up. Push it all the way on and lock it up. We're all set. Now we can load up our favorite roof mounted accessory, on our Flex, and head down the road.That's going to complete our test of the Inno Square Bar Roof Rack System on our 2018 Ford Flex.
Customer Reviews
Custom Fit Roof Rack Kit With INK263 | INXB160 | INXS250 - IN37RV
Average Customer Rating: 4.8 out of 5 stars (130 Customer Reviews)
Low-profile, aerodynamic crossbar lets you build an aftermarket roof rack for your vehicle. Aluminum bar has a T-slot that lets you mount channel-mounted carriers and accessories. Rubber strip in T-slot keeps out dirt and won't need trimming.by: Charles 05/10/2024
Perfect fit
by: Samuel 02/03/2024
Everything was perfect
by: Debbie11/12/2018
2017 Lincoln MKX
We recently purchased 2 kayaks & Thule roof racks from our local outdoor store.
After waiting 2 weeks for our roof racks and J bars to come in we found that the Thule racks did not fit our 2017 Lincoln MKX and they didn't make any racks that would. The vehicle does not have roof racks and has a moon roof.
After a couple of days searching the internet we discovered etrailer.com. We found the Inno roof racks, but still was not sure they would work. We spoke to a repesenative and he assured us that the racks we chose would fit and the Thule J bars we did return would also work. As you can see by the photos 2 days later we were happy Kayakers.


by: Matthew05/22/2023
This kit does not fit well. All measurements have been double and triple checked down to the millimeter. The lock on the covers interfere with the hooks. You have to apply so much pressure to get it to close that it makes the rack come loose. Not very satisfied
by: RJK in Delaware08/26/2023
Acura MDX
Racks were perfect for my Acura MDX. They fit like a glove and I have used them several times.
by: Mark05/15/2022
2014FordFlex
I bought these as part of a kit with 60" Aero bars and the appropriate kit for my 14 Flex. I spent probably an hour and a half double checking my measurements and getting them torqued down properly. I spaced the bars on top of the car just a little wider than proscribed because I was planning on carrying 4x8 plywood, and it looked better to my eye. One thing to watch for: The instructions for the car-specific kit (in my case INK263) show the foot spacing measurements for a square bar, and the measuring point for these feet and Aero bars is different. That measurement point is indicated in the instructions for the feet, not the kit. Same numbers, just different reference point. Otherwise, they look good and are rock solid.


by: Craig01/19/2023
Dodge Durango
I did a lot of searching before selecting this rack for my Durango RT (no factory roof rails). It is easy to reinstall once the initial process is followed, I marked my doorjambs with a sharpie and it is easy to set up. Great product!
by: Preston Ghim06/23/2023
2016 Subaru Outback Wagon
worked as expected, I used them to carry my hobie outback kayak (about 100lbs) on my Honda Civic 2016 Coupe (2 doors). They worked with no problem so far (1 year) even under high speed like 70mph.
by: Christopher10/09/2022
Great racks. High quality parts. Fit perfectly. Went together easily.


by: John A.04/26/2023
Has worked great for transporting my fishing Kayak as well as small loads of lumber. It has worked fine for about a dozen and a half boards at a time or a couple of sheets of plywood. Just make sure that you have a good way to strap them down as well as maybe a rubber mat to help hold everything in place. The noise from it on the high way can be a lot but certainly not as bad as some that I have heard. I figure that anything on the outside of a vehicle like that will produce some noise.
by: Elizabeth07/09/2018
I was so nervous purchasing this product since I would have to do the installation myself but the. instructions were clear and the equipment sam simple to assemble. We love our rack system. We have had kayaks and travel bags on them for summer and ski racks for winter each additional piece fit onto the bars well and we have had no issues.
by: Scott09/16/2021
The Inno Aero Crossbars are of exceptionally high quality and have been used to support kayaks and a travel box. Fit and finish are superior and I have been very happy with performance, price and customer service.
by: Andrew06/14/2022
Started assembly last summer and finally completed installation this spring. Directions took a lot of attention to detail but were adequate. Rack went on car securely and looks great. Have attached kayak rack and a roof pod and both worked flawlessly. Would definitely recommend.
by: Jeff G07/13/2020
Ford F-150
I have had countless bike racks over the years and this is by far the best system I have ever had. Fits like a glove on my F150. Easy to install, looks great and the bikes do not move when on the roof.
by: Daren04/21/2023
Noticed box was taped up more then usual, found other manuals that was not specifically for this, and also found one of the feet already had been mounted as there was scratches on the plastic and metal parts
by: Peter 04/22/2021
Installation went pretty smoothly. The trick is to fully understand each step before moving to the next. There are a lot of small parts which at first was a little intimidating, but soon I was able to "get with it". I love the finished product and think you helped me get a good deal. Thank you for that
by: Jennifer 07/15/2021
2014 Toyota Prius
Installed incredibly quickly on my 2014 Prius V with some of the best instructions I could have ever asked for. Used the video as well in tandem and got it on the car in about an hour and a half with my partner. It was a lovely experience, which is sometimes difficult for couples to say in situations like this!
by: Joshua 04/15/2021
Scion
These work great! Keep it nice and tight! No slipping! Very easy to mount and unmount! Rubber coated so it won't scratch up the roof of the car!! I have this mounted on a 2005 Scion xb!
by: Jay 08/13/2022
There work great and were easy to install. e-trailer rocks and so does Justin.
by: Michael06/29/2020
Installation was a little tricky but once the "feet" were attached to the roof and the bars properly spaced, everything wrapped up very well.
There is no noticeable wind noise with these installed.


by: Antonio 11/20/2019
Mazda
Product is great. Fits perfectly with some minor measurement adjustments. Can be assembled by one person, but helps to have two. Bought the complete roof kit and well as the Inno 80 basket for a Mazda CX3, took about two hours to assemble everything.
by: Connor 06/15/2021
It was an easy install with instructions. The rack has held up well so far and looks good on the car.
by: Bren09/29/2020
One was extremely hard to get on compared to the others (not sure if it had some rough machining or something), but once all we’re on, all was good


by: Dzianis07/21/2021
thanks to Adam for help and competent approach. Adam listened impeccably and in the shortest possible time helped to deliver the goods I needed


by: Clayton05/17/2021
Easy to mount and use. Very sturdy aswell. Measurements are a bit off on width adjustment.


25
848
Show More Reviews
See what our Experts say about this Inno Roof Rack
- Recommended Roof Rack For A 2021 Ford Expedition Max Limited Hey Chuck, The rails on your Expedition are unfortunately too large for the Malone # MAL84AR to properly clamp to so you'll have to go with another roof rack in order to get a large enough crossbar to get a 4" overhang. I recommend the following components from Inno: Inno Aero Crossbars - Aluminum - Black - 60" Long - Qty 2 # INXB153-2 Inno Through Feet for Aero Crossbars - Raised Side Rails - Qty 4 # INXS150 The 60" crossbars should give you roughly 4-1/4" of overhang on each side...
view full answer... - Is There a Front Mount Trailer Hitch Receiver For 2023/2024 Ford Expedition Carrying Fishing Rods? It appears you are going to need to have a front mount trailer hitch receiver fabricated for your 2023 or 2024 Ford Expedition as I do not see a custom fit aftermarket option available. We do have the Weld-On 2" Receiver # E17 which will aid in the fabrication of a custom receiver. If this is not an option you like the only other I can recommend is installing a Inno Roof Rack with the Crossbars # INXB160-2 and Feet # INXS150 which will attach to the factory raised rails on your Expedition....
view full answer... - What is the Longest Inno Aero CrossbarThe longest Inno Aero Crossbar available is the # INXB160 which is 63" long. If you are looking for a pair then we also have the # INXB160-2.
view full answer... - Can I Put A Roof Top Tent On A 2007 Mini Cooper hard Top With A naked Roof?Hello Scott, we do have a 165 lb dynamic capacity roof rack for your 2007 Mini Cooper S naked roof hardtop. For that I recommend the Inno Aero Bar Roof Rack. The full roof rack consists of the following parts: Inno Aero Crossbars # INXB115-2 Inno Through Feet for Aero Crossbars # INXS250 Custom Fit Kit # INK456 That said, I cannot recommend carrying a roof top tent with this roof rack or with this vehicle at all for that matter. This rack uses a fit kit that clamps to the door jambs....
view full answer... - Are there Any Thule Crossbars for My 2013 Honda Crosstour?There is not a fit kit for your 2013 Crosstour because Thule does not make a set of bars compatible with your vehicle. Instead, you're limited to using either the SportRack Semi-Custom Roof Rack for Naked Roofs - Square Crossbars # SR1002, or any of the following: -Inno Aero Crossbars # INXB130-138 for a set of 51" and 54" long bars with the custom feet # INXS250, and the fit kit # INK587, -Inno Aero Crossbars # INXB123-130 for a set of 48" and 51" long bars, with the custom feet # INXS250,...
view full answer... - Which Inno Rack Do You Recommend for a 2018 Hyundai Tucson?If you used the etrailer.com fit guide to find an Inno roof rack for your 2018 Hyundai Tuscon with a bare roof, all of those crossbar lengths will work for your vehicle. The racks that we have confirmed on our fit guide are confirmed to securely fit onto your vehicle properly. For a recommendation of an Inno roof rack, I recommend the following parts: - Inno Aero Crossbars - Aluminum - Black - 51" Long and 54" Long - Qty 2 # INXB130-138 - Inno Through Feet for Aero Crossbars - Naked...
view full answer... - Most Hidden Hitch For A 2010 VW GTI GolfAfter using the fit guide, we see that there is only one hitch available for your 2010 Volkswagen GTI and the one you're looking at # 24825 will not fit. Even if it did, it would stick out quite a bit but I have one for you that won't. The Curt Class 1 Round Tube Trailer Hitch has a maximum gross trailer weight: 2,000 lbs and maximum tongue weight: 200 lbs. Even though this has a visible cross tube, it is not super noticeable because it sits a bit back and under the vehicle. Check out...
view full answer...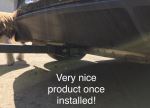
- Inno Crossbar Fit for 5-Door 2014 Ford FocusI'm happy to inform you that this custom fit is compatible with a 2014 5-Door Ford Focus. When pairing these with the feet and crossbars, I recommend getting the Aero Crossbars over the Square as they will cut down on wind noise and offer much more versatility with mounting options (clamps and channel-mount). We have a combo made up with the longest pair, part # INXB138-145, which I've linked for you. The combo includes the crossbars; the feet, part # INXS250; and the custom fit, part...
view full answer... - Recommended Roof Rack For 2016 Honda CR-V With Naked Roof For Carrying KayaksWe can get your 2016 Honda CR-V with a naked roof set up with a roof rack to carry a couple kayaks, and the option I really like is from Inno. The reason I recommend the Inno is because it uses long 54 inch crossbars, which not only gives you enough space for mounting two kayaks, it also makes mounting them easier, particularly on J-carriers like the etrailer J-Style Kayak Carrier # e98878. The closer you can get the kayak carriers to the edge of your CR-V, the simpler it will be to put...
view full answer... - Roof Rack Recommendation for a 2010 Honda InsightWe do have several roof rack options for the 2010 Honda Insight, see link. The highest capacity rack available is from Inno using the following parts: Crossbars, # INXB130-2 Fit Kit, # INK727 Towers, # INXS250 This rack will have a capacity of 140 pounds but is limited to the capacity of the vehicle roof which should be available in the owners manual. You will need to go by the lower of the two ratings. The Rhino Rack options that fit are rated for 110 pounds.
view full answer... - Will Rhino-Rack Ski and Snowboard Carrier Fit 2021 Acura ILX With Naked RoofThe Rhino-Rack Ski and Snowboard Carrier # RR576 is designed to clamp onto or fit the T-slot on roof rack crossbars. You will need to add a roof rack to the 2021 Acura ILX to be able to attach any ski/snowboard carrier. I recommend the Inno Aero roof rack which will clamp onto the doorjambs for installation and can easily be removed when not in use. This is a nice rack at a reasonable price point. You will need the following parts: -Inno Aero Crossbars # INXB138-2 -Inno Through Feet for...
view full answer... - Recommended Roof Rack and Kayak Carrier for 2006 Lexus RX 330If your 2006 Lexus RX 330 has factory installed rails that run front to back, I recommend the Rhino Rack Aero Bar Roof Rack, which consists of # RRVA118B-2 for the 46 inch aero crossbars and # RRSX100 for the crossbar legs. This will provide a sleek, low-profile roof rack with a weight capacity of 165 pounds. If the roof on your Lexus RX 330 has no existing rails or crossbars, you will instead want the Inno Aero Bar Roof Rack with parts # INXB130-2, # INXS250 and # INK789. Then to secure...
view full answer... - Options for Carrying More than 2 Bikes with a 2012 Volkswagen Golf with a Class I HitchYou are correct, anytime you are using a Class I hitch you should never put more than 2 bikes on a bike rack on that hitch. Even if the rack you have is a quality rack that can carry 3 or 4 bikes. The issue is not the bike rack it is the hitch/vehicle. It just does not have the capacity to carry the additional weight, plus the increased leverage of having the weight further out away from the hitch. In most cases it is not the hitch that will bend when overloaded, it is actually where...
view full answer... - Recommended Parts Needed to Carry a 12 Jon Boat on the Roof of a 2019 Hyundai TucsonWe do have a solution for you via installing a roof rack on your 2019 Hyundai Tucson. If your Tucson has flush mount rails that run front to back then I recommend the Thule WingBar Evo roof rack which consists of 47" # TH711220 WingBar Evo Bars, the Evo Flush Foot Pack # TH710601, and Fit Kit # TH186013. If you just have a naked roof (no rails) then I recommend the Inno Aero style roof rack which uses Crossbars # INXB138-145, Through Feet # INXS250, and Fit Kit # INK680. The Thule roof...
view full answer... - What Size Crossbars Do I Need for the Thule Hullavator on My 2019 Hyundai Tucson?For a crossbar kit that will allow you to fit the Thule Hullavator # TH898 on you the roof of your 2019 Hyundai Tucson with factory flush rails involves the following components: - Inno Aero Crossbars - Aluminum - Black - 54" Long and 57" Long - Qty 2 # INXB138-145 - Inno Through Feet for Aero Crossbars - Naked Roofs - Qty 4 # INXS250 - Custom Fit Kit for Inno XS200, XS250, and INSUT Roof Rack Feet # INK680 With this Inno system, you will be able to use the top channels in the crossbars...
view full answer... - Roof Rack for 2016 Lincoln MKX with Naked Roof and Panoramic SunroofThere is one high-quality roof rack that will work on your 2016 Lincoln MKX with a naked roof and panoramic sunroof from Inno, which consists of: - Inno Aero Crossbars # INXB138-2 - Inno Through Feet for Aero Crossbars # INXS250 - Custom Fit Kit for Inno # INK676 This roof rack uses aero crossbars that measure 3-1/8" wide x 1-1/8" tall which are the same dimensions as Thule bars such as the WingBar Evo so your Thule cargo box will fit. The fit kit does have pads to protect your the surface...
view full answer...
- Recommended Roof Rack Options For 2009 Toyota Matrix With Fixed Mounting PointsFor your 2009 Toyota Matrix the only style roof rack system is the clamp on style rather than bolting to fixed mounting points. I would recommned the Inno roof rack system with square bars that clamp securely to your roof. The # INB107 crossbars are mated with the # INSUT feet and # INK244 fit kit, and install easily. The square bars are heavy duty and work with most accessories. You might also consider the Inno # INXB108-2, with # INXS250 feet, and # INK244 fit kit for a roof rack with...
view full answer... - Recommended Roof Rack and Kayak Carrier for 2021 Hyundai Tucson with Bare RoofThe Inno Aero Crossbar Roof Rack part # INXB138-145, part # INXS250,and part # INK680 is an excellent option for a 2021 Hyundai Tucson with bare roof. This is an aero bar system so there will be reduced wind noise and mpg affects. The extended crossbars will be great for kayaks, giving you more space and making loading much easier. In order to secure a kayak you'll still need a carrier, the etrailer J-Style Kayak Carrier part # e98878 is what I recommend. It has all the tie-downs you need...
view full answer... - Roof Rack For 2015 Ford Fusion For KayakFor your 2015 Ford Fusion I do recommend the Inno roof rack because it's a great value. It will perform just as well as other options, but at a lesser cost. The correct fit for your '15 Fusion is the following: - Inno Aero Crossbars # INXB130-138 - Inno Through Feet # INXS250 - Custom Fit Kit # INK860 Then for a kayak carrier that will fit the rack and has the capacity to haul your 75 lb kayak, I recommend the Swagman Exo Aero Rooftop Kayak Roof Rack # S65145. This carrier has a 100...
view full answer... - Roof Rack and Kayak Carrier Recommendation for 2016 Mazda CX-5 With Naked RoofThe best option for a roof rack on your 2016 Mazda CX-5 with a naked roof will be one with longer crossbars to make loading your kayak easier, as well as having an aerodynamic shape for minimizing wind noise and resistance, and durability to withstand a lot of use. The most cost-effective option for a roof rack that fits your '16 CX-5 and meets all of those criteria is from Inno and consists of the following parts: - Inno Aero Crossbars - 54" Long # INXB138-2 - Inno Through Feet for...
view full answer... - Is It Possible To Fit Two Thule Hullavator Kayak Carriers On 2010 Mercury Mariner?The Thule Hullavator Kayak Carrier # TH898 requires a minimum of 28-1/2" crossbar space and the crossbars must overhang at least 4" on each side of the towers/feet. If you installed crossbars that were 57" long that overhang 4" on each side then this would work, however, the weight limit of your vehicle's roof or roof rack may be an issue. Each Hullavator weighs 40lbs then you have the weight of each kayak. I checked the owner's manual for your vehicle and Ford states that you should not...
view full answer... - Recommended Roof Rack for 2017 Fiat 500x with SunroofFor your 2017 Fiat 500X, the roof rack I recommend for your vehicle is the Inno Aero Crossbars # INXB130-138, along with the Inno Through Feet # INXS250, and the Fit Kit # INK482. This combination will allow you to use your Thule accessories whether they are channel mounted or clamp on. This system comes with the integrated locking covers for increased security and has the aero bars for a quieter rack. This roof rack will give you a crossbar spread of 26 inches, so it will work with...
view full answer... - Recommendation For A Roof Rack System For A 2016 Fiat 500X With SunroofIf your 2016 Fiat 500X has a naked roof, I recommend going with an Inno solution which includes: Inno Aero Crossbars (Item # INXB130-138), Inno Through Feet (Item # INXS250), and the Custom Fit Kit (Item # INK482). This Inno Roof Rack Kit will have a crossbar spread of 26 inches and a maximum capacity of 100-lbs. It comes with locking covers for increased security. If your 2016 Fiat 500X has flush mounted rails, I recommend going with a Thule solution which includes: WingBars (Item...
view full answer... - Recommended Roof Rack for 2016 Toyota CamryI reached out to my technical fit contact at Thule and she said that the fit for Thule Aero 400 feet stopped in 2011 so there are no compatible fits past that date. For your 2016 Toyota Camry, I recommend the Inno system consisting of crossbars # INXB138-2, feet # INXS250, and fit kit # INK872. This is a complete system with Aero Bars compatible with your vehicle. If you want a Thule roof rack, I recommend the Thule SquareBar Crossbars - Steel - 43" # TH712100, the Evo Clamp Feet...
view full answer... - What Inno Aero Bar Roof Rack Parts Are Needed for a 2004 Toyota TundraYes, the Inno Roof Rack part numbers # INXB153-2, # INXS250, and # INK532 have been confirmed as a fit for your 2004 Toyota Tundra so it would fit and work well for you.
view full answer... - Recommended Crossbars for a 2004 Toyota Tundra Double Cab With a Naked RoofFor your 2004 Toyota Tundra, I recommend checking out the Inno Aero Crossbars # INXB145-2, with the Inno Through Feet for Aero Crossbars # INXS250 and the Custom Fit Kit for Inno XS200, XS250, and INSU-K5 Roof Rack Feet # INK532. This cross bar setup will work with your naked roof and provide you with 57" long crossbars with integrated top channels for mounting roof top accessories. These bars also have a maximum dynamic weight capacity of 165 lbs, so you'll have plenty of capacity for...
view full answer... - Roof Rack Recommendation for a 2016 Hyundai Elantra Sedan Value EditionSportRack semi-custom roof rack # SR1010 will fit your 2016 Hyundai Elantra Value Edition but there are better options. Considering that your old roof rack put dents in the vehicle roof and the fact that the SportRack roof rack is only semi-custom (not quite universal but not custom either) a better solution is a true custom roof rack. A custom roof rack does cost a little more but will fit and perform much better. The most cost effective custom fit option available for your 2016 Hyundai...
view full answer... - Roof Rack and Ski Box for a 2009 Ford Flex With Vista RoofFor your 2009 Ford Flex, I recommend an Inno square bar kit with a Thule Pulse Alpine roof box, part # TH613. The Inno square kit will provide a solid base for your roof box, and consists of the following parts: Inno Square Crossbars, 58 inches, part # INB147 Inno Feet for Square Bars, part # INSUT Inno Custom Fit Kit, part # INK263. This rack includes locks for added security and can be removed when unlocked to preserve the styling of the first generation Ford Flex. The Thule Pulse...
view full answer... - Roof Rack for 2010 Ford Flex for Installation of Sears X Cargo Rooftop CarrierWe can help you with a roof rack for your 2010 Ford Flex to allow installation of your X Cargo rooftop carrier. If your Flex has raised front-to-back side rails on the roof then a good rack choice for the cargo box is the Thule WingBar Evo system made of parts # TH711420 and # TH710401. This rack will install with a bar spread of 50-inches and it can handle up to 165-lbs. Check the mounting hardware spacing on the box to see if it is compatible with the 50-inch bar spread. If on the other...
view full answer... - Roof Rack Recommendation for 2006 Scion xBFor your application I recommend checking out the Inno aero-style roof rack. The parts you'll need for your 2006 Scion xB include the following: 57" Aero Crossbars - # INXB145-2 Through Feet - # INXS250 Fit Kit - # INK263 The Inno brand has a nice sleek look and comes with locks so that won't be an additional cost like what you see with other brands. I also like the design of the T-Channel in the top since you don't have to trim anything. Attached is a review video for you to check...
view full answer... - Will the Thule Stacker Work with the Inno Square CrossbarsYes, the Inno Square Crossbar System part # INB147, part # INSUT, and part # INK263 which is a fit for your 2011 Ford Flex will work with the Thule Stacker part # TH830. This option will allow you to carry multiple kayaks on the roof of your vehicle. The roof racks comes with locks for security and the carrier comes with tie-downs. I have attached a review video on each of these items for you. Please note that the weight of the roof rack, stacker, and water sport accessories will need...
view full answer... - Parts Needed to Mount Rooftop Cargo Basket on 2014 Ford Flex with Bare RoofThe Surco Safari Rack 5.0 Rooftop Cargo Basket for Factory Rails # SPS4550-1101 is designed to fit on vehicles that have raised roof side rails but not a compete roof rack with crossbars. It cannot mount on a vehicle with a bare roof. To install a rooftop cargo basket on your 2014 Ford Flex you will need to first install a roof rack system. The linked page displays all roof racks offered for your Flex with bare roof. The lowest-cost option is the square bar system from Inno consisting...
view full answer... - Will Inno Ski and Snowboard Roof Rack Fit On Roof Of 2013 Ford Flex Without a Roof Rack? I was able to verify with Inno that you will need a roof rack to use the Inno Ski and Snowboard Roof Rack # INTX726 on your 2013 Ford Flex with the bare roof. They do not have a way to install the rack the way you see in the image you found. The Inno Square bar rack consisting of the Crossbars # INB147, Feet # INSUT and Fit Kit # INK263 will allow you to mount their carrier. The mounts for the roof rack are very similar in the way they clamp to the door frames. We do have the SeaSucker...
view full answer...

- Best Roof Rack for 2006 Range Rover HSEA great all around roof rack for your 2006 Range Rover HSE with no overhang is the Inno Aero Roof Rack system with part numbers # INXB123-2, # INXS200, # INK263. I recommend this over the other roof racks that fit your vehicle because this system uses 48" crossbars # INXB123-2 compared to the other longer 60" crossbars. If you need more space, then get a roof rack with longer bars, but if your priority is a low-profile and sleek look, then the Inno Rack is ideal. The Inno Aero Crossbars...
view full answer... - Inno Square Bar Roof Rack and Fairing that Fits 2005/2006 Scion xBThe correct parts needed to install an Inno roof rack on your 2006 (or 2005) Scion xB would be part # INB137, # INSUT, # INK263. Then for a fairing you would need the # INA262 and you'd be set.
view full answer...
Do you have a question about this Roof Rack?
Info for this part was:

Video Edited:
Chris R

Edited by:
Daron K

Written by:
Ashley K
At etrailer.com we provide the best information available about the products we sell. We take the quality of our information seriously so that you can get the right part the first time. Let us know if anything is missing or if you have any questions.
Product Experts Available Now!
Call 1-800-940-8924
Thank you! Your comment has been submitted successfully. You should be able to view your question/comment here within a few days.
Error submitting comment. Please try again momentarily.