
Yakima HighSpeed Roof Bike Rack - Fork Mount - Channel Mount or Clamp On
(0 reviews)
Price: $308.90
Yakima HighSpeed Roof Bike Rack - Fork Mount - Channel Mount or Clamp On
Item # Y54NJ
Our Price: $308.90
In Stock


- All Info
- Q & A (0)
- Videos (4)
- Photos
Yakima Roof Bike Racks - Y54NJ
- Fork Mount
- Aero Bars
- Factory Bars
- Round Bars
- Square Bars
- Clamp On - Standard
- Track Mount - Standard
- Yakima
- 12mm Thru-Axle
- 15mm Thru-Axle
- 20mm Thru-Axle
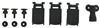
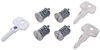
- Locks Not Included
- Black
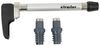
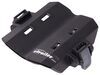
Low-profile, fork-mount carrier lets you transport 1 bike on your roof rack crossbars with T-slots. Torque knob prevents over- or under-tightening. Rear-wheel cradle adjusts to hold bikes of different lengths. 9-mm, Quick-release skewer included.
Features:
- Fork-mount carrier lets you transport 1 bike of almost any size on your roof rack crossbars
- Fits bikes with a 9-mm quick-release skewer or a 12-mm, 15-mm, 20-mm, or Boost 110 thru axle
- Large rear-wheel holder and extra-long wheel strap accommodate fat bike tires up to 5" wide
- 9-mm Quick-release skewer included
- Lockable 9-mm quick-release skewer (Y02118 - sold separately) available
- Fat QR lockable skewer (Y98CR - sold separately) available
- Integrated TorqueRight knob prevents the axle clamp from being over- or under-tightened
- Sliding wheel holder with ratcheting strap secures the rear wheel to tray
- Holder slides along tray to fit different wheelbases
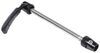
- Easy installation in the T-slots on your crossbars top channels
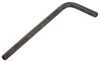
- Also includes hardware for clamp-on installation
- Same Key System lock cores (Y07204 - sold separately) secure bike and rack
- Integrated TailWhip cable lock and TorqueRight knob each accept a core to secure your bike to the rack
- Rear mounting clamp accepts a core to secure the rack to your vehicle
- Streamlined, low-profile design minimizes wind noise
- Sturdy steel construction with chip-resistant powder coat finish
Specs:
- Application: round, square, aero, elliptical, and most factory crossbars
- Carrying capacity: 1 bicycle
- Axle dimensions: 9 mm x 100 mm, 12 mm x 100 mm, 15 mm x 100 mm, 15 mm x 110 mm, 15 mm x 135 mm, 15 mm x 142 mm, 15 mm x 150 mm, and 20 mm x 110 mm
- Weight capacity: 40 lbs
- Maximum tire width: 5"
- Maximum wheelbase: 50"
- Overall length: 54-1/2"
- Carrier weight: 11.5 lbs
- Limited lifetime warranty
8002140 Yakima HighSpeed Roof Bike Rack - Fork Mount - Clamp On
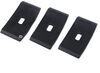
8002122 SmarT-Slot Mounting Kit for Yakima HighSpeed and HighRoad Roof Bike Racks

Video of Yakima HighSpeed Roof Bike Rack - Fork Mount - Channel Mount or Clamp On

Videos are provided as a guide only. Refer to manufacturer installation instructions and specs for complete information.


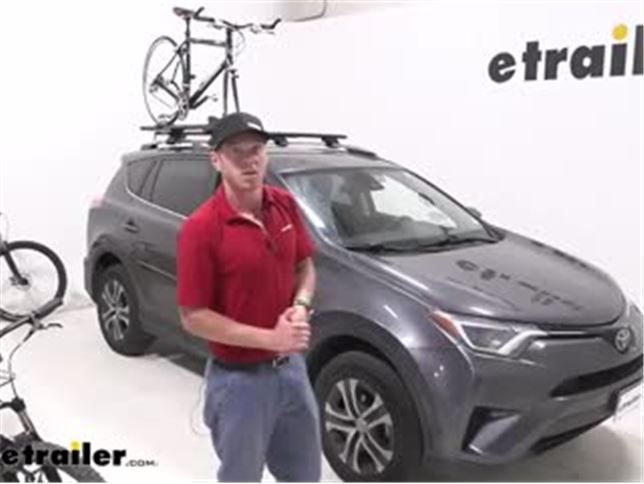
Video Transcript for Yakima HighSpeed Roof Bike Rack Review - 2017 Toyota RAV4
Today I have my buddies 2017 Toyota RAV4 and we are taking a look at the Yakima HighSpeed roof mounted fork mounted bike rack. There are gonna be two HighSpeed roof rack kits on our website. The one we're looking at today gives us two options for mounting. Right now we're utilizing the T track on our aftermarket bars on our roof to get it secured down but it's not going to make it any more low profile than these straps that come on it. Normally these are very low profile but the one reason why the T slots are very nice is notice how it's mounted right above our tower. So we can fully utilize our roof rack system with the T slots.
So you get a little bit of extra room. There are a couple benefits to a fork mounted bike rack. One, it's gonna be a little bit more aerodynamic just because we don't have a wheel in front. So the bike's gonna be tilting down a little bit. So it'll be a little bit more aerodynamic.
It's also gonna be a little bit easier to get it up and on the roof. So if you're a little bit shorter, you have a taller car or a mixture of both, this is gonna be the easier way to get it up on there. One thing about this is any fork mounted bike rack is gonna be the most rigid when it comes to how your bike mounts. As you can see, it's nice and secure. So if you're going on long trips and you're always kind of wondering how your bike's doing up there, this in my opinion is gonna be the most rigid and secure way to mount your bike on your roof.
Depending on what kind of bike you have is gonna determine if you can use the HighSpeed with your bike. So what you need to do is first check out your axle size. We have those listed below, down in the specs. Make sure that they match up with one that's compatible with the HighSpeed. Also the wheel base max, it's gonna be 48 inches which we are pretty much good sitting at about 47 inches.
And we do wanna make sure we don't overload it with weight which the capacity of this rack is 40 pounds. So once we take our wheel off, you can go ahead and take the skewer. I like putting it on first. It makes it a lot easier. All the road bikes that we tested on the HighSpeed worked really well. I think that's what the HighSpeed is mainly for but for a mountain bike like this there are a couple things I want you to look at. One with the bigger wheels typically is a little harder. Mountain bikes are usually a little heavier than some road bikes. This one works, but there is something I want you to measure on your bike. It mainly just comes down to the caliper. So if we we're to look at it, you kind of see how there's an indention on this side of the rack. That's to make room for that caliper. But we do want to make sure that if your rotors get really big. So I'm gonna measure from the center of the skewer. So on your bike, you just measure from the center of the hole, on your forks to where the indention stops is gonna be about five inches. So you just measure from the center to the back of your caliper. And if it's under five inches, you are good. And then notice how I have the whole entire skewer shoved to this side to make room because some of them get a little bit thicker. So now I want you to measure from the inside of your fork and then from the inside of the fork here to the end of the indention on this side it's about an inch and a half. So you'll just measure from the inside of your fork to the edge of your caliper. And if it's less than an inch and a half, you're good. If your front fork looks like this, meaning we have a nut on both sides. It is gonna be kind of a pain to have to rip out two different tools to get that undone. So I highly suggest either converting it over to something like this, little quick disconnect. That's gonna be the easiest way to do it. I just think having an extra set of tools just to take off your bike off your wheels so you can put it up on your roof. I just think that's not the best way but if you don't want to convert yours over or you can't, you could definitely grab another bike rack that doesn't utilize the forks on your bike. If those limiting factors are something you're running into, I do suggest looking at the Yakima HighRoad, the HighRoad will not make you remove that front wheel and you won't have to run into all the other things we we're talking about before. It mounts the same. It has relatively the same footprint. A lot of you we're saying that you like the HighRoad just because you don't have to take the extra time to remove your wheel and find a place to store it on the inside of your vehicle. But it is gonna be a little bit more difficult to get that bike up and onto your roof. Just because right now, there's no way I'm gonna be able to hold this part of my front suspension while this wheel is on there. It's gonna be at least this much taller. So I would have to grab the wheel or something which it's gonna be rotating. And there's not really a great place to hold that. So those are some pluses and minuses between the two. That's the main gist of it. When it comes to the Yakima HighSpeed, we are gonna go over a little bit more in depth specs on this bike rack. And then after we're gonna show you how to fully install. So stick around if you want to. The overall length of the HighSpeed is 54 and a half inches from the front, all the way to the back. On the thickest part of it right in the front, it's about eight and three quarter inches thick. What you could do is you can fit a lot on here, especially if you have the T track. So you can put it right above our tower and you could kind of offset them because the back is a little bit skinnier than the front. The back width is about four and a half inches. Unlike some of the Thule options, we don't have anything underneath. Even if we we're to use the straps, the straps are so much more low profile than any of the Thule options. I really like how Yakima uses the rubberized metal band to secure it down. It's really quick, really easy. And you don't have to worry about anything hitting your sunroof or something like that. You don't have to worry about it scratching up your bars either because we do have a rubber insert right here to prevent all that. If your fat tire bike is under 40 pounds, you can use it with the HighSpeed. It will accept tire widths up to three inches but you might need to grab the fat bike skewer which is not included with the kit. Regardless of what kind of bike you have, if you want to get the HighSpeed, one thing you need in my opinion, is a set of locking cores. So we're gonna have one right here. This will prevent anybody from going up and releasing the skewer. And then moving on back to our back connection. There is another empty little slot right here and that's gonna prevent anybody from sliding this back and opening up the tab to remove the rack. And then the third one, there is a cable lock that's integrated but it's not really gonna do a whole lot of locking if there's no core on the end of it. So you're gonna need three for this one HighSpeed which I highly recommend doing it. It just gives me peace of mind. As promised, we're gonna show you how we converted it from the strap style mounting system to the T track style mounting system and also how we got it up on here and secured everything down. If you decide not to use these straps on the HighSpeed, meaning the little section right here where we open this up, fold this out and this wraps directly around your crossbar. Pretty quick and easy, but there is a second option with this kit. So to start, we're gonna have to convert it over. We're gonna take this out, the strap, and then we're gonna take a screwdriver and notice this little wheel which is used to tighten that. We're gonna pop this up, spread these bands out and then we can go ahead and set this to the side just in case we want to convert it back. We can then remove that strap just by pulling it through and setting that to the side. We're gonna do the same thing for our other two straps over here. Here are the T slots. So what you wanna do is go on your crossbar. We're gonna assemble these first. So put these on the crossbars. So we're gonna have three of them, one, two, and three. So you can go ahead and put that on your crossbar and then we'll line 'em up. Then we have these nuts, which will tighten down on the top with the included tool. There is an extra little clamp that we're gonna put on here. It's just like the other ones. It's just gonna snap in just like that. Regardless of if you're using the straps or the T slots, we are gonna have to pick between these two straps. One's gonna be 12 inches and the other one's gonna be 16 inches. I'm just gonna use the 16 inch one. You just feed it through the bottom here. Once you get it in there, it should just go right up. There you go. To determine which one's gonna be best for you, it depends on the size of your wheel. More so just the height of your rim and your tire and also how low your rack sits to the roof of your vehicle. 'Cause this might get a little long and it might start to hit your roof. So you might want to go with the shorter one. I personally checked a lot of different brand bars that you may have on your roof. And they work with pretty much all of them besides a Rhino-Rack C channel HD bars. So be mindful of that. But what we want to do is slide these down. So I always have the front facing the front and they are about six and a half inches apart. So we can try to kind of line that up. These are our Thule bars we're using right now. And as you can see, everything works pretty good. So kind of just get an idea of where that's at and then we can grab our rack. The goal here is to get those studs through these little holes here and then there's gonna be one in the back as well. So let's go ahead, put this up. We do wanna make sure that the T slots are gonna be facing the side. So they catch that lip, 'cause if they don't, it's not really gonna do a whole lot. From underneath, you can see the two slots on the front that we want to put it in. Kinda lay it down, adjust it. I do wanna make sure that seats in that hole so it's not gonna rotate. Perfect. The back one's a little bit easier because this adjusts like this. It's pretty easy to get it out into place. Now we'll take our nut. I like to get 'em started on all of them, make sure they all are threading and they're nice and easy. And also with the back. We do get a tool with the kit. It's like one of those windy things on those toys you used to play with. It's pretty big, but it's still small enough where you can fit it in your glove box if you want. We're gonna tighten this down. I kind of like to go from nut to nut, get 'em pretty much tightened down and then come back through and torque it down to the specs in our instructions. We will get different clamps that we are just gonna fit right into the slot, hold it down and slide that over. Same with that one and our back one as well. To take the skewer out we just have to loosen this wheel, lefty-loosey, righty-tighty. And if we did have the locking cores installed, just don't come with the kit. We'd have to unlock that before we do this. So what I suggest doing is taking this skewer and we're gonna put it on the bike before we put the bike up on top. I just think that's a little easier. I have messed with a lot of these and that gives me the least amount of trouble but with any type of rack that mounts like this, we are going to have to store this wheel somewhere. So store it somewhere safe. Don't wanna lose it. And also you just wanna make sure you take care of the hardware that you take off the bike and put that with the bike. You should probably just put it right back on the wheel. So don't lose that. You don't wanna have to ride your bike doing wheelies the whole time. So we're gonna loosen up one side, we're gonna put this in. We want to loosen it up a note and we wanna pull this lever out, get it snug. Depending on what this is made of, we do wanna be relatively careful with it. We don't wanna torque it down too much. And then we can grab the bike from the right side. And this is just a lot easier. Depending on how high your car is and how tall you are, it's gonna determine how much easier it's gonna be. And then you just kind of pivot it up there, make sure it's nice and even. Once it is, you can torque that knob down and click whenever it's nice and in place. And then we'll just go back here, adjust this to where it goes right where we need it to, and take that strap. Now for the shake test, with all fork mounted bike racks I always think they're extremely solid. And this one definitely is solid. I don't think it's any more secure up on the roof than if we we're to use these straps. That's typically how I use this bike rack. So I don't think that's contributing to how solid it is. I just think the HighSpeed is a pretty solid rack with the fork mount, but let's take it out on our test course and see exactly how much movement we get. And that's pretty much all you need to know about the Yakima HighSpeed fork mounted bike rack..
0
0
See what our Experts say about this Yakima Roof Bike Racks
- Does Yakima HighSpeed Roof Bike Rack Work With 15 x 110 BoostHey Luke; the answer to your question is yes it does! Your 15 x 110 Boost is 100 percent compatible with the Yakima HighSpeed Roof Bike Rack # Y54NJ. The HighSpeed # Y54NJ is as good as it gets for a roof-mounted bike rack; it uses a simple knob to tighten the fork and secure your bike to the rack, has a hefty 40 lb weight capacity, and can clamp onto your crossbars or install into its channels.
view full answer...
Info for this part was:

Video Edited:
Chris R

Edited by:
Daron K

Written by:
Alex H

Updated by:
Michael B

Test Fit:
Evangeline M
At etrailer.com we provide the best information available about the products we sell. We take the quality of our information seriously so that you can get the right part the first time. Let us know if anything is missing or if you have any questions.
Product Experts Available Now!
Call 1-800-940-8924
Thank you! Your comment has been submitted successfully. You should be able to view your question/comment here within a few days.
Error submitting comment. Please try again momentarily.