
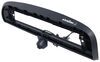
Flint Hill Goods In-Channel Rain Guards with Dark Tinting - Front and Rear - 4 Piece
Item # FHG76FR
Retail:$72.27
Our Price: $55.53
Confirmed to Fit
2018 GMC Sierra 2500
Crew Cab
Will this fit?
To see if this custom-fit item will work for you please tell us what vehicle you'll use it with.
In Stock


- All Info
- Reviews (44)
- Q & A (0)
- Videos (2)
- Photos
2018 GMC Sierra 2500 - Flint Hill Goods In-Channel Rain Guards with Dark Tinting - Front and Rear - 4 Piece
- Front and Rear Windows
- 4 Piece Set
- Dark Tint
- In Window Channel
- Flint Hill Goods
- Side Window
Custom-fit rain guards keep your GMC Sierra 2500's interior dry when you drive in wet conditions with your windows cracked. They also reduce wind noise and allow interior heat to escape by promoting better air circulation.
Features:
- Custom-fit rain guards keep your vehicle's interior dry when you drive with the windows cracked
- Also reduces wind noise and allows heat to escape
- Easy installation inside driver-side and passenger-side window channels
- Secure with automotive-grade 3M tape - no exterior tape required
- Tinted, acrylic construction is durable and helps shield your eyes from the sun
- Made in the USA
Specs:
- Quantity: 2 front rain guards and 2 rear rain guards
- Limited lifetime warranty
72-39415 Flint Hill Goods In-Channel Wind Deflectors with Dark Tinting - Front and Rear - 4 Piece
Replaces e47MR
Installation Details
California residents: click here


Video of Flint Hill Goods In-Channel Rain Guards with Dark Tinting - Front and Rear - 4 Piece


Videos are provided as a guide only. Refer to manufacturer installation instructions and specs for complete information.


Video Transcript for Flint Hill Goods In-Channel Front and Rear Rain Guards Installation - 2016 GMC Sierra 2500
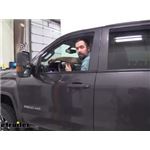
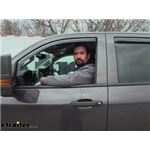
Hello neighbors. It's Brad here at Etrailer, and today we're taking a look and installing the Flint Hill Goods In-Channel Rain Guards on a 2016 GMC Sierra 2500HD. Now this kit is gonna come with the front and rear rain guards, and you're gonna have those for both sides. Installation is relatively simple, and you're gonna gain a lot of use out of this, especially when it's raining but also it has a nice shaded color here which is gonna help block out sun. It's kind of in that area where your actual sun guard doesn't block, so those ones that are kind of hitting you up the side, this is gonna help block some of that out. Now, these are great for when you want just a little a bit of wind coming through, just to get some fresh air, but rolling down the window might be a little bit much.
In a lot of vehicles from the factory, when you crack the window, they actually create a little bit of turbulence and wind noise, so this actually eliminates that, as the air kind of channels in, you still get that fresh air, but it's gonna be nice and quiet and protect the rain from coming in. So with my window like this, you can see that I'm still able to get a little bit of fresh air here but all that water or wind is actually going to pass through to where I'm not gonna have that coming into the vehicle. So I'm only getting fresh air and not that turbulence or that water coming into my vehicle while driving. And with this kit, the rear passengers can enjoy the same benefits of having the rain guard. Great part is, installation is gonna be extremely easy, and it's really just peel and stick, but let's show you how to get these installed.
To begin our installation, we're gonna wanna make sure that we roll the windows all the way down. Now we're gonna grab our deflector here which is gonna be dry fitted in, just to make sure that it's gonna fit properly. And you're really gonna wanna make sure that you stay in this actual channel here, so I'd start here at the bottom, knowing that you're gonna be in that spot, just kind work your way up. Now, these are gonna be a pretty tight fit, so you may need to actually bend this here in order to kind of get this channel to slide in but with a little pressure here, we can work it up, and just make sure you're not pulling that stripping down, following that edge and it should fit up there pretty nicely. So now that we know that it's fitting properly in our seal we're gonna go ahead, and there's included alcohol wipes, we're gonna just follow this inside track area just to make sure that that is going to be nice and clean allowing this to adhere to it.
So let's pull this back out. Now with my alcohol swab here, I'm just gonna kind of run it along this edge, just making sure that we're kind of getting any dust or any dirt that might have built up in here. That's gonna give it a nice surface to actually adhere to. I'll give this a little bit of time, just so it can actually evaporate and become a dry surface before trying to put in your visor. Now, the way that we're gonna make sure that this adheres properly, we're gonna just peel off this tiny little corner here of this 3M adhesive and just kind of have that ready.
And what I'm gonna do is make sure that my bottom channel is in properly and then kind of wedge this in place. Gonna follow it along. Once it's kind of all in place, I'm gonna actually give it upward pressure here just so it's really tucked up in there. Make sure that all of your windows seals are sitting flat, they're not curled over. So at this point you can actually grab this little tail here and we're just gonna work our way down and that's gonna allow it to stick. So now we're gonna roll our window up and down five times. Now you are adding something into the channel where the window is normally used to going, so don't over force it. You want pressure, but also if a it's straining that motor, hold off and really make sure that you're taking your time here. So you don't wanna damage your motor. So let's roll this up. And on our final one we can actually leave it in the up position. So now we have our window rolled up. We're gonna leave it like this for 72 hours and that's gonna allow this to actually find its home and kind of form to the window but also give it time for that adhesion to actually cure up. So if you need to put a little sticky note on your window to remind yourself not to roll it up or on your window controls, that's probably a good step, and that way you'll have a proper secured guard on your truck. Now I've gone ahead and I've actually test fitted our rear window already. So I'm gonna go ahead and I'm gonna clean our seals again. And now this is side specific and you're gonna see that when you do your test fit as one is actually a little more squared off than the other. So make sure that you have the proper one. So just as we did before I've kind of made a little bit of peeling here on our tape. In fact, I might even need to pull this out a little bit more so I can get this placed in there. So we'll just slide this up. Make sure that you have your tape able to be pulled. Get this in, place that up. We can go ahead, peel our strip here. So now out we're gonna do the same process as we did with our front window, rolling it up and down five times. So now that we have this rolled up and down we can leave this window up for that 72 hours again and we're ready to knock out the other side of the truck. And that was a look and installation of the Flint Hill Goods In-Channel Rain Guards on a 2016 GMC Sierra 2500HD..
Customer Satisfaction Score:
82% were satisfied with this product
18% of customers were not satisfied
- Arrived Damaged
- etrailer mistake
Customer Reviews
Flint Hill Goods In-Channel Rain Guards with Dark Tinting - Front and Rear - 4 Piece - FHG76FR
Average Customer Rating: 4.3 out of 5 stars (44 Customer Reviews)
Custom-fit rain guards keep your vehicle's interior dry when you drive in wet conditions with your windows cracked. They also reduce wind noise and allow interior heat to escape by promoting better air circulation.by: Lance01/23/2024
The service was great. Unfortunately the product got damaged during delivery. Past orders have been great.
by: Lisandro09/30/2023
The front driver window and the rear driving side. The parts came broke at the edge just a little. I installed them we will see if they are strong enough to last long on it
by: Eddie05/26/2023
Came in box that made sure it wouldn't break during shipment, nice and wrapped, decent instructions,


by: James10/21/2023
Well it appears that I ordered the wrong parts. The ones I have a for a crew-cab, my 2023 F150 is a super crew cab. Also the little tabs on the end are broken. What would be my process for return and reorder? Jim
by: Michael08/21/2022
Worked perfectly and looks amazing on my new 2022 Ford F-250 Platinum Temor Edition.


by: Patricia 10/20/2023
Easy to install and a perfect fit.
by: Anroe mauricio12/04/2022
I just recieved my package and its broken i want my refund!! I even pay for a fast shipping.. poor quality


by: Reyvin07/12/2023
Still holding up great after a year!
by: Wayne10/01/2021
Both front door guards had broken spots in them. These were in the locations of the most flex to get them installed which leads me to believe they were probably returned by someone.
by: Robert05/23/2023
They work ok. Worried about the stress on the window motors.
by: Russ06/06/2022
Installation simple enough, I think the material is thinner than I expected, all 4 pieces are closer to the glass in the middle, not an even look.
by: Jim03/02/2023
service was great as always thanks a lot


by: Brendan 11/17/2022
Looks like a good product, I haven't installed yet
by: Matthew 05/20/2023
by: David07/07/2022
Not the best quality
by: Robert09/09/2021
All of you were very helpful for returning a new visor back to me. Thank you
by: Chris 05/08/2024
by: John03/12/2022
Perfect fit, quick service!
by: Thomas02/24/2022
excellence service and delivery time...everything came in great shape
by: Art 07/17/2022
Order arrived quickly and in great shape. Thanks.
by: Albert05/01/2024
by: Billy03/14/2023
by: Alan06/27/2023
by: H.E. Iii01/26/2024
25
43
Show More Reviews
See what our Experts say about this Flint Hill Goods Rain Guards
Info for this part was:

Video Edited:
Jacob T

Video by:
Dustin K

Updated by:
Wilson B

Written by:
Matthew S

Edited by:
Daron K

Test Fit:
Bradley B
At etrailer.com we provide the best information available about the products we sell. We take the quality of our information seriously so that you can get the right part the first time. Let us know if anything is missing or if you have any questions.
Product Experts Available Now!
Call 1-800-940-8924
Thank you! Your comment has been submitted successfully. You should be able to view your question/comment here within a few days.
Error submitting comment. Please try again momentarily.