
To see if this custom-fit item will work for you please tell us what vehicle you'll use it with.
Thank you! Your comment has been submitted successfully. You should be able to view your question/comment here within a few days.
Error submitting comment. Please try again momentarily.


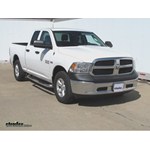
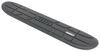
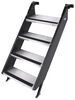
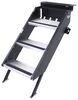
Rustproof stainless steel nerf bars have curved ends for a sleek, street-style look. Non-slip step pads made of UV-resistant ABS plastic resist fading and cracking. Smooth mandrel-bent curves minimize chipping and rust. No drilling required.
Features:
Specs:
Durable, Mandrel-Bent Tubing
The mirror-polished stainless steel tubing of these step bars has curved ends for a streamlined look that complements the factory styling of your full-size truck. Mandrel bending at the corners means that there are no creases in the tubing, which minimizes the chances of chipping and rust at the curves. Each of these tube steps goes through a 6-stage polishing process for a long-lasting, eye-catching shine.
Videos are provided as a guide only. Refer to manufacturer installation instructions and specs for complete information.
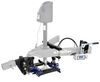
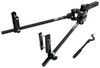
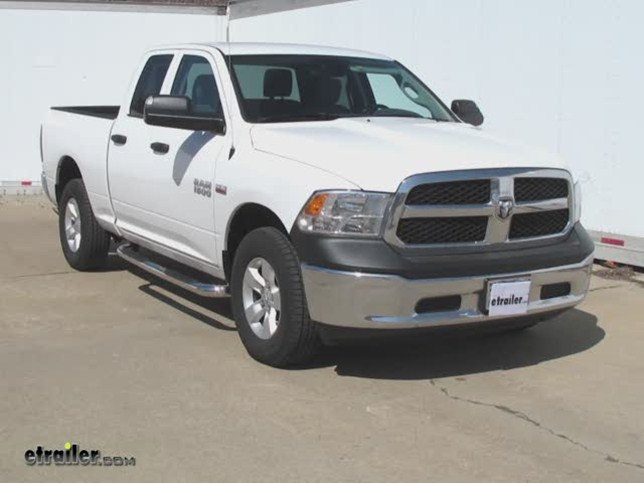
All right, today on this 2014 RAM 1500, we're going to install part number NB-1215x. This is the Bully Nerf Bars, Polished Stainless Steel in 3-inch Diameter. To start off our install, we're going to have all parts laid out. It makes it a little easier to install our nerf bars. I'm going to start on the passenger's side on the front, and our brackets are labeleed, passenger front. We got our hardware together like the instructions will state.
We got all parts arranged out. Let's go ahead and get started. We need to get our truck ready first. Now, bracket for the front is going to line up with 2 holes that are in the body work here. Now, they're covered up with tape right now.
We'll go ahead and pull the tape away or cut as needed. This came off very nice. Our bracket, we'll use those holes. Well, it looks like it uses this hole right here. Now, according to the instructions, this hole should be empty.
Now, we have an insert there. We're going to make an accommodation for that. At this point, we can go ahead and start working with our hardware. First off, we'll have this bolt with the handle or a block welded to it by itself. We're going to add to it this clear plastic plate which will hold everything together while we install our bracket with our flat washer, lock washer and nut. Let's go ahead and install it now.
We'll just go ahead and push it into place. We can go ahead and spin our plastic piece on there to help hold it into place. Now, we're going to do the same thing with this hole here. However, the plate has 2 weld nuts in this one. Typically, we position it and this would line up with this hole. Well, we have an insert here so we're just going to let it fall betweeen the 2. Now, at this point, we can go ahead and install our bracket. We'll just line up the bolts and push into place, then we'll install our flat washer, lock washer and nut just to help to hold our thing together. Now, this did not have the nutsert in place. We'll use a different set of hardware. We'll use a 10-mm bolt, flat washer, lock washer. That will be inside like this. Now, this hardware does not match up the nutsert. This is 10 mm. Inside here is 8 mm. We're going to use the 8-mm bolt bop into the lower 1-1/2-inch long with the flat washer and lock washer. We're going to install that instead. Now, this does not come with the kit. You have to get that locally separated. Before you install, you may want to check to make sure if you have these inserts or not. We're just going to have this thing tight to hold it. We may have to maneuver it when we put our stepbar in place. Our next step, we need to install this bracket right here, which is also labeled P for passenger's side. That's going to have a bolt that will go through here and to the stepbar, and it will also go up through this body mount bolt. Let's go ahead and remove this body mount bolt. Now, this is typically real tight that we cheated it and broke this loose earlier. Put our bracket into place and reinstall our bolts. We also want to leave this loose too. Back here where the cab meets the bed, we have another oval hole right here. We'll go and pull off the tape and we'll install our hardware. This will be the bolt welded into it and a weld nut on this side, which, once again, it's supposed to go on these places but it's already in use. Then we'll go ahead and put our bracket into place. Flat washer, lock washer and nut and another 8-mm bolt to go for our nutsert, which, again, this doesn't come with the kit. Now, we're almost ready to install our tube steps. They dont label what's left or right. The only way of telling is that in the instruction, it says that this height is going to be longer towards the front and then the back. We guess roughly 7-1/2 inches here and about 7 inches here. We rotate it down. We have our pad pointing up so we know we're on the correct side. We'll leave oiur plastic on until we're done. Now, going through our 2 frame brackets and into our tube step will be one of the 4 larger sized bolts, flat washer, lock washer, and then the bolt. It's a good idea is test fit it before we install it. Let's go ahead and just leave one side and the plastic still. We'll go ahead and just pcik this side up. Just enough to hold everything together. Now, let's go towards the back. All right, now, everything loosely together, it's a good idea to go ahead and push everything back and forth and then take a look at it and see how you want it to sit. In this case, pretty much as it sits originally, it's going to be a good spot because we already bottomed out our bracket against the curve of our body work here. We'll go ahead and tighten down our frame brackets first and then come back on these bolts. The brackets are tightened so far. Now, we got one more chance to make an adjustment to our tube step. You also have some up and down adjustment if you like. I'm going to have this mesh at the front so this will cover the bottom edge here, and then we'll go ahead and tighten down those bolts. Now, this thing is not carved in stone, if you dont like the way it looks you could always loosen it up and make one more adjustment. Let's go to the front. Lastly, we'll go ahead and tighten up our body bolt here. Everything is installed, let's go ahead and take off the plastic. On our driver's side, we ended up having to remove a rivet and that's okay because could still use our hardware. You can see how the nut plate will line up with this. Then we'll install a bolt, flat washer, lock washer. Now, we'll basically go ahead and repeat all these same steps over on our driver's side. That will finish it for the Bully Nerf Bars, Polished Stainless Steel in 3-inch Diameter, part number NB-1215x, on our 2014 RAM 1500.
Average Customer Rating: 4.9 out of 5 stars (7 Customer Reviews)
Rustproof stainless steel nerf bars have curved ends for a sleek, street-style look. Non-slip step pads made of UV-resistant ABS plastic resist fading and cracking. Smooth mandrel-bent curves minimize chipping and rust. No drilling required.Quality Construction, excellent appearance, easy to install. It took me about 2 hours total time going very slow to install the bars. The installation film strip was invaluable as an aid to the installation.
The Nerf bars were shipped promptly, arrived the day the tracking stated. They shipment arrived in good condition. Just exceptional service from etrailer from placing the order to the followup after receipt.
LEF
A perfect fit and all the parts were included for the installation. Couldn't have been any easier to install.
The product looks great. Just a quick note, the ovals for the front brackets are not cut out on my 2016 Ram. There is only a hole drilled and the bracket won't go in. Just a minor issue that can be fixed with a cutting wheel.
My mechanical ability is pretty average, but with the aid of etrailers excellent installation videos, I got these installed in no time. It took me less than 90 minutes to install and it was outside in the dark with a trouble light. Watch the installation video right before you install and you won't have any problems.
The bars look nice and are really sturdy. I'm very satisfied with them.
Product appears to be good quality - I just installed it today so time will tell in that regards. The mounting hardware was absolutely awesome and made the installation a breeze. Shipment from etrailer was excellent and the follow ups regarding shipping info was great. I would recommend this vendor and product to others.
nice bars only thing on a 2017 holes are smaller than instructions and a fish wire would have been nice
Awesome product. Easy installation. Looks great on the truck!
Info for this part was:
At etrailer.com we provide the best information available about the products we sell. We take the quality of our information seriously so that you can get the right part the first time. Let us know if anything is missing or if you have any questions.


Tony
3/12/2017
Everything is holding up good!