
To see if this custom-fit item will work for you please tell us what vehicle you'll use it with.


Easily hoist yourself into your Ford F-150 with these straight-style, extra-wide oval step bars. 5" Wide non-slip pads provide grip, and textured black powder coated steel resists rust while adding rugged style. Custom installation kit included.
Features:
Specs:

California residents: click here
Videos are provided as a guide only. Refer to manufacturer installation instructions and specs for complete information.
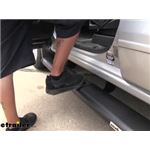
Today, on our 2013 Ford F-150 SuperCab, we're going to be installing the DeeZee Tube Step Running Boards with customer installation kit, Part Number DZ16111-16325. Now here's what our running boards look like installed on our vehicle. Now let's show you how much easier it is to get in and out of the truck with the running boards installed. Now, we're going to begin over here on the driver side. I'm going to go ahead and point out the mounting locations on the truck. We'll start here on the driver side front. We'll be using this hole here and this hole here. We'll then scoot back a little.
We'll need to remove this piece of tape that covers you our next set of holes. We will using this hole here and this hole here. Go ahead and scoot back a little farther. Again, we'll have to remove a piece of tape covering up a hole. Now, here at the rail location, we'll be using the back hole here and this hole here. Now let's point out the hardware that we'll be using to attach our brackets. We'll be using an 8-millimeter U nut and an 8-millimeter by 25-millimeter flat-head bolt.
This would be the same hardware used at all 6 mounting locations. Now let's point out what our driver side or left-hand side bracket will look like. We want to make sure that these 2 flanges are facing towards the front of the vehicle, so, when you line it up with your holes, it'll look like that. Now, let's go ahead and install all 6 of our U nuts. To do that, we'll take the side with the threaded part in it, and that'll go to the inside of the hole as the bolt will threat through this way. We'll go ahead and slide it into position, lining it up with the hole. Now, on these bottom holes, since it's a little thicker, pick a flat-head screwdriver and just spread the U nut apart just a little bit. It'll allow you to slide it on a little bit easier. Now, with all of our U nuts attached, now we're ready to bolt the 3 brackets here under the driver side.
Now that we have all the hardware just hand-tight, we can come back and tighten everything down. Now that we have our 3 brackets tightened down over here on the driver side, we'll go ahead and repeat the same process over on the passenger side. Now, the only difference in the installation between the driver and passenger side is that, the bracket here, you want to make sure that flange pieces here face forward when installed like this. The passenger side will look just like this. Next, we're going to go ahead here on the driver side. Take one of our tube steps and set it on the brackets. Now, with our tube step in place, let's go ahead and point out where we're going to need to install the U nuts on the underside of our tube step. We see that we'll have to put them on this set of slats or the intersection here at the rear.
They'll go in this groove here and this groove here. For the middle section or the middle brace, we'll be using the forward area that you can put the U nuts into or the slats. There's one back just a little bit rather, but we'll be using the forward of the two areas. They'll be going in this slat here and this slat here. Now, for the forward-mounting bracket, we'll be using the rear set of slats. We'll be using this set here to attach. It will be in this slat and this slat right here. Now we'll go ahead and stake our tube step back off and then we'll go ahead and install the U nuts. Now, the outer one or this one here in this slat will slide in this direction, again, with the threaded part up, will in there like this. You'll notice it is adjustable as you may need to move these once you put the running board back on the braces. The other one will go in the other direction. Go ahead and slide that in. Again, it's adjustable here in the slat. Now let's put the remaining U nuts in on this running board. Now, with all of our U bolts installed, we're ready to set the running board back on the brackets. We're going to go ahead and install all 6 bolts loosely so that we can make any necessary adjustments. Now, with all of our hardware hand-tight, we can go ahead and adjust the board forwards and backwards and in and out if necessary to get it to the position that we like. Now that we have the running boards positioned where we like them, we can go ahead and tighten down the hardware that secures it to the bracket. Now, with our hardware tightened down over here on the driver-side running board, we'll go ahead and repeat the same process for installing the running board on the passenger side. That will do it for our installation of the DeeZee Tube Step Running Boards with custom installation kit, Part Number DZ16111-16325 on our 2013 Ford F-150 SuperCab. .
Average Customer Rating: 5.0 out of 5 stars (1 Customer Reviews)
Easily hoist yourself into your vehicle with these straight-style, extra-wide oval step bars. 5" Wide non-slip pads provide grip, and textured black powder coated steel resists rust while adding rugged style. Custom installation kit included.
Makes getting in and out much easier.
Info for this part was:
At etrailer.com we provide the best information available about the products we sell. We take the quality of our information seriously so that you can get the right part the first time. Let us know if anything is missing or if you have any questions.


Thank you! Your comment has been submitted successfully. You should be able to view your question/comment here within a few days.
Error submitting comment. Please try again momentarily.