
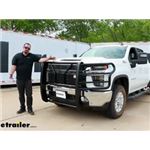
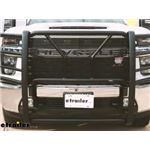
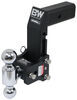
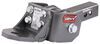
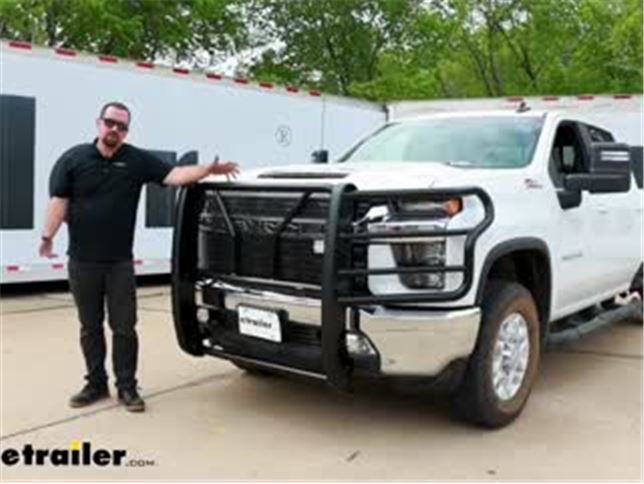
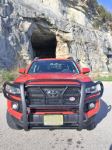
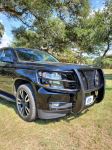
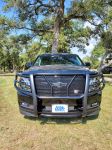
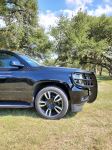
Westin HDX Modular Grille Guard with Punch Plate - Black Powder Coated Steel
(31 reviews)
Price: $814.86
In Stock
Westin HDX Modular Grille Guard with Punch Plate - Black Powder Coated Steel
Item # W44NF
Retail:$1,064.00
Our Price: $814.86
You Save: $249.14
Will this fit?
To see if this custom-fit item will work for you please tell us what vehicle you'll use it with.
In Stock


- All Info
- Reviews (31)
- Q & A (0)
- Videos (2)
- Photos
Westin Grille Guards - W44NF
- Steel
- Black
- With Punch Plate
- Full Coverage Grille Guard
- Westin
- 2 Inch Tubing
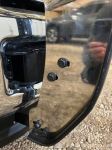
This grille guard gives your vehicle a truly rugged look. Powder coated steel construction, heavy-duty wraparound wings, and full punch-plate grille offer maximum protection. Rubber-coated uprights shield grille guard from damage.
Features:
- Custom-fit, extreme-duty grille guard protects your vehicle's front end
- Deters dents, chips, and scratches on your grille, headlights, and bumper
- Acts as a brush guard for off-road adventures
- Multi-piece, welded uprights are coated in heavy-duty rubber for additional protection
- Bolt-together assembly required
- Large-diameter, contoured tubing wraps around front end for superior coverage and attractive lines
- Punch-plate insert provides full-coverage protection for factory grille
- Guard bars on wraparound wings help to shield headlights
- Black powder coated steel is durable and corrosion resistant
- Quick and easy bolt-on installation with included hardware
Specs:
- Perimeter tube: 2"
- Headlight guard tube diameter: 1-1/4"
- 3-Year warranty
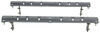
57-23995 Westin HDX Modular Grille Guard with Punch Plate Grille - Stainless Steel - Black
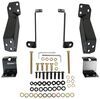
Installation Details
This Product Fits The Following Vehicles
- 2020 - 2023 Chevrolet Silverado 2500
- 2020 - 2023 Chevrolet Silverado 3500


Video of Westin HDX Modular Grille Guard with Punch Plate - Black Powder Coated Steel

Videos are provided as a guide only. Refer to manufacturer installation instructions and specs for complete information.


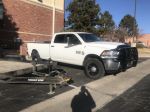
Video Transcript for Westin HDX Modular Grille Guard Installation - 2022 Chevrolet Silverado 3500
Hello neighbors, it's Brad here at etrailer. And today, we're taking a look and installing the Westin HDX Grille Guard on a 2022 Chevy Silverado 3500. Now not only does this give your truck a much more tough look, but it's also gonna serve for a lot of different protection reasons. And a lot of that comes down to the fact that not only do you have these solid two-inch diameter bars, so if you ever hit a deer or any animal that might be out in your area, it prevents an accident on your vehicle and having to take it to a body shop or causing any damage. I think it's totally worth it. And unfortunately, I've been a victim of totaling out a car because of that.
And this is definitely a way to prevent that. This is extremely heavy duty. It's pretty well all bolts on, too, so it's custom fit to your vehicle. So on this Silverado here, you can see, looks nice and clean. It follows the headlights, so that way, you're not gonna be blocking any of your visibility.
And also you get this punch out plate, too. And this is nice because if you have smaller things, say a bird or something along those lines comes here, it's gonna prevent it from maybe causing damage to your radiator. And the great part is it looks really good. You still have that ventilation with no problem. And overall, it's just gonna keep your truck looking nice overall.
You're not gonna have any dings, dents, or scratches, or at least it's gonna prevent it from the front side of the vehicle. This is also gonna be great for anyone that's in maybe a rugged terrain or maybe do some off-roading. This is gonna act as a really good brush guard. That way, you can kind of take those twigs and trees down and really not have to worry about damaging your vehicle too much. You also have this nice coating here on the vertical bars and it may just kind of seem like a nice added touch, but also that's gonna keep any rocks or anything from really nicking this and denting up and just kind of keep it clean-looking overall.
And to go with that durability, you have black powder coat finish throughout the entire thing so it's gonna look really good. Now if you want a slightly different look, there's also a polished stainless steel version available as well. So you can kind of make it custom match your truck. Now as far as installation goes, this one's actually pretty easy. You do have to take off your grille and a few of the garnish that, you know, just kind of is necessary to gain access to the bolts to get your bumper taken off. And that's gonna allow you to bolt up through your factory tow hooks, which you do maintain, which is nice. The bottom brackets, which require a little bit of trimming as you can see here, but it's minor. And once the grille guard's in place, you really don't notice it too much. So overall, this is pretty easy to do. I do recommend having an extra set of hands as it is rather heavy and kind of getting this in place and starting your hardware can be a little bit tricky. But overall, I think it's a great looking brush guard or I'm sorry, grille guard, and you're gonna get that added protection. So as far as installation, totally worth doing and definitely a great addition to your truck. So let's take a look at that now. To begin our installation, go ahead and get your hood lifted up and we're gonna take this plastic cover here that's right above where our hood latch is. And it's just gonna be a series of plastic push pins. These are pretty easy to pry up. There's gonna be a slot on one of the sides that you can get a trim panel tool or even a flathead screwdriver. Just pry that center portion up, lift that up, and then the whole thing should come out with it. If it comes out in two separate pieces, no worries. You can always put those back. Now during this whole installation, highly recommend having a nice organized spot to keep all your hardware. It's gonna make putting everything back in that much easier. So go ahead, go along this outer edge, get all those plastic push pins, and then we'll set this cover aside. With those push pins removed, we can go ahead and lift this out. Now our hood latch is kind of right here, so I think if we kind of get this at an angle, we should be able to slip this out. Worst case, there's some torque bit screws that if we need to, we can go ahead and take those out. And it does kinda look like that might be what we're gonna do. I don't want to damage our plastic here, so I'll go ahead and get my torques bit. We'll take this off. And these are just T15, so this'll make sure that we can get this all taken out. So now this lifts out and we can set this aside. So with that cover out of the way, that's gonna expose the four 10 millimeter bolts that we're gonna take. These are the ones that attach the grille to our little coarse port that we have here. So go ahead and get these taken out. Now we need to go to the wheel well where there's gonna be two torques bit screws. We have one that's kind of right where the bumper kind of meets this filler panel. There's also gonna be one that's tucked up here. So with that T15 torques bit, we'll go ahead and get those taken out. We're also gonna do that on the other side of the vehicle. Now with those Torques bits taken out, we're gonna go ahead and pry back our wheel well trim here. Now be careful, we need to get to about this point where there's gonna be a seven millimeter bolt that's attaching this filler panel. You don't want to bend these too much because if you put a crease in the plastic, unfortunately, it's pretty hard to get those out. And you don't want to damage your truck in the process of getting your grille guard on. So just kind of pry on here. There's gonna be a series of plastic clips. If you need to, you can use a plastic trim tool to kind of pry on it. But normally with your hands, just kind of take your time here. And if the clips pop out or if they break, which is very possible, just be careful. Those clips will slide back in. So I'm gonna get this top one here. There we go. And then my clip popped out here, but this is gonna be just enough for us to gain access to this seven millimeter bolt. So go ahead and get that taken out. Now I'm gonna just take, you can take some paper towels or a rag or something and just kind of place this here on our fender liner or our wheel well trim, just to kind of keep that gapped out. Now we're gonna be prying off this filler panel and there's probably gonna be a series of clips. So just kind of be careful here. There may be some hardware along the way. We're gonna find that if we need to. Now to get our filler panel off here, it can get a little bit tricky. I've found that if you kind of peel back the fender liner here, there's a clip that's kind of tucked right in this area. So I'll go ahead and get that one popped out first. We're just gonna be kind of working our way along this whole edge. Now we're also gonna be popping it out over here. So what I like to do is kind of find the biggest gaps and work on those. And that way, it kind of helps get the rest of the clips to pop out. And a plastic trim tool really comes in handy here. You can kind of pry and get to those clips without damaging the paint. So I highly recommend having some of those handy for something like this. But a lot of times, if you kind of just give it a little bit of force and just take your time, we'll get this to pop out. There we go, okay. So as I kind of work here, those clips pop out fairly easily. And then again, once you kind of get to this point, just kind of wiggling it along should help loosen this up. So we'll go ahead and get this set aside. You can go ahead and do that on the other side of the vehicle as well. Next, we're gonna go ahead and get our grille removed and there's gonna be a 10 millimeter bolt on each side. It's gonna be this one that's about the furthest one out compared to the other 10 mills. So go ahead, get that taken out. And there's also gonna be some electrical connections that attach to the bumper from the chassis. So while we're here, since we're gonna be taking the bumper off, we're gonna go ahead and separate these plugs. So this one here, the red tab, pull that back. That's just a locking clip and you should be able to push in on that center and get it separated. Now on our passenger side, I'm not for sure as far as the electrical connections, but we'll go ahead and get these separated as I do think they run to the bumper. So there's this guy, you just push that tab. And then we have this one here as well. So we'll just get those separated. And then as far as getting the grill taken off, we do need to be careful here. There's some plastic kind of retainers or keepers that kind of hold the grille in place. So you're gonna wanna pry up on this to get those to pop out. That way, they're not locked in place. And then also, you can see where the Chevrolet badge is. This goes in between the headlights and your turn signals. So these do clip into the headlights. You wanna be real careful on these, obviously. So I'm gonna just slowly kind of pry on these and you should be able to kind of see where the clips are along here. So if you can, you can use a plastic trim tool. Again, just be careful here. You don't want to damage anything. So with that side popped out, I'll go ahead and do the same over here. And then as we pull this back, there's like a plastic centering clip here. It seemed like it popped out pretty easily. But now that we have our grille off, we'll go ahead and get this put aside. And we're gonna start attacking the hardware that's holding the bumper on. So up top there's gonna be a total of four bolts that we're gonna get. And it looks like we have two of them that are gonna be, the head will be vertical. These are gonna be a 13 millimeter. So we'll have one here and here. And then our larger one that's tucked down here is gonna be an 18 millimeter socket to get to those. So we'll go ahead and get these taken off first. And for the bolt down here, the 18 millimeter, it's kind of tricky to get on there. I got this plastic will kind of move and there's a knockout or a cutout there to where that socket should fit. And honestly, a short socket might work a little bit better as it's gonna see it. So I'm gonna go ahead and grab one of those and we'll get those taken out. Now we're gonna head underneath the truck and you'll see that these arms that attach to the frame, just follow those and you're gonna see that there's a 15 millimeter bolt that's gonna be attaching to our bumper. We're gonna go ahead and get that removed. Now at this point, we should be able to get our bumper off. Sometimes, these will take a little bit of persuasion to get taken off. So I'm gonna grab on the bottom here. And remember, we may have some electrical connections that are still slightly attached. So just be careful you don't want to yank it too hard and pull it all the way out without making sure we have everything separated. Now once I tried to take my bumper off, it was still fighting us. And the instructions aren't super clear exactly what hardware you're taking off. The picture's not the best. So those vertical or those bolts that ran horizontal, I should say, I don't know if those needed to come off. It can't hurt at this point, but I do see that we have another 18 millimeter bolt that's kind of tucked further down. It's kind of tricky to see, but in between this gap between our air vents here and our bumper, you should be able to shoot this down with a nice extension. We'll go ahead and get these removed. Now with those two removed, this should come off. There we go. Again, just before you start pulling too far, you're gonna wanna double check. Make sure there's no electrical connections that we forgot about, but I think we covered them all. So I'll go ahead and set this aside somewhere safe. And you're gonna want to get your brackets out for mounting up. So we're gonna be looking for this as well as this one here. Now they are gonna be specific as to which side of the vehicle. You can see there's a P that's stamped into this passenger obviously. And also the passenger stuff actually came in a different colored bag than the driver. So before you just pull all the packaging out, that'll also help separate it in the proper fashion. Now they don't mention taking off the tow hooks. We're gonna go ahead and we're gonna use them. So we need to take off our factory bolts so we can get the new ones in and these will sandwich around it. And also one of the steps that they have you do is trimming the balance before doing this. But I recommend getting this in place and that way when you're trimming, you can kind of test fit it to make sure that it's gonna go on nice and proper. So go ahead and get your factory tow hook bolts off. These are gonna be an 18 millimeter, so I do recommend maybe having a wrench on the backside and then go ahead get these taken off. So now we'll take our passenger bracket here and take our long new hardware And we're gonna pass this through and have your tow hook ready 'cause as we pass this in, we're also gonna align it with that. So if it helps, you can do one at a time obviously. And with that passed through, we're gonna take our lower plate here and this is gonna slide over those bolts we passed in and then it's gonna bolt up here. So to finish this off, make sure you put a flat washer and a split washer. And we're not gonna be tightening these down quite yet. We're gonna wanna leave this little bit just loose. So main thing is just kind of get it hand tightened on. And then this bottom bolt, we're gonna go ahead, take this shorter one flat washer. And then this will pass through here. Make sure you finish that up with also flat washer, split washer, and our nut. So go ahead and you can repeat this on the other side. So now we're gonna go ahead and in our instruction manual, we're gonna grab the templates. And these are gonna pretty much line up exactly where we need to be as far as cutting out for our brackets. And that's why we mounted those up first. I like to actually cut and that way we can test it on and then we may have to cut a little bit more and that's probably gonna be normal. But I've gone ahead, you kind of taped this up into the corner and I'm gonna go ahead with a oscillating tool, a multi-tool, whatever you want to call it. If you have drill, that's gonna work just as good, but it's kind of up to you. Main thing is get some nice clean cuts here. So I'll cut along here and see how it looks. (tool whirring) We'll take our template off. Now something I noticed too before cutting was beneath this, there is a kind of a plastic portion that's kind of, it's a small bracket. We may end up having to cut through that, obviously, to make space for our bumper brackets to mount up. So I'm gonna go ahead and get this knocked out. I got a few corners that are still sticking. (tool whirring) And we can see that plastic bracket is in the way. So we're gonna need to cut that out as well to make that clearance. I'm gonna go on the backside and see if we can't just remove that if that's possible. But I'm gonna also go ahead and cut mine out now. Now something too, you're gonna wanna get those burrs knocked off before you obviously get it in place. You can use a file. Generally, you can use the backside of a knife too to just kind of run this along the edge and that really knocks those burrs down nice and clean as well. So we'll go ahead and get this one cut out and then I'll take a look at the backside and see what we need to do. So I finally got that back part cleared out and you really can't just take off the whole thing. So the way I did it, I'll show you. It actually wasn't too bad. On this plastic part, I just made a line and then I cut down here. Now this portion you might have to get from the front side, but mainly we're just cutting out to make sure we have that clearance. So I'll make the marks on this side and show you kind of how I did that. So this section here that I marked out will be cut out and as I mentioned, this one's gonna be kind of tricky to get to. So I'm gonna be cutting that from the front side, but I've really just kind of followed the outline of what we cut previous. And just take your time, make sure you're not cutting past this and making any extra damage that you don't need to. So we'll go ahead and get this trimmed out. So now at this point, I'm gonna flip it over and take that knife blade and just clean everything up or a file. Main thing is you wanna get all those burrs off because once you put it in and have that those brackets slide through, it's gonna be really hard to get that nice and clean. So take your time here and just take that little bit of extra effort to give your installation a nice clean look. So with everything trimmed out, let's test to see how it fits. So slide those brackets through the holes that we cut and you might need an extra set of hands to kind of guide this along. And then get your tow hooks to kind of pass through. And also this upper mounting part, just make sure that that slides over and it should kinda look something like that. Now there's gonna be some vehicle side specific brackets here and these are gonna bolt up where that kind of tucked down bolt was, where we saw it previous. And what you can do, this plastic trim actually pops up. We may end up having to trim this to get that clearance, but this is gonna go in right down through here. So you might have to pull the bumper out just as hair. But this'll drop in here. And then we'll align that up. Take those factory bolts that we removed previous and I'm gonna just get this started. Now with these kind of in place, what we're gonna wanna do is check to make sure that we're pretty close within tolerance here. So we're going to measure this out. It should be from end to end, about 42 and a quarter. Now once we're pretty happy with that, what we're gonna do is I'm gonna start tightening these down as well as that bolt that was kind of tucked down there. That way, our bumper's gonna be in place. I am gonna have to trim this as well. It looks like I can make like a small little notch here and that way, we can still maintain a little bit of rigidity here. But once we get this all tightened down, at least these bolts, we're still gonna leave this loose for now, but we can start getting the rest of our filler panel and our grille back in place just in the reverse order that we took it off. So as we're getting everything back together, I will remind you, make sure you get all of your electrical connections put back together from our bumper. And that way, everything works properly. And also as we're kind of tightening these down, before we get the grille on, again, double check your measurements. It should fall in to what the instructions point out. And I did end up trimming this just a little bit here and it looks pretty clean. So if you need to trim yours, just go ahead, follow along, and you should be able to leave about a quarter of an inch on that backside so it's still one piece. So with an extra set of hands, we're gonna go ahead and get this in place. Now I have hardware here, we have a a button head bolt with a, you can see that it's got a washer here. Just make sure that those indentions are facing towards the head. And then we have our serrated flange nut. I'm gonna get this started on our top mount here. So we'll just go ahead and get one of these started on each side. And that way, it's gonna support it and allow us to get the rest of our hardware in place a little bit easier. So with those top ones holding in, we're gonna grab our larger bolts and it's gonna be the same configuration. We're gonna get those started on our bottom brackets. Now those are still loose, so you can adjust it. So if those holes aren't lining up, you can kind of move that bracket. And once these are kind of in place, just hand tighten them all. Then we can continue on putting the rest of our grille together. Now before we get our side wings on, I used this bolt to kind of get our bottom one started, but this is gonna pass through here. So we'll go ahead, we'll take these out, and those bolts are gonna keep it from falling forward. But we'll raise this up a little bit, slide this out, and then we'll go ahead and lift this in place. And we'll get that aligned and pass our bolt back through. Now it might help to get some of the smaller hardware in place here, which should be the smaller bolts in the smaller flange nuts. So if we get these holes aligned and started, that might help us kind of leverage this back up to get our big bolt pass through. So now at this point, we have all of our hardware in place. It did come with Allen keys and that's gonna be kind of nice here, but we do need to tighten and torque everything down properly. The torque settings are gonna be found in the instruction manual. But as you probably noticed, there's a decent amount of play due with our brackets being still somewhat loose as well as all of our hardware. So that's really so you can custom cater exactly how you want. You can get a nice clean fit and make sure that all your clearances are good while doing that. So I'm gonna go ahead, I'll start snugging everything down, and getting it fine tuned and then we'll torque it up and we'll be good to go. Now as far as tightening down the hardware, I do recommend really having someone hold it in place exactly where you want it and start with the biggest hardware down below. Make sure you get all three bolts on each side. And also, I forgot to mention those little support arms that we took those factory bolts on, make sure those are back in place. But as you kind of work your way up, you can go ahead and get these and then to your top mounting bolt and then we can do the wings and that way we can really fine tune it, but we'll have the basic form already set. Now the torque settings, as I mentioned before, are gonna be found in the instruction manual. But if you need a torque wrench, we have these available here at etrailer. You can generally go to an auto parts store and rent one for free. This is gonna make sure that our hardware is properly torqued down. It's not gonna come loose over time, but it's also not gonna be too tight, causing any stress on those threads. So go through all your hardware. The different sizes are gonna have different torque settings so just adjust accordingly for that and then go through, get all of your hardware properly torqued down. And that was a look and installation of the Westin HDX Grille Guard on a 2022 Chevy Silverado 3500.
Customer Satisfaction Score:
78% were satisfied with this product
22% of customers were not satisfied
- Arrived Damaged
- Wrong item was ordered
Customer Reviews
Westin HDX Modular Grille Guard with Punch Plate - Black Powder Coated Steel - W44NF
Average Customer Rating: 4.6 out of 5 stars (31 Customer Reviews)
This grille guard gives your vehicle a truly rugged look. Powder coated steel construction, heavy-duty wraparound wings, and full punch-plate grille offer maximum protection. Rubber-coated uprights shield grille guard from damage.by: Joseph06/14/2023
Love the new grille guard. Very heavy duty construction and looks great! My wife has had one on her truck for several years and loves it too. Weather's very well.


by: Christopher 02/13/2024
by: Chris01/20/2023
Receive it yesterday and installed it. If it wasn't for the garbage stainless steel hardware it would have been a faster simply install. I had the 2 bolts, the only 2 I tried to close up the gap lightly with a short wrench pull threads and get stuck before it was even tight. I couldn't back it out or get it tight So I had to unbolt the brackets and pull it all off and cut the bolts with a sawzall. Then I replaced all the hardware with 1/2 inch grade 8 flanged bolts and nuts. Save yourself the trouble and junk the hardware that comes with it and get 8 hardened bolts uptown.


by: Todd01/25/2019
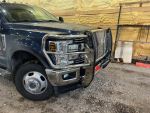
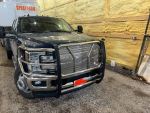
This the review I posted on TacomaWorld about the grill: “I had purchased a HD Steelcraft grille guard, via Carid, for my 2017 Tacoma, but it was not received in acceptable condition (from manufacturing and shipping). After being refunded I purchased a HDX Westin, grille guard, via etrailer. First, I have to say the Westin was much more difficult in install; luckily I had a buddy with more experience on such projects, more patients and the right tools. The instructions covered several years of Tacomas and were poorly written and illustrated. With that said the packaging from Westin was far superior than that of Steelcraft’s. Westin had every part covered by cardboard cut to fit. Under the cardboard the grille guard had been wrapped in foam. The likelihood of the grille being damaged was very unlikely. On the other hand the Steelcraft only had foam and bubble wrap around it with a thin leather like covering around it all on the outside. Before even unpacking the Steelcraft it could be seen were the corners of the up rights had cut through the wrapping. As mentioned the quality of the grille was poor. There were places where it had not been powder coated, the powder coating on the punch out was sloppy and one of the up rights appeared to have been damaged before it had even been wrapped. The Westin was made of thicker and wider steel. Both grilles were one piece units. The Steelcraft bolted to the frame using vertical bolts, which seemed to me could be sheared off on impact, while the Westin grille bolted on horizontally. Steelcraft looked good the way the upper part of the guard turned inward to follow the upper part of the grille, and the Westin upper part turn outward following the angle of the lower part of the grille. The Westin offered more protection. If you were to hit something the wider spread of the Westin uprights seem like they would protect more. The uprights on the Steelcraft were just powder coated medal, but the uprights on the Westin had a nice rubber strip over them, well suited for pushing another vehicle. The Westin cost more, but worth it. Just make sure you’re very patient and having a pass though socket is a great help since there is very limited room to work under the bumper on the upper bolts. And Steelcraft’s warranty is two years while Westin’s is three years.”

by: Al L09/15/2019
We chose this particular guard because we like the design over other brands for the Tahoe application. This is a 2020 Tahoe Premier RST. Grill guards are popular here in rural Texas even on cars and SUVS because they are known to at least sometimes help minimize vehicle damage during highway impacts. Turkey buzzards, hawks, feral pigs and deer are a constant presence on our rural public roads. We like the way it fits and the tubing is even heavier than the Ranch Hand on our farm trucks. We are very happy with this product.


by: Anderson03/07/2023
Amazing product. Westin always struggles with clear and easy to follow instructions. etrailer online install video is always the reliable go to.
by: Jim N11/23/2016
I like to think my Westin Grille Guard is the best compared to some of the others I have seen on the road. I have the polished stainless and I do not see one bit of rust or discoloration. I do wish though that the bolts that hold the grille onto the truck were polished stainless or came with caps to cover the zinc oxide bolts that are used for the installation.

by: Steven 12/08/2021
After ordering the grille guard I wondered how it would be delivered as I have a long driveway with no turn-around. I called etrailer and made them aware of my driveway situation. They gave me the number to the shipper and we were able to meet up less than two miles from my home. I was really impressed with the way my grille guard was packaged. The installation went smoothly for the most part. The illustration pictures included with the instructions were a bit confusing at first. After scrutinizing the diagrams I was able to finish the installation. Since the grille guard was to much to handle for one person, I used a block and tackle hung from my garage roof rafter and had my wife steady the grille guard as I installed the bolts. Torquing the nuts was a bit of a challenge due to the limited access space. Also, after the installation was completed, I had a hard time opening the hood due to the limited space to access the horizontal hood latch. The top of the grille guard sits a bit higher than the truck's grill and the hood release space. Finally, after succeeding in opening the hood, I drilled a hole in the horizontal latch, installed a zip tie in the hole, and now can pull the zip tie horizontally to release the latch. The grille guard appears to be sturdy. If it keeps my headlight and factory grill intact after a deer strike it is money well spent. Price a headlight assembly and grill for a 2019 Ford F250 and I'm confident that you'll agree with me. The only added cost for me was buying an 18mm socket. I've received many compliments already on the grille guard.


by: John 08/09/2022
This is an excellent grill guard excellent people to deal with couldn't be happier thankyou etrailer
by: Jim M.04/13/2017
It has a few chips in the chrome when I received the grille guard. Not sure if it was for the warehouse or shipping. Also there is a little rust starting at one of the welds. Still very happy with the grill guard.
by: Jeff 03/16/2021
This has been a great grille guard! Power coat looks new and this has been a "better than expected" item.
by: Jim 07/06/2022
I love my grill guard. Now I am thinking I may want to attach some lights to it.
by: Tee03/15/2018
Great Grill Guard. It was very easy to mount and we added a heavy duty winch. It really changed the look of the truck. Holding up really well with no rock chips or fading still looks brand new!
by: Andy09/24/2018
Great quality, finish is holding up excellent despite abuse. Another bit of information to note: if you have the chrome mesh grill (Denali style) it will require modification and not install per the instructions.
by: Andrew10/07/2021
Good and strong grill guard.
by: Jane 11/10/2022
I bought this grill one year ago. I like this grill. I can recommend it.
by: wayne04/11/2019
Excellent product, timely received, easy to install. Glad I purchased it. Keep up the good work!
Wayne
by: Allen07/25/2018
Paint is peeing off in several places, it’s made very well and I pleased with everything except the paint.
by: Gerald R12/29/2018
LOVE IT.
by: Bruce B07/19/2019
On time, as described!
by: Duran05/09/2024
by: Louis 02/07/2024
by: H C01/07/2021
25
31
Show More Reviews
See what our Experts say about this Westin Grille Guards
- Does Westini HDX Grille Guard for 2021 GMC Sierra 2500 fit with Front Sensors and CameraYes, the Westin grille guard part # W44NF does fit your 2021 GMC Sierra 2500 diesel with the front parking sensors. It would block the front camera though as the mesh would be right in front of it.
view full answer... - Can a Westin HDX Grill Guard From a 2020 GMC Sierra 2500 Be Moved To a 2017 GMC Sierra 3500? The Westin HDX Grille Guard # W44NF removed from the 2020 GMC Sierra 2500 is different than the Westin HDX Grille Guard # 57-3795 which fits your 2017 GMC Sierra 3500. Because the guards themselves are different there are no brackets which will allow you to install the newer guard to your 2017. So you will need to get an entire grille guard to also ensure your headlights are not impaired as well with the different front end designs of the trucks.
view full answer... - Recommended Grille Guard For A 2022 GMC Sierra 2500 Yes, for your 2022 GMC Sierra 2500, we have the: -Westin HDX Modular Grille Guard with Punch Plate # W44NF. This is a custom fit, extreme-duty grille guard that is made from black powder coated steel, and features an easy bolt-on installation using the included mounting hardware.
view full answer... - Grille Guard Options for 2022 Chevrolet 2500HDThere may be a level of obstruction when installing the Westin HDX Grille Guard with Punch Plate, # W98RV for any lower level lights in the bumper. That is the nature of the design for needed mounting location and dependent on which bumper option your vehicle is equipped with. There is also the option of the Westin HDX Modular Grille Guard with Punch Plate, # W44NF.
view full answer...
Do you have a question about this Grille Guard?
Info for this part was:

Expert Research:
Jameson C

Video Edited:
Joshua S

Written by:
Matthew S

Edited by:
Daron K

Video by:
John S

Test Fit:
Bradley B
At etrailer.com we provide the best information available about the products we sell. We take the quality of our information seriously so that you can get the right part the first time. Let us know if anything is missing or if you have any questions.
Product Experts Available Now!
Call 1-800-940-8924
Thank you! Your comment has been submitted successfully. You should be able to view your question/comment here within a few days.
Error submitting comment. Please try again momentarily.