
Reese Quick-Install Custom Installation Kit w/ Base Rails for 5th Wheel Trailer Hitches
(58 reviews)
Price: $300.02
In Stock
Reese Quick-Install Custom Installation Kit w/ Base Rails for 5th Wheel Trailer Hitches
Item # RP50054-58
Our Price: $300.02
Will this fit?
To see if this custom-fit item will work for you please tell us what vehicle you'll use it with.
In Stock
Thank you! Your comment has been submitted successfully. You should be able to view your question/comment here within a few days.
Error submitting comment. Please try again momentarily.


- All Info
- Reviews (58)
- Q & A (0)
- Videos (2)
- Photos
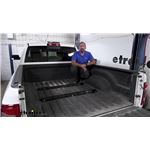
2019 Ram 2500 - Reese Quick-Install Custom Installation Kit w/ Base Rails for 5th Wheel Trailer Hitches
- Above the Bed
- Reese
- Custom
Custom brackets reduce the amount of drilling and time required to install your fifth-wheel trailer hitch. Brackets, base rails, and hardware included.
Features:
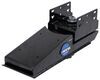
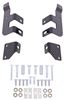
- Installation brackets mount beneath your truck bed to provide attachment points for 5th-wheel rails
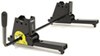
- Base rails sit in truck bed and allow installation of 5th-wheel trailer hitch
- Custom brackets mount to existing holes in truck frame, minimizing drilling and measuring
- Cuts installation time in half when compared with universal bracket systems
- 10-Bolt rails and hardware included
- Compatible with Curt, Draw-Tite, Hidden Hitch, Husky, Reese, and Valley 5th-wheel hitches
- Will not fit Reese Elite Series (Signature Series) or Valley UBS hitches
- Sturdy, black powder coated steel resists corrosion
- 5-Year limited warranty
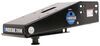
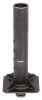
50054 Reese Custom Quick Installation Brackets
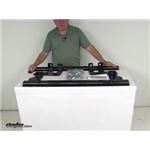
58058 Reese Fifth Wheel Rails - 10 Bolt Design
Installation Details


Video of Reese Quick-Install Custom Installation Kit w/ Base Rails for 5th Wheel Trailer Hitches


Videos are provided as a guide only. Refer to manufacturer installation instructions and specs for complete information.


Video Transcript for Reese Quick Install 5th Wheel Base Rail Kit Installation - 2019 Ram 2500
Hello, neighbors. It's Brad here at etrailer. And today, we're taking a look at the Reese Quick-Install Custom Installation with Base Rail Kit for a 2019 Ram 2500. If you plan on towing a fifth wheel trailer and you don't have the OEM tow package or puck package as they call it where you can just drop in your fifth wheel, your alternatives are going to be generally rails. And these are a great example of something that allows you to have your fifth wheel hooked up. And the Reese Quick-Install comes with brackets that are specifically for your Dodge, and that's gonna make it a little bit easier to get installed.
And there is gonna be drilling required, obviously, as you're gonna have to pass some carriage bolts through the bed. But really, overall, it's not too bad. The brackets use factory weld nuts located on the frame, so it really gives you a good, you know, at least reference point to get those mounted up and know that everything's aligned. 'Cause really, it comes down to making sure that these are set up nice and even and parallel and straight in the bed. Because once they're installed, you're gonna be hooking your fifth wheel up to it, so you wanna make sure that you're able to not only drop it in easy but also take it out.
Now, these rails come into an ISR standard, which just basically means that a lot of different brands of fifth wheels are gonna be able to drop in. And that way, once you have these in place, you're gonna be able to drop that fifth wheel in, hook up to your trailer, and hit the road. But whenever you're not using it, it's super easy to just unpin, pull your fifth wheel out. (hardware clanking) (hardware thuds) And the great part is it doesn't take up a whole lot of bed space once you don't have your fifth wheel installed. The kit is going to have the two rails as well as the hardware and the brackets to get it all attached to your truck.
And the rails have a nice black powder coat finish on 'em, so it's gonna hold up long term. They're gonna live in your bed, so even if you don't have a tonneau cover covering 'em up, they're gonna hold up to that weather long term. And the same goes for the brackets that you're gonna be mounting up on the frame. Now, there's no drilling required on the frame. But obviously, drilling through the bed, it's not too terribly hard to do.
But you do wanna make sure that you have a long 9/16 drill bit because portions of it require you to drill through the bed and then through the bed sill, so it does take a longer drill bit to do that. And you might wanna have a step bit as well to accomplish dropping in. There's some spacer tubes that go through here that you are gonna need to make inch and an eighth diameter hole, so make sure you have that ready. But other than that, I'm gonna walk you through the installation to make sure you get yours installed. And within a few hours, you should be able to get this all in place. There's a few places that do get tricky as far as just space, but the general concept of it is fairly easy. So let's go ahead and get those rails installed on your Ram. Now, the first thing that we wanna do before we get installing is get our spare tire out of the way. So if you need to, you can go ahead and lower that as well as taking your heat shield off, which will be bolted up. Our neighbor today already had that removed for us, making it a little bit easier for me. If you have plastic wheel well liners, I've found that sometimes removing them does make it easier to get access to the frame. It's not always necessary. Sometimes, you can kinda peel it back. But something that I always do is lower down the exhaust. That's gonna give us just a little bit of wiggle room. The Ram exhaust tend to not move too much even after taking it off of our isolator. But just that wiggle room gives us a little bit more when getting our hardware in place. So to get these pried off, just a nice soapy, water solution. You can soak that down. And with a pry bar, we'll pry it off of the isolator. (hardware clanging) And just this little bit of movement should be enough to really help us out long term. And while we're under the truck, we're also gonna want to loosen up some wire loom as well as our brake line brackets that are attached to the driver side frame rail. You're gonna see they're just kinda snapped in with some plastic clips, and this is gonna give us access to get our hardware and our brackets in place. So I'm using a trim panel tool. You're just gonna wanna kinda pry this out to where it's loose. So these trim panel tools work really well. If not, you can use a flathead screwdriver. So go through, find those plastic push-in fittings and just separate those. (pushpin popping) (pushpin popping) So now, at this point, head up into your bed. Grab one of your rails. And I use a chalk marker, you can use really anything that's gonna denote where our measurement's gonna be. And we're gonna be measuring from the lip of the bed. We're not using the tailgate. So from this edge here, depending if you have a short box or a long box, there's gonna be a measurement that's in the instruction manual that you're gonna wanna follow. But if you have a spray-in liner like we do today, you're gonna wanna kind of account for that by adding an eighth of an inch to that measurement. So what I'm gonna do first is take our measurement that we have. And I'm gonna just run my tape measure back and just make a few lines across our corrugation. And that's gonna give us a nice line to get our rail in place. (distant machinery humming) (tape measure rustling) (tape measure scraping) So now, we're just gonna take our rail and line up our marks to the edge of that. And it's nice to have this chalk marker. This will come off with water. So these lines, the pink paint will go away, it's not a big deal here. But that way, we can always make sure that we're squared up across. Now, at this point, what you're gonna wanna do is kinda eyeball and get this as centered as possible. And then, from there, take your tape measure and you're gonna find a reference point that's equal on both sides. So you can use the wheel well. There's also this line here in the bed that's a good reference mark. And we're just gonna measure that side to side. Mine's coming up with right about 2 1/2, pretty close to that. So we'll see on the other side, and then we'll bump it back as necessary to make sure that it's even. All right. (tape measure cracking) So I got about 2 9/16 roughly. Yours may vary, so don't use that measurement. Make sure you're double checking that it's even. And this is one of those steps where you take your time because this kinda determines the rest of the installation. So you wanna make sure it's perfectly, you know, nice and square in the bed and also side to side. So now that I have it in place, I'm gonna hold it and I'm gonna just kinda go around the outline here. Just in case we bump it or something, we at least have a reference mark to go back to, and that's gonna just take away having to remeasure. So now, at this point, you can either grab a punch, you can use whatever pen you were using to mark the holes, and it's gonna be specific to this. So double check your instructions, but we're gonna be using the furthest towards the outside holes here towards the end of the bed. And then, we're gonna be using the closest inside ones here towards the cab. There's also gonna be a hole that's gonna be in the center towards the bed as well. So go ahead, and I'm using a punch, it just kinda helps get that drill bit started a little bit later on. And line it up perfectly in the center. Get your punch. Now, on a bedliner like this, it may or may not help us here but there is a little dimple that I can see. And I believe at some point, this truck might have either had a different rail kit or they attempted to install it. So I already have a few holes, so if you see extra, those we're there previous. So just make sure that you have it nice and centered, again, 'cause this is gonna determine how well it bolts up. (hardware clunking) (punch snapping) So now, we'll come back with an eighth-inch drill bit, and we're just gonna drill through the marks that we've made. (tool whirring) (tool clanking) Now, as I mentioned previous, I do believe this had a rail system at some point that might've been different. Some of the holes aligned. This one is already out, and this one we won't be using. So go ahead and just drill out the marks that you have. And then, we're gonna head underneath with our frame brackets to make sure everything lines up. So now, you're gonna wanna grab your brackets that are included in the kit, and they are side specific. So you can see there's an angle here. That's gonna go towards the back tailgate of the truck. And we're gonna be using right above our sway bar end links here. You're gonna see weld nuts. Now, since these are exposed on the frame, sometimes they can get a little tricky for the hardware to thread in just because of rust and corrosion buildup. So what I'd recommend doing is take your hardware, make sure that it passes through fairly easily. If it starts to bind up, what you wanna do is get a little bit of penetrating oil, spray it in there. And you can use a tube brush. You can use a tap if you're careful. But the main thing is clearing this out for our hardware to be able to pass through. So I'm just gonna kinda clean this out and make sure that our hardware goes through. And another way you can do it is if it's not binding up too much, take your hardware and a 3/4-inch socket and just kinda run that through, and it should help clear it out as well. But once we get these cleared up, we're gonna loosely put our bracket in place, and we're gonna check to make sure that the alignment of that eighth-inch hole that we drilled is going to align with the top portion of our bracket. So I'll get this cleaned up, and then start hand threading our hardware in. Also, make sure that you put your conical tooth washer in place as well. And there's little teeth on the washer. Make sure those are biting into that bracket. And as I mentioned, we're not gonna tighten it down completely. We're just gonna wanna have this held in place. And once we kinda get it to where we're happy, we're gonna hold this up like flush against the frame rail and look from underneath and make sure that eighth-inch hole is aligned with our bracket. There's a little bit of play in the bracket until you tighten it down, so you wanna press it against the frame and also up towards the bed, and you should have that hole in that elongated hole of the bracket. So make sure that, that is aligning properly. And also, we're gonna be enlarging that hole. So mine sits a little bit forward here. So just when I drill it out, I'm gonna make sure that I'm getting that drilled out to where it's gonna fit through our bracket perfectly. And make sure you take your bracket and go to the other side of the vehicle and check for that alignment of your pilot hole. And once you're happy with that, you wanna take those brackets out. We're gonna be drilling 9/16 holes to get our carriage bolts to pass through. We're gonna focus on row one, which is gonna be the one that's closer to the tailgate. So as you can see, there's the pre-existing holes. Here's our eighth-inch, but this is 9/16, and you can see our carriage bolt's able to pass through. So I recommend grabbing one of these. You might notice the rail kit actually has separate hardware than the custom bracket. So it says it's optional, I prefer to use the carriage bolt, makes it a lot easier to tighten this down long term, so have this handy. And as I enlarge this, you can use a drill bit. You can use a step bit. It's kind of up to you, but just double check to make sure that this is passing through, and then you're good. So I'm gonna go ahead and start getting this drilled out. (tool whirring) (bolt clanking) Perfect. Once you get that one done, we're gonna do the center hole, and then the further outside hole. So go ahead and get those drilled out. (tool whirring) (tool thuds) (bolt clanking) Now, the row two or the holes that are closer towards the cab will actually get drilled out a little bit larger but only on the bed. So this surface here is gonna have an inch and 7/8 hole, so using a step bit is a great way to accomplish that. And you can actually start by drilling a 9/16 and going all the way through because this will go through the lower bed sill. And what we're doing with this larger hole up top is allowing our pipe spacer to eventually drop in, and it's gonna sit in that bed sill below. And then, our carriage bolt's eventually gonna go through this. So we need to make sure we don't drill all the way down that inch and 7/8. Otherwise, this is gonna drop through. But having that 9/16 bolt means once we get our rail in place, it's gonna tighten down. So go ahead, get those drilled out. And once you've made all your drill marks or drilled through your bed, you're gonna go through with a file, kinda knock those burrs down. (file rasping) And then, vacuum up any of the metal shavings you may have. And then, any raw or exposed metal, you can see these were done a little bit ago, and they're already starting to rust up a little bit. So to prevent that from happening, I use a black paint marker. You can use spray paint too. Just coat any of that raw metal. That way, it doesn't turn to rust long term. (distant machinery humming) So now, at this point, we got the holes drilled. You can go ahead and get your side brackets put back in and loosely tightened in place. And that's gonna be creating a mounting point for our rail. So at this point, we're gonna take our we pipe spacers here. (spacer clanging) Drop these in. (spacer clanging) And then, we're gonna get our rail put in place. And then, we're gonna pass our large carriage bolts through, making sure they go through the bed sill as well. (hardware clanging) (bolt clanging) So now that we have our row two long carriage bolts in place, we're gonna go ahead with the row one and get these mounted up. Now, anywhere where there's a gap in the corrugation, you'll see here I can kinda get my finger through, which is gonna be all of these up front, we wanna make sure it doesn't crush the bed as we tighten. So in the hardware kit that comes with the rails, we're gonna take these block spacers, and you can kinda just feed 'em in, you know, however you want. They should slide in pretty easily. And then, take your carriage bolt from the kit and pass this down. And we're gonna do that for all the locations. Again, and that's just gonna keep that nice and even here, and you'll see that it's a little bit wide for the corrugation. So even if you put it in at long ways like this, the main thing is we're not crushing our bed. (bolt clanging) So underneath, you're gonna need your conical tooth washers, some spacers, and your nuts. So the center one here, pretty easy. Since we have that spacer, there's really no gap that this can hold that up. So I went ahead with my conical tooth washer and my half-inch nut and tightened that down. The same goes for our long carriage bolt that went through that pipe spacer on the driver side, super easy. Passenger side is tricky because it does come into where that exhaust hanger bracket is. So the best bet that I've found is to actually go up top with the carriage bolt, pull up. You're gonna need to try to get this washer threaded in as well as the nut. And once you get it started, you can kinda tighten it from the top, it'll cinch it up. The problem is the nut sits against the metal here, so it's kinda tricky to get a wrench on. You can kinda get it started with your fingers. But what I've found to make it a little bit easier is just take a pry bar and just kinda wedge here, and it's gonna give you just enough space to where you can kinda get a wrench in there and tighten that down. But it is kind of a tricky one. Now, as far as our side brackets, these we're gonna use two spacers. So since they're still loose, what we'll do is, well, we'll take our U-shaped spacer. And that's gonna go on the top portion here, (hardware clanking) kinda close that gap up. And then, on the bottom, we're gonna be using a flat spacer here, our conical tooth washer, and then our nut. Now, sometimes this can get tricky threading it 'cause it's gonna wanna push those carriage bolts up. So if you need to, if you're doing this by yourself, you can put a weight or something heavy up top to kinda keep that in place so you can start threading it. I've also used super glue and just kinda glued that carriage bolt portion. It's not the best option, but if you're by yourself, it's gonna allow you to kinda get it started. And as far as the plate spacer and our conical tooth washer, you can wrap tape around this to kinda keep it one piece. It makes it a little easier to do, especially 'cause up in this frame rail, it gets pretty tight. So that way, you're not having to hold both of them at the same time. So as you can see, I just dropped my washer. So I'm gonna tape mine up. That way, I can hold this with one hand, and then get this started with the other. So now that this is one piece, I can just slide this up over it. And that's the thing too is if you can get your plate spacer and your washer in place, sometimes if this is threaded all the way down, it's actually you can use that to push it against the carriage bolt to kinda keep it in place. There's not a whole lot of excess thread here, so you're gonna have to kinda really try to get a few of 'em started. So just be patient here. And you're gonna be doing this on both sides, so hopefully after you do the first one, you'll kinda get a good grasp of it. So as you can see here, I don't have a lot of that thread poking through. And this is where it's definitely helpful to have either someone pushing up top or that weight. But I was able to pull a little bit out with my nail, so I'm gonna go ahead and get this nut started. So now, at this point, once you get all your hardware in place, you're gonna snug it down with a 3/4-inch socket. This is gonna keep our rail in place. We're not gonna torque it down yet, but you do want it to where it's not gonna move. So go ahead and get all your hardware tightened down. (tool ratcheting) (tool clanging) Now, at this point, you're gonna wanna grab your fifth wheel base, and this is where we're gonna get the measurement for the front rail. If you have multiple ones, you're gonna wanna test fit 'em to make sure that you get a nice, even spot. We have ours here. So what I'll do is I dropped it into our installed rear rail. I'll lift this up, slide our rail into place, and get this to drop in. (shoes scraping) (hardware clunking) So with our rail dropped in place, what I'm gonna do is kind of push our fifth wheel towards the back, and then our rail towards the front to give it a nice, tight fit. If you need to, you can use a dead blow hammer to kinda knock this back. You can just push on it. But the main thing is we're getting this to where it's nice and tight but not too tight. That should put it at a good threshold to when once it's installed, we should be able to just drop it in. There's no perfect way to figure this out, but the main thing that we found is if you pull this back, push that forward, that's gonna get you pretty close. But we do need to make sure that we're even on both sides. It can kinda sway one side to the other. So go ahead and take those measurements just as we did before and make sure it's even. Now that we're nice and even on both sides, we'll go ahead and make our marks. We're gonna be using the third hole towards the middle, on the front and back, and also on both sides. And then, we're gonna use this back tab here closer to the cab. So go ahead and mark that as well. And with those marked out, we'll go ahead get our base out of the way, move our rail, and then we're gonna start drilling those out with the pilot holes just as we did before. (tool whirring) (drill bit rasping) So now, we'll use our 9/16 drill bit to enlarge these. Again, have your carriage bolts handy. And that way, you can test it to make sure they work. (tool whirring) (tool whirring continues) So now, we'll go through just like we did before. File these down, vacuum up our shavings, and then we'll just throw some paint around those raw edges. (file rasping) Now, you can go ahead and put your rail in place. Take your carriage bolts and drop them through. And since these are on the raised portion of the corrugation, you don't need to worry about a spacer. But this rear one, just as we had in the our rail on the backside there, just a U-shaped spacer should kinda keep that corrugation from crushing. So we'll head underneath the truck, and we're gonna grab our other brackets where we're gonna get those bolted up. Now, onto I would think the most tedious portion of the install, and that's getting these brackets in place. Now, it is side specific. We're on our passenger side, and these tabs are gonna go up to where they bolt into the carriage bolts we passed through. And then, these are gonna bolt into weld nuts on the frame. But you're gonna see, we have a large wire here that's gonna be just like the ones that we previously removed. So go ahead, pop that off. And we're gonna have to slide the bracket kind of behind this also while aligning this up with those carriage bolts that we passed through. So just kinda slide this in first. (hardware thudding) And the passenger side is definitely easier than the driver side because it gets pretty tight there. So this should align with these weld nuts. So I'm gonna go ahead, grab my hardware, and kinda get those at least started, making sure that these stay in place here. Now, before we get our weld nut bolts put in place, that's gonna cinch it up pretty tight. We need to put our U-shaped spacers in the bed corrugation, so it doesn't crunch down. So slide those in. (hardware clanking) So as you raise this up, get your U-shaped spacers in place and kind of press that up. Then, I put my long spacer there. I'll go ahead take my conical tooth washer and my nut, and get that started. (hardware clinking) Just make sure those U-shaped spacers don't pop out of place. And then, on this side, I'm just gonna be using my conical tooth washer and a nut to get that tightened down. And with that started, we can go ahead and take our bolts with our conical tooth washer that go into the weld nuts here, and you may have to kinda pry on this bracket a little bit to get it aligned. It's pretty tight here. If you need to, you can put a flathead screwdriver and kind of use the other hole to get one started, and that's gonna help us get the other one in place. I was able to get this one kinda started, and that's gonna help us, I think, get this one. But I'm gonna grab a screwdriver and kinda wedge that, so we can get that started. (hardware clanking) (tool rattling) Now, just as the outside ones, I do recommend kinda cleaning these weld nuts too to kinda get these started. But to get these aligned, what helped me, I actually took a 3/4-inch socket and tightened up the top bolts here from our carriage bolts. And that kinda drew it up to make it a little bit easier to get that started. So if you need to do that, go ahead and tighten that up a little bit. Once you get this one in place, we'll go ahead and repeat on the other side. So our middle bolt, we just get that tightened down with a washer. I actually ran out of spacers between both kits, so I wasn't able to use one here. But because we have that spacer on the other side, this should cinch down just fine. And then, our driver side got a little bit tricky. Now, it's the exact same concept as the passenger side. You just have a lot more that you're dealing with as far as brake lines and some of that wire loom. So make sure that's all outta the way. And kinda getting the plate in set where it needs to be was kinda tricky, but then also aligning those bolts was also not exactly fun. But once I got it started, I got that tightened down. So at this point, we're gonna go back and start torquing down our hardware with our torque wrench. Now, the torque wrench, we're gonna be using two different torque settings, and you're gonna refer to your instruction manual. The hardware, when it changes, it's two different settings, so just adjust to that. Now, the one that was kinda tricky to tighten here by the exhaust or the hangar there, I might end up using a crow's foot. I think that's gonna be our best option. I can kinda get in there, but it's pretty tight there so do the best that you can. All the other ones should be fairly easy to get to. You might need some extensions to get some to the ones on the driver side as you probably had to use to tighten it. But go through, get all of your hardware tightened down properly. Now, as far as sequence, we wanna make sure that we're doing the ones that bolt up to the rails first, and then we'll do the side ones that bolt into the frame. So I'm gonna go through, get all this torqued down. (tool beeping) (tool clicking) So all of our hardware is now torqued. We need to make sure we get our exhaust put back in the isolator. We're also gonna get our heat shield put back up and our spare tire, load up our fifth wheel, pin it in, hook up our trailer, and then hit the road. And that was a look and installation of the Reese Quick-Install Custom Installation Kit with Base Rails on a 2019 Ram 2500.
Customer Satisfaction Score:
99% were satisfied with this product
1% of customers were not satisfied
- Wrong item was ordered
Customer Reviews
Reese Quick-Install Custom Installation Kit w/ Base Rails for 5th Wheel Trailer Hitches - RP50054-58
Average Customer Rating: 4.8 out of 5 stars (57 Customer Reviews)
Custom brackets reduce the amount of drilling and time required to install your fifth-wheel trailer hitch. Brackets, base rails, and hardware included.by: Roger T.03/03/2016
Overall the install went pretty good. I used two 2x2's with stops to hook at the end of the bed to set the proper distance to the rear rail. See image. The only real problem was with the hole location on the right inside of the rear rail. After I drilled it and crawled under the truck I discovered that there was no way to get to the bolt to install the nut because it was under the welded on sway bar bracket. I moved over to the next hole towards the center and drilled another hole and installed a 1/2-13x3 1/2" bolt with nut and washer. This hole came smack dab in the center of the bed support channel under the bed. Perfect! See other image.


by: Dennis A.03/24/2018
Nissan Titan
Purchased with a Reese Titan 16000 lb hitch. Instructions were clear and easy to follow. Thanks the ETAILER'S videos I installed myself without any issues. There were a few tight squeezes to reach areas, but not too bad.


Dennis A.

3/24/2019
No issues. Great hitch system.
by: Dave M.03/12/2017
2016 Dodge Ram Pickup
What a great product. The quick install brackets made installation very easy. Took about 2 1/2 hours. Was installed on a 2016 Ram 2500 Cummins with rear coil springs.


by: Kelly 02/10/2024
Easy to install with basic tools. Worked on a little for a few days . Probably about three hours total. Highly recommend.
by: George04/07/2023
2017 Ram 2500
ordered on 3/30/23, was promised delivery on 4/3, actually got on 4/5 and only received rails without installation kit. called E-Trailer - told installation kits are backordered for 2 months - AND THEY NEVER TOLD ME so I had to cancel my RV hitch install and find order a different kit
by: Michael 04/30/2020
Dodge Ram Pickup
The brackets are made well and feel very high quality. Install was pretty easy and straight forward but I think the instructions are not totally accurate for my truck. On my 2020 Ram 2500 gas truck one of the bolts I had to drill ended up right on top on an exhaust hanger mount. I triple checked the measurements too. I got it to work but could not get it as tight as I wanted and definitely can’t get a torque wrench on it. Only an open end wrench would fit. Overall though I do recommend this mounting system for the bed rails.
by: Dennis 04/30/2021
2014 Ram 2500
Custom 5th wheel, rail mounting kit w/rails was short a bag of hardware. It took one phone call and I received what I needed in two days. Customer care was excellent.
by: Adam01/26/2019
2014 Dodge Ram Pickup
This installation kit for my 2014 Ram 2500 and Reese hitch worked perfectly. I installed it myself without a single problem. Couldn't be happier with the quality and the instructions were pretty easy to decipher. I had this installed in about 4 hours by myself.

Adam S.
1/26/2020
A year later and everything is still perfect just like the day I bought it. Ive been pulling a 5th wheel since i installed this kit with nothing but confidence.
by: Eric02/09/2018
Install wasn't too bad. Only gave it 3 stars because the slots for the 5th wheel or gooseneck hitch are a little sloppy. sure it makes it easier to install or remove the hitch, but the little jerks of the hitch moving when taking off from a stop or slowing down too fast are annoying. Guess I shouldn't have gotten the spacing perfect and I wouldn't have the issue.
by: Doug S. Ray, Michigan 05/02/2018
2017 Ram 2500
Arrived on time. Everything was in the box and in great shape. Instruction along with you tube made the job easier. Thanks to friends with big barns to get out of the Michigan weather.
Will continue to purchase through Etrailer Corporation again. Great prices and Customer Support.
Doug M.
5/2/2019
Fantastic I installed it with a friend which was needed. I measured three times and drilled once. It turned out perfectly because when I was done I []ped in my hitch and it fell in without any forcing involved. Just a note I purchased the Reese hitch from a friend and didnt have it with me at the time of my installation of the rails. So it was a huge relief to see it fit perfectly. The quality of the product also played a big part of the install.
by: Michael 03/26/2020
I installed this kit myself with the instructions that came with the kit. The instructions were very easy to understand and the kit was fairly easy to install on my truck. The rails worked perfectly with my fifth wheel hitch.
by: Vince06/02/2017
2016 Dodge Ram Pickup
the RP50054-58 brackets fit my 2014 Ram 2500 perfectly. I installed them myself for a 1999 Reese 22K Hitch in about 4 hours. no issues at all.
you may want to watch this youtube video that is a step by step install on a 2016 Ram 2500. It REALLY helped!!
the name of the video is-
"Installation of the Reese Quick Install 5th Wheel Base Rail Kit on a 2015 Ram 2500 - etrailer.com"
by: Gregory01/18/2021
This product worked great but the install is a bit of a pain. The installation video kind of skipped over the part about mounting the drivers side forward bracket to the frame. This bracket mounts in a blind tight spot between the fuel tank and frame rail. Once moving the wiring harness and cleaning the bolt holes the install went ok but you need some long ratchets and extensions and long skinny arms. If you’re not very comfortable in your ability, have someone else install it for you.
by: KC01/22/2017
It is always a nerve racking prospect to drill holes in the bed of your truck. So follow the old rule of measure twice cut (drill) once, but up the formula to - read the instructions twice, measure twice (even three times) and drill once. But drill slowly and smoothly. I had trouble getting the spacers into the corrugation areas because I rammed the drill thru a bit fast and left lots of rough metal edges which prevented the spacers from slipping into place. Installation is relatively straight forward per instructions. Watching the etrailer install video helps as well.
by: Arlin T.04/27/2017
The rails and frame mounts worked like they should. The left front rail bracket was a little hard installing being the fuel tank was real close. If I were to do it again I would order the outboard frame mount kit.
by: Dean P06/19/2015
Very Happy with fifth wheel kit. Much heavier duty than expected. Easy to installed, but time consuming. Two men makes it go alot faster. Tried it out with my camper, great! Service excellent. Over and above what I expected! Thanks for quick shipping. DP
by: James05/11/2020
2020 Ram 2500
The product arrived quickly and was of high quality. I had watched the video and pre-read the instructions. The video spent quite a bit of time discussing the heat shield being in the way....sure. But, made no mention of the bracket going in next to the gas tank! That 4th bracket kicked my butt :o It is all in and fit great! Thanks!!!
by: George K02/28/2017
2017 Ram 2500
The kit had ample hardware... one hole had to be enlarged for fitment.... working around the diesel fuel tank was a bit challenging.... but overall a good, straightforward kit.
by: Bob R04/01/2015
I am very pleased with this item. Item arrived in just a few days with free shipping. Instructions were included. Pay attention to instruction. Comes with two versions based on rails. Self install with two people went smooth.....
by: Kyle 02/07/2020
Easy install, better with 2 people and truck on jack stands.
by: Jim W05/24/2019
Package showed up yesterday as scheduled. I watched the video and read the instructions prior to starting. Installed it this morning without any issues. took about 2 1/2hours including a trip back inside to review the video. great product with easy to understand directions. Only suggestion is before you start get rid of all the paper instructions which are not applicable. Great product and service. Thanks
by: Amie P07/11/2015
2014 Dodge Ram Pickup
Get me fully informed to where my package was. Also improved on the lead time of the brackets. Excellent company to work with.
by: Andrew04/28/2016
2015 Dodge Ram Pickup
Took a little longer to install than expected but not having a lift didn't help. Overall fit my 2015 RAM 2500 Larmie 8ft box great.
by: Kevin02/10/2018
Good instructions, good quality and all the mounting was included.
by: Ryan .o02/18/2017
2017 Ram 2500
Nice brackets they bolt up in perfect location but make sure you have a ratcheting 19 mm. It says 18 but it's 19mm ....
25
58
Show More Reviews
See what our Experts say about this Reese Fifth Wheel Installation Kit
- Recommended Custom Fifth Wheel Installation Kit For 2016 Ram 2500 Crew Cab The fifth wheel installation kit I recommend for your 2016 Ram 2500 is part # RP50054-58. This custom kit includes the mounting hardware needed to install the kit on your 2016 Ram. I have attached a link to an installation video for this kit you can check out.
view full answer... - Curt Fifth Wheel Bracket Kit that Fits 2016 Ram 2500Sometimes the brand is stamped into the rails, but that's not always the case. Do you have a set of rails installed in a truck that you are looking for a brand for or are the rails not installed in anything at all.
view full answer... - Could Andersen Ultimate Fifth Wheel Hitch Adapter Fit 2015 Ram 2500 with Fluid TankDo you have a set of fifth wheel rails installed in your truck yet? If not, can you measure 11 inches forward from your rear axle center to see where the front rail would be placed? That will tell you if a set of fifth wheel rails like the part # RP50054-58 would fit and not interfere with your tank. This rail kit is a custom install kit for your 2015 Ram 2500 which means it would install in quite a bit less time than a universal kit and would minimize drilling.
view full answer... - Reese Fifth Wheel Bracket Kit Recommendation for 2017 Ram 2500 without Factory Rail KitFor your 2017 Ram 2500 without the factory rail kit the Reese fifth wheel bracket kit part # RP50054 that you referenced will fit your Reese rails. These are part of the inboard rail kit part # RP50054-58. You'd need new hardware for the rails to attach to the bracket kit as these bolts are one time use. For that you'd need part # RP58430. If instead you have the longer outboard rails you'd need the part # RP56009 which is a part of the # RP56009-53.
view full answer... - Fifth Wheel Rail Kit Recommendation for 2019 Ram 2500A few years back Dodge decided to start referring to their trucks as just "Ram" so in your case you'd need to look up a 2019 Ram 2500 which we have fits for and I attached a link to see them all. I personally wasn't a fan of the change in branding. For a fifth wheel rail kit that fits your 2019 Ram 2500 I recommend the Reese kit part # RP50054-58 which is custom fit for your truck. This means a shorter install time and minimal drilling.
view full answer... - Parts Needed to Install B&W Patriot Sliding Hitch in 2019 Ram 2500 Short BedIn order to use the B&W Patriot 5th Wheel Trailer Hitch w/ Slider - Dual Jaw - 18,000 lbs # BWRVK3270 you will need to install an above bed rail kit like the Reese Quick-Install Custom Installation Kit w/ Base Rails for 5th Wheel Trailer Hitches # RP50054-58. These are a custom install kit for your 2019 Ram 2500, so they're designed to minimize and in most cases eliminate any drilling required during installation. I've linked some review and installation videos of these for you to check...
view full answer... - Fifth Wheel Rail Bracket Kit that Fits 2017 Ram 2500For a bracket kit that fits Reese fifth wheel rails and your 2017 Ram 2500 you'd want the part # RP50054 which is part of the complete rail kit that fits your truck # RP50054-58. I attached an install kit for this for you to check out as well.
view full answer... - Will Airbags Work with the Articulink Rear Suspension on a 2017 Ram 2500 Power WagonThe articulink rear suspension on your 2017 Ram 2500 Power Wagon will not cause any issues with a set of airbags or a 5th wheel hitch because they all install in slightly different locations on the vehicle and do not counteract one another. For a set of airbags, I recommend using the Air Lift LoadLifter 5000 Air Helper Springs part # AL57289 because they do not require any drilling into the truck frame and they do not interfere with the brackets for a 5th wheel hitch. The Air Lift LoadLifter...
view full answer...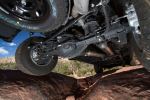
- Hitch and Sidewinder for 2020 Ram 2500 Short Bed Ram Box to Tow 2019 Momentum 376THThe correct Sidewinder pin box for your 2019 Momentum 376TH would be the part # RP34FR that you referenced as it fits in place of the Lippert 1621 style pin box you have now and also has the same 19k capacity you'd need as well. With the Sidewinder you wouldn't be able to use the Superglide you have now since the head of the hitch was designed to pivot as you make turns. So you'll need to go with a rail kit and fixed hitch instead. For your 2020 Ram 2500 you'd want custom fit rail kit...
view full answer... - Fifth Wheel Hitch Towing Setup Recommendation for a 2014 Ram 2500 Short BedThe max angle a Demco Hijacker like part # DM8550038 can disconnect is 8-10 degrees. 45 degrees would be too extreme. I have a solution for you that will allow you to tow your trailer without having to manual operate a slider though. You would need to replace the pin box on your trailer with a Sidewinder. Sidewinders are pin box specific so you will first need to know what pin box you have now in order to pick out the correct one. There should be a sticker or a stamping on the OEM pin...
view full answer... - Fifth Wheel Rail Kit Recommendation for Installing B and Patriot in 2020 Ram 2500 Long BedTo install the B and W Patriot hitch part # BWRVK3255 in the bed of your 2020 Ram 2500 long bed you'd just need a set of standard above-bed fifth wheel rails like the Reese part # RP50054-58. This will install the easiest and won't require any frame driling.
view full answer... - Brackets Needed To Install Anderson Ultimate Connection 5th Wheel Adapter # AM3200 on 2014 Ram 2500The Andersen Ultimate Connection, part # AM3200 would connect to the truck using industry standard fifth wheel rails. The frame bracket/bed rail kit you need is part # RP50054-58. You'd also want to install a 7-way trailer connector in your truck bed, part # 41157. If you click the provided links, you can see install videos for the bracket/rail kit and the wiring harness I've recommended.
view full answer... - Recommended 5th Wheel Hitch for 2020 Ram 2500 Long Bed without Prep Package For your 2020 Ram 2500 long bed I highly recommend the Reese M5 5th Wheel Hitch # RP30928 along with the Custom Installation Kit # RP50054-58 for mounting. The Reese M5 not only features a robust single-piece jaw that will provide a superior connection with the trailer and a smooth, quiet ride during travel, but it also uses a unique design that keeps it always ready to receive the king pin on your trailer. This means you won't have to physically release or open the jaws every time you're...
view full answer... - Recommended 5th Wheel Hitch for 2014 Ram 2500For your 2014 Ram 2500, if you have the 8 foot bed, you will not need a sliding hitch but with a 6-1/2 foot bed it is recommended to allow you proper turning clearance. The standard bed normally refers to the 6-1/2 foot bed, but people use different terms, so I'll give you both options. For your rail kit, I recommend the Reese Quick-Install Custom Installation Kit w/ Base Rails for 5th Wheel Trailer Hitches # RP50054-58 which comes with brackets specifically for your truck. Then if you...
view full answer... - Will a Reese Revolution/Sidewinder Allow a Ram Truck with Rambox to Tow Fifth Wheel TrailerYes, a Reese Revolution or a Sidewinder pin box replacement would allow you to tow your 2014 Montana fifth wheel with your 2015 Ram 2500 that has the Ramboxes and a short bed. The Revolution/Sidewinder puts the pivot point up higher so that the pin box would not hit the Ramboxes as you turn. Also this give you the ability to make tight turns without having to have a slider hitch so it basically is a win/win solution for your truck. Sidewinders are pin box specific so you will first need...
view full answer... - Will Sidewinder Pin Box Void Warranty on 2020 Jayco Talon 403TSince a Sidewinder like the 20K # RP34FR is a pin box replacement it won't void the warranty of your 2020 Jayco Talon 403T. With that being said, we do want to make sure that you get the correct one that fits your 5th wheel. The pin box that you referenced is a direct replacement for the following pin boxes: Fabex 663 and 665 Lippert 0719, 1621 and 1621HD M&M 663 and 665 Lippert 1716, 1116, and 0115 (spacer kit required - # RP97FR) If you have something else please let me know and I'd...
view full answer... - Recommended Base Rails for 2016 Ram 2500 Compatible with Hensley TS3 Trailer SaverThe Hensley TS3 Trailer Savor hitch utilizes the industry standard base rails. So, if you do not have the OEM pucks, I recommend using the Reese Quick-Install Custom Installation Kit w/ Base Rails for 5th Wheel Trailer Hitches # RP50054-58 on your 2016 Ram 2500. I've attached a video of this installation to assist. If you have the OEM pucks, then I recommend using the Demco 5th Wheel Rail Adapter for Ram OEM 5th Wheel Towing Prep Package - 25,000 lbs # DM6099 to get the industry standard...
view full answer... - Recommendation for a 5th Wheel Hitch to Fit a 2017 Ram 2500 With RamBoxI might have a solution for you. Unfortunately, none of the 5th wheel hitches that we offer for the 2017 Ram 2500 short bed are recommended to be used with the RamBox feature on your particular model truck. The issue is the needed use of a slider hitch with the short bed design of your truck and the possible interference with the RamBox. For this reason manufacturers do not recommend using a 5th wheel hitch with the RamBox feature installed. The solution I mentioned would be to use a fixed...
view full answer... - Fifth Wheel Rail Kit Recommendation for a 2015 Ram 2500 for Use with Reese HitchFor a fifth wheel rail kit confirmed as a fit for your 2015 Ram 2500 short bed that also will work with your Reese fifth wheel hitch you would want the part # RP50054-58. This is a custom install kit that will minimize drilling and install time as well. I attached an install video for the rail kit for you to check out as well. Your hitch is designed to fit the industry standard rail design like what the rail kit I recommended provides.
view full answer... - Installation of Reese Custom Base Rail Kit on 2019 Ram 2500The Reese Quick-Install Custom Installation Kit w/ Base Rails for 5th Wheel Trailer Hitches # RP50054-58 does not use the lock washers on your particular vehicle. It will only use the conical washer and nut on the underside of the bed.
view full answer... - Recommended 5th Wheel Trailer Hitch Install Bracket and Rail Kit for a 2017 Ram 2500 Power WagonDespite the Power Wagon package the bracket kits for your truck are the same as any 2017 Ram 2500. I checked with Reese to make sure there aren't any variances that would cause an issue. I recommend part # RP50054-58 for your hitch. It's a custom kit to make the install quicker and reduce the amount of drilling. I've linked an install video on a 2016 2500 for you as well. I'm not sure which fifth wheel hitch you're using but since the Power Wagon only comes in a short bed these days...
view full answer... - Can 2018 Ram 2500 with Ram Box Tow Fifth Wheel TrailerThe only way to do it is to swap the pin box of the trailer to a Sidewinder as that moves the pivot point up high enough that you can make turns without the pin box hitting the Ram Boxes. Now to do that we have to know what pin box model your trailer has and hope it's one that there's a Sidewinder for. You'll have to look at the trailer's pin box and see if there's a pin box model or brand listed there. From there you'd need to go with a fixed hitch like the Reese M5 5th Wheel Trailer...
view full answer... - Parts Needed to Tow Fifth Wheel Trailer with 2020 Ram 2500 with Ram BoxesThanks for all of the info you listed on your camper and tow vehicle. Since we know your camper has a Lippert 1621 pin box the correct Sidewinder would be the # RP61422. On trucks with Ram Boxes the only way to tow a fifth wheel trailer is to use a Sidewinder pin box since it moves the pivot point up higher so there is no pin box interference.
view full answer... - 5th Wheel Base Rail Installation Kit for a 2014 Ram 2500 Without a Factory Rail KitThanks for sending a picture of your Ram! Yes, the Reese custom install kit # RP50054-58 you referenced with fit your 2014 Ram 2500 (6 or 8 foot bed) with rear coil suspension. I also attached the installation instructions for you too.
view full answer...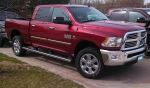
Do you have a question about this Fifth Wheel Installation Kit?
Info for this part was:

Expert Research:
Mike L

Expert Research:
Michael H

Expert Research:
Jameson C

Expert Research:
Jeffrey L

Expert Research:
Victoria B

Video Edited:
Zack K

Video Edited:
Joshua S

Video Edited:
Jacob T

Video by:
Andrew K

Video by:
Chris R

Video by:
Jonathan Y

Updated by:
Lindsey S

Updated by:
Wilson B

Updated by:
Isabelle B

Installed by:
Jeff D

Written by:
Laura H

Test Fit:
Jared G

Test Fit:
Brent H

Test Fit:
Ryan G

Test Fit:
Bradley B
At etrailer.com we provide the best information available about the products we sell. We take the quality of our information seriously so that you can get the right part the first time. Let us know if anything is missing or if you have any questions.
Roger T.
3/3/2017
Truck was traded in with the rails still mounted in the bed.