
To see if this custom-fit item will work for you please tell us what vehicle you'll use it with.
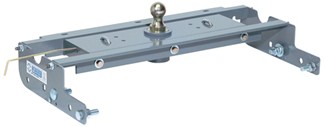
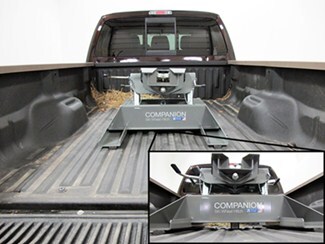
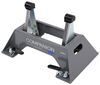
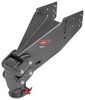
Install the Companion fifth-wheel hitch in your truck bed with this custom kit. Better than a traditional mounting kit, this setup doubles as a gooseneck hitch when the fifth wheel is removed, and the underbed design allows for full bed access.
Features:
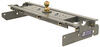
Not only does this kit provide you with a sturdy, custom base for installing your Companion fifth-wheel trailer hitch in the bed of your truck, but it also doubles as one of the most recognizable gooseneck hitches on the market. This fifth wheel installation kit actually is the Turnoverball gooseneck hitch from B&W.
Gooseneck Specs:
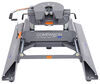
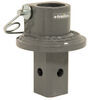
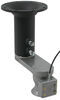
With the B&W Turnoverball underbed gooseneck trailer hitch you get the best of both worlds. When you go to tow a gooseneck trailer, the Turnoverball creates a sturdy, dependable connection with your trailer. And when you're done towing, you can stow the ball upside down in the hitch to get full bed access and a clean appearance. When you're ready to tow your fifth wheel trailer, just install the Companion in the ball hole in place of the gooseneck ball and lock the post in place using the built-in handle. You can remove the fifth wheel when you're done towing, leaving your truck bed open once again.
Simple, Custom Installation
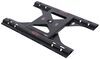
This kit is custom designed for your vehicle. The mounting brackets bolt to existing holes in your truck's frame. While some modification is required - you will need to cut a 4" diameter hole in your bed for the hitch ball and drill holes for the built-in safety chain loops - there is no need to weld onto or to drill into your frame.

California residents: click here
Videos are provided as a guide only. Refer to manufacturer installation instructions and specs for complete information.
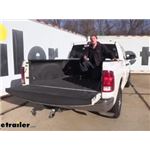
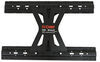
Hi there, Ram owners. Today on your 2011 Dodge Ram, we're going to be taking a look at and showing you how to install the B&W Companion Fifth Wheel Hitch. This installation kit is designed to let you install a B&W Companion Fifth Wheel Hitch, while also still functioning as a traditional gooseneck hitch. This allows you to get the best of both worlds and tow a fifth wheel or gooseneck trailer with your truck.This is what our hitch looks like when it's installed. It's installed underneath the bed so it keeps all the components underneath so you still have full truck bed access here at the back. The only thing that's going to stick up on top here is your safety chain loops, which are fairly flush down to the bottom, as well as your ball here.
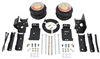
And if we release our ball with the mechanism here, we can remove the ball. One of the cool things about this is that rather than just taking your ball out and tossing it into your truck, you can flip it over, reinsert it and lock it back into place. Now you've got full truck bed access with no ball here in the back. It's all stored inside the component there.This hitch is going to allow you to haul your gooseneck trailer. The ball that comes included is a 2 5/16 inch size and this hitch is going to have a 7,500 pound ton weight, which is the force going down on top of our receiver here and a 30,000 pound gross towing capacity, which is how much that it can pull behind it.
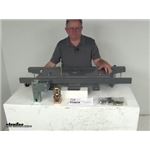
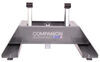
Now, as always, I recommend that you verify in your vehicle's owner's manual and ensure you don't exceed any of its towing capacities.The safety chain loops that come included are spring loaded so it keeps them flush down into the bed when you're not using them. Then when you hook up, they simply just pull up like this and you can see you've got a nice large opening here that should accommodate just about every shape, size, and style of safety chain.This is what our hitch looks like installed from underneath. You'll receive the center section, as well as all the bracketry you need to attach it. You can see how to attaches to our center cross member, as well as to the side of the frame here. The only drilling that's required is the large hole for your ball and the release mechanism that we we're using up top.
Down here below, all the bracketry is custom fit, specifically designed for this vehicle. There's no drilling required to get anything down here installed. It all just lines up into place and you just bolt it together. Everything here is actually in a pretty decent spot too when you're installing goosenecks and fifth wheels, things like that. Back here, you often run into bolts that are in some really tough locations to torque down.
But luckily this one here, they are all fairly easy to access and easy to torque.You can also see here, this is where our ball mechanism would be. We've got it currently in the ball use position where it's up, but if it we're to drop down, you can see there's plenty of clearance here to where it's not going to contact anything. Our exhaust is right here and our ball wouldn't drop down below the exhaust. So we know that we're not going to cross any plane of contact.Now that we've gone over some of the features of our hitch, why don't you follow along with me and I'll show you how to get it installed. We'll begin our installation here at the back of the truck. We need to cut out a hole for our gooseneck. We're going to be using a 4 inch hole saw for that. We also need to make a small hole for the release lever for our gooseneck. What we're going to be doing, is we're going to be measuring from the back of our truck. We've got the tailgate open and we want to make sure that we're measuring from the back of the truck bed and not the tailgate. We're going to be measuring down the center and then depending on your truck, whether you have a short or a long bed, there are going to be different measurements. So you'll want to refer to your instructions and make your mark at the location that it indicates in your instructions for your particular length of bed.We want to make sure this is centered. It's pretty easy to do since we're in the center corrugation right here. So just put it right in the center of the corrugation. Once we've got that in place, we're going to hop over one corrugation section and that's about 4 3/4 of an inch over from here to here. We're going to refer to our instructions again, because there is a different measurement. And again, it's different depending if you have a short or a long bed truck and you'll make your mark at this location as well. The second mark here is pretty non-traditional. Typically you just have for your gooseneck, but due to the way the fender liners are on this truck, there's not a side release handle that comes with the gooseneck. Instead, it's going to be an in-bed release mechanism that you'll have right here. But in order to access that mechanism, we do have to cut out a small hole to be able to use it.Now we'll take our hole saw, we're going to start with the larger 4 inch hole and drill it out. Now we're just going to move on to our other hole using a 3/4 inch hole saw, and we're going to drill this one out. We'll now just clean up the mess we made here and then I'm going to use some clear coat after I've cleaned it up to seal it up, just to protect it against any rust and corrosion.We'll now need to remove our fender liner here so we can have access to the frame and below the bed here so we can easily get our components installed. There are several bolts that run around the outside lip here. We're going to remove all of those with an 8 millimeter socket. Now here at the back of our fender liner, just above the tire, you have a little slotted section here where it goes in. There's going to be one at the rear of the tire and also one at the front of the tire. We're going to remove both of those with the same sized socket. Now you can see all the bolts are loose. It's fairly loose in here so we're just going to work it out now. We don't need to take it completely all the way off the car. We just need to get it out of the way so we can have access above our frame there. We're just going to pull this down until it's out of our way, and then we're actually just going to let it sit and hang down once we get it out.Once we get it worked all the way around, get it worked out there, we're actually just going to probably just let it sit right on the tire here. Because it's not going to be in our way and we can get above the frame rail and stuff that we need to right here. Once we've got this one out, we'll go ahead and remove the one on the other side as well.We're now underneath the vehicle. Now you might notice our spare tire's out of the way, and that's because our customer didn't have one. You don't have to remove the spare tire. But if you want, you can get it out because it does give you a little bit more room to work so it can make things easier for you. You'll also notice we have a hose here coming off of our axle and that's going to run down this cross member. We're going to need to remove that. We'll be putting it back into place, but we're going to temporarily remove it so we don't damage it when we're putting any of our components up.It's just some clips that hold it on so you can just grab the hose and just pull it away. It'll actually just slide right off of it. They're not even held on very tight. They just slide right off these little guys right there and just run them down, pull them off and then just set this thing down. We're just going to have it hang down for now. We're going to be putting it back up. We just need to get it out of the way.You'll also notice that there's an electrical wire that runs across the top here as well. There are several pins here. We're just going to reach up and pull these out. They can be kind of tight so you might want to use a pair of pliers to just go up here and grab them and pull them out. We're going to pull these out all the way down until we've got our wiring loose and then we can take the wiring and we're going to just pull it back in this notch here. We're just trying to keep it out of our way.We can now put our cross member into place. We're going to start with the large thick one that has threaded holes in it. It also has a slot little notch here on one side. This notch, we want to have facing towards the rear of the vehicle. We're on the passenger side here and we're going to be sliding this towards the driver's side and this end's going to go in first. It's just going to slide right on top of our frame rail here.Now that we've got it slid in this far, we can come underneath. We're going to continue sliding it over. Now we need to get our cross member positioned in the correct location. It needs to go all the way towards the rear and then it needs to flip up just like that. You'll see that there is a notch here and this is for our wiring if we needed to, to allow it to pass by and underneath. But you can see that there's a gap here underneath our cross member that we just put in and the factory one that's right here. We just need to check our wiring all the way down and just make sure that we're not pinching our wiring underneath the cross member that we just put in. That's really all we're doing now. Just make sure it's not pinched. Looks like we're all good there so we can go ahead and let this just hang down here out of the way. We're going to grab our center section now so we can raise that up to get it into position.To make things a little easier when getting your center section attached, it's best to prepare your hardware. These are the shorter bolts that come in your kit. We're going to slide on lock washer and flat washer on them.We can now our center section and put it in position. We're going to work it up above the exhaust. Going to line up the hole here. We do have this hole offset towards the front. That's going to line up with our hole that we had cut out previously. This can be heavy, you might need an extra set of hands. It's not ridiculously heavy, but it can be difficult with one person. We just want to line these up with the holes in our cross member and snug it down. Now that we've got a couple of bolts started, we just want to get it lined up into where it's supposed to go and then we can put in our front section. We're just going to lower it down like that and rest it on the exhaust.We're now going to make a small notch here. Our customer already has a little notch. It looks like he probably bent it putting in some aftermarket accessories, but that's about the location we want it to be in. We want to insert our front cross member between the cross beam you see here and where our leaf spring attachment point is right here, so in this little section. We're just going to take a pair of snips and just cut out just a small section of this, just a little notch. We don't need to take out very much. It's just a little bit to just help ease the clearance of our front cross member.Now that we've got a small notch there we can easily get our front cross member into position. Just going to slide over our rail here, over the frame. We can now hold our center section up and then we're going to attach it to our front cross bar here using the longer bolts that come in your kit. On the center holes here, we're going to put a flat washer on our bolt first, and we're going to slide it through those center holes. We're going to follow that up with a lock washer and a nut on the other side. Now we're only using the flat washer on these two center bolts. For the outer ones you don't need to put a washer on those.Now that we've got bolts supporting our center section in both sides, the front end and the rear, any bolts that we're missing, that we hadn't installed, we want to go back now and get all those loosely inserted. Then we're going to take our passenger side bracket here. This is the one that has two holes here at the top with two holes here on the side. These are going to line up with your section, just like that. That's going to slide over the bolt that we just put on and we can then follow that up with another flat washer, lock washer and nut.Then while we're here, we can take one of the smaller bolts that comes in our kit. This is going to slide through the cross beam and come out the other side of the bracket. Once again, we're going to attach it with a flat washer, lock washer and nut. Now that we've got those bolts attached, this bracket here is going to attach to the frame using the U bolts that come included with your kit. We're just going to slide this around the frame and then line it up with the holes in our bracket. Then we can secure these with lock washers and nuts.Now we're going to take our driver's side, side plates and start attaching those. On the driver's side it's going to be two plates. We're going to start with the plate here that has an enclosed section here with a small slit. That's to slide around your brake lines right there. We can slide around those and it's going to attach to the cross member and the cross beam, just like it did over on the passenger side with these two top bolts here. Now we're just going to take our U bolt, just like we did on the other side, slide it around the frame and slide it through our bracket.Now we'll take our second bracket, this one's got a U opening instead of just a little slot. This one's going to go over top of the one that we just installed, making sure you don't pinch any wiring or anything like that so you can get around those brake lines. You might have to slide it back out of the U bolt just a little bit, just so you can slide it up in there. Now that we've got them both slid on our U bolt, we can attach it to the U bolt using the same hardware as the other side; a lock washer and nut. We just need to get these loosely installed for now, just to hold things in place.Now, over here on the other side, it's like on the passenger side, place a washer on it. Then we're going to follow that up with another flat washer, lock washer and nut. We'll also need to attach our brackets together. We're going to do that with one of the shorter bolts, a lock washer and a nut. Same thing with the other hole there.We can now slide in the large bolts for our middle support here at the back and go in through the dip. You just got to keep twisting your bolt head and eventually you're going to find the right spot where it slides up in there. Then it's going to just drop down right through the hole, just like that. Our handle that's on there is going to keep our bolt from spinning so when you go to tighten the nuts up we don't need to have a wrench or anything on it.For our next step we will have to back out the bolts we installed to the left and right of our center bolt here towards the back of our gooseneck. Now we can raise our support bracket here. The three tabs here are going to be the lower section. This side here with no bolt hole is going to slide in between this section here. It's going to rotate up like this and the holes that go into the cross beam here at the rear, we removed the bolts just on the outside of the center bolt. We're going to be reinstalling those, but through this bracket. We also want to make sure we don't pinch our wiring, so just pay attention to that when you're installing it. We'll first secure our bottom bolts. Now that we've got them both started, we're just going to snug it up to make sure that it's going to stay in place. Then we can come back around and reinstall the bolts through our section in the back end of the rear cross beam.Now we're just going to install these. Now, if you're having an issue getting these reinstalled because the gap's too big, you can see the bolt's not actually touching the cross member, all you need to do is just go back and you can snug up these three ones here and that'll draw that cross number closer so you can get this one started back into it again. Now that we've got those snugged up snug, you can see it's brought our cross member closer, which is going to help our holes line up a little better. Now we can just reinsert our bolts and tighten them down. We can now go back and tighten down all of our hardware and then we'll torque it to the specifications found in our instructions.Now that we've got everything torqued down here, we do need to take our hose and our wiring that was just hanging down and we're just going to reattach that. We just used some zip ties to zip tie it back up to the bracket here on the hitch, running it back across so it's in a similar location to where it was before. We can now take the holes located in our center section here and we need to drill them out through the bed for our safety chain loops. There's going to be two on each side, and we're going to use a 1/2 inch drill bit to drill these out. We'll just use our center section here as a template.Here we are back up on top. I did use a little bit of clear coat once again, just to seal these holes up and then we're going to take our safety chain loops and we're going to drop them down through the holes. I did bring my drill up here with me because sometimes when you come up here on top, you do need to clean the holes up just a little bit more to get them to drop down if they're a little bit too hard. Those drop down nice and easy though. So now we'll just head underneath again to secure them.You'll have some springs that come in your kit. They're going to slide over the end of the U bolt that we dropped down and just push it up on there. Then you're going to have some locking nuts that also come included with it. Just going to thread that locking nut on there just like that. Then just snug it down a little bit and then check it. A little bit more. That's pretty much what we're looking for right there. Maybe a thread to flush sticking out the bottom. Then we'll go ahead and do the same thing over on the other side.Now we just want to test things out to make sure everything's working properly. We've got our loops here, they go up and down just fine. We're going to go ahead and open up our hitch, slide our ball down in, lock it into place and just make sure that everything seems to be working properly. Our ball can easily go in and out, we can store it, lock it in place and everything seems to work here. Now at this point, I would recommend reinstalling anything that you've removed. Maybe if you dropped down your spare tire for that extra room, put that back up. If you took the fender liners out, you want to reinstall those in reverse order. Once you've got all those components back up though, you're ready to load up your gooseneck trailer and hit the road.That completes our installation of the B&W Companion Fifth Wheel Hitch on our 2011 Dodge Ram.

Do you have a question about this Fifth Wheel Installation Kit?
Info for this part was:
At etrailer.com we provide the best information available about the products we sell. We take the quality of our information seriously so that you can get the right part the first time. Let us know if anything is missing or if you have any questions.


Thank you! Your comment has been submitted successfully. You should be able to view your question/comment here within a few days.
Error submitting comment. Please try again momentarily.