
To see if this custom-fit item will work for you please tell us what vehicle you'll use it with.
Thank you! Your comment has been submitted successfully. You should be able to view your question/comment here within a few days.
Error submitting comment. Please try again momentarily.
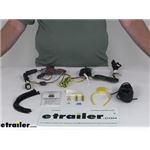
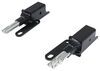
Quickly and easily install a 4-way trailer connector on your vehicle with this custom wiring harness. T-One connector plugs directly into existing wiring. Powered ModuLite reduces strain on wiring system.
Features:
Specs:
Installation
This custom-fit T-One connector plugs into your vehicle's wiring harness, which is located behind the driver's-side and passenger's-side tail lights. You will have to remove the tail light assemblies to access this harness.
Once you've plugged in the T-connector, run the hot lead up to your car battery. Connect the lead to the included fuse holder, and then connect the fuse holder to the positive terminal on your battery and insert the provided fuse.
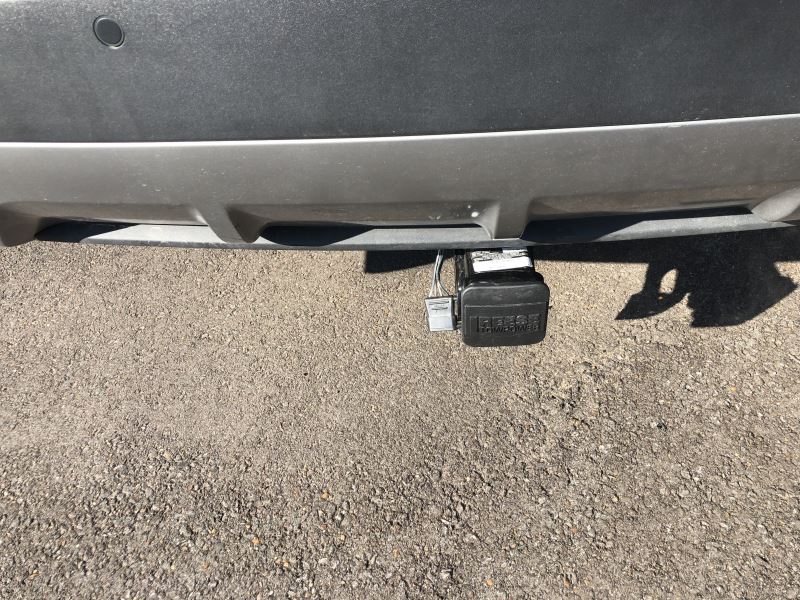
Once installation is complete, the 4-way flat connector will be stowed beneath your vehicle, near the trailer hitch. A mounting bracket (sold separately) is recommended to keep the connector secure.
It is recommended that you use a small amount of grease on all electrical connections - the plugs on your automobile and the 4-pole connector itself - to help prevent corrosion.
A ModuLite power module is built into this T-One connector. Because most trailers run on a two-wire system - wherein the brake and turn signals are carried on one wire - the separate brake and turn signals from your vehicle's three-wire system need to be combined so they are compatible with the wiring system of your trailer. This power module functions as a tail light converter to combine the brake and turn signal functions of your automobile so that they run on one wire to properly activate your trailer's tail lights. Note: This will not affect how the tail lights on your vehicle operate.
With a ModuLite, your trailer's lights will be powered without overloading your vehicle's electrical system. Because the module draws power directly from your car's battery and bypasses the electrical routes that are used by a basic wiring harness, there is virtually no draw on your tail light circuits.

California residents: click here
Videos are provided as a guide only. Refer to manufacturer installation instructions and specs for complete information.
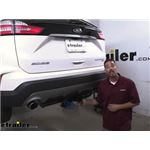
Rob: Hey everybody. It's Rob here at etrailer.com. Today, we'll be taking a look at the Tekonsha T-One vehicle wiring harness with a 4-pole flat trailer connector on our 2019 Ford Edge. Now one thing I do want to mention right off the bat, is that our wiring here does not come with a mounting bracket. But you can see we went ahead and used one in our application. One, because it gives it a nice clean look, makes it really accessible whenever you do want to tow your trailer, your wiring will be there, but it's also going to help protect it, keeping it off the ground and preventing it from dragging.
But the wiring is designed to stay on the outside of the car. Again, another reason why I recommend getting a bracket.It is nice to have the wiring on the outside because it is going to be right by our hitch whenever we want to tow, so we can get all of our lights, so we can get our trailer down the road safely and legally. Because our wiring is going to provide us all the required lights that you need when you're towing your trailer, like your tail lights, your turn signals and your stoplights. But trailer wiring, especially 4-pole wiring comes in handy for a lot of other things besides trailers. There's a lot of hitch-mounted accessories that have lights on them, and it's a lot easier to plug in a trailer connector than it would be to hard-wire in LightSail on a cargo carrier or any other kind of accessory.
Now as far as the installation goes, I know a lot of people get a little nervous when it comes to any kind of wiring, but that's the nice thing about our wiring kit. Not getting involved in any kind of cutting or splicing of the factory wires.It's going to use a simple T-connector that they'll plug inline with your tail lights and then have the signals come out to the trailer connector. However, they are going to require us to run a wire from the converter box back here, up front to the battery. And that's because it's going to take power from the battery rather than from the tail lights. Again, hopefully preventing from overloading the circuits.
Now the installation is going to be relatively the same, regardless of what kind of wire you're getting. But on our Edge specifically, there's a few models you want to make sure you're getting the correct wiring and this is the wiring for the titanium model. But now that we've seen what our wiring looks like in the end result, let's go ahead and go through the installation process together so you can have the confidence of doing it at home.To begin our installation, we want to come to the back of our Edge. We're going to open up the rear hatch. And then right on the inside channel, we're going to have a little notch.
There's a little cover there that we need to pop out. That'll give us access to the hardware that's holding the tail lights in place. So you can typically just get a flat blade screwdriver or trim panel tool, something, and you want to come around the edge of that little tab, pull that cover out. And again, that'll expose the bolt that's holding the tail light in place. You want to grab a T-25 Torx bit and we'll pull that bolt out.Now it is kind of recess, so usually if it does drop, it is going to be right behind the tail light right here. So I don't have to worry about losing it, but now we want to grab the tail light and pull it straight back as possible. The tail light does go back pretty far along the edge of the body here, but there's some alignment pins all the way back here. So we don't want to twist too much because it's very easy to break those. So typically what I try to do is come back as far on the tail end as possible and grab at the back same time, kind of push and work that light loose until we can get it to slide back and loosen up.There's that pen, again, light really doesn't come back that far, but the plastic does, you really don't want to break the housing. Once we have the tail light loose, the connector is actually right at the body here. So just reach down, squeeze the tab, and it'll pull the connector up. It's a little bit hard to see with a tab right there. Just squeeze, pull the tab out and we'll set our tail light aside, but we do want to move over to the passenger side and pulled that one out as well. Now, if we look down right at the connector where we disconnected our tail light, you'll see there's a little push pin that's actually holding it against the bumper. We want to loosen it up so we can get some room in here to get our new harness in place.So if we take a trim panel tool and we come to the outside towards the body and see where it goes in, just want to pry against the body so that we can get that push pin to come out. And we can move it to the side. Kind of pull a little bit on there to get a little bit of slack. Just so we can open up that opening a little bit more, make it a little bit easier for ourselves to get our new connectors through. And the way I'm going to get my harness up to the tail light pocket and I'm going to use a pull wire.Now I'm going to use a airline tube just because I have it laying around, but you can also use a coat hanger or even just a string with something heavy attached, but you want to pass it down between the body and the bumper. And so we can reach it from underneath the bumper and we can meet up with our harness. So once you have your pull wire down at the bottom, you want to grab some tape or something to secure your harness to the pull wire. Now we only want to attach the connector with the yellow and brown wires to our pull wire for now, because it is on the driver's side. Now it's a pretty tight fit. So I definitely recommend making sure that your harness is secure to the pull wire because it can get pretty tight. And we want to make sure that we get it all the way up there and we don't want the tape to let go. And then we have the pull wire or the harness stuck inside the body here.Just take the slack and start sending it up. And you may have to kind of help guide it up to help you bring the connector up top here. And then again, it is a pretty tight fit to get all the connectors through. So you may kind of have to adjust the connector, kind of twist it and work it through to get them up to the top. Thought it may help you take a screwdriver or trim panel tool, kind of push on the plastic a little bit. Just be extremely careful because we don't want to damage the wires or the connectors themselves just pulling them up to the top. Now on your harness, you're going to have one connector. That's going to match the one on the car and then one that's going to be the exact opposite. And that way we can connect our vehicle side to the harness and then the harness to the tail.So let's plug the female into the male. And since we don't have a whole lot of room behind the tail light itself, I'm actually going to tuck the factory connector down, take my excess wire and a little connector comes with, all that wiring down below and make sure I leave the loose end connector still open so we can plug it into our tail light. And it's just a matter of plugging in the factory plug, make sure it locks in place. And then again, just kind of working all those wires, so they're not going to be in the way.Then we can put our driver's side tail light back in place, make sure everything's lined up and we can put the hardware back in. So I went ahead and use that same pull wire method. I ran my airline tube, actually behind the bumper here in between the facia and the actual metal bumper. So it would keep it away from the exhaust number of route my green wire over to the passenger side and use that same method to get it up top and connect it to the tail light. We'll just use some like fill tape again, secure it to a pull wire and start feeding it over to the passenger side. Again, you may have to kind of help guide the wire over. Because there is a little bit of a tight fit, but we want to keep that wire as protected as possible. So if you can round it as far away from the exhaust and any other heat sources that you can't.So once we got our wire up, we just connected over on the passenger side and again, made sure we had enough room to have our tail light go back in place. Now we want to move back underneath our Edge and we're going to tidy up some loose wires and we still have two more connections we need to make. So now we do have, we have a black wire and a white wire left. The black wire should be pre-stripped. I'm going to grab one of the butt connectors out of our kit. Slide it over to the end. I'm going to crimp that down. Black wire is going to be our power source and these run directly up to the battery.Now, obviously this length isn't going to reach, but that's why we put that butt connector on so we can add the length of wire that they provide in our kit. So we'll just strip back the end of this, put the stripped in, into the butt connector and that'll give us plenty of slack so we can route it. Now these are heat shrink butt connectors. We're going to come back, use a heat source and shrink them down. If you are going to use a lighter, any kind of open flame, so be extremely careful not to burn or char the wire or the connector.So we got a white wire with the ring terminal left. This is going to be our ground wire. So we can either use the included quarter-inch self-tapping screw, or we can find an existing stud that's already on the car. Now unfortunately, there's not a whole lot of existing studs that are back in this area and we do need to mount the converter box. So we want to make sure that it's within reach of an area that we want to mount it. So I'm actually going to mount my ground wire at the very bottom of the sheet metal here. So I just got a quarter inch nut driver and an extension so I can reach. And I'm just going to go right into the bottom of that metal. Get my hole started first and then we'll come back and put the ring terminal in place.Now I'm going to mount my converter box right around the same area. And actually, we can move it forward just a bit to be protected by this plastic panel. Before we put it in place, you do want to take a rag with some, either some water, alcohol, something and make sure the surface that you're going to be mounting your converter box to, is nice and clean. So I'm going to go ahead and wipe off the area inside that we're mounting my box to make sure again, there's no dirt debris or anything else sticking to it. And we can take the included double-sided foam tape and peel the backing off of one side. We'll stick it directly to the back of the converter box.I'll take the other side of the backing off and we just want to stick it real firmly against the surface that we're going to mount it to. So just move the wires out of the way, tuck it back right behind this panel. Make sure it's nice and secure. Now we're going to have a little bit of excess wire left along with our power wire and our 4-pole wire. I always like to leave everything real loose until the very end and come back and clean everything up, once I verify that it's all working. So we're going to pay attention to our power wire first. This needs to get rammed to the battery. And again, every they're routed a little bit differently, but we want to make sure that we stay away from any major sheet sources like the exhaust or any moving components, like the steering or suspension.So I'm going to go ahead and run my power wire and then I'll show you the route that I took after we have it up front. So I did end up going ahead and tying up all the loose wires underneath that panel on the driver's side. I also went ahead and routed my 4-pole. So I got a little bit of slack, so it's real close to the hitch. Now there's a panel right here that I actually just ran my wires underneath and you can see where it came out right here at the bottom. But for our power wire, again, I ran underneath this panel and the corner you can see right here, where it came out and went over the subframe and the rear axle. Started going over all of these components here, so I don't have to worry about them interfering and came out right above where our fuel tank filler neck is and went over that, continuing to follow it, went around my fuel tank here.And then we had this really large panel that works out really well. It protects the wire and it keeps it from dragging the ground. So I just ran that wire all the way till it came out right here. Now I went ahead and ran an airline tube from the top of the engine bay, down, just like we did with the tail lights. But when you are running it, you'll notice that the exhaust is right here in the center, but we have a lot of lines that run from the front to the back. So if you can make it real nice to use those lines to kind of keep your pull wire against the firewall, but we can move up top and pull all the slack up. I do want to make sure you pull up all the slack.It's not a bad idea to go back underneath your edge and check, make sure there's not a water wire, because we don't want to get caught while we're driving. So I'm going to pull my wire really taught. And then right by the positive post on the battery, we have this thick cables, so we're going to take one of my zip ties, use it as an anchor point. That way, if there is any kind of slack, it's not going to fall back down and it shouldn't cause any problems.So at this point, I want to grab our fuse holder, make sure the fuse is not in there. And we'll go ahead, cut about halfway or so. Cut our wire in half, and we'll want to strip back both ends. On one end, we're going to grab another one of our butt connectors and crimp it in place. And on the other end, I'm going to grab the ring terminal out of our kit and crimp that down. And we can trim off some of the wire from our power wire, get rid of the excess, strip back the end. And then we can connect that to the butt connector.Now we're going to grab a 10 millimeter socket, we're going to loosen up the nut on top of the positive post here. We'll slide our ring terminal over, then tighten down the nut. Now there are electrical connections made, grab that fuse out of the kit. We'll put it in the fuse holder. Then we can make sure that all the wiring is working properly. So I went ahead and plugged up my 4-pole tester, that way I can verify that all the circuits are working properly. So if I turn on my headlights, we can see the tail light function is working, along with the left turn signal, the right turn signal, my brakes and the brakes and both turn signals.Now that we know that our wiring is working, it'd be a really good time to go back, clean the any wires up and mount your 4-pole. If you're not using a bracket, you can use the dust cover to hook it on your safety chain loop, and it'll be ready for you. In our case, we are going to be mounting it to a bracket. So first we're going to mount our no-drill bracket. We're just going to use a clamp to wrap around the hitch and give us a nice secure spot to mount our wiring. So I'm going to feed my clamp over the hitch, make sure my bracket sits in place. And then it's just a matter of getting the clamp to go around the bracket, then we can tighten everything up. We're using a 5/16 socket to tighten up that clamp.And we have our actual 4-pole bracket. The holes in our 4-pole bracket are going to line up with the hole in our no-drill bracket. So I'm going to take the hardware and it maybe a little bit tight, but I'm going to sneak it from the top, going down to this two holes in our no-drill bracket. Take our 4-pole, line up the holes, going over the screws and we'll secure it down with the locking nuts. That is the nice thing about these locking nuts is that we don't have to have a screwdriver to hold the screw down when we tighten these up, because it's got those little star washers on them. So we shouldn't have to worry about trying to get a screwdriver in between the bracket and the bumper here. Should be able to just take a 10 millimeter or a 3/8 socket. Just kind of hold your finger on the screw and tighten it down.Then it's just a matter if you want to take your 4-pole coming from the backside of the bracket. We're going to feed it through, but you'll notice it's got these little notches on there, that first notch needs to go right past this little lip on the bracket and the tension will hold it in there. So you can see, we just got to push right past the notch. And now whenever we're going to plug in our trailer, it'll have that tension to hold it in place. Now that everything's mounted working and looking nice, we're ready to hook up to our trailer and hit the road. But again, I'm Rob here at etrailer.com. That'll finish up your look at the Tekonsha T1 vehicle wiring harness on our 2019 Ford Edge..
Average Customer Rating: 4.5 out of 5 stars (36 Customer Reviews)
Quickly and easily install a 4-way trailer connector on your vehicle with this custom wiring harness. T-One connector plugs directly into existing wiring. Powered ModuLite reduces strain on wiring system.Fit great however, it took longer than the advertised 45 minutes to install. I even had it up on a hydraulic lift.
Installed in 1 hour. Lights took 2 but I was being careful. Great kit, all the gear worked great. Good instructions to use the cheater wires. Nice product. Thx. Gold star!!!

Quality products with great installation instructions.
We are very happy with the product on our 2019 Ford Edge Titanium. The videos and detailed install reviews posted by others made it a fairly straight forward process. We are in our late 60's and finished installing the hitch and running these wires in about 2 hours. The hardest part was figuring out how to get a grip on the streamlined tail light lens to pull it off the car for access to the wiring connectors. Rubber gardening gloves helped! Oh also - when testing the lights - remember to lower your tongue onto the hitch or the continuity won't be there for the lights to actually work. Parking next to it didn't do the job.
I was really impressed with how well this hitch fit my vehicle, also the directions were though and complete.
Would recommend etrailer for all your needs.
Patrick
Installed on my 2019 Ford Edge Titanium. Watch the installation videos and take your time. The tail lights do need to be removed but do exactly what the video says and they will pop off. Tips: 1) the video says to be careful not to let the existing wiring connector that goes to the tail light fall into the hollow of the car body. You actually need to let it drop down so the wiring harness can be pulled through. Once the harness is pulled through use needle nose pliers to pull it back up. It does not drop far. 2) I attached the module with a machine screw, lock washer, large washer and nut to a large existing hole in the under carriage. I did not want to trust the adhesive pad provided. 3) Make sure that you heat shrink the connectors to prevent corrosion of the wire ends. I also used dielectric grease (perhaps an overkill). Everything works great!
This will be the third one which I have installed. First off, there is no need to run any wires outside the vehicle except the harness which runs to the trailer. Keep everything inside. Remove rubber liftgate sealing strip and plastic strip where latch is. Pull back interior side panels. The Ford engineer who designed the wiring harness path should be fired. Route wires through the hole where those funny shaped doors with the rubber flappers are. A 12 volt source is on the drivers side panel, however I used a plug rather than cut wires. I will never again purchase a vehicle without a trailer package, I'm getting too old for this .
This is a nice kit. Installation went pretty smoothly. The trickiest part is getting the Y connectors up behind the bumper to the taillights. My tip - be sure to remove the zip tie between the 2 connectors, and arrange in a way where you can pull the plugs through one by one. There is a rectangular isolator at the Y which wants to be inline with the second plug as you try to pull it through. They have to come seperately and that isolator only fits one way. Also, once you get it to the void behind the bumper, there is no turning back (they aren't easily coming out the bottom), so tape it well and be prepared - it's a tight squeeze but it works.
This is my second Edge installation and it is a pain having to run the power feed all the way to the front, but alas it works so just plan on another 30 minutes of snaking it across the chassis. Also, finding a route down from the battery isn't a cake walk - I ended up getting my snake into the wheel well, but once there I was able to get the wire behind the splash panels with 3 screws, so it all worked out!
Everything is that is needed to get the job done is included. But, it feels like a generic kit and not a vehicle specific one. The wires are much longer than needed leading to a bundled up wad zip tied near the box. I wish it came with a holder for the 4-pin. Once you figure out what angle to pull the tail light adapters up at, it isn't too terrible. The biggest drawback is the black rectangle nonsense near the plugs. Whoever decided on that shape never actually installed it. Running the +12 from the battery was a little tricky. Once you get it down along the firewall it gets easier. I ran it along the brake and fuel lines staying as far away from the exhaust as I could. Once you get to the bottom of the car, the clips that hold the lines have a center section which you can push the wire into and it will retain it. I loosened the long insulation panel on the driver's side and ran it to the back.
This was, by far, much harder than installing the actual hitch but that difficulty had nothing to do with the product but with the car. The product had everything that I needed. They are making things in the new cars so compacted and unaccessible that it is very difficult to find a good path, even with the video. Coming down through the engine compartment was the hardest. Ford did not make it easy.
One thing that I did that was contrary to the video was that instead of trying to pull the ends of the wiring with the connections on them, I cut them off with about 6" of wire left on the connectors. Pulling the wires was much easier in the tighter spaces. I used water tight, heat shrinkable butt connectors to reconnect the ends. This also allowed me to cut the wiring to the length I actually needed and I did not have to secure a lot of extra wiring after the job was complete.
The trailer hitch and wiring harness I ordered from etrailer is perfect and was easy to install. there was more then one to choose from and Phyllis was extremely helpful in assisting me with getting the right one. Thank you!!
Does not properly fit 2021 Ford Edge.

Mike L.

10/13/2022
Which sub-model 2021 Ford Edge do you have? The # 118806 fits the Titanium model only. If you DO NOT have the Titanium model, youd need # 118805.
Painless ordering process and quick shipping. Not etrailer's fault but when the product was delivered the box was damaged, as a result part of the coating on the mounting brackets was rubbed off down to the metal. Will have to coat after mounting the hitch onto my vehicle so it won't rust.
Plenty of links to the wire and once I got the tail light assembly off it was easy to install
Way too complicated. Kit says run a 12 volt from battery to box at back of car. This car has way too many computer controlled devices to be doing, wasted my money !
Works great but helps to have a lift. Have to fish the wires through some tight spots. That’s the Edge not the kit!
It works great. The installation was super easy. The instructions and guides were simple to understand very helpful.
I was impressed with how quickly I received the items for my trailer hitch. No "hitches" at all.
Appears to be a very nice easy to install harness. On line video of installation makes almost fool proof Very fast service. Would highly recommend
Perfect fit, easy to follow directions and installation took just about as long as estimated..
Worked out great. Watching the video is a must. I did this on a garage floor with the driver side raised in front.
Would have saved a lot of time if I had a car lift.
Excellent customer service and speedy d elivery!
It's excellent quality and fits perfect ly.
on time delivery installed- my wife approves nothing else to say all good bobby platt
Info for this part was:
At etrailer.com we provide the best information available about the products we sell. We take the quality of our information seriously so that you can get the right part the first time. Let us know if anything is missing or if you have any questions.


Gerald
1/22/2021
Working great I’ve had no problems