
To see if this custom-fit item will work for you please tell us what vehicle you'll use it with.
Thank you! Your comment has been submitted successfully. You should be able to view your question/comment here within a few days.
Error submitting comment. Please try again momentarily.
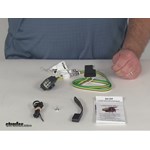
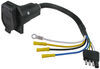
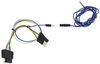
Quickly and easily install a 4-way trailer connector on your vehicle with this custom harness. Connector plugs directly into OEM tow package port - no cutting, splicing or tapping required.
Features:
Installation
This custom-fit T-connector plugs into your vehicle's factory tow package wiring harness, which is located behind the rear bumper.
Once installation is complete, the 4-way connector will be stowed beneath your vehicle, near the trailer hitch. A mounting bracket (sold separately) is recommended to keep the connector secure.
It is recommended that you use a small amount of grease on all electrical connections - the plug on your automobile and the 4-pole connector itself - to help prevent corrosion.

California residents: click here
Videos are provided as a guide only. Refer to manufacturer installation instructions and specs for complete information.
Today on our 2013 Land Rover Evoque we're going to be taking a look at and installing a Curt T-connector vehicle wiring harness, part number C56159. So here's what our wiring looks like when it's fully installed. It's going to give us a four pole flat, which is going to allow us to hook up to our trailer and have all the required lights going down the road such as our clearance lights, turn signals, and brake lights. When you're not using your wiring, you can take your dust cap loop it through your hitch right here, and not only will it keep our four pole protected against all the elements, but it will also keep it from dangling and hitting the road. Now this is a very straightforward installation. We're just going to have one plug that we're going to plug into our factory harness, and then we're going to route our four pole to our hitch. Now let's show you how we get it installed. Now to begin our installation we're going to need to come to the back driver's side of our vehicle.
Now right behind and above our tailpipe we're going to have two connectors. We're going to have one square connector and one rectangular connector. Now we're going to want to go with the bigger one that has eight pins on it. Now to get a little bit more room if we take our connector and we slide it towards the back and away from our vehicle, you can slide off the clip that's holding it against the frame. Then if we come to this button right here, we can push that and it will release the cover that's connected to our plug.
Now where we pulled the cover off, that's where we're going to plug in the end of our wiring harness, but before we plug it in I'm going to actually ground my wire here to the vehicle. That way I just have a little bit more room to work with and get my plug in place and not have to worry about getting my drill and a self-tapping screw and fighting my plug. I'm just going to take a self-tapping screw that they provide in the kit, and I'm going to take the ring terminal and attach it to the bare metal on the frame. Now before we plug our connector into our vehicle's harness here, I'm going to put a little bit of dielectric grease in the connector. That's just going to help prevent rust and corrosion from building up and help keep out some of the moisture. I'm just going to put a little bit of grease on my connector.
Then I'm going to take our harness that we just installed and it will lock into place. Now all I need to do is route my four pole wire over to the center towards my hitch. Now I just ran my four pole wire across the front of my hitch to help keep it away from the muffler, then I had it coming down right here. Now to keep it a little bit more neat, and cover it up a little bit, I'm going to take some wire loom and cover this portion. Also helping with some of the heat I'm going to wrap it in electrical tape. I'm going to go ahead and put our dust cap over our four pole now.
I'm just going to slide it over. Instead of just having it dangling here, we can actually take our dust cap and attach it to our hitch that way we'll keep everything nice and secure, and our wiring will be here when we're ready. Now to make sure everything is working properly I'm going to hook my tester up to my wiring. Now with an extra set of hands I'm going to have him run the lights. Can you turn the lights on please We can see that it's working. Now we can check the left turn signal, right turn signal, the brakes, and finally the brakes and the left turn signal, and the right turn signal. Everything looks good. We're ready to hit the road. That will finish up our look at the Curt T-Connector vehicle wiring harness, part number C56159 on our 2013 Land Rover Evoque.
Average Customer Rating: 4.4 out of 5 stars (7 Customer Reviews)
Quickly and easily install a 4-way trailer connector on your vehicle with this custom harness. Connector plugs directly into OEM tow package port - no cutting, splicing or tapping required.This works on my 2017 Land Rover Range Rover Evoque. Its my understanding that all Evoques have the trailer wiring port built-in that this plugs into. For some reason, there is nearly no information about trailer wiring on the internet. And even at etrailer.com they say "Not confirmed to fit" and only certified it for the 2013. Well, it does work on other years. just put your head under the left rear bumper (or your phone) and look for the port. It should be there. Whatever you do, don't get the ZCI Circuit Protected Harness. You don't need it.
Delivered quick and worked like a charm. Had a connection question so I called in and they answered my question. Etrailer is my place to go for all my hitch needs.
Fit my 2016 perfect! So glad they could ship two day so we could have it for our trip!
Works great and super easy to install!
Do you have a question about this Custom Fit Vehicle Wiring?
Info for this part was:
At etrailer.com we provide the best information available about the products we sell. We take the quality of our information seriously so that you can get the right part the first time. Let us know if anything is missing or if you have any questions.


Jennifer
7/20/2022
After a year, the hitch is still a great purchase and has served us well!