
THIS ITEM IS NOT A FIT FOR
2016 Honda Pilot

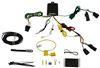
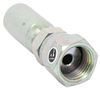
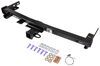
Curt Custom Base Plate Kit - Removable Arms
Item # C98FR
Retail:$696.95
Our Price: $420.61
$345.61 after $75.00 Mail-In Rebate 2016 Honda Pilot
Will this fit?
To see if this custom-fit item will work for you please tell us what vehicle you'll use it with.

Thank you! Your comment has been submitted successfully. You should be able to view your question/comment here within a few days.
Error submitting comment. Please try again momentarily.


- All Info
- Reviews (6)
- Q & A (0)
- Videos (2)
- Photos
CURT Base Plates - C98FR
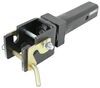
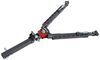
- Removable Drawbars
- CURT
- Twist Lock Attachment
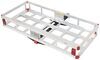
This custom-fit base plate kit lets you hook up your tow bar to your vehicle. The main body remains hidden for a clean, unobtrusive look when your vehicle is not being towed. Simple, bolt-on installation with included hardware.
Features:
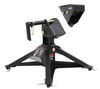
- Custom-fit base plates provide attachment points for tow bar
- Twist-lock tabs for easy installation and removal as needed
- Concealed main body for OE look and seamless integration with the vehicle
- Sturdy, dependable design
- Spreads towing force evenly to minimize weight placed on suspension
- Constructed of welded steel
- Simple installation - no welding required
- Bolts securely to your vehicle chassis
- Physically tested to gross vehicle weight rating (GVWR)
- Precisely welded for superior strength and fit
- Protected by a durable high-gloss black powder coat finish
- Co-cured in a rust-resistant liquid Bonderite coating
- Includes base plate and installation hardware (tow bar sold separately)
- Compatible with Curt and Blue Ox tow bars
Specs:
- Distance between brackets: 37-1/4"
- Bracket height: 20"
- Limited lifetime warranty
70103 Curt Custom Base Plate Kit - Removable Arms
Installation Details
This Product Fits The Following Vehicles
- 2019 - 2020 Jeep Cherokee excluding Overland and Trailhawk
- 2021 - 2023 Jeep Cherokee excluding Trailhawk
- 2019 - 2020 Jeep Cherokee Overland and Trailhawk
- 2021 - 2023 Jeep Cherokee Trailhawk


Video of Curt Custom Base Plate Kit - Removable Arms


Videos are provided as a guide only. Refer to manufacturer installation instructions and specs for complete information.


Video Transcript for Curt Custom Base Plate Kit Installation - 2020 Jeep Cherokee
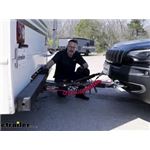
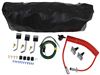
Hi, John with etrailer. If you looking to flat tow your Jeep Cherokee check out this option we have here at etrailer. It's the CURT Direct-Connect baseplate kit and it's going on our 2020 Jeep Cherokee. Now, if you're new to flat towing and you are interested in flat towing, then of course the base plate is just gonna be one of five things that you actually need to be able to flat tow. Now this setup right here, this is all hooked up, ready to go. So of course we'll start with the base plate.
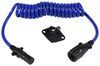
That's what we installed here. This is gonna be the physical connection actually on your Jeep, and that allows you to hook up all these other things to it to be able to flat tow. The next thing you're gonna need is some diode wiring and this is just going to be able to when you hit the brakes on your RV the brakes are gonna light up on your Jeep. Just like the blinkers and the taillights and everything else. It lets people know what you're doing.
It keeps you safe out there on the road. Third thing that you need you need a supplemental braking system. This is required by law and it just helps you to come to a complete stop safely. Fourth thing that you need, you need a tow bar. This is gonna be the physical connection between your Jeep and your RV.
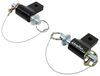
This locks in, keeps you straight down the road. And the last thing you need, safety cables. In the event that something comes loose or something fails here these safety cables are gonna keep your Jeep behind your RV until you get over and safely pulled over. So let's take a closer look at the CURT base plate. Now, first thing I am gonna let you know here is that the arms that come with this, they call this a a Blue Ox style arm.
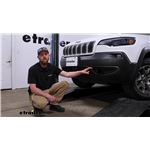
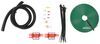
Now if you have a Blue Ox tow bar, that's great. It's gonna work for you. If you don't, if you had say a Roadmaster or Demco we have adapters to fit the arms that come with this kit here. They basically all work the same though. It's nice and quick and easy to disconnect. Get the safety cable out of the way. Hold that. And these simply pull out, twist and come out. And that'll give you a nice factory appearance when you're not towing down the road. You say you wanna hook back up and get back out on the road. It's just as easy to put it back together again. This is a nice, nice kit. It's a direct connect kit. There's no bar that's going and spanning across the bumper on here. It installs where your factory tow hooks were. And the nice option is is you still have these safety chain loops. So in the event that you would need a tow bar or a tow hook or something like that you still have this space available. As far as installation goes, it's a little involved. You have to pull this front fascia off the whole bumper and everything. You need some special tools. It's not really complicated, it's just there's things that you need to do. There's a process to it. But other than that, the kit itself there's no welding, there's no cutting, there's no drilling for the base plate kit. It's pretty straightforward. And if you wanna see how we did it, stick around, we'll show you how we did this one. Now in our installation we're gonna be removing this big plastic cover here on the front. It has a number of these plastic fasteners here. You can use either a small screwdriver or a pick, either one of those. What you do is come in and you lift up the center section. It'd come up and lift the bottom like that. Sometimes these centers come out. Not a big deal, they'll just go right back in. So I think we have about 14 of these on here. So just work your way around the front. Taking these fasteners off I want you to have all of them loose. Just go ahead and lift up over the front here. It'll kinda pop out and up just like this. And set this off to the side. Now just on the inside of the headlight here we're gonna have a T30 screw that we're gonna take out here. And you have one of these on each side. (drill buzzing) Now we can turn our attention to the wheel wells. Inside of here, we're gonna have three 8 millimeter bolts that we need to remove. This is the same on both sides. (drill buzzing) Now you can take a trim panel tool or a screwdriver, a flat screwdriver, and we're gonna peel back the inner liner of this fender well. And it's gonna expose a 10 millimeter bolt that's up here that we need to get to. So this liner is plastic, just kinda push it outta your way. (tools rattling) (drill buzzing) It was in this orientation so we had to get it out this way. But this is your 10 millimeter. Now after you're finished with both fender wells come underneath and just to the inside of your tire, on both sides you're gonna have an aluminum rivet that you need to drill out. (drill buzzing) Sometimes they come off just like that. It's great if they do. Otherwise just drill the center out until it begins to spin and you can take a screwdriver and you'll pop it right off. That worked out good for us. Now, once you drilled out both rivets, one on the passenger side, one on the driver's side, there's four 10 millimeter bolts under here that need to be removed. (drill buzzing) Now while we're under here, I did wanna point out that there's other 10 millimeter bolts here. We're gonna leave those alone. If you kind of kinda see the the plastic fascia comes around and I think it's being pinched by our skid plate right now. And just to be on the safe side, I'm gonna loosen these. I'm not gonna take them off. I'm gonna loosen them (tools rattling) just enough that fascia will slide out now. (tools rattling) Yeah, that's a lot better. Now we're getting ready to pull the front fascia off. But before we do get you some painter's tape and just tape up your seams right here. Protect your paint from any scratches just in case these panels wanna overlap or do anything while you're taking them off. Okay, so come to the inside of the fender well back where we had our 10 millimeter bolt that was clamping these together. And you'll feel on the inside a plastic tab. We are going to take a screwdriver, insert the screwdriver in there and kinda twist and I'm pulling out at the same time. What we're doing is pushing down and releasing this tab in this tab here. So just gently pull out. I'm kinda pulling out at the bottom too and it loosens it up around these headlights. These clips kinda slide in. Now keep in mind, especially if your Jeep has fog lights we're gonna have a wiring harness behind this bumper. So you don't wanna pull too hard, you don't wanna yank it off. We're just loosening things up right now. Just work your way around. If you need a trim panel tool anywhere it's gonna be on these corners of these headlights. And we can take a look. You can see this is the wiring harness I was talking about right here. And to remove this, we have a yellow tab. We'll push down on that. Pull out on the red. Sometimes they get dirt and stuff in them and they don't wanna cooperate too much. Just pull out on the red and it will separate. Looks like that's the only harness on this side. Okay, and we are clear. So no more harnesses. This is the inside. This is what the inside looks like here. I'm gonna have you just your one harness and it's gonna power both of your fog lights. So there's only one harness to worry about. Now set this off in a safe location. Now we'll head over to the tow hooks here. On the backside there's gonna be a 30 millimeter bolt. I've got a long extension, a wobble socket. If you have a universal, that'll work too. It's all the way tucked in here. And this is the best way I found to get up here. I mean, they're not on there too tight. (metal clunking) But we'll take this off first (metal clunking) (tools rattling) and then come up to the front. Up here, you're gonna have two 16 millimeter bolts that are holding the tow hook on. (drill buzzing) And you could slide that out. (drill buzzing) Go ahead and do this on both sides. Once the tow hooks are removed you can come down to the frame extensions. You're gonna have three 15 millimeter bolts. Get these. (tools rattling) That's gonna be the exact same on both sides. Now, both sides you're gonna have a stud with a manufacturing clip. These we're just holding this part on while they went down the assembly line. We're not gonna reuse these, so don't worry about destroying this clip when you take it off. I'm just using the small screwdriver. Get some needle nose pliers behind it. Maybe a trim panel tool, whatever it takes to get these things off. (tools rattling) (metal clunking) Okay, we'll take these off and go ahead and do this on both sides. Now, when it comes to installing the base plates they are gonna be side specific. So the passenger side like this is gonna have the hooks, your safety chain loops are gonna be on the inside. So these are gonna go right where the bumper on the frame extensions mounted up. And the hardware, we're reusing the hardware. So the the black bolts that we're holding the tow hooks up we're just using one of them that's gonna go in the same position as it was. And then the three bolts that we're holding the frame extension we're gonna reuse those as well. And they go back right where they were. So we're gonna snug these up in this order. We're gonna torque this to the specs in our installation manual first. And then these get torque to spec. (tools rattling) Now this kit is gonna include a half inch bolt, flat washer, and conical tooth washer. This threads into the backside of the base plate that we just installed. So you'll see little teeth on this washer, they go towards the base plate and it's gonna be the flat washer. I highly recommend using some Blue Loctite on this bolt just as a little reassurance. Now this is gonna thread into the backside, like I said, of this base plate here. (metal clunking) Just insert it where the old tow hook ran through and we removed that big 30 millimeter bolt or nut on the backside here. Now installing these base plate safety cables. In this instance on our Jeep it was actually, the cables we're long enough that we went up and we looped around the frame, but it was on the inside of this radiator support. And we we're able to loop up and come back down on both sides here and tie it up. We did the same thing on both sides. Now when you do this at home, you wanna make sure that you're not gonna hit any air conditioning lines. Make sure it's free from your circuiting belt, moving parts, stuff like that. And if you can't get it up and around the frame up here, it's okay to kinda loop them through and bring it back down, down here. Just as long as it's where you hook up is something strong like the upper frame up here and it's behind the radiator support. Now, as far as installing the base plate it is pretty much done. If you weren't gonna do anything else you could just go ahead and slap your Jeep back together. If you we're looking to flat tow and do this all yourself now is the time to get your diode wiring done, your braking system, all of that stuff while the front ends torn apart like this. It just makes it a lot easier to run the wires through, make all your connections, and do everything that you need to do to set this Jeep up to flat tow. If you're wondering how to do say diode wiring or a braking system on a Jeep like this we have videos right here on our website that'll show you how to do it step by step. That's what I'm about to do right now. I'm gonna get everything together here. As far as the base plate install goes, we didn't have to do any cutting to this fascia. The only thing we had to cut was for the breakaway switch and then of course the electrical cable here. And so we kinda had to do that. Of course, that's a different video, but just to let you know there's very minor cutting involved when you're going to outfit your Jeep and set it up for flat towing. And that was a look at CURT's Direct-Connect baseplate kit on our 2020 Jeep Cherokee.
Customer Satisfaction Score:
91% were satisfied with this product
9% of customers were not satisfied
- Defective
Customer Reviews
Curt Custom Base Plate Kit - Removable Arms - C98FR
Average Customer Rating: 4.5 out of 5 stars (6 Customer Reviews)
This custom-fit base plate kit lets you hook up your tow bar to your vehicle. The main body remains hidden for a clean, unobtrusive look when your vehicle is not being towed. Simple, bolt-on installation with included hardware.by: Richard 02/10/2024
The custom base plate kit has worked great. Appreciate your free install as part of the purchase. Look forward to our continued purchases from you!
by: Wayne 05/17/2023
Works good. But must keep caps over open Sockets to assure rocks or debris does not enter.
by: James 07/22/2020
The quality is top notch and the fit was perfect! The price was very reasonable compared to other suppliers! Very happy!

James

7/25/2021
Perfect fit and function
by: 11/25/2023

Brooke M.
11/28/2023
We would love to know more! If you would like to add any comments to your review, please reach out!
by: Robert 10/17/2023
by: Brian 06/18/2021
2019 Jeep Cherokee
6
6
See what our Experts say about this CURT Base Plates
- Base Plates for 2019 Jeep Cherokee Trailhawk Compatible With Roadmaster Falcon All-Terrain Tow BarThe Curt # C98FR base plate kit you'd looked at fits all models of the 2019 Cherokee, and if used with an # RM-031 adapter, it would work great with your Falcon All-Terrain tow bar. In addition to the base plates and tow bar, you'll also need safety cables if you don't already have them as well as a taillight wiring system, a supplemental braking system and possibly a high/low adapter if the installed height difference between the base plate and the receiver on the motorhome is greater...
view full answer... - Best Blue Ox Base Plate for 2019 Jeep Grand Cherokee to be Flat-towedThe base plate adapter you will want for your 2019 Jeep Grand Cherokee Trailhawk is the RoadMaster Base Plate to Blue Ox and Demco Tow Bars Adapter # RM-033. This base plate adapter will be compatible with your Blue Ox Aventa tow bar. The wiring harness you will need is the Roadmaster Diode 7-Wire to 6-Wire Flexo-Coil Wiring Kit # RM-15267. This wiring kit will let you you wire your vehicle to accept your RV's tail, brake, and turn signal lights for flat towing.
view full answer...
Do you have a question about this Base Plate?
Info for this part was:

Expert Research:
Mike L

Edited by:
Lindsey S

Video Edited:
Joshua S

Video by:
Chris R

Updated by:
Wilson B

Written by:
Kristina F

Test Fit:
Ryan G

Test Fit:
John A
At etrailer.com we provide the best information available about the products we sell. We take the quality of our information seriously so that you can get the right part the first time. Let us know if anything is missing or if you have any questions.
Product Experts Available Now!
Call 1-800-940-8924
Wayne
5/18/2024
All good except the front tung and groove opening are bending.