
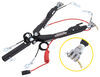
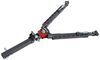
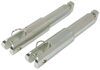
Blue Ox Base Plate Kit - Removable Arms
(3017 reviews)
Price: $539.51
In Stock
Blue Ox Base Plate Kit - Removable Arms
Item # BX1676
Retail:$592.90
Our Price: $539.51
You Save: $53.39
Will this fit?
To see if this custom-fit item will work for you please tell us what vehicle you'll use it with.
In Stock
Thank you! Your comment has been submitted successfully. You should be able to view your question/comment here within a few days.
Error submitting comment. Please try again momentarily.


Need help with installation?
Locate installers near me- All Info
- Reviews (3017)
- Q & A (0)
- Videos (1)
- Photos
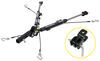
Blue Ox Base Plates - BX1676
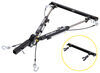
- Removable Drawbars
- Blue Ox
- Twist Lock Attachment
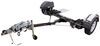
Custom designed to fit your vehicle so it can be safely towed behind your RV, this base plate has easily removable arms that offer a seamless look when you're not flat towing. Base plate bolts directly to your chassis, so no welding is required.
Features:
- Custom-fit base plate provides attachment points for your tow bar when flat towing
- Hidden design provides a clean, seamless look
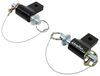
- Arms remove with a simple twist when not in use
- Brackets won't protrude past the front of your vehicle
- Sturdy design spreads towing force evenly to prevent stress on your vehicle's suspension
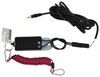
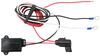
- Integrated mounting points let you easily attach an electrical connector plug with bracket (sold separately)
- Receiver covers keep dirt and debris out of the base plate when arms are removed and provide a finished look
- Durable steel construction is powder coated to resist rust and corrosion
- Straightforward installation - no welding required
- Base plate bolts securely to your vehicle's chassis with included mounting hardware
- Sturdy lugs pair with Blue Ox tow bars to form a secure and reliable connection
- Adaptable for use with Roadmaster tow bars - adapter (RM-031 or RM-031-5) sold separately
- Adaptable for use with Demco tow bars - adapter (BX88310) sold separately
- Made in the USA
Specs:
- Distance between brackets: up to 31-1/4"
- Bracket height: 17-1/4"
- 3-Year warranty
Simple, Hidden Design


This base plate's hidden design creates a clean and seamless look. The bracket arms are easily removable, creating a slick appearance when you're not flat towing. Because the arms can be removed, you also won't have to worry about banging your leg into any protruding arms when you walk by.

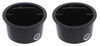
Attaching and removing the bracket arms is a breeze. To attach the arms to the base plate, simply insert them into the receivers and rotate them until they lock into place. Once you're finished towing and want to remove the arms, pull the pin to disengage the lock, rotate the arms, and remove them from the receivers. Finally, plug up the now empty receivers with the included receiver covers to help keep dirt and debris out of the base plate and provide a finished look.
Guide to Flat Towing
Flat towing your vehicle is much more convenient than using a trailer or a tow dolly. These other options take up much more storage space, leaving you less room both at home and at the campsite. In addition, securing your vehicle to a trailer or tow dolly can be a hassle and more time consuming than hooking up with a tow bar.
There are 5 basic components needed when flat towing a vehicle: a tow bar, a base plate kit, a safety cable set, tow bar wiring, and a supplemental braking system.

The tow bar links your towed car to your motorhome. It attaches to the custom-fit base plates that install on the frame of your towed car. Safety cables ensure that your towed car does not separate from your motorhome in the event that your tow bar becomes detached. Tow bar wiring allows your towed vehicle's signal lights to sync up with your motorhome's tail lights, which is required by law in most states. Finally, the supplemental braking system - also required in most states - brakes your towed car when the brakes in your motorhome are activated, preventing wear on the motorhome and decreasing braking distance for your entire setup.
BX1676 Blue Ox Baseplate - Removable Tabs
Installation Details
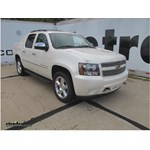
This Product Fits The Following Vehicles
- 2007 - 2013 Chevrolet Avalanche
- 2007 - 2011 Cadillac Escalade excluding Platinum
- 2012 - 2014 Cadillac Escalade excluding Platinum or Premium
- 2007 - 2013 Cadillac Escalade EXT
- 2007 - 2014 Chevrolet Suburban 1500
- 2007 - 2014 Chevrolet Tahoe excluding Hybrid
- 2007 - 2014 Chevrolet Tahoe Hybrid
- 2007 - 2014 GMC Yukon
- 2007 - 2013 GMC Yukon XL 1500


Video of Blue Ox Base Plate Kit - Removable Arms


Videos are provided as a guide only. Refer to manufacturer installation instructions and specs for complete information.

Video Transcript for Blue Ox Base Plate Kit Installation - 2011 Chevrolet Avalanche
Today on our 2011 Chevrolet Avalanche, we're going to be installing the Blue Ox Base Plate Kit with Removable Arms - Part number BX1676. To begin with, we're going to need to raise the hood of the vehicle. With our hood raised, we're going to need to remove three screws. To remove the screws, we're just using a 10mm socket. With these three screws removed, we'll go ahead and repeat the same process over on the driver's side. Next, we're going to need to go up underneath the vehicle. Again, we're going to start over here on the passenger side. We're going to need to remove these three screws next.
To remove these three screws, we'll be using a 7mm socket. We'll then go ahead and repeat the same process over on the driver's side. Next, we're going to need to move into the fender well. Again, we'll start here on the passenger side. We're going to need to remove a total of five fasteners: two screws and three push fasteners. We'll then move over to the driver's side and we'll repeat the same process. Next, we're going to need to remove the front fascia.
We'll come here to each of the fender wells. We'll need to gently pull outward, releasing the clips here, the fender and the front fascia. Now as you're removing the front fascia, you want to make sure that you undo any electrical connections. As you can see here, here's one of the fog lights we're going to need to disconnect. This is the passenger side.
To do that, you simply squeeze in on the locking tab and pull outward. You'll need to do this over on the driver's side as well. You can then set the front fascia aside for now. Next, we're going to need to remove the tow hooks. The tow hooks right here. We'll need to remove the bolt and the nut and this bolt right here.
We'll be using an 18mm socket and wrench to do that. We're going to start over here on the passenger side. We'll then go ahead and repeat the same process over on the driver's side. Now the tow hooks and the hardware that we just removed will not be reinstalled. Next, we're going to start over here on the passenger side. We're going to need to remove the bolt that holds the bumper in place and add four flat washers that come with the kit underneath the head of the bolt. This will shim the bolt up high enough that we have clearance underneath for our base plate kit to be installed. To remove the bolt, we'll be using a 21mm socket. With our bolt loose, we'll go ahead and pull it out, slide four of our washers over it like that, then we'll reinstall the bolt and tighten it back down. Now, as you can see, we've taken out the extra section of bolt that was hanging down, giving us clearance to install our base plate. Go ahead and repeat this same process over on the driver's side. Next, we're going to go ahead and start over here on the passenger side with installing our base plate. This right here is the section that will go into the vehicle's frame. You'll notice how there's two holes that lines up with our holes here in the frame. Go ahead and install it here. We're then going to take one of the bolts that come with the kit. We're going to install it in the front hole. It goes all the way through. We'll then put a half-inch nut on the other side to hold the base plate secure while we drill through the rear mounting location all the way through. Next, we're going to temporarily tighten down the forward mounting location here, to hold our base plate in position while we drill out the rear hole. Now that we have the base plate secured with the front mounting bolt, go ahead and take our drill bit per the instructions and we'll drill out the rear mounting location the rest of the way. Now that we have the rear mounting location drilled out, we can go ahead and remove the nut from the front bolt that we installed. We'll go ahead and take the second half-inch bolt, line it up with the rear mounting location. We'll install it like that. With the bolts pushed through, go ahead and take the plate that ties in with our safety cables - one for here; the other hole will be up here. We have two holes that go over the bolts. It will be installed so that it looks like that. The remaining hardware that will go on each of these is a half-inch slip washer or a lock washer. And again, we'll be re-installing the half-inch nylon lock nut. When installing the hardware, you want to make sure that you use red loctite on all of the hardware before tightening it down. The loctite that we'll be using today is Loctite Threadlocker 262, part number LT37420. Once we have our loctite installed, we can go ahead and install the half-inch lock nut, get everything lined up and we'll go ahead and tighten it down. Then torque it to the manufacturer's specification. Next, we're going to go ahead and take the removable arm. We're going to do a quick test fit into the base plate. We'll line up the grooves here, twist it into place. If some reason this ear here or the tab would hit on the bottom portion of the frame and not allow it to twist in properly, we may need to take a hammer and bend the lower piece of the frame up a little bit to give a little bit of clearance. On our particular vehicle here today, you can see we will not need to do that, because everything seems to clear just fine. With our passenger side complete, we'll go ahead and move over and repeat the same process over on the driver's side. Next, we're going to need to install the safety cable using the quick link to this location right here. We'll take our safety cable, go around the frame, take our quick link and we'll go through the bracket and through both ends of the safety cable. Then go ahead and tighten down the quick link. With that done, we'll go ahead and repeat the same process over on the driver's side. Next, we're going to need to do some trimming on our fascia. Right here is where the old tow hook used to be. We're going to need to trim out this whole section here to allow room for our base plate. So I'm just going to briefly mark out the areas that you'll need to trim. Once you have that area marked out, we'll go ahead and just use a razor knife to trim out our excess plastic and open up the pocket here to allow our base plate to slide through. We will be repeating the same process on both the driver and the passenger side. Before you re-install the front fascia, it's a good idea if you're planning on doing any break-away switches or wiring or anything, to go ahead and plan this out now, because it may be easier to install them before the front fascia goes back on. Now in our case today, we're not going to be installing any of those items. We're ready to go ahead and put the front fascia back on. It's a good idea to get an extra set of hands to help you re-install the front fascia. Now even after all of our trimming here on this piece that used to go around the tow hook, we still found when we put the front fascia back on that it was really putting it into a bind. We went ahead and removed the remaining piece of trim from the tow hook hole and the front fascia fits much better now. Depending on your vehicle, you may or may not need to completely remove this. We found that everything lines up much better once we removed the piece. We did this for both the driver and the passenger side. Once you have your fascia pushed back up into position, don't forget to plug in any fog lights or any other accessories that you may have had to unplug to remove the fascia. Now that we have the fascia back in place, we'll go ahead and re-install the hardware in the reverse order that we removed it. Now that we have the fascia re-installed, let's go over how the removable arms are installed in each of the base plates. You'll notice how there's a tab that's sort of cut to fit. It lines up with the groove in the base plate itself. There's a spring-loaded locking mechanism. We'll line it up. Twist so that it locks into one of the tabs right there. When not using the removable arms or your tow bar, it does come with these little rubber plugs or plastic plugs that can be inserted into the base plate to help keep dirt and debris from getting in there, making it difficult to re-install the arms later. In addition to the base plate itself, you do get a couple of additional brackets. This bracket here can be used to install a breakaway switch. Depending on your exact model of vehicle, you'll have to choose the location to mount that. It does come with some hardware as well, some nuts and bolts, to install that. And you'll also get this bracket here to help you install your lighting or your wiring going back from the towed vehicle. It also does come with a little bit of hardware to help you mount it. And you will need to choose your location depending on your exact model and the type of wiring that you're using. And that will do it for our installation of the Blue Ox Base Plate Kit with Removable Arms - Part number BX1676 on our 2011 Chevrolet Avalanche. .
Customer Satisfaction Score:
92% were satisfied with this product
8% of customers were not satisfied
- Product did not meet expectations
- Wrong item was ordered
- Alternate product found
Customer Reviews
Blue Ox Base Plate Kit - Removable Arms - BX1676
Average Customer Rating: 4.8 out of 5 stars (3015 Customer Reviews)
Custom designed to fit your vehicle so it can be safely towed behind your RV, this base plate has easily removable arms that offer a seamless look when you're not flat towing. Base plate bolts directly to your chassis, so no welding is required.by: Charlie 04/22/2023
Always appreciate the great products, excellent customer service and good communication with customers. Thanks ETrailer
by: Shawn 10/06/2023
Seems to be as advertised.
by: Tommy 11/05/2022
if all your people are as helpful as Kimberly you have some petty good people. She is an asset to your Business. This is the 3rd set of base plates I bought from you. Thanks for the quick response. Ordered Thursday revived on Saturday
by: Michael 06/26/2022
Chevrolet Avalanche
Product works well, just towed our Avalanche 4353 miles on this trip. Everything is solid and wiring as it should.
by: Don R05/27/2014
2009 Cadillac Escalade
Have yet to install this base plate on my Cadillac Escalade. It looks like it will install easily, all parts are included and I like that it appears it will fit nicely with the styling of my truck. No protruding cross bars etc.
I look forward to trying it out.
by: Dennis T07/15/2017
2011 GMC Yukon
Very good product great service given by etrailer.
by: Ole09/19/2015
Product came quickly and instructions are easy to follow. Installs well and is hardly noticeable.
Service from etrailer was great as always
by: Ronald S.07/16/2014
great product,easy to install and looks great after installed on vehicle
by: Reginald 10/14/2022
Delivered promptly!
by: Breck04/07/2022
Install went well. I removed the entire rubber shrouds around the two hooks.
by: Steven 08/14/2021
So far all is good with the plate kit. Thanks
by: Charlie 08/03/2022
Outstanding customer service. Amy should get a raise!!
by: John K.01/21/2012
2007 Chevrolet Avalanche
Looks great as figured tomorrow I will start installing it I will see for sure after thats complete.
by: Buddy P04/08/2015
Great products and great service
by: Carlo 12/06/2021
The parts were exactly what I ordered and complete. Thanks Nicole T.
by: Karl 11/14/2021
Great product
by: Charles B11/26/2023
by: John 06/11/2023
2007 Chevrolet Tahoe
by: Levi D04/15/2023
2012 Chevrolet Tahoe
by: Marty 09/18/2021
by: afitz09/17/2012
2009 Chevrolet Avalanche
Had very useful instructions with it.
by: Paul 01/28/2021
by: William 02/11/2021
by: Rod04/13/2023
The size of the box terrified me but I had to do this one myself.
This project is not for the faint of heart. When you think about what could go wrong you could wet yourself. I went with my gut and just opened the box. Hmmm, packaged very well with everything you need for the install. No going to the hardware store for this or that. Sat there with a cold sarsaparilla and read the very detailed instructions, went back to the etrailer web site and checked out some vids and pics. Hmm, it didn’t seem that daunting of a job. On my 04 Lexus GX470 most of the holes were drilled. Before I knew it 5 hours had past and I owned a toad! I took it to my local Rv service center for an inspection and it was deemed safe to use.
This thing is awesome, tracs straight as an arrow.
Now, I have to figure out this diode lighting kit. Camping is fun! Yah!!! :) Noah and etrailer made this a tolerable project. I urge everyone to take advantage of the resources that are on this sight. I always learn something when I’m there. See y’all on the trail….Rod


by: Me Mac Mini 2009 cooper05/02/2023
Well, I'm glad I'm good with tools, grinders, drills, and such. It was not just bolt-on dal. The car grill was able to be used any longer as it was too tight of a fit. Some of the lower fascia had to be trimmed and also removed OEM nuts from the front, the angle wouldn't allow the stock nuts to work. But in the end, I got to work out. So prepare to spend around 4-6 hours playing with it to get it to work. I am positive it's going to work as intended.


25
3010
Show More Reviews
See what our Experts say about this Blue Ox Base Plates
- Parts Needed to Flat Tow a 2013 Chevy SuburbanWe can certainly help with that. The replacement breakaway switch kit is part # BRK2505, witch includes the breakaway switch, the coiled lanyard and the power cable that plugs into the Patriot II Supplemental Braking System. The top fangs are available as a replacement part as # BLU34FR. For a base plate, use # BX1676 (assuming your Suburban is a 1500 model) and for a wiring option, I'd recommend the # RM-15267 Diode kit. According to my research, your Suburban is capable of being flat...
view full answer... - Base Plate Kit for a 2012 Chevy Avalanche and Blue Ox Alpha Tow BarSince you already have a Blue Ox Alpha Tow Bar # BX7380 for towing your 2017 Buick Enclave you just need the Blue Ox Base Plate Kit # BX1676 for your 2012 Chevy Avalanche. I checked the online version of the owner's manual for your Avalanche and it did state that you can only tow your vehicle is it have the two speed automatic transfer case. Please note that you will also need vehicle tow bar wiring, a supplemental braking system, and possibly a high-low adapter to complete your towing...
view full answer...
- Recommended Flat Towing Set Up for a 2008 Chevy Tahoe To flat tow your 2008 Chevy Tahoe you will need a tow bar, base plate kit, wiring harness, charge line to keep your battery from dying, supplemental braking system, and high low adapter. I have linked the part numbers below along with any installation and review videos we have for the products. Tow Bar - Blue Ox Avail Non-Binding Tow Bar - Motorhome Mount - 2" Hitch item # BX7420 Base Plate Kit - Blue Ox Base Plate Kit item # BX1676 Wiring Harness - Roadmaster Diode 7-Wire to 6-Wire...
view full answer... - Flat Towing Recommendations For A 2007 Chevy Tahoe 4X44WD models of the 2007 Chevy Tahoe are capable of being flat towed without removing the driveshaft but there are other steps listed in the manual to follow to get it ready to tow with all four wheels on the ground. You'll need a tow bar, tow bar wiring kit, base plate, braking system, and safety cables to tow your vehicle. I have the following recommendations for you below: Tow Bar: Blue Ox Alpha 2 Non-Binding Tow Bar - Motorhome Mount - 2" Hitch - 6,500lbs Item # BX7380. This tow bar...
view full answer... - Blue Ox Base Plate Kit for Flat Towing 2011 Chevy TahoeSince you have a Blue Ox tow bar already the base plate kit you'd want is the Blue Ox part # BX1676 which fits your 2011 Chevy Tahoe. Most likely you are missing the breakaway kit of your Break Buddy so for that you'd want the part # HM39340. For lighting you can use the diode kit, # RM-15267, and not have to worry about cutting into the taillight housing. This will splice into your taillight wiring to allow your tow vehicle to control the taillight assemblies of the towed vehicle. This...
view full answer...
Do you have a question about this Base Plate?
Info for this part was:

Expert Research:
Mike L

Expert Research:
Jameson C

Video by:
Andrew K

Written by:
Lindsey S

Updated by:
Adele M

Updated by:
Wilson B

Updated by:
Mike S

Updated by:
Carrie F

Test Fit:
Shane T
At etrailer.com we provide the best information available about the products we sell. We take the quality of our information seriously so that you can get the right part the first time. Let us know if anything is missing or if you have any questions.
Product Experts Available Now!
Call 1-800-940-8924
Ronald S.
7/16/2015
great product, easy to use and set up,would recomend this product to everyone with a tow vehicle.