
To see if this custom-fit item will work for you please tell us what vehicle you'll use it with.
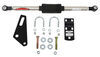
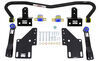
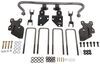
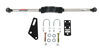
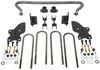
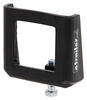
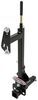
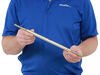
Minimize sway and driver fatigue by improving the stability and driveability of your motorhome. Solid, 1-3/4" chromoly bar mounts to the front axle and to the frame to balance weight transfer and reduce body roll. Includes mounting hardware.
Features:
Specs:

California residents: click here
Videos are provided as a guide only. Refer to manufacturer installation instructions and specs for complete information.
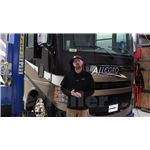
Hey everyone, Ryan here at etrailer. Today on our 2014 Ford F 53 Chassis Motor Home, we're gonna be showing you how to install the Hellwig Front Sway Bar Kit. Before we do that though, let's take a minute, check this out and make sure it's going to work for you. Here's what the sway bar can look like installed on the front of your motor home. And the whole point of a sway bar is to help control and minimize body roll and sway, which, you know, those are pretty bad on a big coach, right These are just big, huge boxes going down the road. And I'm sure if you're watching this, you probably realize you need a little bit of extra help when it comes to suspension and making your driving experience actually pleasurable because I can imagine you get caught out on some twisty roads or windy days trying to control a big old, big old coach like this isn't the most comforting thing to do.
So that's where an upgraded sway bar, like the Hellwig one can really go a long way in making that experience that much better. What it's going to do or how it works. So the sway bar will be connected to your front axle and then the other end of it will connect to your motor home's frame. And when you experience that body roller, that sway. So for example, let's say if the motor home, you know, is top heavy and is starting to lean over towards this way, the sway bar is going to counteract that, push on the opposite side and help to straighten it back out, right Because more or less what the sway bar is, it's almost, for lack of better term, a big spring, okay And it's always going to want to come back to its natural position there.
And so when it experiences a change, you know it's going to fight that change to help keep everything planted and straight and transfer that energy back up into the chassis and everything and keep the motor home upright and help eliminate all that body roll. This is going to be a direct replacement over your factory sway bar because they do come out of the box with stock sway bars, right And honestly, I just don't really feel like they're up to the task. You know, they're definitely underperforming, at least in my opinion, with these big coaches and that experience so much body roll. There's a lot of room for improvement and that's where, where this comes into play, it definitely works and definitely makes everything a lot more manageable compared to the stock one. Now there are other options out there for front sway bars.
Roadmaster makes one and they have awesome parts, too. I've dealt with them for a long time and you definitely get a performance upgrade compared to the stock one, but compared to the Hellwig, you know, they're both going to work, and get the job done. They're both gonna be better than the stock one. The one thing that I noticed that the Hellwig has an advantage with, at least in my opinion, one of them being the finish, which I'll tell you, tell you why here in a moment. But really just the end links and everything, these things are extremely stout and they're gonna definitely be up to the job being able to transfer that energy, right Because if the energy's coming from the sway bar, you know, up into the frame or vice versa, if you got little itty bitty InLinks here, what good is that, right And with these, you know, it's something you're not gonna have to worry about, extremely stout and really well built.
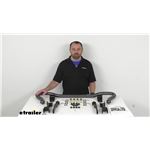
That's not to take away from the Roadmaster ones. Those are beefier and you know, more durable and everything compared to the stock ones. But just comparing these two, that's the main difference that I see. But with that in mind, I actually have an extra one of these on hand and we have our stock one, why don't we go over there, lay the two next to each other and check the differences out. So I got our factory sway bar laid next to the Hellwig one just so we can have a good comparison and a closer look at some of the differences. And you know, what meets the eye right away you might not notice a ton of differences but there are quite a few. First and foremost it's gonna be the thickness of the sway bars. All right, so I've got a tape here just out of curiosity. We go around it, that's about five and a half inches around as to where our factory one is about four and three quarters, which doesn't seem like that much, but when you're talking diameter, that's a pretty big difference. And more or less, you know, these sway bars are almost almost like a torsion spring, right So having that thicker diameter is gonna be able to transfer that energy that much better and be able to hold up to these really high demands and weights of these motor homes. The Hellwig is going to have what's called polyurethane bushings, which are these here and with polyurethane, you know, they don't wear out nearly as fast, they help transfer energy better, they're more resilient to chemicals and salt and stuff like that you would find on the road. And you know, one of the things with the Hellwig, if you look at the finish of it, it's really nice actually. It has what's called a hammer tone finish and so there's almost little pockets in there. So what happens with these polyurethane bushings, you have to put grease on them and with those little pockets from that hammer tone finish, that grease will get trapped in there and stay put. As opposed to some of the other aftermarket type sway bars, they just have a smooth powder coat finish and eventually over time, you know when this is moving and doing its thing, a lot of that grease can potentially get pushed out and cause premature bushing wear. So it's good to see there and it looks cool, you know, in my opinion at least. As to where the factory type bars, they're just going to have rubber bushings and they're a lot softer, you know, they don't transfer that energy as well and it don't take long for these to wear out, especially you know, on a vehicle like a motor home where these are kind of under built to begin with, at least in my opinion. When those wear out, the sway bar is gonna have a really hard time on being able to properly do its job. Last but not least, you know, to compare the end link. So what the end link does is connects to the sway bar and then to the frame and you know that helps transfer all that energy. So here's the stock ones, they got the, the rubber bushings in them and you can kind of almost tell they're starting to get deformed and worn out because of that rubber and they're just kind of dinky to be honest with you, you know, not very stout as compared to the Hellwig ones. And these things are no joke, really thick steel, you know, these are gonna do a great job of being able to handle the, you know, high demands of your coach whenever you're driving it down the road. And with these, you know, the bushings for the end links are integrated into the actual sway bar and these are polyurethane as well. And so just throughout the whole assembly, you know, just about every part is gonna have an advantage over the stock one. Something that I always recommend, it's definitely worth looking into and I say this because we see it all the time. People come in for one suspension enhancement on their motor home and end up just going with all of them 'cause they see the huge improvement that it offers. So Hellwig makes sway bars for the rear as well so you can do the front and back and have that covered and perfect example, our neighbor today who owns this coach is doing just that but more and it's, I definitely don't blame him. So he's doing the front rear sway bars, we have these sumo springs installed here in the front, also doing them on the back as well as a exact center steering stabilizer device which will kind of cover the steering side of things. So you know, you get the suspension covered, the steering covered and it makes a huge difference. It tightens everything up and makes a motor home that much more controllable and you'll have that much better of a driving experience, which I think is huge, right You don't want to be terrified whenever you're trying to get to your destination and enjoy yourself. And so this will really go a long way and help with that. And honestly, you know, it's kind of surprising that these manufacturers don't start kind of putting these upgrades in right from the factory. I think they should because you know that it makes that much more of a difference and who wants, you know, their customer to be scared when they're driving down the road or uncomfortable. So you know, a sway bar, all them enhancements will definitely help out in all the different scenarios. But as far as the installation goes, being that this is a direct replacement, you know it's not terrible. Sometimes it's a little tight to get to a couple things, it's heavy but that just kinda holds true when you're working on motor homes in general, right But this is something that you can do at home if you're mechanically inclined and got basic set of tools and things like that. If it's something you're not interested in messing with, I don't blame you. You can always check out our dealer network and hopefully that can get you pointed in a direction on someone who can help you get these installed and do it for you. But with that said, if you are doing them yourself, feel free to hang around. We'll go ahead and get started on them now. Very first thing that we're gonna undo is where the in link connects to our factory sway bar and from this point on whatever we do to one side, we're also gonna do to the other side because it'll be set up the same so the head of the bolt on this side can hold that with a 15 millimeter and then this one can grab an 18 millimeter, break it loose and completely remove it. (removing screw) (loosening past) The brackets here that are holding our sway bar on there's gonna be two fasteners, one on top, one on bottom. The heads of the bolts are gonna be a 15 millimeter. And then on the backside there's an 18 millimeter nut. Go ahead and get those removed. I just kinda like to break them all loose, same time, get that out of the way. As far as the top one goes, I probably just leave a couple threads on that hand tight. That way when we do the other side we'll leave it the, you know, set it up the same and the sway bar's not just gonna fall down on us, you know, we can get ready to remove it and just take the nuts set off that we left hand tight, make it a lot more manageable. (tool tightening) We'll get this off. I left or I removed that nut that we left on over on that side. These things are pretty heavy so if you need help make sure you ask someone but we'll get it removed and set off to the side. We can't get our in link removed now and so there's gonna be two fasteners. We're first gonna worry about this one here. The head of the bolt is a 15 millimeter and then on the backside where it comes through this bracket, the nut is an 18. So I'm holding the socket on there to prevent it from spinning and not a ton of space here. In our case you have these lines that run through here. So just be aware of that, you don't wanna damage those. We'll go ahead and and get this hardware removed. Once we get this bolt out, we should be able to grab the in link and slide that out of the way. We're gonna have that same exact hardware combination just holding on the rest of this here bracket. A little more room with this one. It's not directly in front of it, those hoses there. So we'll get everything removed. Here's what the hardware comma looked like, holding that bracket on and we're not gonna be reusing this. So go ahead and set it off to the side. Take these brackets now and they're gonna be offset right, so they kind of protrude outward. You want that to face towards the inside of the vehicle and the holes in it are gonna line up. Let those holes we were just working with there and you know, wipe that surface down, make sure it's clean and then you get these two bolts. All right, so you put them in like this, I take our bracket and get them lined up with the bolts pushed through there. We'll come back with these nuts and both started and both the head of the bolt and the nut. It's gonna be a three quarter inch in size. So we will hold the bolt head from spinning. Once you get the bolt snug, you wanna make sure and come back with a torque wrench and tighten them down to the amount specified in the instructions. With this part all torqued on and everything, you can grab the end link, this big bolt, put on a flat washer, line that up, push it all the way through to the other side, another flat washer and a nylon lock nut. And we're just gonna leave this hand tight for now. The surface here where our sway bar is going to, you know, bolt to, what I've done is just kind of wiped it down clean, got rid of any, you know, stuff that was built up on it and then just hit it with some spray paint. Give it a fresh coat. So while this is drying we can move over to our sway bar and get that propped. Moving up to our bench here, you can lay your sway bar down and grab the bushings and they give you a tube of grease and apply, you know it, liberally to the inside here. And I put a little bit on the outside too. This is something I do. And then, so these are split in two, right That's going to get slid around our sway bar and then the straps, they're gonna go in place just like that. It definitely makes this much easier if you have someone that can help you do this. We're gonna line this up and the little hump in the sway bar, you want that to be pointing downward like we have it here and then you take the factory bolts, put those through and we'll get them started hand tight. Just to avoid any confusion, you know the, the factory bolts that I mentioned, it's the bolt and the nut. You're gonna reuse the ones that we inchesre holding our existing sway bar in place to begin with. With this hanging freely now, you know we're able to kind of start to rotate it and we're just gonna line it up with our in links. Take another big bolt and flat washer, push that through, another flat washer and nut. With this in place, you know, do your best to make sure that it's centered. Usually it just kind of sits where it's gonna sit naturally, right But you know, if you need to make an adjustment to one side or the other, you can do that and just make sure everything looks good, right And once you're happy with it, well first snug down these stock bolts here. The 18 on the back, 15 on the front. (tightening bolts) For the end links, you can snug those bolts down with a 1516 socket and wrench. (tightening bolt) Use a torque wrench to tighten down all of the hardware to the amount specified in the instructions. Once you have all the hardware torque, if you're done working on your coach, you know, definitely a good idea to go out, take it for a spin, see how it does and then come back, take a look under here, make sure everything looks as it should. You know everything's still centered. Not a bad idea to come back and recheck the torque on your bolts, just to be on the safe side. And once you have that complete, you are all wrapped up and that will finish up our look at and our installation of the Hellwig front sway bar kit, on our 2014 Ford F53 Motorhome.
Average Customer Rating: 4.8 out of 5 stars (36 Customer Reviews)
Minimize sway and driver fatigue by improving the stability and driveability of your motorhome. Solid, 1-3/4" chromoly bar mounts to the front axle and to the frame to balance weight transfer and reduce body roll. Includes mounting hardware.Rear Sway bar by Helwig: Great, HOWEVER the flange is too rounded on the brackets provided and you cannot get a washer to fit when tightening-also cannot get a socket on to tighten, thus you cannot get a torque wrench on. Front Sway bar by Roadmaster: Great. BUT the provided new bushing that fits in the factory bracket is too thick and needs to be trimmed to fit right. BOTH of these issues SHOULD NOT have to be tolerated by a buyer of what is supposed to be an expensive quality product!!! The staff is superb but they asked me for a PRODUCT review and both brands are not impressive on the hardware.
Really takes that rock-n-roll motion to a minimum, especially when driving out a driveway. Much beefier than the stock E450 sway bar - very pleased with this product.
Really takes that rock-n-roll motion to a minimum, especially when driving out a driveway. Much beefier than the stock E450 sway bar - very pleased with this product.
Sway bars are considerably larger than factory. They were easy to install and helped to control side to side sway. These bars were installed along with a rear sway bar. I would recommend these sway bars
Almost twice the size of my original. It was an easy perfect fit. Used the stock mounting locations as original.
Fast shipper, quality products and installation videos too
Installed this sway bar along with a front sway bar. This bar is quite larger than the factory one and helped control side to side sway. I would recommend this sway bar cause it make driving our RV so much more enjoyable.
Great experience. The orginal sway bar was disconntinued however Tiffani stayed on top of my order at all times with a direct replacement for my truck.
Thank you,
Easy installation and noticably better handling. Hope it will help when I have the drop in camper in the bed. (Already had rear Hellwig bar)
Thank You etrailer for your prompt shipping and Expert advice and videos!!
Excellent website and easy ordering! The parts were delivered in just a couple of days; really fast process! Thanks for everything and if I need anything else, Etrailer will be the first place I look:)
We’re in total awe that delivery occurred today. An installer has it and it will go on our truck tomorrow.
Good product no torque values on bolts in direction!
Massive improvement over the stock sway bars!
Massive improvement over the stock sway bars!
As usual, etrailer was so helpful and knew exactly what part we needed for our rig. They were sent out the day they were ordered and we had them installed and are 100% pleased with the product. Our motorhome definitely feels more stable and tight with these stabilizers on them.
We ordered the hellwig front and rear stabilizers and had them installed and are 100% pleased with the stability of the rig. I did not even feel a semi passing me after we picked it up from the shop to take it back to the storage unit unlike before.
Great product that works to perfection on my 2020 Ford Expedition. I wanted less sway when on a less than great highway. And that’s what we have achieved.
Excellent , easy to install
Perfect fit and felt a huge difference on the first drive. Install was straight forward with no issues. Highly recommend for all F150 owners!
Very good boxing
Very knowledgeable people
Info for this part was:
At etrailer.com we provide the best information available about the products we sell. We take the quality of our information seriously so that you can get the right part the first time. Let us know if anything is missing or if you have any questions.


Thank you! Your comment has been submitted successfully. You should be able to view your question/comment here within a few days.
Error submitting comment. Please try again momentarily.