
Electric Trailer Brakes - 7" - Left/Right Hand Assemblies - 2,000 lbs - 10 Pairs
(354 reviews)
Price: $582.44
In Stock
Electric Trailer Brakes - 7" - Left/Right Hand Assemblies - 2,000 lbs - 10 Pairs
Item # ETBRK102A
Our Price: $582.44
In Stock


- All Info
- Reviews (354)
- Q & A (0)
- Videos (2)
- Photos
etrailer Accessories and Parts - ETBRK102A
- Dealer Pack
- Trailer Brakes
- etrailer
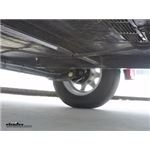
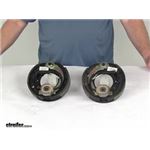
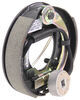
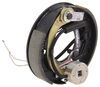
Driver's-side and passenger's-side electric brakes measure 7" x 1-1/4". Brake pads are made of durable friction material for improved braking and longevity. E-coated backing plates resist rust. Fit 10" to 13" wheels.
Features:
- Electric brakes are easier to install and offer more user control than hydraulic brakes
- Require only an electric brake controller (sold separately) - no actuator or hydraulic lines necessary
- Automotive-grade friction material is molded to brake shoes
- Pads are fully bonded - not riveted - to shoes for long life and more braking torque
- Less chance of cracking and crumbling that can lead to mechanical lockup, thanks to tapered edge and circular grinding
- Periodic manual adjustment required
- Fine-tooth brake adjustment gears allow for a more precise setting
- E-coated backing plates resist wear and corrosion
- Adjuster plugs (included) cover access holes to keep dirt and grime out of the assemblies and off of the shoes
- Left-hand (driver's-side) brake assemblies, right-hand (passenger's-side) brake assemblies, and mounting bolts included
- Ideal for building multiple trailers
- Nuts and lock washers (BRKH710) sold separately
- QAI and CSA certified
Specs:
- Quantity: 10 left-hand and 10 right-hand assemblies
- Application: most standard hub-and-drum assemblies, including Dexter, Lippert (LCI), and AL-KO
- Dimensions: 7" diameter x 1-1/4" wide
- Mounting flange bolt pattern: 4 bolt
- Wheel size: 10", 12", and 13"
- Axle rating: 2,000 lbs
- Limited 1-year warranty
Manual-Adjust Brakes
With repeated use of these brake assemblies, the brake shoes may move out of alignment, causing less efficient braking performance. To keep the brake shoes aligned and the brake assemblies performing correctly, you should perform routine maintenance.
These brake assemblies should be adjusted after installation and then as needed for the life of the brakes. To adjust the brakes, use a brake adjustment screw tool (sold separately) to turn the adjustment gear on the inside of the assemblies. Continue to turn the gear until the drum surrounding the brake catches on the brake pads enough so that the hub can no longer be turned easily by hand. Then reverse the gear by about 10 clicks. A properly adjusted brake should drag slightly on the brake drum.
Thoroughly Tested for Safety
These brake assemblies meet the requirements for certification by the Canadian Standards Association (CSA). The CSA creates standards, which when complied with ensure a safe and quality product. These brake assemblies underwent extensive testing to measure stopping distances when braking. These brakes have also been tested by QAI for braking performance in a complete automotive setup and under real-world conditions to provide the most realistic scenario for the everyday driver.
Automotive-Grade Friction Material
Each shoe on these brake assemblies is lined with automotive-grade friction material for improved stopping performance and longevity. The friction material is fully bonded onto the surface of the brake shoe. This lining is custom-molded for a perfect fit. The edges are tapered to ensure long-lasting performance. This taper, along with the circular grinding that the lining undergoes, helps to prevent cracking and crumbling. This durability helps to prevent mechanical lockup, which can occur when brake shoes are excessively worn or broken.
The friction material is also SAE-N certified, which means that it is an environmentally safe product that complies with California and Washington regulations regarding the composition of brake pads. As a result, this material not only provides high-performance braking that can endure the test of time, but it is also environmentally friendly and safe for use throughout the United States and Canada.
B07E-21 AxleTek 7" x 1 1/4" LH Electric Brake Assembly - Drivers Side - 2K Axles
B07E-22 AxleTek 7" x 1 1/4" RH Electric Brake Assembly - Passengers Side - 2K Axles

Video of Electric Trailer Brakes - 7" - Left/Right Hand Assemblies - 2,000 lbs - 10 Pairs


Videos are provided as a guide only. Refer to manufacturer installation instructions and specs for complete information.


Video Transcript for etrailer Electric Trailer Brake Kit Installation AKEBRK-2
Speaker 1: Today we'll be having a look at and showing you how to install the etrailer electric trailer brake kit with 7" diameter brakes for the left and right-hand assemblies for 2,000 axles, part number AKEBRK-2. Here's what our brakes look like installed on our trailer now. As you can see they rotate nice and smooth because of all the new bearings. We're going to take it out on our test course and show you what the trailer is like without having brakes on it and with having brakes on it, and you can see how big the difference is.When it's going down the road without trailer brakes you can see that there is nothing helping slow down the trailer. It's actually pushing your vehicle along. With brakes on it you can see how the trailer's tires are actually slowing down and not pushing the vehicle towing it.
It's causing it to slow down in a much more safer and controlled manner. Now the reason you're going to want these is if your trailer brakes are worn out you're not going to be able to stop smoothly or safely. And also in some states they do require by law that you have trailer brakes on trailer that weigh over a thousand pounds. A lot of small trailers out there that are lightweight, they don't come equipped with brakes on them from the factory. This is a great way to add them to your trailer so you can stay legal, stay safe at a cost-effective price.Okay, here's what our kit comes with.
We have a left-hand brake assembly and a right-hand brake assembly. This kit comes with both. If you need to purchase these individually we have them sold separately on our website. For the left-hand one you're looking at part number AKEBRK-2L, and for the right-hand one it's AKEBRK-2R. Now both of these assemblies are 100% new.
There's no re-manufactured parts here, everything you need to get functional brakes back on your trailer is here. We have brand-new magnets, brand-new adjuster arm here, brand-new springs, and, most importantly, brand-new shoes, which are fully-bonded to the surface of our shoe. These are not riveted in place, and by not having the rivets we have more contact patch with our drum to provide us longer life and better stopping ability. On the backside we have a brand-new backing plate with mounting studs, and this is e-coated so it'll resist corrosion over the course of time and offer us many years of service.These brake assemblies are designed to work with 2,000 pound axles. Now for a few measurements here, going across the full diameter of our drum from here at the widest part over here to the other widest part you're looking at 7".
This is designed to work with 7" drums. Now we'll measure how wide our shoe surface is. From one end of the shoe to the other you're looking at an inch and a quarter. Now these brake assemblies will require periodic manual adjustment as they start to wear down. You do that with your adjuster right here. This has a fine-tooth mechanism for precise settings so you can dial it in very smoothly so you can get the adequate braking ability that you want and prefer.To access this there's a rubber plug right here, which pulls off. Once you have the cover pulled off you can insert your flathead screwdriver or your brake spoon if you have one. You go down like this over the teeth. This will pull the adjuster out, spreading your shoes further out. As they start to wear you'll have better contact with the drum. If you find you adjusted it too much and you have too much drag, if you go back the other direction it'll bring the shoes back closer together, taking pressure off your drum.Now what's great about these assemblies is if your brake shoes are worn out on your trailer you don't have to worry about taking apart any of this assembly just to replace the shoes. You'll have all new shoes, all new springs, everything. It's always a good idea when replacing brake shoes on a trailer or a vehicle to always make sure you have new hardware, such as springs as well. This takes care of that for you. You have everything all ready to go. This will save you time installing it and save you money in the long run because it's an economically priced solution with everything you need on it.All right, to begin our install we have our trailer jacked up and safely supported with a set of jack stands, and we have our wheels removed. In our particular application on our trailer we don't have brakes on it currently. We just have an idler hub, so we need to remove this. We'll start off by removing our dust cap here, so use a flathead screwdriver to come behind it. Once we get it started we'll just work our way around till it comes off. Now at this point we're going to want some gloves and some paper towels. We're going to clean off all the grease around there with a towel so we can see what we're working with. We'll pry the keeper off with our flathead screwdriver. We can see how it's keyed, it'll only go in one way. This keeps our hub nut from coming loose. Now we'll remove our nut that holds our hub in place.Now we can just pull our hub straight off. Now we'll take our towels and just wipe our spindle until it's clean. We can take our brake assembly and we'll slide it onto our spindle and the studs on the backing plate will go through these corresponding holes on our axle flange. Now when we slide this on, since we're working on the passenger side, we'll make sure we have the right-hand assembly. We want to make sure our magnet is on the bottom. Now, nuts and lock washers are not included with our brake assemblies. They are required in order to mount them. We have a kit available on our website as part number BRKH7, which comes with the necessary eight nuts and eight lock washers. Okay, now we'll slide our lock washer on our stud, and we'll thread-on our nut. We'll do the same for all four, and now we'll tighten those nuts down with and 11/16 socket. Okay, now we'll snug down the nuts completely and make sure they're nice and tight.Now the reason you're going to want a new replacement drum assemblies is if you have bearings that have been worn out and had neglected maintenance, over time they can score the races inside your hub assembly to the point where they can't be reused. Replacing the races inside of a hub assembly is not the easiest thing to do. It's a lot easier just to have a new hub with a race already in it. Also, if your brakes have been worn out excessively and you've had metal-to-metal contact, your surface area here where the shoes contact could be deeply grooved or scored and damaged, and you won't have a smooth contact surface that maximizes how much friction material is actually touching your drum. That will affect your braking ability. By having a new surface you'll have maximum contact pattern with your shoes, providing you smooth and safe stops with less noise.Okay, the first thing that we're going to want to do is get our new wheel bearings packed in grease. What I like to do is wear gloves, put it inside my grease container and just work the grease in by spinning the bearing around in the grease. This will pack it full of grease inside and out. We have this grease available on our website if you need to purchase some. We even have marine grease available too if you're putting these brakes on a boat trailer or a trailer that sees excessive moisture. You can see how we have a grease ring all the way around our edges on both sides so we know we have it adequately packed.Okay, with the grease on it drop it down in. Now we'll pack the other bearing the same way. Now that we've placed our bearing in we'll install our seal. You can use a seal driver to do this, which we have available on our website, or you can use a block of wood. We'll show you both ways. Block of wood, you just sit on top and you'll tap it in until it sits flush with the end of your hub just like that. We'll show you on this one how to use the seal driver. That's what it looks like when you use a seal driver, and it sits flush.Now that we have both of our hubs ready, we'll slide them onto our spindles. Now we'll put our outer bearing in place. Now we'll place on our shim, it's keyed, only goes one way. Thread-on our nut now. Now what I like to do is spin the hub backwards as I tighten up the nut. Now we'll get our keeper in place. We may need to rotate the nut back a little bit for it to line up properly. We'll just tap it in. Now we'll replace our dust cap. I'm going to reuse the existing one that came on our trailer because our trailer has an easy-lube axle, and the dust cover has a cut out here which you can remove to insert a grease gun to lube your spindle.The replacement that comes with our hub is a solid piece. You'd have to remove the dust cover every time in order to lube your spindle. This one you don't have to do that, that's why we're reusing it. We'll take our cover, get it centered and lightly tap it in. Now we'll pop off the cover and we'll grease our spindle with a grease gun. Push the grease gun onto the fitting and I'll pump the handle until we get an adequate amount of grease coming out. Wipe off the excess grease and we'll place our plug back in place.Okay, now we find ourselves looking at the backside of our backing plate and we needed to start the process of adjusting our brakes. To do that there's a plug right here. We'll need to remove this. Use a flathead screwdriver. You can pop it loose. Now like we showed the adjuster earlier when we we're showing you the assemblies where we showed how to adjust it, we'll adjust it the same manner by sticking our screwdriver in the back side and rotating our wheel up. We'll do this until we achieve a light drag on the brakes, so we'll spin the brakes by hand until we feel resistance. Okay, you can hear it starting to drag and it's slowing down faster, so we'll keep doing this until we reach the desired feel. All right, right about there I can still rotate it by hand, but it stops almost instantly. That's the drag that we're looking for. We can take our plug and reinstall it. We'll repeat the same process for our driver side in putting our hub assembly on and adjusting the brakes to the proper drag level.Now the wires that come off our electric brake assembly for the magnet, we're going to strip off a little bit more insulation from both wires, twist it together nicely. We'll place on a heat shrink butt connector, which we have available on our website, and crimp the butt connector into place. Do the same for the other wire. Now since this is for a magnet it doesn't matter which wire is which when we attach our wires. One's ground and one's power. It doesn't matter which order.Okay, now we're going to connect our butt connectors to our duplex wire. What duplex means is there's actually two separate wires inside this jacketed cover. A white one and a black one, both these wires are 10 gauge. We have this available on our website as part number as 10-2-1. It is sold by the foot, so for however many feet you need order a quantity of that much. We'll take our wires here, utility knife, run down the middle. Peel back the insulation here and inside we find our two wires, black and white. Strip back the insulation from both wires, and, again, it does not matter which wire goes to what wire.Now, in order to shrink these down we'll use a heat gun that we have available on our website. The reason you want to use a heat gun is because it's a source of indirect heat and you don't run the risk of burning the butt connector like you do with a lighter. We went ahead and routed our duplex wire through a hole here next to our axle. It goes over towards our driver side on the axle. We have it secured with several zip ties along the way, and it comes out through the same hole that's right behind our hub assembly. We can connect our wires right there. All right, now we'll measure off how much of our duplex wire we're going to need, and we'll cut off the excess. Now we'll cut off our insulation again. We'll strip back the insulation.Now, this side's a little different. We're going to twist our wires onto the duplex wire that we brought over, so we'll just put one of the whites and one of the whites and we'll put the other one to the black. We'll put them into a butt connector together and we'll crimp it down. Now we'll twist the other one onto the black, place on our butt connector, crimp it. Okay, we have nice secure crimps on both of our wires. Now we'll take the other end of our left-over duplex wire, take off the sheathing again and strip back the insulation. Now we'll put this in the other end of our butt connectors. We'll just go black-to-black and white-to-white. It doesn't matter, but I like to color-code stuff as much as possible. We'll pull back on our wires and make sure they're crimped in there nice and good, and they are. Now we'll shrink down our butt connectors with our heat gun again.Okay, we've routed a wire back through our hole and zip tied it to our axle here where we stopped right below these electrical conduit lines. You can see where it hits a conduit above our axle, works it's way forward, comes under our frame here. It's zip tied up to this wiring bundle that goes into our junction box. Okay, we'll open up our junction box by undoing the two screws. Now there's a grommet on the bottom that we can use. We'll pull that open, we'll poke a hole in it, pass our duplex wires through that hole.Okay, now we'll measure off how much wire we're going to need to make our connections. This blue wire here, this is for our electric trailer brake output. This terminal all the way over here to the far right with all the white wires going to it, that's our ground. These are the two terminals that we're going to be using to make our connections. I'll measure off just how much we're going to need, cut off the excess. All right, I'm going to use our black wire for our output and the white wire for the ground because most white wires are ground. They just look better that way in my opinion.Now we'll use some of these small yellow ring terminals, which slide over our studs in our junction box, and I'll crimp these onto our connectors. We have these available on our website if you'd like to purchase one. We'll use a socket to remove the nut from the brake output terminal first. Okay, once we have the nut off the blue terminal we'll slide over our black wire and reinstall the nut, and we'll tighten it back down. I'll do the same for the white wire on the ground terminal. We'll slide our grommet back into place now.Now because many states require a breakaway system when their brakes are on a trailer we're going to be installing one. We're using the Hopkins Engager system. This is a breakaway system that has your switch, a batter, which has a built-in charging feature. This is part number 20099 on our website. Here we are on the driver side of our trailer next to our coupler. We need to find a place to mount our breakaway switch. Right here in this area will be fine. We'll drill a small pilot hole and get it marked. Take the breakaway switch down so it don't damage the wires, potentially, and we'll drill in the channel. We use a self-tapping screw to go into that pilot hole. Place the switch back over the hole and run the screw in all the way. Okay, that gives us a nice solid mount for our breakaway switch.Okay, now we need to find a place to mount our battery box. Inside the storage compartment for our propane tank and battery right here is a great spot. We're just going to drop this down, stick it through there. We'll run the wires through the expanded metal. Now we'll drop down a couple of screws, and we'll go underneath and use some fender washers and nuts to hold it in place. Now we'll get an extra set of hands, one to hold the screw in place at top with a screwdriver while we tighten up the nut on the bottom with a socket and a ratchet.Okay, our white and black wire we routed over here to our seven-way connector wire and zip tied it and routed it over towards our junction box. Okay, we'll pass those wires in through the grommet as well. We'll cut off our excess wire, the white wire is a ground. We'll go back to our white wire terminal over here. The black wire will go to our 12 volt power feed, which is this wire right here, the red wires. Place on a ring terminal, and we'll crimp that. We'll move the nut from the terminal for our ground, place the white wire on over the stud, reinstall the nut and tighten that back down.Our black wire, we'll measure off how much we need to connect to this terminal here. This is our constant 12 volt source of power. Strip back our insulation, place on a ring terminal, crimp that down, remove that nut. Place the terminal onto that stud. Now the black wire for our breakaway switch we routed along the same path as our white and black wires we did from the breakaway battery along our seven-way cord. We'll insert this through the grommet as well. We'll measure off how much we need to connect here to the blue wire side for our electric brake trailer output terminal in our junction box. Cut off our excess, strip this on back. We'll remove that nut now, place our ring terminal on with a stud, reinstall the nut, tighten it back down.Now we need to combine our blue wire from our breakaway switch to the blue wire from the breakaway box. We'll just hold them together as we measure off how much we're going to need and cut both of them simultaneously. We'll strip back the insulation from both ends and we use a blue heat shrink butt connector, which we have available on our website. Now we'll use our heat gun to shrink down the butt connector. With that done that completes all of our electrical connections for the breakaway system. We'll replace our cover now.Okay, now we have everything put together and wired up. We'll reinstall our tires and get back on the road. That completes our look at and installation of the etrailer electric trailer brake kit 7" in diameter for the left and right-hand assemblies for 2,000 pound axles, part number AKEBRK-2.
Customer Reviews
Electric Trailer Brakes - 7" - Left/Right Hand Assemblies - 2,000 lbs - 10 Pairs - ETBRK102A
Average Customer Rating: 4.6 out of 5 stars (354 Customer Reviews)
Driver's-side and passenger's-side electric brakes measure 7" x 1-1/4". Brake pads are made of durable friction material for improved braking and longevity. E-coated backing plates resist rust. Fit 10" to 13" wheels.by: Moto Hobo Jim02/10/2024
I installed a set of these a few months ago and they have worked as good as the OEM set.
Unfortunately, they have not improved the spring & clip design to hold the electromagnet in place. A simple hole drilled into the end of the retaining bar with a cotter pin would keep the magnet properly in place on rough roads.
by: CHARLIE B05/22/2021
Brake assemblies seem fine, but they don't come with the mounting nuts! You have to purchase them separately. Others have pointed this out only to have an "e-expert" reply with a link to the mounting hardware and an implied "Duh!" So let me do their job for them, here is what should be in the product description- "BRAKE ASSEMBLIES DO NOT INCLUDE THE 8 FINE THREAD 7/16THS NUTS NEEDED FOR THE PRODUCT TO FUNCTION. YOU HAVE TO PURCHASE A SEPARATE PRODUCT TO HAVE A COMPLETE PRODUCT. UNLESS OF COURSE YOU WANT TO GET ELBOWS DEEP INTO YOUR PROJECT ONLY TO DISCOVER YOU HAVE TO STOP EVERYTHING AND GO TO LOWES TO GET 8 NUTS AND WASHERS."
Good Grief


by: Dennis10/05/2019
Purchased electric brakes for a camper. Good price
Easy instructions seem to work fine.


by: Greg07/28/2022
I replaced the original hydraulic brakes and hubs on a Jayco popup trailer. The electric brake and hub Assemblies are excellent and were an easy install. Haven't used the trailer during the Covid pandemic, but hope to soon.


by: Jon 02/27/2024
Easy site navigation, straight-forward ordering process, fast shipping.
by: Greg04/28/2022
Ridiculously horrible packing job resulted in damaged parts. The Post Office tried to salvage the box that was getting pounded apart because the person who "packed' the parts just threw the parts together in a padded envelope and then tossed that in a much larger box with no further packing, so the 9 lb. of parts just banged together and banged the shipping box apart. See photos of what post office did to try and salvage the box.


by: Jim K.06/23/2023
I installed these brakes on my trailer a year ago and they still perform great. I repacked the bearings just now after the first year and observed the brakes still appear in good working order. However there are two items to remain attentive to. First, these brakes were shipped poorly. They were just thwon in a box without packing, so they tossed and banged their whole way here. Second, when you receive these brakes simpley throw away the retaining clip for the magnet. It doesn't hold worth a lick, you can replace the clip with BP19-001 which fits great even though advertised for 10" and 12" brakes. Good luck.
by: Patrick04/24/2022
Have had nothing but problems with these brakes. The retainer clip that holds the electromagnetic metal disk to the lever keeps coming off, which allows the disc to pop off and hang down making a racket in the wheel. I have taken the wheel apart three times to put a retainer clip back in. Gave up and bought some Dexter brakes at a [local] store in Tucson. Wish I had a photo still of the mess that the brakes became.


by: Ken07/09/2018
First purchase but not the last. Got them super quick and fit perfectly. Linda was awsome and a true asset for the company. I'd recommend E-Trailer to everyone for any and all trailer needs.


by: Jerry07/14/2023
Package arrived completely destroyed, no packing materials to speak of. Wheel bearing sets were open and rolling around loose in what was left of the box. Electric breaks were damaged and parts of them loose in the box, I have no idea as to why none of the smaller pieces didn't fall out during shipping. I was able to repair the break parts. This company has all the trademarks of a 3rd party drop shipper. I won't waste my time or money returning the items, as they will only send more damaged [cheap] junk. Shipping is extremely slow and tracking data is all over the planet. My money is better spent elsewhere.
by: Rodger B.03/03/2016
Outstanding product and installs literally in minutes once you get the old ones off! Very reasonable pricing and speedy delivery.


by: Danny08/03/2023
As far as the brakes go, they were a one-to-one replacement with what I had mounts for. Like others have said, it requires bolts and washers so don't forget! Time will tell on longevity, but the shipping was a little bit concerning. The brakes were not in packaging, free floating in the box and had been jostled around.
by: Jim 02/08/2024
Excellent customer service and fast shipping !
by: Paul02/12/2024
I installed these on my 1995 Jayco 1206
by: Rudy04/20/2023
Purchased as part of all parts required to upgrade a 1996 Jayco to electric brakes. Very pleased with quality of parts and results. Battery still fully charged after winter in storage!
by: Allan 07/28/2023
The price and quality of the e brakes I purchased are excellent! Great service from E trailer. 5 stars
by: 06/16/2021
These brakes squeal horribly. I have adjusted them, cleaned them, tried heavy force, light force adjusting all the way out and all the way in. They just make the trailer sound horrible. I actually try to not use the brakes because of the way they sound. Bad Bad Bad
by: Christopher Lee Wirth07/21/2016
don't forget when ordering these that you order the lock washers and nuts to attach, I didn't read all the way down to notice this, all is good, local hardware store had them


by: Greg06/27/2023
The whole process took a long time. I ordered brakes Sunday night and it took 9 days for them to make it from Missouri to Minnesota. Other places would have had a 3-4 day turnaround. The whole process I feel took to long.
by: Glenn05/30/2016
as always, these guys deliver fast and products of quality..will sure shop with you again....pic shows brakes installed on trailer


by: Lawrence 03/07/2024
Thanks works great!
by: Alan01/25/2017
Upon inspection these look extremely well built. Installation took about 15 minutes each. As it is winter here in Northern Minnesota, I won't know how well they perform for a couple months yet since they are on my boat trailer. I don't think there will be any problems. Great product.


by: Tom 12/13/2023
Jaime B was very helpful in ordering my parts. Super fast shipping. The right parts at the right price. Thanks.
by: Charles06/24/2019
Parts went on without a problem.
Took me about an hour for both sides.
The only thing was that the brake adjustment hole was missing the plug on one side.
Not bad for an 84 year old.


by: Peter02/17/2022
Installed on 2029 sunray 109 that came with 2200 dexter axle and 14 inch wheels/tires. All parts fit well and the new pregreased etrailer hubs/drums made it even easier to assemble. Paula did a great job making sure everything would fit by diligently checking all part numbers,sizing and making sure I got the right controller adapter and brake plate mounting nuts and washers kit. The brakes and pod time delay controller are working well although stopping power seems a mite weak as expected during breaking in period described when you should then readjust after the 1st 200 miles.
25
315
Show More Reviews
See what our Experts say about this etrailer Accessories and Parts
Info for this part was:

Edited by:
Lindsey S

Updated by:
Wilson B

Written by:
Alexander C
At etrailer.com we provide the best information available about the products we sell. We take the quality of our information seriously so that you can get the right part the first time. Let us know if anything is missing or if you have any questions.
Product Experts Available Now!
Call 1-800-940-8924
Thank you! Your comment has been submitted successfully. You should be able to view your question/comment here within a few days.
Error submitting comment. Please try again momentarily.