
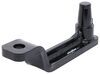
Towing Kit w/ Ball Mount and Trailer Wiring for Stealth Hitches Hidden Rack Receiver - 2" Ball
(28 reviews)
Price: $299.00
In Stock
Towing Kit w/ Ball Mount and Trailer Wiring for Stealth Hitches Hidden Rack Receiver - 2" Ball
Item # 391CONVE5
Our Price: $299.00
Will this fit?
To see if this custom-fit item will work for you please tell us what vehicle you'll use it with.
In Stock


Need help with installation?
Locate installers near me- All Info
- Reviews (28)
- Q & A (0)
- Videos (1)
- Photos
Stealth Hitches Accessories and Parts - 391CONVE5
- Trailer Hitch Ball Mount
- Ball Mounts
- Towing Kit
- Stealth Hitch
- Stealth Hitches
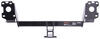
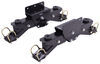
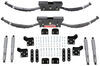
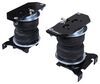
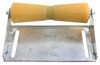
Use your Stealth Hitches rack receiver to tow a small trailer with this all-inclusive towing kit. Remove the receiver attachment from your hitch and insert the included ball mount. Custom-fit 7-way harness, hitch ball and safety chain loops included.
Features:
- Complete kit lets you use your Stealth Hitches rack receiver (391AUDQ818 or 391AUDQ716) for towing
- Detachable ball mount locks into hitch in place of receiver attachment
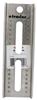
- Mount securely attaches to your hitch's cross tube to eliminate rattle and play
- Included hitch ball provides connection point for your trailer's ball coupler
- Black powder coat finish on ball mount and safety chain loops offers superior rust protection
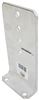
- 7-Way, blade-style connector mounts beneath hitch to power your trailer's signal lights
- Connects directly to battery to avoid overloading vehicle's electrical system
- Safety chain loops included
Specs:
- Maximum gross trailer weight: up to 8,000 lbs
- Not rated for weight distribution systems
- Ball mount:
- Ball size: 2"
- Rise from ground to top of ball (when used with 391AUDQ818 or 391AUDQ716): 18"
- Length (from center of ball hole to center of peg inserted into hitch block): 10"
- Total length: 13"
- Base thickness: 3/4"
- Ball hole diameter: 1"
- Limited lifetime warranty
SHT25010 Stealth Hitch Hidden Trailer Hitch Towing Conversion Package - 2" Ball
This Product Fits The Following Vehicles
- 2017 - 2024 Audi Q7
- 2017 - 2024 Audi Q7 without factory trailer connector
- 2019 - 2023 Audi Q8
- 2019 - 2023 Audi Q8
- 2024 - 2024 Audi Q8 e-tron
- 2020 - 2024 Audi SQ7
- 2020 - 2024 Audi SQ7
- 2020 - 2024 Audi SQ8
- 2020 - 2024 Audi SQ8


Video of Towing Kit w/ Ball Mount and Trailer Wiring for Stealth Hitches Hidden Rack Receiver - 2" Ball


Videos are provided as a guide only. Refer to manufacturer installation instructions and specs for complete information.

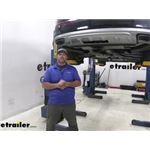
Video Transcript for Stealth Hitches Towing Kit with Ball Mount and Trailer Wiring Installation - 2017 Audi Q7
Hey everyone, Shane here with etrailer.com Today, I have a 2017 Audi Q7. I'm gonna walk you how to install Stealth Hitch Towing Kit. Why would we need the Stealth Hitch Tiwing Kit Well, let's say we, we purchased the hitch with the receiver tube on it for bike racks and cargo carriers, that one's not designed for towing. In my opinion, rather than getting the receiver tube for bike racks and cargo carriers, and then later on down the road behind the ball mount and the wiring, if you have any thought in your mind that you're ever gonna tow just buy the kit. You get the kit that comes with everything in it, because you do have to remove your fascia to put the hitch on and you will have to remove the fascia to put the wiring on. So it's better to do it all at one time, cut out this bottom section one time, reinstall it all when it's all done, and then you're finished.
If you buy them separate, you're gonna have to take the fascia off twice, you're gonna have to cut an extra off and then reinstall everything again. This kit is gonna come with a ball mount. The ball is gonna have to be mounted to the bracket. Just make sure you're following instructions for torquing the nut. 'Cause you're gonna install the same way that your receiver tube installs, push it up into place until it clicks.
It's gonna remove the same way, and it's gonna lock the same way. And another thing about this kit is not only does it come with a seven pole plug, but it's also gonna come with installed all the wiring itself is gonna come with your reverse wire and your brake controller wire if you happen to have a trailer that has brakes on it. Another nice thing, it's gonna come with an adapter. With this adapter is, if you pull a trailer that has four pole plug, you simply plug the seven pole in into your plug here, then you can put in a four pole plug from a trailer. This kit is gonna come with everything you need to get it installed.
You're gonna have plenty of wire, not only to get through the wiring inside that you need to tie into, but also to get to your battery. It's gonna come with your bracket, to attach your seven pole plug. As I mentioned before, the four pole adapter. As far as the installation process, it's really not that difficult. It's pretty straightforward.
It is a little bit time consuming because you do have to take the fascia off, which is why I recommended, if you ever plan on towing, go ahead and install the wiring along with the hitch so you taking the fascia off all at one time. Now we've gone over some of the features, I'll just walk you with how to get it installed. To start our installation, on each side of the vehicle, behind the tire, we'll remove two screws with a T25 Torx bit that are right here on the inside, holding our fender liner in place. We're gonna pull our fender liner back. We're gonna have one right here we need to remove. On the inner, on each side, we're gonna have four screws we need to remove. Two on the outside, we're gonna have two right here. This is gonna be towards right behind the rear wheel. And then, on the lower part of our fascia, left and right of center, we're gonna have two screws we need to remove. I'm gonna take some tape, if you want to. I like to do it to help protect the paint. We're gonna go right here, right where this trim piece meets this front piece. And go right on this edge. It doesn't have to be big. We're gonna pull out, we're gonna take a trim panel tool, kinda get it back in the inside here if you can. There's some clips in there that we need to release. We're just gonna pull out it. And get that to pop this. And I'm gonna work down, popping them up until we get to about right here. So the bottom two are a little bit different. They're gonna have these little wings on them. What you're do is reach back, there was an opening, take a small stubby screwdriver, and you're gonna push down on one and up on the other, and you're gonna pop it out of that clip. So here is the bottom of it. There's an opening right on the backside. And then take your screwdriver, push it down, and that up. Next on this side, we need to remove these two screws. Same bit. We're gonna tape these two edges. So next, we're gonna start pulling our fascia loose from the top part of our body. In the instructions, they're gonna show you the trim panel tool. I find that I can do it like this. Less pressure we put in between these two pieces in that seam, the less chance we're gonna have of chipping any paint within there. So, just take your time with it. You're gonna kinda push up and pull out, similar to that. We're gonna get our fascia loose to about right here. Then we're gonna have an extra set of hands, stand on this side and hold this piece. We're gonna go over to the passenger side, and we're in our work our way across. The reason we have to do that is there's an electrical connector located right behind the panel here that can not be disconnected. If it is disconnected, the car has to get reprogrammed. So what you need to do is have a table, have something that's elevated with a blanket. Anything that when you set the fascial on it, it's not going to get damaged. So we're gonna set it right over here by our driver's corner. Now with our extra set of hands over on the driver's side, we're gonna start working our way across, let you pull it up here. There we go. So since our wiring is so short here, there's a couple of clips that hold it onto the fascia. We're on the zip ties that are running around there, we can replace those. So what we're gonna do is we're gonna cut the zip ties and give us a little extra length so that the side over here, doesn't hit the body. Make sure you don't cut the wire itself. That'll give us enough room to work where our bumper beam is. You can see where this panel, where my hand is, could make contact here if we move the cart out. So, what I'm gonna do is I'm gonna move it back and I'm gonna take this whole area right here. So, if this makes contact with that, we don't have any paint problems. When it comes to the inside, we're gonna remove the threshold here, we're gonna remove by just pulling it up and then we'll set it aside. Now we'll take a T40 Torx bit, we're gonna move this pole. it's holding down our rear tie down, on our driver's side. We're gonna take either a small flat head screwdriver or a. pin like this. Right in the back here, there's a little panel. At the very top, there's a little slot. We need to get that little panel out to access the screw behind it. We'll take our T25 Torx bit, remove that one. Remove the net here and this panel. You're gonna take this panel and you're gonna kinda pull it loose from the top. You can see the little tabs there. Once you get the top side out, pull up on it and you can lift it off of this piece and then slide it forward. Give you a little bit more room to work. Our wiring harness, on one end, or one side of our converter box, we're gonna have wiring that looks like this. It's got some covering on it. This end is gonna go down through and then come outside and over to the center to the receiver as I mentioned a few minutes ago. Again, you're gonna kind of have to reach down in this area, kinda down back in that corner and reach your hand kinda around. You'll feel the edge of a plate there. Just kinda reach around it and you'll be able to touch your two hands. So when you take this and feed it around you can reach in here and grab it, pull it out. If you're gonna be towing a trailer with brakes, blue one's gonna be for a brake signal. If you wanna hook up a reverse wire, you're gonna hook up the reverse wire. In our case, we're not gonna be hooking those up. These would be hooked up somewhere inside the vehicle. So, we're just gonna leave these tucked in here. That way, if they decide later on, that you want to and go ahead and find those wires and hook those up. Next, we're gonna take our black and white wire, which is gonna be our power and ground. We're gonna route it out the same way, the black wire for power, pass or run to the battery or to a positive source. Our battery is located underneath our passenger seat. It would take a while for me to try and get all of his interior panels off and get it wired up that way. So what I'm gonna do is I'm gonna come out, I'm gonna go underneath. There's a cardboard panel that runs underneath that side and it runs all the way up underneath the passenger side seat. So we can lower that panel, we can drill a small hole in the bottom where our battery container is, run the wire up through it, hook it into the battery, seal the bottom of that hole, and put the cardboard panel back up and you're never gonna know it's there. So, we're gonna wire, get these out the same way before we mount our converter box. The kit is gonna come with some two sided sticky tape. I'll peel off one side, we'll stick it on our converter box like this. And right then, I'll set it right here. Basically straight back from here. It's flat right there, right in that area. We're gonna take our converter box and we can stick it right against that back wall there. We have four wires that we're gonna have to route up behind this panel all the way up to here. And this is where we're gonna tie into the wiring that's in our tailgate or lift gate. The four wires, we're not gonna use all of them, we're not actually gonna use the red one. Because on this vehicle, the brake signal and turn signal are on one wire, however it can be confusing because they tend to separate up here. So, if you happen to hook this up and you tested it's not working correctly, cut this wire off and then test it again. Probably gonna work right the next time. So we're just gonna be hooking up these three wires. You have your green wire, which is your passenger side brake and turn signal, yellow wire, which is your driver's side brake and turn signal, brown wire, which is gonna be your running lights. And we're gonna go ahead and remove this top center panel. We're gonna kinda pull down and back just a little bit like that. The wires we're gonna be tying into are actually inside of here. So we're gonna cut some of this off. You just want to be careful when you cut it, or you don't nick any of the wires. Now, you wanna make sure when you test, you have the gate closed. If you don't have the gate close, they're gonna test that on the fascia. And we don't want them to do that. We wanna get the proper wires that are testing for the gate. Right now, we have our right turn signal on. It is gonna be the gray wire with a black stripe. It would be kinda hard to see the black stripe 'cause it's down on the bottom. Now we'll test our left, which is going to be a white stripe, I'm sorry, a white wire with a gray stripe. Switch this over. And when you do test for running lights signal. There's gonna be three gray wires. You're gonna have to test each one in order to determine which one you're gonna use. You just want to make sure it's the one that when you have the running lights on that wire are you got the signal from and when you turn it off, the power goes off. So now that we know which wires we're gonna be using, we can go back outside and make our, and get our green, yellow, and brown wire ran up and make our connections sure are the proper wires. We're gonna add some quick connector that are gonna look like this. On one side, just black, the other side has the silver connector in it. We're gonna use the wire on the black side. We're gonna kind of push it into place. We're actually doing the running lights signal right at this moment. So, we'll take our brown wire, do it like that, then close these two together. We'll take a pair of pliers, careful, and then hold it together. We're gonna do the same thing on right turn signal. It's gonna be our green wire. And again with our white pair. Put our panel back in place. We're gonna get our power wire ran, our ground wire, and then our seven pole or our wires connected to our seven pole. We'll test it all out, make sure it's working correctly. Once we know it's worked correctly, then we can come back and we put all this back together. I'm gonna start with my ground wire. We can ground it on metal. This is a little bit thin. So actually, what I think I'm gonna do so I'm gonna come over here towards the center of the body, I might ground it right there. We'll just measure it out, cut the sides, strip back the end, add on a connector. Take the self tapping screw. And we'll take our black wire, strip it back, we're gonna add on heat shrink butt connector that comes in the kit. Then we're gonna take the bundle of black wire, strip back the end, we're gonna add it in the other side of the butt connector. Take our heat source, shrink our butt connector. If you don't have a heat gun, you could find that here are etrailer. And we're gonna go ahead and get our seven pole plug and brackets installed. You're gonna loosen this screw right back here, you don't need to take it out all the way. We're gonna take out these two. You have one here, one on the opposite side. Pull this out, take your screwdriver and stick it in the backside. We'll pop it up, just like that. We're gonna take our wires, we're gonna feed them through here, and out the front. On the back of our plug, we're gonna mark what color wire goes where. Take that out with our flathead. We're gonna loosen the screw, you don't need to take it out all the way. This little plate will separate. You're gonna take the wire after you get them all stripped back. We're gonna feed it right in between that plate and then back in place. And we just tighten the screw down. Here to repeat that for the rest of it. One thing I want to note, is, even though these are marked or tell you the color of the wire, go ahead match all the colors where they go. Purple wire's gonna go in the center. Once you get them all connected, the brown and green wire, switch it. So brown is gonna go to green, green's gonna go to brown. Once you get those connected, or switched, you can reinsert the connector inside. On the bottom of it, there's gonna be an open slot that needs to be at the bottom. Once you get it back in place, tighten this screw, it's gonna hold your wires in place. And then reinstall the two screws here. Next, we're gonna install the brackets. One of them is gonna look like this, where your two safety chain loops come down, you have two bolts that go through the side that have the nut on them. All we need to do to remove the nut. We don't have to remove the hole bolt. We're gonna take this bracket, we're gonna slide it to root top like that and then reinstall the two nuts. And when we wanna come back, we wanna retighten those and then retorque them to the specifications in the instructions. We're gonna have a bracket like this. You mount it either way. I'm actually gonna mount it this way so that it brings the plug down closer to the bottom of the fascia or the opening that we're gonna have to cut in the fascia. Take the hardware that comes in the kit. We'll tighten that down, then we can take this and then use the hardware and install it right around the other side of that. Next, we need to run our power wire. Two ways you can do it. You can run up to the engine compartment if you want to, or you can run to the battery. The online instruction, they're gonna tell you to run it up to the battery. Probably the driver's side and run it up, except, you'll exhaust those pipes are run up like this on each side of the engine. That means you're gonna have a hard time keeping that wire away from anything hot on that side. So, should be you run it right over to battery compartments. What I did there was ran my wire from here directly across went over top of this power line, over top all my suspension components. Got some hard lines up here, went over the top of them. And got some cardboard panels, one here, and one here, they're running right along this side. Take your T24 Torx bit or 25. You're gonna remove these screws, you have a couple of 10 millimeter head nuts, plastic nuts over here. Pull that down and you can route your line right up to right about here. This is where your battery pan is for your passenger compartment. Once you get your hole drilled, you're gonna need a pretty long drill bit, unless you take this whole panel off. If you take a whole panel off, keep in mind where your battery is sitting inside the pan. You're drilling, have a short amount or a small amount of space to drill a hole. So if you have a long drill, what I suggest going from top down. If you have a short one, or you don't have a long one, make it stay over close to the corner here. Once you get your holes drilled, get wire fed up inside. We're gonna measure out what we need to get to the positive side of the battery here. We'll add on our fuse holder, we'll make our connection. Next, we need to add our fuse holder. We're gonna go ahead and pull the fuse out. The ring terminal that's on here. We're actually gonna be replacing it with one that has a little bit smaller hole. The reason is, is that I don't wanna completely disconnect the battery. This nut right here is not designed to come all the way off. So we're just gonna loosen it up enough, we're gonna add on this ring terminal, and we're gonna cut a little spot in it and then we're gonna take it and we're just gonna slide it right behind the nut and tighten the nut back down. So go ahead and cut this one off. We'll add on our new one. Cut little section out, right here. Just like that. We're gonna take our black wire that we just spread up. And cut it aside. Now that we have everything connected on the back. We can go ahead and make this connection. 10 millimeter socket or wrench and then loosen this nut. Just enough where you can get the ring terminal slide back behind it. And I'm just gonna tighten it back down. Make sure it connected and install the fuse. We'll test everything out, make sure it's working correctly. Once we know it's working, we can start trimming out our fascia the rest of the way for the wiring and then reinstalling. Now we're gonna test out our wiring using an alternate power source. Left turn, right turn, break lights, running lights. Now we've tested out our wiring, we know it's working correctly, we need a trim out our fascia to fit our wiring. So, from where a hole was that we originally had in the bumper or the fascia, on the driver's side, we need to cut over another three and a half inches. Top and bottom we'll make it square and then we're gonna cut that out and that should give us enough room for our wiring. And go ahead and reinstall our panels on the inside. Take some electrical tape, wrap it around your wires up here, go ahead and put that panel back in place. And then you getting reinstall our fascia in reverse order from the way we took it off. Don't forget about your rubber plug that we took out for our wiring. We cut a little slit in it, right up to the center, we're gonna take this, feed our wiring around it and put this back in place. Once you have your fascia reinstalled, you're ready to go. That's gonna do for the look at and installation on the Stealth Hitch Towing Kit on 2017 Audi Q7..
Customer Reviews
Towing Kit w/ Ball Mount and Trailer Wiring for Stealth Hitches Hidden Rack Receiver - 2" Ball - 391CONVE5
Average Customer Rating: 4.8 out of 5 stars (28 Customer Reviews)
Use your Stealth Hitches rack receiver to tow a small trailer with this all-inclusive towing kit. Remove the receiver attachment from your hitch and insert the included ball mount. Custom-fit 7-way harness, hitch ball and safety chain loops included.by: Nenad07/15/2023
by: Bob05/02/2023
2023 Volvo XC60. I bought this and the hitch separately. If you're not used to doing these, like me, the install was actually a fun and easy project, if you take your time to understand how things come apart/go together. I won't know if I did it all right, though, until I have the dealer program the vehicle to accept the new accessory. One pic shows white,braided wire to grounding nut. Another shows where I affixed the module. And another shows the black plug that is to be removed for where the wires will exit the vehicle.


by: Garry11/11/2023
You should have seen the macho Marina crowd as they watched me back my BMW 640 down the launch ramp with a 16 foot boat trailer hanging off the back. Guys were down on their knees looking under the rear of the car. But the best part was when I dropped the hitch and put it in the trunk! Lot' of OOOs and Ahaaas.
by: Amy L07/23/2022
Worked fine but wiring came with no instructions (got from stealth website) and the thickness of the wires was not compatible with the connectors without a lot of effort to force the splice. Wires much thicker than car wires. Hitch part works great.
by: Jake K07/04/2023
The Stealth Hitch is a great option if you want to keep your rear end looking clean. This kit allows you to add towing ability to an already installed Stealth Hitch Rack Receiver. I added this to a 2020 Volvo XC90. You do need to remove the bumper fascia which, with the excellent videos on this site, was not very difficult. I was able to complete the project in a couple of hours.
***Note*** Stealth changed the size of the bolts holding the hitch block to the bar (from 1/2” to 5/8”) in 2021. Since I had installed my receiver rack in 2020, the included, longer bolts that you need to use to install the chain hooks did not fit. I contacted Stealth and they sent me a new kit with the smaller bolts, chain hooks, and (nicer) bracket to mount the connector to the hitch - no charge. It took about a week to get them so plan accordingly so you’re not stuck with your bumper fascia lying on the ground, not able to complete the job. I ran to the hardware store to grab some temporary bolts so I could get everything back together until the correct bolts came. I’m hoping I can change out the correct bolts without having to remove the bumper fascia again.
by: Steven Casey10/09/2023
Excellent hitch, instructions and videos were easy to follow no issues. Cant wait to install my bike rack and tow something
by: Patrick09/06/2023
the longer bolts weren't included. used original bolts even though a tad short. contacted etrailer and no response couple days later.
by: Albert 07/29/2023
I am generally very happy with the design and function of this hitch. Unfortunately the paint started peeling off and rusting within weeks of installation. I keep my cars a long time so I will need to put extra effort into maintaining over time.
by: Bill 01/02/2024
Product was exactly as advertised - works perfect & was also recommended by my local BMW Dealership. Customer service form Alex (x72965) was exceptional!
by: Randy 02/28/2023
the rubber grommet and key fell out and were lost
by: Gerald04/17/2022
Great look, no ugly hitch to look at. HIGHEST quality products!


by: William 01/02/2023
Fast shipping. Great instructions. Lots of good videos. No problem installing the hitch. Love it.
by: John09/24/2022
The installation instructions were not very clear. The reinstallation of the bumper trim was very hard and to have another person help. That should be included on the instructions to understand the process and have another person available. Bumper trim was very hard to place back on correctly and I still have an edge that is not flush.
by: Evans C01/15/2022
I was looking for a hitch that I could tow my motorcycle trailer behind my E92 3 Series 335i. This stealth hitch has the removable quick mount receiver and ball adapter, so that it wouldn’t be an eye sore when I wasn’t towing my bikes to the track.
It works great! I was thinking it would be a loose fit, but the hitch is rock solid! I’ve never pulled more than 1K since the car is so light, but I’m sure it wouldn’t be the hitch that would go out.
It is pricey, but you certainly get what you pay for! Minimal cutting required to the bottom side of the bumper, and it goes in place of the bumper plate. You can only see about 1/8” of the machined receiver under the bumper.
Great product if you need to tow something light with your 3 series!
by: Robert 12/10/2020
Product works great. Only challenge was determining the correct turn signal and marker light wires without owning a multimeter. However, a couple paper clips, lead wires, and 12v bulb helped confirm the correct wires to splice into.
Note: The wire to pin 1 is for left/right directional. The wire to passenger side pin 4 is for the marker lights.
For connecting the wiring to power, remove the spare tire bracket to access the additional positive battery connections. Attach the black power line here instead of the battery post. For the ground wire, there is a collection of brown ground wires fastened with a crown nut towards the rear wheel well in the rear passenger side fuse compartment area. Attach the ground wire here instead of directly to the negative battery post.
I tested the wiring multiple times through the installation process to ensure all was good before closing it all back up again.
by: Adam08/23/2022
Hitch worked perfectly and wiring did also. Great fitment.
by: Richard 09/23/2022
A great Kit. Good instructions. Totally hidden when not in use.
by: William 07/11/2021
Etrailer is great, knowledgeable, parts in stock and fast shipping.
by: JT04/01/2022
Easy installation and all is well after one yer of use.
by: Chris 10/21/2021
This is Amazing for the model 3. Love towing with it!!
by: Tom04/09/2022
Awesome shopping experience! Lori B was thorough, professional and extremely
knowledgeable. I am especially grateful for her product knowledge and how courteous she was in the process. Best service I have received in years!
by: Brian 03/16/2024
by: Darcy04/27/2022
Received my hitch fast. Quality. Highly recommended.
by: James 01/28/2024
by: Marc 09/27/2023
25
28
Show More Reviews
See what our Experts say about this Stealth Hitches Accessories and Parts
- Parts Needed to Add a 7-Way to a 2019 Audi Q7We do sell some wiring harness options for your 2019 Audi Q7 and we can get you to a 7-Way round style that works with your RV plug. To start off we have the # C59236 which splices into your OEM wiring or the ZCI Wiring # 119250KIT which clamps around your OEM wiring and senses when your light functions activate so you can avoid splicing into your OEM wiring. For a fully-functioning 7-Way you just need to add the Universal Wiring Kit # ETBC7. This pulls the basic lighting functions from...
view full answer... - Hitch Confirmed to Fit a 2022 Audi Q8There is. The Stealth Hitches Hidden Rack Receiver # 391AUDQ818 is confirmed to fit all models of the 2022 Audi Q8. This hitch is made in the USA, has a bolt-on, no-drill installation and will provide you with a 2" receiver which is the most common size used for hitch mounted accessories such as bike racks and cargo carriers. The hitch receiver on the # 391AUDQ818 is only rated for hitch mounted accessories. If you plan to do any towing with your Q8, you will need to add the Towing Kit...
view full answer...
Do you have a question about this Accessories and Part?
Info for this part was:

Edited by:
Lindsey S

Video Edited:
Chris R

Written by:
Alexander C

Test Fit:
Shane H

Updated by:
Mark S
At etrailer.com we provide the best information available about the products we sell. We take the quality of our information seriously so that you can get the right part the first time. Let us know if anything is missing or if you have any questions.
Thank you! Your comment has been submitted successfully. You should be able to view your question/comment here within a few days.
Error submitting comment. Please try again momentarily.