
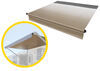
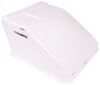
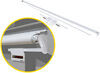
Replacement 14'1" Fabric for 15' RV Awning - Universal - Silver Fade
(2 reviews)
Price: $246.12
Replacement 14'1" Fabric for 15' RV Awning - Universal - Silver Fade
Item # LCV000334393
Retail:$262.95
Our Price: $246.12
You Save: $16.83


- All Info
- Reviews (2)
- Q & A (0)
- Videos (2)
- Photos
Lippert Accessories and Parts - LCV000334393
- RV Awnings
- Fabric
- Lippert
- 15 Feet Wide
- Silver Fade
- Extends 8 Feet
Replace the 169" fabric on your Solera, Dometic A&E, or Carefree RV awning. Heavy-duty, 13.5-oz vinyl fabric works on pitched or flat awnings. Integrated light track gives you the option to add an LED light kit to your awning.
Features:
- Universal fabric replaces the fabric on your 15' Solera, Dometic A&E, or Carefree RV awning
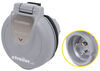
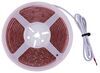
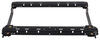
- Integrated light track gives you the option to upgrade to an LED light kit (sold separately)
- Heavy-duty, durable fabric is made with premium 13.5-oz vinyl
- Cold-crack tested to -25 F
- Heat-welded seams prevent leaks
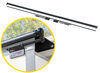
- Fabric installs on roller tube and awning rail (sold separately)
- Silver Fade color
- Made-to-order
- Made in the USA
Specs:
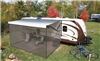
- Application: 15' awning assembly (measured center of left arm to center of right arm) with an 8' projection
- Fits pitched or flat awnings
- Compatible with Solera, Dometic A&E, and Carefree of Colorado awnings
- Fabric width: 169"

Awnings measured from the center of each support arm. Fabric will be 11" shorter than the size of your awning.
Note: Replacement awning fabric is made-to-order and non-returnable.
V000334393 Lippert Solera Replacement Awning Fabric for 15' Assemblies - Silver Fade
Installation Details


Video of Replacement 14'1" Fabric for 15' RV Awning - Universal - Silver Fade


Videos are provided as a guide only. Refer to manufacturer installation instructions and specs for complete information.


Video Transcript for Solera Replacement Awning Fabric Measurement and Installation
Hi there RV and camper owners. Today we're going to be replacing the awning fabric here with Solera's replacement fabric. These fabrics come in a variety of different sizes and color scheme, so you can get the best one to match your particular RV or trailer. We're going to be covering in detail on how to measure and determine the appropriate size for your trailer, as well as in detail steps on how to get that old fabric removed and your new one installed. If your old worn out fabric looks like this, where you've got stains and mold and dirt and debris, sure you can clean some of it but it's probably never going to come completely clean again. And to top it off, we've got some tears and stuff here, so when we're sitting outside, we get drips on our head.
The best way to correct that is to just replace the entire fabric. Now, regardless of how long your awning is, they are all going to install the same. Now whether it's a short one or a long one, let's go ahead and get into it and get this old one retired and a nice new one up on there. And now don't worry if your awning has a built-in LED strip, we also have RV awnings replacement fabric with the LED strip installed in them as well. With a replacement fabric the main thing that you need to figure out is how big the fabric is that you're going to be replacing, because the replacement is going to be basically the same for all of our Solera fabrics here for your Solera systems.
So in order to determine which fabric is going to fit your motorhome, cause you can't necessarily just go off the make and model of your trailer or RV because there's so many different sub models and you can have various different lengths of awnings that can come pre-installed on those, based on those various sub models and options that are out there. So, to determine the correct size, we're gonna measure center to center between our arms. And what I like to do is clip onto the inside lip of one arm, and then if I stretch this out from the inside lip of that arm, and go all the way down and go to the outside lip of our other arm, that's going to give us our center measurement. And we're right at 21' for this setup, so that way we know we need to order a 21' fabric. Now the fabric itself is not going to be exactly 21'.
It's going to be properly sized to fit an awning that is spaced 21' apart. So, whatever yours measure center to center, make sure you order that correct fabric here at etrailer. We begin our installation by extending our awning out by about a foot here. We then want to take our arm here and we want to tie it to the upper pin here, and that'll ensure that it's going to stay in place for us here. We're going to use some zip ties.
You can use some twine if you've got that at home. Whatever you really have to just loosely secure it. And we'll secure the other side the same way. Once we've got both sides zip tied, we're going to take the screw here that's holding our fabric into the rail, and we're going to remove it. In most cases, that's going to be a 1/4" socket. And then you also want to see the gap here. That's where the cord for our fabric runs through. And it's secured into place with a single screw as well. So we're going to remove that. We're using a Phillips screw to remove this one. It looks like it would also accept the square bit. We're going to be removing those bolts over on the other side as well to get our fabric free so we can get it out of here. Now I'm going to use a little paint stick. I just want to make sure that I've got it marked on each side, so I know which way that this is going to roll. So our fabric comes in on the top. And we're just going to put a down arrow on this side, And we're going to put a down arrow on the other side showing that the fabric goes down over the top of it. This is just to make it easier to ensure that when we're putting this back together, we've got it spooled up with the tension and everything all in the correct direction, so that way it's going to operate the way it used to. We don't want this to be underslung either, cause that can potentially cause water to pool up and lead to water damage and stains and everything else, and mold underneath here. So, we want it to be just like our old one here. Now we'll want to take out the screws in our end cap here. There's going to be three around our end cap. I recommend a square bit on these. You can use a Phillips, but a #2 square bit just seems to work better. When we go to remove our roller assembly down here, we're going to need one, possibly two or three extra sets of hands here, depending on how long our roller tube is. So, now we've got these loose, we're going to loosen them on the other side. Now you just want to check your drip channel here at the end on both the front and rear. See which one's going to be easier for you to slide your fabric out. It looks like ours is going to be able to slide out through the channel here with no issue. But if you're, if this is going to be in the way of getting your fabric out, you want to make sure you remove this, and you can reinstall it once we get our new fabric on. Now, we've got ourselves an extra set of hands here. We're going to take our arms here, and we're going to slide the caps off the ends. After we've got it loose from both ends, we just need to slide it down and work it on its way. You may need to stop and move your ladder at a couple of points. That's why we've got so many extra sets of hands. Alright, thank you, boys. Now it's on a large flat area where we can lay this out, your driveway should work pretty well, and then we'll just start to unroll it. And now that we've got it all rolled out, the tube assembly here, it's just going to slide right off. Now we can get our old fabric retired here. We're going to go ahead and get it rolled up and get it out of the way. We're going to take our new fabric and we're going to lay it out just like you see here with our new fabric. Now, your new one's going to come in a much smaller box than you would imagine because it is all folded up, so you just need to get it unfurled. So, now we can take new fabric. This here is the small flap that kind of hangs down over the end. And the other side is the side that will attach to the strip that goes across the top of your RV or trailer. So, we can take our roller assembly now. Our new fabric only has a single channel unlike the dual that we had before. That's no big deal. It's still going to function the same as it did before. So, we're just going to just slide it through one channel. So, we'll just take the end, line it up there, and then we're just going to gently work this down, kind of lifting up on it slightly cause I don't want the roller to drag on our fabric. So we don't want to gouge into it while we're trying to slide this down. This is a used, you know, it's an older roller, so it's been out in the elements for a while, so the edges might not be as smooth as they used to be when it was brand new. And as I'm working this down, I'm trying to keep my fabric taut. That makes it slide a little bit easier as we're doing this. Kind of using my knee and my arms here as a brace to do so. Then I want to just get our fabric centered on our tube. And then if we roll it in just a little bit, we can see the cord here where it slid into our tube. We can also kind of see the markings from where our cap is. We want to re-install the screw that holds our fabric in place. Thread it in there. Make sure this screw though doesn't end up underneath where your cap's going to go. So, we're going to go in just a little bit from that. And this is just the old screw that we had before, we're just reinserting it. We're going to do the same thing on the other side as well to ensure that our fabric is held. And another thing that I'm going to do as I go down the other side, I'm just going to double-check the cord to make sure that it is pulled taut all the way down. Now, with extra hands we're going to have them pull our fabric taut, and we're just going to roll it up. We just want to keep it snug on the roller as we're rolling it. And we need to get it most of the way rolled up. We're going to keep about a foot like we had before when we we're removing our old one, so we can get it slid back in. So, now with our extra hands once again, we're going to get this fed back in the end here. Your just going to slide it right in to the end where we've removed our old one. And you get that set into place. You want to be careful not to tear your fabric. You just kind of work it slowly down in the groove and feed it on down. When you're feeding this down, you just gotta take your time and work at it. Sometimes you gotta lift it up and down to get the right angle to get it to keep on sliding. You can also use a little bit of silicone spray to help make it a little easier if it's really stuck. Once you've got it all the way fed down, we can then bring it back and we're going to push it back into our cup. Line up the slots with the slots in your cup and push it together. Once you've got it pressed in and then we'll just re-install our hardware into the opening holes. So now that we're fully attached here, we can go ahead and remove our straps that we had put into place. And really the only thing left at that point, is to reinstall the screws here. But I like to extend the awning out first, so that way I can make sure that I've got this slid in the position I want it to, so it's nice and straight and it's going to roll up properly. So, I do recommend that you maybe operate it once or twice, get this centered, and then run that screw in. So we're gonna go ahead and do that now. So, we'll extend our awning here. And now that we've got it extended out, we can go ahead and adjust our ends here, and run those screws back in, which that looks pretty good. So now that we've verified we've got it nice and centered so it'll roll up nice and smooth and not be offset, we can re-install our set screws here, to keep our awning in place so it stays centered. And now we're just going to retract it and make sure it rolls up properly. And if everything works good here, at that point, our installation is complete. Ready to get back out on the campsite and enjoy our new shade. Everything looks like it tucked up nicely. I do like to come on the ends here after I rolled it up to check to see if we've got like a cone shape here on the end showing that it's rolling up uneven. And we've got a very minimal one. I would say the cone is no more than about 1/4", and that's probably about as close as your going to be able to get it there. So that's pretty much perfect. It looks good on both sides. So we're ready to get out there and enjoy ourselves. And that completes our installation of Solera's awning fabric..
Customer Satisfaction Score:
91% were satisfied with this product
9% of customers were not satisfied
- Wrong item was ordered
- etrailer mistake
Customer Reviews
Replacement 14'1" Fabric for 15' RV Awning - Universal - Silver Fade - LCV000334393
Average Customer Rating: 5.0 out of 5 stars (2 Customer Reviews)
Replace the 169" fabric on your Solera, Dometic A&E, or Carefree RV awning. Heavy-duty, 13.5-oz vinyl fabric works on pitched or flat awnings. Integrated light track gives you the option to add an LED light kit to your awning.by: Lowell09/13/2022
Once I got the correct size ( measuring on my own didn’t work & i ended up initially getting the wrong size) the awning itself was great and installed easily!
by: Darrell07/26/2022
this was shipped fast and it was packaged very well and there was no damage to the items i would recommend etrailer to everyone who needs parts.
2
2
See what our Experts say about this Lippert Accessories and Parts
Info for this part was:

Edited by:
Lindsey S

Video Edited:
Jacob T

Video Edited:
Chris R

Updated by:
Wilson B

Updated by:
Kristina F

Updated by:
Carrie F

Updated by:
Amanda K

Written by:
Mike S
At etrailer.com we provide the best information available about the products we sell. We take the quality of our information seriously so that you can get the right part the first time. Let us know if anything is missing or if you have any questions.
Product Experts Available Now!
Call 1-800-940-8924
Thank you! Your comment has been submitted successfully. You should be able to view your question/comment here within a few days.
Error submitting comment. Please try again momentarily.