
Charging Station for RVs - 2 USB Ports - White
(15 reviews)
Price: $29.96
In Stock
Charging Station for RVs - 2 USB Ports - White
Item # DG61031VP
Retail:$48.11
Our Price: $29.96
You Save: 38%
In Stock
Thank you! Your comment has been submitted successfully. You should be able to view your question/comment here within a few days.
Error submitting comment. Please try again momentarily.


- All Info
- Reviews (15)
- Q & A (0)
- Videos (2)
- Photos
Diamond 12V Power Accessories - DG61031VP
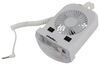
- Power Socket
- 2 USB Outlets
- Diamond
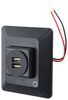
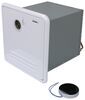
Charging station lets you add or upgrade an outlet to charge multiple USB accessories at the same time. Includes 2 USB ports. Mounts vertically or horizontally - hardware not included. 2-Wire design hardwires to 12V power source.
Features:
- Charging station lets you add or upgrade an outlet to charge multiple USB accessories at once
- 2 USB ports charge phones, tablets, GPS units, and other devices
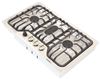
- Surface mounts in horizontal or vertical orientation - hardware not included
- Snap-on wall plate provides a flush, finished look
- 2-Wire design hardwires to 12V power source
- Durable white plastic construction
- RoHs compliant
Specs:
- Dimensions: 3-13/16" long x 3-7/16" tall x 1" thick
- Distance between mounting holes (center on center): 3"
- Inputs:
- (2) 2.1 amp USB ports
- 1-Year warranty

DG61031VP Diamond Group Replacement Dual USB Charging Center - 2 USB Ports - White
Alternate part number: 61031USB


Video of Charging Station for RVs - 2 USB Ports - White


Videos are provided as a guide only. Refer to manufacturer installation instructions and specs for complete information.


Video Transcript for Diamond RV 2 USB Port Charging Station Review
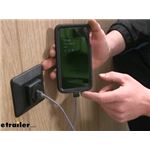
Today, we're going to be taking a look at Diamond's USB charging station for RVs. This 2.1 amp two port USB charging receptacle is going to make a great upgrade for your camper, RV, or toy haulers. It operates off of 12 volts, so it'll work with your existing lighting system that's in most RVs. And it's going to be great for charging your phones, your iPods, tablets, GPS systems. There's a lot of different devices now that charge off of this, even small RC cars and drones, so it's not only great for your phone devices that you bring with you every day but for the toys you might have there on the campsite.What I really like about this is that you can place a convenient USB charging port in your RV where everybody can access it back in your living area. Typically in your RV, the only place you have a 12 volt place to plug in to charge your phone is going to be in the outlets up in the cab area.
Now, you can put one in the back. If you we're in the back, you normally just have 110 outlets where you're going to have to plug in a charge adapter that goes into it. Well then you have to be at a campsite or have your generator running to get that 110 to power that charger. Since this just runs off of your batteries, it's always there in a convenient location for you to access it, and you don't have to worry about forgetting your charge adapters or where you left them last.It comes in three different colors: black, white or ivory, so you can best match your interior. Regardless of the color, it's going to have the same look, design, and two charging ports.
The removable face plate hides all of the installation components, so that way, you'll get a clean look after you've got it installed. What I really like about this too is that it extends out around it, so in case you made your hole a little too big, or it's not quite perfect, those mistakes you made are now hidden.So whether you're using it to charge game devices, cell phones, or tablets, you can ensure that wherever you go, you've got a place to charge your devices, so you can enjoy your time out and as well stay connected on social media, so you can show the rest of the world all the adventures you're going on.Now, we'll go ahead and show you how to install it. We've got an RV panel here that we'll use to simulate the inside of your RV. It's wired up on the inside just like your RV would be. We've got a light switch here, and this is usually a great point when determining where you're going to be adding things to your RV to access power and easily run your wires.The first thing you're going to want to do when mounting this is determine where you do want to have it mounted.
Most people mount it near their couches between a couple of chairs, so that way, it's easy to access, so they can charge their devices while they relax. Other customers reported they like to place it next to the nightstand, so they can charge their devices while they sleep. We're going to be placing ours down low. This way, it stays out of the way, but when you're sitting down, you can still easily reach it to charge all your devices.You want to keep in mind where your light switch is and where you're putting it, so you can route your wiring from that light switch over to here. And it doesn't need to be a light switch.
Anything that's got 12 volt power going to it where you can access it in your wall will work. A light switch is just usually an easy access point.Once you've determined your mounting location, we'll be using a one and three quarter inch hole saw to drill out right here in the center. You can kind of see that it sticks up flush past the outside, so three quarter inch will give us enough room to get it mounted sitting flush against our wall and have enough wiggle room to ensure that we get it level.A quick tip when using a hole saw on this thinner RV paneling, like we have here, on thinner paneling or plastics, if you run the saw backwards, so we'll start it forwards first to make our pilot hole, and then once the hole saw contacts the wall, switch your drill, run it backwards, and this will cause it to cut a smoother hole into this thinner paneling. If you run it in the normal direction, the teeth can tear into it and make it look kind of rough.We're going to go back to our light switch. We're going to remove it, so we can access our 12 volt wiring in the wall and run that down to our switch. So we'll start by taking our covering off. We'll then remove the switch from the wall. Now, before removing our switch, it is a good idea to turn off any power or disconnect your battery, so you don't accidentally cause any shorts when moving your hot wires around.And now we've got access to our switch. Our switch has its positive wires connected to it, and a lot of times, there is a ground there or nearby, so we've got both of those. You're going to want to determine which one is hot all the time because that's the one we're going to be using. So we're just going to grab our test light. We crimp this on to our ground. Sounds hot. This one is not. If we turn our switch on, it's now hot, so we want to use this one, so that way, our switch doesn't affect our outlet, and we'll just be adding a wire from this post and running it down. We'll do the same thing with our ground.Now, your switch is going to have its power going to it. It may not look like our switch here. More often than not, you're going to find wire nuts is what's connecting your switches and stuff inside your RV walls. We've got ring terminals go into screws. That's how we're going to do it for this switch. Just keep that in mind. You're probably going to see these, and we're going to be using the wire nuts just like you would find in most RVs down below to hook up our charge port.So we've gone ahead and connected our power and ground to the same wires that are power and ground on our switch here. We'll then need to route these down to our hole that we had cut. There's a couple of different ways that you can do this. You can use a fish wire to route from one hole to the other, but since our hole's pretty much straight down from our switch, we're just going to be attaching some weight on it and then dropping it down. You can use anything as a weight. We're probably just be using some washers or spacers, anything we've got laying around, and some tape.To ensure ours drop down, we tied a nut to it. That made it easy for us to just reach into the hole, fish it out. We can just take that nut off of it. Now, if you we're in a different spot where it wasn't straight down from the switch, you may need to use a fish wire. Coat hangers work very well for that because you can bend it and tweak it to the way you need to go around corners or to move over a little bit and come out a hole that may not be straight down.We'll now take both of our wires, and we're going to strip them back. You can cut them shorter to length but having a little excess is usually a good thing for future repairs or other things you may want to add so having that extra wire is kind of nice. If it's ridiculously long, it's acceptable to cut it. We're going to leave the little excess we have here. Our white wire is attached to the red wire up top, which is the battery positive, so you want to remember which colors you've attached to where in the event have more red wire. If you need some wire, you can pick some up here at etrailer.com.We've got those stripped back. The wires on our USB port come pre-stripped, so we're just going to simply take those. We're going to twist those together, and then we're going to take a wire nut, put it on, and twist them together. If you prefer to have a little more permanent connection, you can use butt connectors. Those are also available here at etrailer.com. We're going to do the same thing with our white and red wires since that's our positive wire.We can now begin to mount our switch. The front cover just pops off. There's a couple of square holes that the alignment tabs line in, so we're going to remove that to expose our screw holes. You will have to provide your own hardware to mount these. Small wood screws work very well.Now, you can choose which way you want to mount it. Whether you mount it vertically or horizontally, it really doesn't matter. We're going to go ahead and mount ours horizontally. So we'll hook our wires back up inside our wall. We'll get our mount lined up, so it's pretty level. We're going to use some self tapping wood screws to get it in. Now, our cover simply snaps back into place, and we're ready to use our outlets. There is some minor left and right adjustment on the back. There's a nut located on the back side, so if you do need to straighten it out, there's a little tweaking you can do, but it doesn't have much movement.Now, I've got my phone here. We'll plug it in, so we can test it out. Currently, you can see the battery's at 91%, and it's not charging. Plug in our USB charge cable, and the phone lights up. I've got my charge indicator there at the top. We'll put the phone display to sleep. Give one tap, and now, it indicates that about 21 minutes until it's fully charged. All that's left now now is to reinstall your light switch. And that completes our look at Diamond's USB charging station for RVs.
Customer Satisfaction Score:
99% were satisfied with this product
1% of customers were not satisfied
- Product did not meet expectations
Customer Reviews
Charging Station for RVs - 2 USB Ports - White - DG61031VP
Average Customer Rating: 4.9 out of 5 stars (15 Customer Reviews)
Charging station lets you add or upgrade an outlet to charge multiple USB accessories at the same time. Includes 2 USB ports. Mounts vertically or horizontally - hardware not included. 2-Wire design hardwires to 12V power source.by: Ron F10/19/2020
This is a well-designed product! We needed an outlet for my wife's (passenger side) iPad and GPS. I installed this at a light outlet that wasn't being used and it works like a charm! I would highly recommend this product.
by: Jay 10/30/2021
I had removed an old cigarette style adapter because it had cracked over time. I was in search of something more modern to replace it with that would be more functional with todays needs. This item did the trick. Was easy to install. The interior of my trailer is aluminum sheeting and I used pop rivets to install. I'm really glad I got this product.
by: Douglas 08/06/2022
All product I've ordered from etrailer (and its been multitudes) has been excellent products and service!
by: James 02/16/2021
Works great. Very handy for boondocking. I wired it into a 12V light with constant power.
by: Richard11/05/2018
I have installed this one and it is great so far a much better fit than the original that was in my trailer.
Regards,
by: Carnus07/16/2020
Easy to install. Just used it last weekend after having it for over a year. The only problem is I only ordered one so I will be ordering 2 more.
by: Joe 10/13/2022
Great looking charger that works well. Looks like oem equipment and is very easy and clean to install.
by: Ralph 07/13/2022

Ralph D.

7/15/2023
Works great. Easy install
by: Mike O03/31/2019
Installed in the bedroom of my RV. Very convenient, works great.
by: Cory 08/11/2020
Great product and easy to install
by: Marc 07/31/2020
Just what I was expecting.
by: Joseph03/27/2022
by: Mike 05/17/2023
by: Donna 08/27/2022
by: Erik 08/12/2022
15
15
See what our Experts say about this Diamond 12V Power Accessories
- Can the Dual USB Charging Station # DG61031VP Withstand HeatThe Dual USB Charging Station # DG61031VP is thermally protected which helps prevent it from becoming damaged due to excessive heat. It is always good practice to try to keep from leaving accessories plugged in and left when it is really hot outside.
view full answer... - Does the Charging Station # DG61024VP Have an LED Indicator LightI tested the Charging Station # DG61024VP that you referenced and it does not have an LED light on it. If you were just needing the USB charger then we also have part # DG61031VP which I also tested and it doesn't have an LED light either.
view full answer... - Power Draw Of The Diamond Group Charging Station When Not In Use USB chargers like the Charging Station for RVs # DG61031VP draw approximately 0.05 watts when not in use.
view full answer... - Will Diamond Dual USB Charging Station DG61031VP Charge Android PhoneYes, the Diamond Dual USB Charging Station # DG61031VP will work to charge two USB-connected devices including an Android phone. Each of the two USB outlets provides 2.1-amps of charging current. If you prefer a charging station with both two USB connections and a standard 12V outlet you can use part # DG61023VP.
view full answer...
Do you have a question about this 12V Power Accessory?
Info for this part was:

Video Edited:
Jacob T

Expert Research:
Adam R

Video by:
Dustin K

Installed by:
Cole B

Installed by:
David F

Updated by:
Wilson B

Updated by:
Brian T

Updated by:
Hannah L

Edited by:
Daron K

Written by:
Anna W
At etrailer.com we provide the best information available about the products we sell. We take the quality of our information seriously so that you can get the right part the first time. Let us know if anything is missing or if you have any questions.
Product Experts Available Now!
Call 1-800-940-8924
Carnus R.
7/16/2021
One year later USB power port is still working like you would expect. I just purchased a couple more for a new project.