
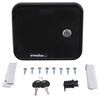
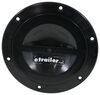
Charging Station for RVs - 2 USB Ports - 12V Socket - Ivory
(4 reviews)
Price: $33.10
In Stock
Charging Station for RVs - 2 USB Ports - 12V Socket - Ivory
Item # DG61025VP
Retail:$48.16
Our Price: $33.10
You Save: 31%
In Stock
Thank you! Your comment has been submitted successfully. You should be able to view your question/comment here within a few days.
Error submitting comment. Please try again momentarily.


- All Info
- Reviews (4)
- Q & A (0)
- Videos (2)
- Photos
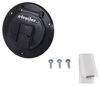
Diamond 12V Power Accessories - DG61025VP
- Power Socket
- 1 DC Outlet
- 2 USB Outlets
- Diamond
Charging station lets you add or upgrade an outlet to charge multiple USB and 12V accessories at the same time. Includes 2 USB ports and (1) 12V socket. Mounts vertically or horizontally - hardware not included. Hardwires to 12V power source.
Features:
- Charging station lets you add or upgrade an outlet to charge multiple USB and 12V accessories at once
- 2 USB ports charge phones, tablets, GPS units, and other devices
- 12-Volt socket charges a tire inflator, vacuum, coffee maker, or other accessory
- Surface mounts in horizontal or vertical orientation - hardware not included
- Snap-on wall plate provides a flush, finished look
- Hardwires to 12 volt power source
- 12V socket wires with spade terminals
- USB outlet wires with 2-wire pigtail
- Durable metal construction with ivory finish is ideal for interior applications
- RoHs compliant
Specs:
- Overall dimensions: 5" long x 3-3/4" tall x 2-1/2" deep
- Distance between mounting holes (center on center):
- Horizontal: 1-9/16"
- Vertical: 3"
- Inputs:
- (2) 2.1 amp USB ports
- 12 Volt DC socket
- 1-Year warranty

DG61025VP Diamond Group Replacement Eurostyle USB Charging Center - 2 USB Ports - 12V Socket - Ivory Wallplate
Alternate part number: 61025USB


Video of Charging Station for RVs - 2 USB Ports - 12V Socket - Ivory


Videos are provided as a guide only. Refer to manufacturer installation instructions and specs for complete information.


Video Transcript for Diamond RV 2 USB Port and 12V Socket Charging Station Review
Hi there, RV owners. Today, we're going to be taking a look at Diamond's Charging Center with two USB ports and one 12-volt outlet. The charge port comes in black, white, or ivory, so you can match the interior of your RV. This will allow you to add a charging station at a more convenient location inside your RV. Typically, your 12-volt outlets are only located in the front cab area, and often you want to relax in the back and be able to plug-in and charge your phone or plug-in any of your accessory devices and either use them off the power or charge up the battery that's on them. If you have a camper or a fifth-wheel, you may not even have any ports inside of it for you to charge your devices, requiring you to bring along your adapters and be plugged into a 110 power source from your campsite or have your generator running.
Well, this way, you can have one at a convenient location and run directly off your 12-volt battery wherever you are without the need of any kind of extra port or plugs. There's 2.1 amps available on the USB ports, so you can charge your phones, your GPS units, and there's even enough power there to charge your larger tablets.Our 12-volt socket here is going to work great with any device that doesn't have a direct USB connection to charge it, and for other devices that don't charge, that just run directly off of an auxiliary 12-volt power. I use this to charge my RC cars when I want to run them around and I need a place to charge them up. It's also good for other devices that run directly off 12-volt power such as air pumps, so you can pump up the tires in your bike or your air mattress. What I really like about it is that I only need to remember to bring the cable to charge my phone.
I don't have to fumble around with the adapters, that you're constantly losing and looking for. It's always there and ready.It's not only great in your kitchen or living area, but many of our customers have reported they like placing it next to their nightstand so they can charge their devices when they're sleeping at night. And now with this installed, you can keep all of your mobile devices charged up so you can stay connected on social media, share your adventures with the world, or in the even of an emergency, ensure that you've got power on your phone to contact help.First we'll need to choose a location to mount our charging port panel. We've got our RV panel here, which is set up to simulate the RV wall that's inside of your RV. You can see we've got a light switch on it.
You've typically got devices and light switches on there. We're going to be needing those to assist in getting this all wired up. After you've determined where you want to place your panel, you need to get the wires from wherever they are on your RV to this panel. We're going to be coming from our light switch and routing it over to where we want to mount it. We're going to mount this pretty low because typically you're sitting down, you want to enjoy your time in your RV sitting in a car, so we're going to put it down as if it was sitting next to a chair.
We're going to place our switch down about here.Now that we've determined where we're going to place it, we're going to go ahead and cut a hole. We're going to start with a 1 and 3/4 inch hole saw to make that cut, and then we'll use a jigsaw to cut the rest of the shape out. When drilling out your hole, after you've made your pilot hole into the center here, and your hole saw has make contact with your paneling, I recommend switching it backwards and cutting it that way. RV paneling is usually very soft, so if you go in the normal forward direction, it usually gouges into it. By going in reverse, it cuts a smoother hole. After I made the two holes next to each other, I was going to trim off the rest with a jigsaw, but putting two 1 and 3/4 inch holes right next to each other like that, turned out to be sufficient for our paneling to mount flush, so we're just going to stop there.We're going to go back to our light switch, we're going to remove it so we can access our 12-volt wiring in the wall, and run that down to our switch. We'll start by taking our covering off. We'll then remove the switch from the wall. Now, before removing our switch, it is a good idea to turn off any power or disconnect your battery, so you don't accidentally cause any shorts when moving your hot wires around. And now we've got access to our switch. Our switch has its positive wires connected to it, and a lot of times there is a ground there or nearby. We've got both of those. You're going to want to determine which one is hot all the time, because that's the one we're going to be using. So we're first going to grab our test light. We crimp this onto our ground. That ones hot. This one is not. If we turn our switch on, it's now hot. So, we want to use this one, so that way our switch doesn't affect our outlet, and we'll just be adding a wire from this post and running it down. We'll do the same thing with our ground.Now, your switch is going to have its power going to it. It may not look like our switch here. More often than not, you're going to find wire nuts is what's connecting your switches and stuff inside your RV walls. We've got ring terminals going to screws. That's how we're going to do it for this switch. Just keep that in mind, you're probably going to see these. We're going to be using the wire nuts, just like you would find in most RVs down below to hook up our charge port. We've gone ahead and connected our power and ground to the same wires that are power and ground on our switch here.We'll then need to route these down to our hole that we had cut. There's a couple of different ways you can do this. You can use a fish wire to wrap from one hole the other, but since our hole's pretty much straight down from our switch, we're just going to be attaching some weight on it and then dropping it down. You can use anything as a weight. We'll probably just be using some washers, or spacers, anything we've got laying around and some tape. Now, we can just reach into the hole, grab the wiring that we dropped down. You can see we tied a nut to it to ensure that it dropped straight down, since our hole is pretty well straight below our light.We've got our positive and negative wires here. The white wires are positive. The black is our negative. Now, we're going to take these and connect them to our charge port. There are four connections that we'll need to make, so we're going to use wire nuts, which is what you'll most likely find inside of your RV's existing wiring, and we're going to run some extensions out of those. So, we've got some additional wire here, make sure we've got a total of four to make the connections to our charge port. You can pick up some wire here at etrailer.com, if you need some. We'll be connecting these to our wires here using wire nuts, so we're just going to strip all these back. If you need some wire nuts, you can pick those up at your local hardware store. You can also use butt connectors, if you'd like, which you can pick up here at etrailer.com. They're a little bit more permanent and robust. But, if you have a lot of intentions on adding devices and modifying, wire nuts will make your life a little easier.Now, that we're all striped back, we're going to take our black wires and twist all of those together. Place a wire nut on. And then we're going to do the same thing with our white wires. We can now strip back all the ends of the wires we just attached. On one set of positive and negative wires, we'll be attaching female spade terminals. If you need some terminals, you can pick those up here at etrailer.com. These will attach to our 12-volt socket. And, on our other set, we'll be using wire nuts to attach those to the USB charging ports. So, we've got our black here. We'll start with that. Twist those two together, and then use wire nuts to secure them. Now, we'll do the same thing with our white wire and our red wire, since those are our positive wires.Now, on the back of our switch, we're going to attach our positive and negative. Positive's going to go to the copper color. Negative is going to go to the silver color. We'll now remove the bezel from our charge port. Slide all of our wiring back into our wall. We'll try and get it as level as possible. And then, we're going to use some self-tapping wood screws to secure it. Screws don't come with it, so you will have to purchase some. You can get those at your local hardware store, as well.Once you've got one screw in, you can adjust it to make sure it's level, and then install the rest of your screws. Then, simply snap your bezel back in place. We're now ready to reconnect the 12-volt batteries in our RV and test everything out. I've got my phone here to test it out. Currently, we're at 92% charge. We'll go ahead and plug it in, and the phone immediately responds, and now it says, charging 92%, about 17 minutes until fully charged. If you have any 12-volt accessories, we can go ahead and test it out as well.That completes our look at Diamond's Charging Center with two USB ports and one 12-volt outlet.
Customer Reviews
Charging Station for RVs - 2 USB Ports - 12V Socket - Ivory - DG61025VP
Average Customer Rating: 4.8 out of 5 stars (4 Customer Reviews)
Charging station lets you add or upgrade an outlet to charge multiple USB and 12V accessories at the same time. Includes 2 USB ports and (1) 12V socket. Mounts vertically or horizontally - hardware not included. Hardwires to 12V power source.by: Jack04/06/2024
I researched as many power sockets as I could find online and finally concluded that etrailer had the best quality socket. It cost a little more but it’s well worth it. I haven’t installed it yet I will follow up with a picture and let you know how the installation went. Another thanks to Lauren for helping me with another problem great customer service.
by: Reginald04/07/2018
Received the charging center faster than expected, well packaged. Contacted customer service to request change in color, was handled well. Thanks
by: Elmer 06/11/2021
Purchased one of these before and was pleased with added usefulness to replace original 12v outlet.
by: Cj12/03/2019
Works just fine. Could have had longer leads.
4
4
See what our Experts say about this Diamond 12V Power Accessories
- Depth of 12 Volt and USB Charging StationThe Charging Station # DG61024VP (White) and # DG61025VP (Ivory) is 2-1/2" deep in total and 1" deep behind the faceplate. In terms of the writing, the "Charging Center" does not come off, but the etrailer.com sticker does not come with the product. We only use those in our photos to try and prevent other retailers from stealing them and using them without permission.
view full answer... - Max Amps for the Charging Station # DG61023VPThe USB ports can handle 2.1 amps each while the 12V Outlet on the Charging Station # DG61023VP can handle 10 - 20 amps. This station is also available in White # DG61024VP and Ivory # DG61025VP.
view full answer... - Installation of 12 VDC for USB Charging Station for RVsThe Charging Station for RVs, # DG61025VP has 2 each 2.1 amp USB ports and one 12 Volt DC socket. Yes, you will run a 12 volt DC power to the station and it will step it down to the power level for supporting USB charging. Please note the linked product review and installation video below.
view full answer...
Do you have a question about this 12V Power Accessory?
Info for this part was:

Video Edited:
Jacob T

Video by:
Dustin K

Installed by:
Randy B

Installed by:
David F

Updated by:
Wilson B

Updated by:
Brian T

Edited by:
Daron K

Written by:
Anna W
At etrailer.com we provide the best information available about the products we sell. We take the quality of our information seriously so that you can get the right part the first time. Let us know if anything is missing or if you have any questions.
Carl J.
12/5/2020
works fine. Installed in a boat. use it to charge phones and power the aerator on a minnow bucket.