
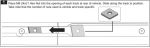
To see if this custom-fit item will work for you please tell us what vehicle you'll use it with.
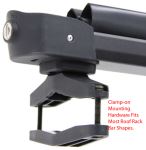
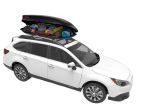
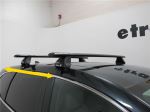
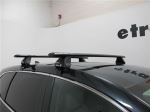
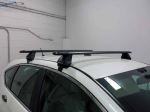
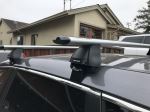
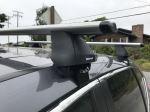
These heavy-duty, aluminum crossbars work with Rhino-Rack legs to create a sturdy roof rack. The square bars include built-in C-channels for mounting Rhino-Rack heavy-duty, contractor-grade accessories.
Features:
Rhino-Rack HD Crossbars - Black - Qty 2:Videos are provided as a guide only. Refer to manufacturer installation instructions and specs for complete information.
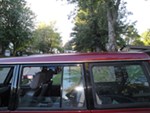
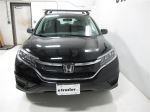
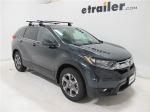
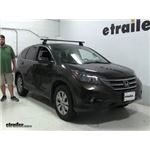
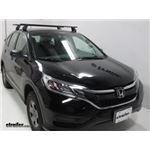
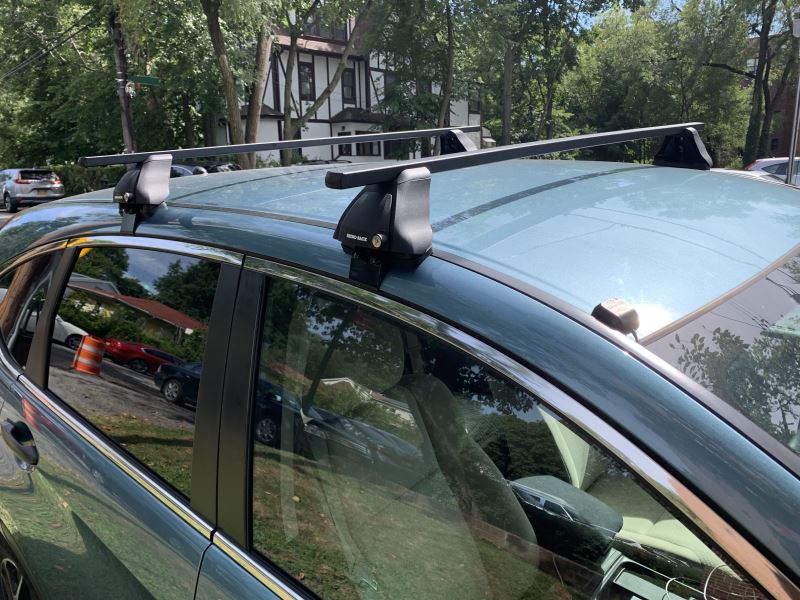
Hey, everybody. Today we're going to be going over and showing you how to install the Rhino-Rack Vortex Aero crossbar system here on our 2020 Honda CRV.So here's what our roof rack system is going to look like installed. As you can see here, Rhino-Rack uses these nice aero-shaped crossbars, which are going to do a couple different things for us. Number one, the aero shape is really going to help cut down on wind noise. We're not going to have that whistling sound here with our crossbars. And, number two, we're not going to have near as much drag.
Therefore, we're not really going to have to worry about losing as many miles per gallon when we're driving out on the highway.So this particular system here is going to install on our CRV here with some door clips. We have these metal clips here, which are rubber coated, so they're not going to have to worry about scratching or dinging up the vehicle. But they're going to install inside the door jamb here, which is what secures the crossbars to the roof. It's nice and sturdy, and, again, all our parts are rubber coated here, so you don't have to worry about dinging or damaging the vehicle.So, right now, we have the black crossbars that Rhino-Rack offers. However, there's also a silver crossbar option as well, so whichever you're going to feel is going to blend in better with your vehicle, this is the route I recommend choosing.So adding a roof rack to your CRV, it's going to be an excellent option.
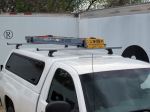
It's going to make our vehicle much more versatile. We're going to be able to set a cargo box up here if we need to free some space inside the vehicle, or we're going to be hitting the slopes, we need a place to carry our skis. We can also use these with a other wide variety of accessories, such as a cargo basket. We have bike racks that go up here as well as kayak racks. So if you're interested in any of these items, we have a large selection here at etrailer.
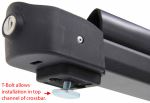
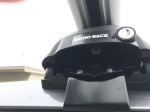
I definitely recommend you check these out.So, one thing I really like about the Rhino-Rack roof rack systems are they really give you some top-of-the-line features and a nice quality, affordable price. Number one, like most of the other top-of-the-line systems, we have integrated channels in the top of our crossbars. And what this does is it essentially makes it possible for using channel-mounted accessories, which are a little bit easier to attach than the wraparound ones that you may be used to. We're also going to get locking mechanisms on our crossbars and locking mechanisms on our mounting feet. Now, normally, the locking mechanisms for some of the other top-tier options, such as Thule and Yakima, these are actually sold separately, and they're not cheap, either.
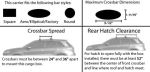
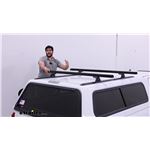
But with the Rhino-Rack, we're going to get plastic locks for the crossbars, which prevent the encapturing being removed, and we're going to get metal locks here at the mounting feet all included with no added fee. Keep in mind, if you would like to opt for metal locks, you can replace the plastic locks in the crossbars with metal locks. Those are, however, sold separately.So, a couple numbers to go over with you. Number one, the length of our crossbars, it's going to be 54 inches, so we're going to have plenty of space for multiple rooftop accessories. In regards to weight, we're going to have a 165-pound capacity. So, again, we can really pile stuff on top of these crossbars without have to worry about any damage to our vehicle or the roof rack components. And, last, I like to give our customers a measurement, the distance from the top of the roof to the bottom of the crossbar. This may vary slightly from application to application, but we're going to get about three and three-quarter inches.So another question we get here at etrailer is they're wondering if they can open their sunroof with the roof rack installed. And as you're about to see, that's not going to be any issue at all for the system. There'll be no interference at all.So now that we've gone over some features, let's go ahead and jump into installation so we can show you how it's done. So the first part of our installation, we want to get our fit kit laid out in front of us, along with our mounting feet and our crossbar here. So the first thing we're going to do is we're going to take a look at the instructions for the fit kit, and they're going to give us a measurement that we need to cut this strip for. So, basically, we just have it in here now just as a reference, but, basically, we're going to cut this strip here to a certain measurement that they give us. We'll slide that all the way over here. And this measurement is essentially going to let us know how far inward we need to place our mounting foot. So that's going to be our first step.Once we get that done, we can begin assembling our mounting foot and get ready to install it on the crossbar. Now if you haven't already done so, we're going to need to remove the end cap on our crossbar here. In order to do that, it's super simple. You're going to get a little key that comes in our kit here, and we'll simply rotate this once we insert in to the unlocked position. We have locked and unlocked. And then we can just slide the end cap off.But now what we're going to do is we're going to take our pad here that comes with our fit kit. We're going to install this onto our mounting foot. Now we need to be careful, because these pads and our mounting feet are going to be labeled front and rear and left and right. So we need to make sure that we have the correct one, depending on which side of the vehicle we're working on and whether we're doing the front or back.So now what we're going to do is we're actually going to be installing our foot here on our rubber fit kit. You'll just simply press it down to lock it in place. Now we're going to take our metal door clip here. These aren't labeled side to side or front to rear, so it doesn't matter which one we grab. But if we take a look on the inside of our mounting foot here, we're going to see our little threaded nut. What we need to do is we need to place our fit kit in there like so, and then we're going to come back with our bolt here. We're just going to loosely thread that in. We should be able to thread it in by hand for now, but we're also going to have our tool in our kit here to tighten it down further when needed.So now we're going to pay attention to our little channel nut here. On the bottom of the side, we're going to have a hex screw. We're going to loosen this now to about the end of our threaded block here. We don't want to take it completely off. And then we're going to go ahead and slide our mounting foot with our fit kit attached into the channels here. We're going to stop here when we've reached our rubber strip. If you remember, we measured and cut that to the correct location according to our instructions.Now we may need to maneuver this little metal block here a little bit to get it to line up within our channels, but once we do, it's pretty easy. It just slides on. And then we're going to butt it up to our strip here, whatever that measurement was, and then we can go ahead and take our handle here. We're going to go ahead and tighten that down. We're going to be torquing it down as well. Now when it's going to be properly torqued, you can see our handle is actually bent now, that's going to straighten up when we reach the proper torque. And there we go.Now we're going to reinstall our end cap here. Simply press it into place. Use our little blue key here to turn it, and it should be locked now. We'll go ahead and repeat the same process on the other side of our crossbar here. So you can see we have our front crossbar already installed for you guys. And, basically, what we're going to be doing is we're going to get some measurements in our instructions again. We're going to get an A measurement, and we're going to get a B measurement. So our A measurement, we're going to take from the center of our door jamb on the B pillar here. We're going to measure forward the amount that they tell us to in our instructions. That's going to line up with the center of our crossbar, and that'll be for our A measurement. Our B measurement will then be from the center of the crossbar on the front one to the center of the crossbar on our rear one. So we'll use the measurements that come provided.And then what we'll do here, I've already done it for you guys, but go ahead and take a piece of tape and just mark out where the center of our crossbar needs to go. So now with our piece of tape in place, we know where we can set our crossbar assembly. We'll go ahead and lift it up now so we can set it into position. Now we'll take our crossbar assembly alignment with the mark that we've made. We're going to open up our door and loosely secure our fit clip.So I don't have this bolt completely tightened down. We've just snugged it up. We'll go ahead and jump onto the other side. We'll tighten that bolt there, and then we'll come back here and torque this one down. So now once we have both of our bolts torqued, we can take our locking end cap. You're going to see two tabs here. We'll line up with the tabs in our mounting feet, press it into place. We'll take our key here, and we can lock it to secure it. I'll repeat this process on the other side and for our forward most crossbar.And that'll do it today for our look and installation of the Rhino-Rack Vortex Aero crossbar system here on our 2020 Honda CRV.
Average Customer Rating: 4.7 out of 5 stars (202 Customer Reviews)
These heavy-duty, aluminum crossbars work with Rhino-Rack legs to create a sturdy roof rack. The square bars include built-in C-channels for mounting Rhino-Rack heavy-duty, contractor-grade accessories.
Great tools that was suggested when purchasing my
Flint Hill Goods Roof Cargo Basket - 46" Length x 36" Width x 4-1/4" Depth - 165 lbs!
I’ve had this rhino rack for over 3 years and it’s been excellent on long road trips to the ski slopes. A year after my purchase, I realized that I was missing the plastic coverings that attached to the end of the bars and called their customer service to resolve the missing pieces. I was impressed with their quick response and seamless delivery.
I bought the rhino rack for my 2013 CRV to haul my kayak. Installation was pretty simple and easy to understand. It is super sturdy and strong. Spent significantly less going with the Rhino Rack name over Thule or Yakima and I'm very happy with how strong this rack is. It's rated up 165lbs witch is plenty for me. The staff at etrailer was very helpful with upgrading my order to 2 day shipping once I realized I needed to get my rack asap to get some striped bass in the bay with my kayak. I just called and in 5mins had my order from regular to 2 day shipping. I will use these guys for whatever else I might need rack wise.
The rack fit well and was easy to install. Seems to be made well. The problem is the amount of road noise. I never even put the basket on. It was so loud, it roared. I repositioned it several times but the noise was way too much and I finally just removed it. I spent a lot of money for the rack and the basket and now they are in storage. I wish it would have worked out better because I thought it looked really good.
The clamps fit well on my 2014 Honda CRV. I took my time reading the instructions and attaching the cross rails to ensure proper attachment, and found the fit to work great. The clamps work well on the contour of the CRV.
I took a test drive, and did not encounter any problem.
Aloha from Hawaii!
Great directions easy to install. Solid rack. No issues after a year of use
It took about an hour. It fit very well on my 2018 Honda CRV.
Seems decent enough. Some parts appeared dirty out of the box, one had minor scratches. Overall ease of putting the racks on/off moderate (could be easier, could be more complicated). Still brand new so jury is still out on longevity. We will see...
I got these as part of the Rhino Rack cross bar set for our 2012 Honda CR-V. The set as a whole works great. I was impressed by the clear instructions and the little details like the decals they provide to put on your car and parts to quickly assemble without re-measuring after the first time. I was also pleased by the customer support. I called to inquire about shipping time because it looked like my parts were coming later than I needed them. William B was very courteous and helpful in getting my order out on time.
On time delivery, quality product, very sturdy, fit my CR-V as described
This has been a disaster, and terrible experience from the start. Original product Rhino roof rack ($188.00) misrepresented for sale, even called and was told all parts were included as "Open Box" item. Received item with missing parts and mismatched parts, then ET sent wrong parts (Legs) causing having to order these cross bars ($192.00) to fit parts sent (Legs). Now my $300.00 BougeRV ski rack - mounting base plates won't fit the crossbars. Still waiting for return label for original item so I can get my refund of $188.00. Three weeks later, still dealing with problem. I do appreciate Shawnee and EDW for their efforts in follow up service attempts.
Fit my Honda CRV perfectly and the whole kit was easy to install. The cargo box I ordered for in the racks perfectly. Of course there was some noise when traveling, and also reduced gas mileage, but that is to be expected. The very slight whistle when driving at higher speeds was easy to tune out. Service from etrailer was great and shipping was quick! I also appreciate all of the information and tutorials available. Would order from this company again.
As always, fast shipping and great quality products
This rack works perfectly on my Nissan Versa for carrying my two Perception Sound 9'6" kayaks. The Rhino-Racks look good to me. The kayaks can rest directly on the rubber pads on the rails, unlike the Yakama racks I had in the past that had bare pipe rails. Also, I expect I can buy parts to adapt this product to a different car without having to buy new towers. I am sorry there are not hooks or loops to attach bungees when carrying lumber. They are noisy in the wind, but less so when carrying the kayaks.
Great product, fit was spot on with correct vehicle specific parts. Etrailer
was fantastic to work with. Great communication and feedback, worked through a small problem with positive outcome. Will definitely purchase from them again, their customer service department is top notch.
Ordered a Rhino Rack for my 2014 GMC Sierra 2500HD Denali. Rack arrived in very good shape and all items were there. Installing at this time and see no problems ahead.
This review covers the Rhino Rack 2500 Vortex Aero crossbars and associated parts (DK284, RRRLKVA, RRVA137S-2) for a naked roof installation on a 2018 Honda CR-V.
Very solid racks. We just took our first trip using them and the didn't budge. As recommended, a few days after installing, I tightened the bolts a bit. I'm not sure they needed it--just a little insurance.
The installation process was clear, but fairly detailed. It would be easy to miss a step, so take your time. Also, I tried a couple shortcuts in the order when installing on the car, but had to back track. So, go in the order they give you.
The racks easily supported our filled "pod" and a couple surfboards, strapped side-by-side. Sorry, no photos of the rack loaded. One thing to watch out for is that our old Thule pod almost didn't fit because of the thickness of the racks. I had to loosen the bolts almost entirely.
Of note: I feel that although I followed the measurements to the millimeter, the fit on our 2018 Honda CR-V wasn't exact. Where the pads sit on the roof of the car didn't align perfectly. I could have adjusted this by just re-trimming the rubber pads that go in the channels, but it's not a big deal, so I just left it.
Finally, I do have one concern. The angle of final installation doesn't really protect the racks from theft very well. The plastic plate that locks over the screw would allow someone with the proper tool to get up under it and loosen the bolts. That being said, someone so inclined could also just break the little plastic door or drill a hole in it to access the bolt. So, I guess it's just a deterrent anyway.
Overall, I'm very happy with the racks and etrailer.com! Despite shipping delays due to Covid-19, they were able to get the racks to me in time for an upcoming trip. I did choose to expedite shipping, but the cost was very reasonable.
Installation was relatively easy. Like others have mentioned here, make sure you pay attention to the instructions. Make sure the pads with arrows are pointing to the front of the car and you're relatively accurate with the suggested mounting measurements.
I rode with them on the car for about 900 miles - hot and rainy weather - and they make a really weird noise. Haven't been able to confirm if the noise came from the wind rushing in between the roof and the bars, or, as my uncle thinks, from the slot spaces under the bars that hold the 4 mounts.
I later attached a Leader Accessories Upgraded Roof Rack (64"x 39"x 5') carrier basket to the top of the rails and the noise went away. The carrier has a wind deflector in the front, go figure.
I drove another 1000 miles with the rails and carrier with some stuff in it and it handled very well.
In any case, I like the way they look on our 2016 Honda CRV SE. Admittedly, I'm scared to take the mounts off to see if they leave a dent or scratch. I'm pretty sure they will, but still happy with them.
I'll try and update this review after I remove them.
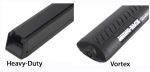
High-quality, sturdy rails, but noisy. There was a pronounced and audible whistle driving with these racks at any common road or highway speed (with the rubber inserts installed across the top). I have since replaced these rails with the Rhino vortex aero style (change of vehicles and the HD bars did not fit the new car). Having used both types several times, I would recommend the aero style over the HD if you have the option.
This review is for the Rhino Rack Vortex Aero Aluminum-Silver crossbars and
associated legs and custom fit kit (RRVA137s-2, DK284, RRRLKVA) necessary for a naked roof installation on a 2018 Honda CR-V. Just enter the model and year of your vehicle and etrailers website will tell you exactly what additional items are necessary to complete the install. etrailers installation instructions and videos are very helpful. The installation document provided is for more than one vehicle and for more than one style rack, so take your time to understand witch measurements apply to your installation and refer to the installation video if necessary. ON that note: The measurements given for front rack did not fit as nicely on the roof as the rear rack, I adjusted the the front rack measurements slightly. I would suggest trial fitting on your vehicle before cutting the metric rulers to final length. Stick On tags are supplied to indicate front, rear and the location to install on your vehicle. Once the rails are adjusted and tagged you can remove and reinstall the racks very quickly. Korren was very helpful in keeping me informed as to availability of items in stock and email shipping tracking. I am very satisfied with etrailers customer service and happy with the appearance and functionality of the Rhino racks.
This fit on my 2023 Honda CRV LC model.
Very happy with the product and the easy to follow instructions! Looks great on my car! Thanks etrailer$
Tricky to rivet tracks onto car with a manual riveter but once done, a great solution for the car with ease of bar removal. My only regret was going with the square bars which result in notable increase in wind noise.
We received our rhino rack system, and in just over an hour we had it installed, the kayaks loaded and were on the toad.
We have had our rack about a year now. We have had no issues, except perhaps remembering to tighten the mounts every so often but that is us being lax.
Product installation instructions were fair, and that is the worst thing I have to say. I havent put anything on the rack yet as I just installed it, but I gave a good tug on the bars and they are SOLID. The product came in a reasonable amount of time, and the feedback for etrailer is that I got followup emails at each step of the process keeping me fully informed right up to the message asking for feedback.
Bottomline: etrailer is a great business to work with, and this product seems to be good too.


Do you have a question about this Roof Rack?
Info for this part was:
At etrailer.com we provide the best information available about the products we sell. We take the quality of our information seriously so that you can get the right part the first time. Let us know if anything is missing or if you have any questions.


Thank you! Your comment has been submitted successfully. You should be able to view your question/comment here within a few days.
Error submitting comment. Please try again momentarily.