
Summer Starts Here - Save up to 70%
To see if this custom-fit item will work for you please tell us what vehicle you'll use it with.


These heavy-duty, aluminum crossbars work with Rhino-Rack legs to create a sturdy roof rack. The square bars include built-in C-channels for mounting Rhino-Rack heavy-duty, contractor-grade accessories.
Features:
Rhino-Rack HD Crossbars - Black - Qty 2:Videos are provided as a guide only. Refer to manufacturer installation instructions and specs for complete information.
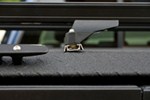
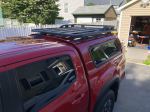
Hey everyone, it's Evangeline here at etrailer, and today, we're taking a look at our track mounted RLTP Rhino-Rack legs. These are gonna be low profile but also adjustable towers for your Rhino-Rack system where you use the RC or RTC tracks. These are heavy duty towers where you have a glass reinforced nylon construction where it's lightweight, but also designed to hold weight. Another thing to this is that it's two inches tall, so measuring from the track to the top of the tower, this is gonna have your crossbar sink two inches above your vehicle. Low profile does not mean zero clearance, though. Of course your actual clearance will be dependent on where you install your tracks on your vehicle, and what type of vehicle you have.
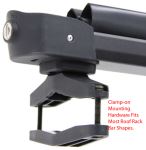
But having that two inches of height, give or take an inch for your vehicle, is gonna be helpful for most types of accessories, especially those that have clamps that go around your bar, or if you have channel mount accessories, the amount of clearance doesn't matter whatsoever. So something to be mindful of is if you want a low profile look, you want something that's sleek, and you're not mounting things with U bolts and wing nuts, having these low profile towers are gonna be a good path to go. Please remember that these on their own are designed to be used with Rhino-Rack heavy duty crossbars. If you want to use your Vortex arrow bars, you are gonna have to get the appropriate adapter. These are not the only towers that Rhino-Rack has that works with their RT and RTC tracks.
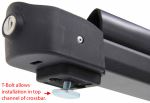
What makes these specific towers different from the others is how they mount to the tracks, so each tower has two bolts, and if you needed to adjust the towers and slide them side to side, then you only have to loosen those bolts. Compared to some other towers, where you have to take off the whole system to move the bases, this is gonna be a much faster method. Now with it being fast when it comes to security, these are also security bolts and require your Rhino-Rack Allen key in order to loosen or hand tighten the towers. But once you have these loose, you can then slide this back and forth to get the best fit for your different types of accessories. And once you've picked your spot, it's simply a matter of tightening them back down again.
While the RLTP towers are gonna be great for most situations, if you do need that extra height, take a look at the RLTF towers instead. Exact same design, but they are gonna sit at three inches of height versus the two inches that this one has. And then if you have, say, fixed mounting points or other types of tower-based systems, then definitely use our fit guide here at etrailer. Put in your year, make, model, and then we will suggest the kit that is going to fit your vehicle. These towers are going to be the base of your system, very straightforward, very easy to use, pretty easy to understand.
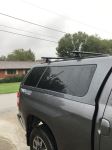
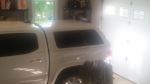
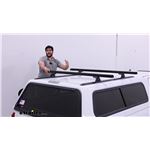
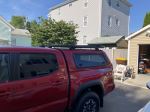
How they shine compared to the other towers is in the process of installation. So if you're curious about that process, well, stick around, and I'll show you how I got these towers on this truck. So before installing your roof rack towers, you first need to make sure you have the right base for it. So this is gonna fit into your RT or RT-style rails. So you can see we already have it installed on our truck. This will create that base, and that channel that will allow you to slide your roof rack back and forth to get the best fit on your vehicle. Now that installation is gonna be found on the Rails page, especially since there's different methods of installing, depending on what type of rails you do get. After your tracks are installed, you can then install your crossbar and your towers. A lot of what you're going to need is gonna be included with your kit except for some tools. So I have a five-eighth inch wrench, preferably a ratchet wrench or crescent wrench-style. And then I have my tape measure just to make sure everything's lined up to where I need it to be, and everything is even. So with all that in place, you are also gonna have to bring your crossbar appropriate to your vehicle size. So we're gonna get that onto our towers first. There's a rubber piece included with your tower, so go ahead and insert those. They'll be pushed into the top channel. Once that's inserted, you can then flip the tower or the crossbar over, and install the tower. If you have heavy duty bars, then you don't need to get any adapter pieces or set that up. You simply loosen that top rectangular plate or block. You're gonna put it into your crossbar, and then turn the bolt, which will tighten that block in that channel. Hand tighten to the point where this will not come off of your crossbar, but you'll still be able to slide it back and forth to make adjustments once it's on your roof. Getting this on your roof will be easier if you have a second person to help guide your towers, but the perks of this style is that they have tabs in the towers that will fit into your tracks, and then that will help you hold your spot as you adjust for spacing from crossbar to crossbar, as well as spacing of length the bar on each side. How far apart you want this depends on your accessories. So a good compromise for a lot of accessories is to put this about 32 inches apart. You'll measure from the front of one crossbar to the front of the other. Slide your towers until it matches that measurement on both sides. Secure the towers with these hex nuts. These are gonna have to slide into your track system. On one side of the tracks, there is gonna be an opening that you can just fit these into. On the other side, there might not be an opening, but you can slide the end cap out to make space for these nuts. Lifting up on the crossbar, we're then going to slide these nuts in the general direction of where they need to go. You're gonna wanna fit on the outside of those tabs, and if in doubt, further away is better than closer inside. Now we're also gonna place these wedges. So the direction you should have this is a tall part of the wedge facing the inside of the vehicle and the tapered end facing out. This allows for a level surface of your tower, even if you have a sloped or curved roof. With this being such a low profile design, you are gonna need those wedges to bounce things out. Finally, secure your towers with your bolts. So you're gonna have your bolts, and you're gonna have your split washer, and then your flat washer. These are gonna come in from the top of the tower. Go ahead and fit that through the wedge, and then thread it onto that nut underneath. If you have everything lined up, you should have that threaded in no time, meaning to wobble your tower around a little bit in order to catch that thread. Once both sides are threaded, go ahead and double check your measurements for crossbar spread before you tighten down using the included Rhino-Rack Security tool. Tighten down until that split washer flattens out on both sides. With the towers in place, you can then adjust your crossbar length. Now this will depend on your vehicle and the spacing, but make sure the space is even on both sides. I like to measure from the tower to the end of the crossbar. Once it's there, you can then secure your crossbar using your five-eighths inch wrench. After I tighten down all the crossbars in the towers, I like to give them a good shake test to double check that everything is secure. But other than that, that's it for the install process. You're now ready to load up your roof rack system with accessories and cargo, and hit the road. And this right here was a look at our Rhino-Rack track mounted RLTP towers, and you saw it at etrailer.com.
Average Customer Rating: 4.8 out of 5 stars (12 Customer Reviews)
These heavy-duty, aluminum crossbars work with Rhino-Rack legs to create a sturdy roof rack. The square bars include built-in C-channels for mounting Rhino-Rack heavy-duty, contractor-grade accessories.
I’ve had this rhino rack for over 3 years and it’s been excellent on long road trips to the ski slopes. A year after my purchase, I realized that I was missing the plastic coverings that attached to the end of the bars and called their customer service to resolve the missing pieces. I was impressed with their quick response and seamless delivery.
Installation was easy and I haven't had any issues. I had originally ordered a wrong part, but the person I spoke with at etrailer made it very easy to correct this and get the parts I needed. The next time I need something from my truck, I'll be checking here first.
This has been a disaster, and terrible experience from the start. Original product Rhino roof rack ($188.00) misrepresented for sale, even called and was told all parts were included as "Open Box" item. Received item with missing parts and mismatched parts, then ET sent wrong parts (Legs) causing having to order these cross bars ($192.00) to fit parts sent (Legs). Now my $300.00 BougeRV ski rack - mounting base plates won't fit the crossbars. Still waiting for return label for original item so I can get my refund of $188.00. Three weeks later, still dealing with problem. I do appreciate Shawnee and EDW for their efforts in follow up service attempts.
Great product, fit was spot on with correct vehicle specific parts. Etrailer
was fantastic to work with. Great communication and feedback, worked through a small problem with positive outcome. Will definitely purchase from them again, their customer service department is top notch.
Tricky to rivet tracks onto car with a manual riveter but once done, a great solution for the car with ease of bar removal. My only regret was going with the square bars which result in notable increase in wind noise.
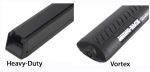
High-quality, sturdy rails, but noisy. There was a pronounced and audible whistle driving with these racks at any common road or highway speed (with the rubber inserts installed across the top). I have since replaced these rails with the Rhino vortex aero style (change of vehicles and the HD bars did not fit the new car). Having used both types several times, I would recommend the aero style over the HD if you have the option.
Product installation instructions were fair, and that is the worst thing I have to say. I havent put anything on the rack yet as I just installed it, but I gave a good tug on the bars and they are SOLID. The product came in a reasonable amount of time, and the feedback for etrailer is that I got followup emails at each step of the process keeping me fully informed right up to the message asking for feedback.
Bottomline: etrailer is a great business to work with, and this product seems to be good too.
Very HD, no worries at all regarding ability to carry weight safely. Rubber track keeps things from sliding, great stuff. 4 stars rather than 5 because one bar arrived with a large scratch down the side. They’re compensating with $20, but it is worth $90, so if I eventually need to replace because of oxidation, I’m up a creek…
Can't really comment on the bars because they didn't arrive but the legs got here. Called Justin and he is getting them shipped, just wondering why it takes so long to get here. Picked on 8/12 and delivery is set for 8/23.
eTrailer and RhinoRack are the best! r>^^^^
I am normally a exclusive Amazon shopper, but etrailer gives equal or better service and has specialty items you just can't find anywhere else. The pricing is great also. This is my 4th order from them on this project and the response has been perfect and the shipping has been prompt. They even offered to take back an item that I did not need. I desperately wanted to mount my 19ft Kayak on my new RV and with some Rhino RT tracks, a Rhino Nautic kayak lifter, a few really heavy duty rivets, and some ingenuity, I was able to accomplish the task. I am replacing the current Nautic bars with the heavy duty bars. See the attached pictures.
Good product, no need for foam blocks
Just got it put on and it looks great. Have not had a chance to use it much at this point, but installation was fairly easy and I'm happy with how it looks.
Rock solid with over 120 pounds on them daily, 1 year later.
Solid. One of the end caps came broken in shipping but otherwise ok. Rubber top on bar is nice for holding items
Perfect product for my aero bars and great customer service getting it to me ASAP before a big trip -
You guys are the best! I have never had a problem with any products from etrailer. Items are always what I expect and are on time.
Needed to lower my heavy duty Rhino Rack Did the job quickly and easily . Would have given 5 stars but seams a little less solid than original feet .
Easy to install and pretty good fit. They feel extremely sturdy when put together.
Desi was awesome in helping us build the perfect mount for our roof top tent set up.
Great quality parts, good customer service and quick shipping
Customer Service was awesome....and super fast.
Strong, good appearance and functional.

Do you have a question about this Roof Rack?
Info for this part was:
At etrailer.com we provide the best information available about the products we sell. We take the quality of our information seriously so that you can get the right part the first time. Let us know if anything is missing or if you have any questions.


Thank you! Your comment has been submitted successfully. You should be able to view your question/comment here within a few days.
Error submitting comment. Please try again momentarily.