

Weak Braking Performance with Electric Drum Brakes on 6000-lb Tandem Axle Sealcoating Rig
Question:
Hi! I have a 500 gal sealcoating rig double axels by equipt. manufacture I think that they are 6000lb. brakes, I have about 3/32 of brake lining left so I desided to adjust the brakes thinking that will fix the problem, but it did not, so I took it to a friend and he said that there is current going to all four brake hubs, and still very bad brake performance, what should I try next?
asked by: Shawn D
Expert Reply:
On the Dexter Electric Brake Assembly you referenced, part # 23-105 rated for 6000-lb axles, the pad thickness varies slightly across the arc-shaped curve of the pad. I measured one with a precision digital caliper and found that pad thickness varies from 0.20-inches in the center of the pad to 0.18-inches at the ends. If your brake pads have 3/32nd-inches of pad thickness left (or 0.093-inches) then this clearly indicates wear that could, but does not necessarily, explain your weak braking performance.
First you can apply a voltmeter to the pins on the vehicle-side trailer connector; please refer to the linked photo that shows the two contacts to test on the vehicle side. You should read +12V when you apply the voltmeter to the two terminals indicated when the manual override is engaged. If you do, then you know the issue is somewhere on the trailer side; if not then you will need to troubleshoot the vehicle 7-way, checking for loose connections, discolored contact surfaces, etc.
Next you can isolate the issue to the trailer wiring or brake assemblies by applying a voltmeter to the two wires for one of the brakes with the manual override applied on your controller. If you detect 12V going in to the brake assembly then you know your trailer connector and wiring are okay and that the issue is likely in the brakes. If you do not detect 12V at the brake wiring when the manual override is engaged then you know the issue is upstream of the brakes and you can focus on the trailer connector contacts to look for signs of discolored, bent or damaged contact surfaces. Clean or replace the trailer connector as needed. Check all trailer wiring for signs of worn or cracked insulation or rough edges on the trailer frame that may have damaged the insulation due to vibration.
Another simple troubleshooting step for further down on the trailer side is to confirm that the one of the two wires from each brake assembly that grounds to the trailer frame is making solid contact to a corrosion-free surface. You can try sanding the metal surface where the ground wire attaches to provide a fresh new bare metal contact point. Without a solid ground you cannot get full braking power. You can also check that the main ground connection up front where the trailer-side connector grounds to the trailer is also solidly affixed to a clean bare metal surface.
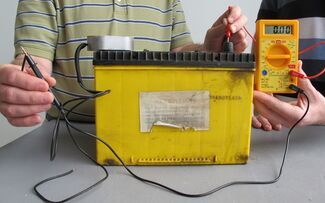
Another possibility is that the brake magnets themselves are shot. It is possible to test the brake magnets for proper operation; this process is described in detail in the linked article. The article includes a table showing the amperage values you should detect when applying a multimeter. You will want to confirm the diameter of your brake assemblies in order to know the appropriate amperage value you should find when testing with the multimeter.
If your magnets are indeed bad, then you can replace them (we offer part # BP01-180 from Dexter that will fit the brake assembly you referenced) but the cost of an entire new brake assembly is not much more than the cost of the magnet itself, so we always suggest replacing the entire unit. This guarantees that all the components in the brake are new and it will then be less likely to soon require attention for another one of its components.
Last, it could also be that if your hubs have been in service for a long time and have severe wear on their inside surface the magnets may no longer be able to make adequate contact to engage the brake pads. In this case you will need to replace the hub assemblies and would be advised to replace the brake assemblies at the same time. The linked video illustrates the process.


Products Referenced in This Question
Replacement Trailer Brake Magnet for 12" Brake Assemblies

- Accessories and Parts
- Trailer Brakes
- Electric Drum Brakes
- Brake Magnets
- 12 x 2 Inch
- Redline
more information >
Product Page this Question was Asked From
Dexter Electric Trailer Brake Assembly - 12" - Left Hand - 6,000 lbs

- Accessories and Parts
- Trailer Brakes
- Electric Drum Brakes
- LH
- 6000 lbs
- Brake Assembly
- Manual Adjust
- 12 x 2 Inch Drum
- Dexter
more information >
Featured Help Information
Miscellaneous Media


Continue Researching
- Q&A: Lug Nut Torque Chart for Trailer Wheels
- Article: Trailer Wiring Diagrams
- Q&A: What is Difference Between Dexter Hubs # # 8-201-9UC3-EZ and # 8-201-5UC3-EZ
- Q&A: Difference Between Dexter Hub and Drums 42866UC3 & 42866UC3-EZ
- Q&A: Will MORryde Upgraded HD Shackle Kit Fit 2020 Grand Design 2670MK
- Article: Parts Needed to Add Electric Drum Brakes to a Trailer
- Q&A: Correct Replacement Braking Assemblies and Hubs for a 2009 Airstream PanAmerica
- Q&A: Converting Trailer from Surge Brakes to Electric Brakes
- Q&A: Troubleshooting A Noisey Coleman-Mach RV Air Conditioner
- Article: Testing Trailer Brake Magnets for Proper Function
- Article: Trailer Drum Brakes vs. Disc Brakes: Making the Decision
- Article: Most Popular Wheel Bearings
- Article: Breakaway Kit Installation for Single and Dual Brake Axle Trailers
- Article: How to Tell the Weight Rating of a Trailer Axle