

How to Bleed Brakes and Install Demco Hydraulic Brake Actuator with Electric Lockout DM8164311
Question:
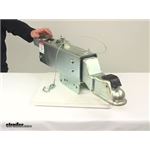
I am replacing a 12,000 hitch with yours DM8164311/16,000 lb. I have a tandem trailer with rear only disc brakes. The boat weighs 12,000 lbs. I never received any installation instructions. I am concerned with the electrical connecting and how to purge the lines. I have looked on U tube and have an idea. I would like some instructions for this specific model please. I can down load the instructions if you can email them or what ever you think is best. Thank you.
asked by: Richard C
Helpful Expert Reply:

The solenoid on the Demco Hydraulic Brake Actuator w Drop and Electric Lockout # DM8164311 will have two wires coming out of it, a ground wire and a power wire. You'll need to connect he power wire to the reverse circuit on the trailer connector. To ground the solenoid, you could either ground the wire to chassis (recomended) or connect to an existing solid ground connection. When your vehicle's in reverse, this solenoid will ensure that that hydraulic actuator does not activate your trailer brakes, allowing you to back up your trailer.
Page 10 of the operator manual I attached walks through the steps of bleeding the brakes on the DM8164311 brake actuator. The steps provided are as follows:
1. Elevate tongue on trailer 4-6 inches.
2. Loosen or remove two 5/16” bolts that hold the lever guide and flat emergency lever spring. Remove master cylinder fill cap.
3. Using short strokes, pull forward on emergency lever, pumping master cylinder until brake fluid in master cylinder reservoir stops bubbling.
4. Attach a bleeder hose to a bleeder valve on one of the wheels (starting at wheel farthest from master cylinder ) and submerge other end into a transparent container partially filled with brake fluid to prevent possible splashing from container.
5. Loosen bleeder valve one turn and while watching fluid in container, use emergency lever to pump fluid as long as bubbles continue to leave submerged hose. When bubbles stop, close bleeder valve, move to next wheel and repeat until all brakes are bled. ( Note: Check master cylinder often (every 4-5 strokes) and refill above half full as needed).
6. Refill master cylinder and securely attach cap. Reinstall emergency lever spring, lever guide, lock washers and 5/16” hex head bolts. When tightening the bolts, make sure the lever moves freely in the groove in the guide.
I've attached an installation video on a similar actuator with electric lockout for you as well since the steps are basically the same.


Product Page this Question was Asked From
Demco Hydraulic Brake Actuator w Drop and Electric Lockout - Disc - Zinc - 2-5/16" Ball - 16K

- Brake Actuator
- Surge Brake Actuator
- Straight Tongue Coupler
- Bolt-On
- 16000 lbs GTW
- 2-5/16 Inch Ball Coupler
- Disc Brakes
- Electric Lockout
- Demco
more information >
Featured Help Information
Instructions
Miscellaneous Media


Continue Researching
- Shop: Demco Hydraulic Brake Actuator w Drop and Electric Lockout - Disc - Zinc - 2-5/16" Ball - 16K
- Video: Demco Brake Actuator - Surge Brake Actuator - DM8164311 Review
- Q&A: How To Bleed The Brakes With A Demco Hydraulic Brake Actuator DA91
- Shop: Demco Hydraulic Brake Actuator w Drop and Electric Lockout - Disc - Zinc - 2-5/16" Ball - 12.5K
- Shop: Kodiak Disc Brakes - 12" Hub/Rotor - 6 on 5-1/2 - Dacromet/KodaGuard - 5.2K to 6K - E-Z Lube
- Shop: Replacement Shock for Demco Hydraulic Trailer Brake Actuators - Models DA10, DA16, DA20, and DA91
- Shop: Replacement Bypass Solenoid Valve for Demco Brake Actuators - Qty 1
- Shop: Demco Hydraulic Brake Actuator w/ Drop - Disc - Zinc - 2-5/16" Ball - 8,000 lbs
- Article: How to Tell the Weight Rating of a Trailer Axle
- Search Results: dm8164311
- Shop: Replacement Master Cylinder for Demco Actuators - Disc Brakes
- Article: How to Bleed Your Trailer Surge Brakes
- Search Results: 46304
- Video: Demco Brake Actuator - Surge Brake Actuator - DM8758811 Review
- Video: Review of Demco Brake Actuator - Surge Brake Actuator with Lockout - DM8750311
- Video: Review of Kodiak Trailer Brakes - 12" Hub/Rotor - 6 on 5-1/2 - Dacromet Disc Brakes - KOD89FR
- Video: Kodiak Trailer Brakes 18SI-BLKIT Review
- Search Results: disc brake actuator
- Shop: Vehicle Tow Bar Brake System
- Search Results: kodiak brakes
- Q&A: Mounting Hole Dimensions of Demco DA91 Surge Brake Actuator
- Video: Dexter Axle Trailer Brakes - Hydraulic Drum Brakes - 23-342-343 Review
- Q&A: How to Tell if Demco 16K Hydraulic Actuator Can be Used as Replacement for Dexter UFP A-160 Actuator
- Q&A: Recommended Surge Brake Actuator W/ Drop To Replace 3 Bolt Actuator On Shorland'r Boat Trailer
- Video: Kodiak E-Z Lube Disc Brakes Installation
- Q&A: Do I Clean Or Replace The Master Cylinder on a Titan Model 6 Actuator That is Full of Rust?
- Q&A: Shock, Master Cylinder Rebuild Kit, and Pushrod Assembly for Demco DA603
- Q&A: Will Demco DM24ZR Master Cylinder Rebuild Kit fit Drum Brake Actuator on Older KarKaddy SS Tow Dolly
- Search Results: ufp
- Search Results: fulton magnum series jack