

Alignment Instructions for Roadmaster Tow Dolly RM-2000-1
Question:
Im not sure of the year of the tow dolly as I purchased it second hand however the tires are wearing to the inside. Is there any way to do an alignment to correct this problem?
asked by: Gary F
Helpful Expert Reply:

Tire wear on the inside tread of both tires would not necessarily be caused by any alignment problems. It could also indicate that the dolly was likely overloaded which could mean that there are parts that are damaged and need to be replaced. Inspect the parts as you go through the instructions below.
There are alignment instructions though depending on the tow dolly you have. For # RM-2050-1 follow these instructions:
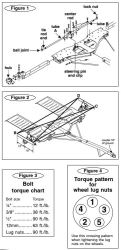
1. First make certain the steering pin (Figure 1) is in place.
2. With the coupler 18 inches off the ground, jack up the axle just enough to allow you to put blocks under it. Now remove the wheels and fenders.
3. Next you’ll need two 24-inch long bars. Each bar may be a level, a square or any straight piece of iron bar. Clamp each of these bars tight to the face of each hub, centering them with the spindle.
4. As illustrated in Figure 2, first measure Line AD. Next measure Line BC. If these dimensions are equal, your hubs are square with the dolly, and you are ready to proceed with the toe-in adjustment (below).
5. If the dimensions are not equal, loosen the lock nuts on the end of Tube A and Tube B (Figure 1). Then, remove the six bolts in the center rod.
6. Rotate Tube A and Tube B as necessary to make Line AD the same length as Line BC. When these measurements are equal, the hubs are square with the dolly.
Then follow these instructions for Toe-In adjustment:
1. The dolly is designed to operate with 0" - 1/16" toe-in.
2. To adjust the toe-in, turn Tube A and Tube B (Figure 1) equally until Line AC (Figure 2) is between 0" and 1/16" less than Line BD (Figure 2).
3. Re-insert the six bolts, washers, nuts, etc. to the center rod.
4. Re-tighten the lock nut at the end of each tie rod.
5. Now re-measure to ensure that the measurements have not changed.
6. Re-assemble the wheels and fenders.
7. Torque all bolts according to the Bolt torque chart (Figure 3). Tighten lug nuts as shown on the Torque pattern for wheel lug nuts chart (Figure 4).


Product Page this Question was Asked From
Roadmaster Tow Dolly with Electric Brakes - 4,250 lbs

- Trailers
- Tow Dolly
- Wheel Decks
- 4250 lbs
- Cars/Trucks/SUVs
- 8-1/2W x 12L Foot
- Powder Coated Steel
- Roadmaster
more information >
Featured Help Information
Instructions

Continue Researching
- Shop: Roadmaster Tow Dolly with Electric Brakes - 4,250 lbs
- Shop: Demco Kar Kaddy X Tow Dolly w/ Disc Brakes - Tilt Bed Frame - 4,800 lbs - Wide Tread
- Search Results: bx1139
- Video: Roadmaster Tow Dolly with Electric Brakes Review
- Search Results: tow dolly
- Video: Demco Kar Kaddy X Tow Dolly with Disc Brakes Review
- Q&A: Parts Needed to Flat Tow 2015 Chevy Malibu LS
- Article: Trailer Wiring Diagrams
- Q&A: Can SumoSprings Maxim Work Together With SuperSprings Leaf Spring Enhancement on 2022 Ford E-450
- Q&A: Why Wouldn't Demco Wireless LED Tow Bar Lighting Kit DM36MV Work with Mercedes Sprinter
- Article: Best Vehicles to Flat Tow Behind an RV
- Q&A: What 5th Wheel Hitches Are Compatible with 2018 Nissan Titan xD with Factory Puck and Gooseneck?
- Q&A: Replacing Igniter Battery in Furrion 2-In-1 Range Oven
- Article: Can You Flat Tow a Ford Escape?
- Q&A: How is the 7 Way Plug on the Custer Wireless LED Tow Bar Light Wired
- Q&A: Can Wireless Towed Vehicle Lights Be Used with Tow Dolly Lights
- Article: Flat Towing Package for 2010-2011 Jeep Liberty
- Article: Trailer Tire Sizing
- Article: How to Choose a High-Low Adapter
- Article: Must-Have Flat Towing Components
Richard L.
9/5/2020
You said tighten the 6 bolts on center rod ! Mine has only 4 bolts ,and the rod A & rod B move in & out in center rob!