

Installing a Brake Controller from Scratch on a 2004 Honda Pilot
Question:
I recently purchased this product after reading your answer to question 1259, regarding use of a Ridgeline part on a Honda Pilot. It stated that this item in conjunction with a brake controller wouldbe all one would need assuming the flat 4pin was already installed. From what Ive read item ETBC7 does not come with any kind of instruction manual. If this is true, does etrailer.com provide any form of installation guide that I could use to install this on my 2004 Honda Pilot?
asked by: Brian
Expert Reply:
You are correct, the ETBC7 does not come with written installation instructions because it can be used with so many different vehicles and brake controllers. But I will be happy to provide you with step by step instructions on installing the 7 and 4 Way Installation Kit, # ETBC7, on your 2004 Honda Pilot. I will also provide a helpful FAQ article and a video install of an ETBC7.
The first thing you will need as you have pointed out is the correct 4-Way wiring harness if not already installed on the vehicle. I recommend the Tow Ready Custom Fit Vehicle Wiring, # 118336, for your Pilot. I have included a link to the installation details and a video install on a similar vehicle below.
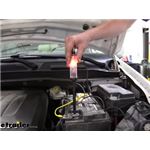
Now you can begin installing the ETBC7. Plug the 4-Way you previously installed into the back of the ETBC7. There will be 4 wires left to connect: blue, black, white, and purple (sometimes yellow). First, attach the white wire to the vehicle frame. Using a circuit tester # PTW2993 find the wire for the Pilot reverse lights and attach this wire to the purple (or yellow) wire. Using the included duplex cable, attach the black wire in the cable to the black wire on the ETBC7 and attach the white wire in the cable to the blue wire on the ETBC7. Next, route the duplex cable under the Pilot, up through the engine compartment, and over near the battery. Be sure to avoid areas that might pinch or burn the wires.
Under the hood, mount a 40 amp breaker. Attach the black wire to the silver post on the breaker. Next, run a length of wire from the other post to the positive battery terminal. Route the white wire from the duplex cable through the firewall and over to where you plan to mount the brake controller. This wire attaches to the brake controller blue wire. Inside the cab, mount the brake controller.
Attach a length of wire to the black wire on the brake controller and another length of wire to the white wire on the brake controller (you will have left over wire from the duplex cable). First route the wire connected to the brake controller black wire. Attach it to a 20 or 30 amp breaker (see brake controller instructions for which size to use), and then to the positive battery terminal. Next, route the brake controller white wire through the firewall and attach it to the negative battery terminal.
Back in the cab, there is one remaining connection. Using the circuit tester, find the wire on the brake switch above the brake pedal that carriers a signal ONLY when the brake pedal is pressed. If you find a wire that carries a signal at any other time (like with the blinkers or headlights on) it is not the correct wire. Once the connections are made tie up and conceal any loose wires and installation is complete.
I have included a link to an FAQ article on installing a brake controller from scratch and a video showing installation of an ETBC7 kit. For a brake controller, I recommend the Tekonsha Prodigy P2 Brake Controller, # 90885. It is one of our more popular models. I have included a link to the installation details below.


Products Referenced in This Question
T-One Vehicle Wiring Harness with 4-Pole Flat Trailer Connector

- Custom Fit Vehicle Wiring
- Trailer Hitch Wiring
- Converter
- Custom Fit
- 4 Flat
- Tekonsha
more information >
Tekonsha Prodigy P2 Trailer Brake Controller - 1 to 4 Axles - Proportional

- Trailer Brake Controller
- Proportional Controller
- Electric
- Electric over Hydraulic
- Automatic Leveling
- Under-Dash Box
- Dash Mount
- Up to 4 Axles
- LED Display
- Up to 360 Degrees
- Tekonsha
more information >

Product Page this Question was Asked From
Universal Installation Kit for Trailer Brake Controller - 7-Way RV and 4-Way Flat - 10 Gauge Wires

- Accessories and Parts
- Trailer Brake Controller
- Installation Kits
- etrailer
more information >
Featured Help Information
Instructions
Miscellaneous Media


Continue Researching
- Article: Brake Controller 7- and 4-Way Installation Kit (ETBC7)
- Article: Brake Controller Installation: Starting from Scratch
- Article: Wiring Trailer Lights with a 7-Way Plug (It's Easier Than You Think)
- Article: Trailer Wiring Diagrams
- Q&A: What is the Difference Between a 4-Way and 7-Way Trailer Connector
- Article: Towing a Trailer? Let's Talk About Brake Controllers
- Article: How to Choose the Right Trailer Hitch Class
- Article: How to Measure for Trailer Hitch Drop
- Q&A: What is the Difference Between a Class II and a Class III Hitch?
- Q&A: Where Do the Wires on the Universal Install Kit for Trailer Brake Controllers Get Installed?
- Q&A: 2022 Toyota Highlander Wiring for a 7-Way Blade Connector
- Q&A: Should I Get a Proportional or Time-Delayed Brake Controller
- Q&A: Parts Needed to Tow Trailer With Brakes Using 1992 Dodge D250
- Q&A: 4-Flat Trailer Wiring For 2024 Jeep Wrangler With Tow Bar Wiring