
Agri-Cover SnowSport LT Snowplow for 2" Hitches - 82" Wide Blade
Curt Front Mount Trailer Hitch Receiver - Custom Fit - 2"
Part Numbers: SS98GV,31374
Retail:$1,728.95
Our Price: $1,679.71
You Save: $49.24
In Stock
Thank you! Your comment has been submitted successfully. You should be able to view your question/comment here within a few days.
Error submitting comment. Please try again momentarily.


Need help with installation?
Locate installers near meAgri-Cover SnowSport LT Snowplow for 2" Hitches - 82" Wide Blade
part number: SS98GV
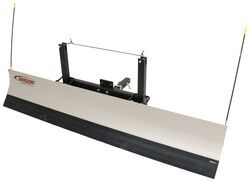
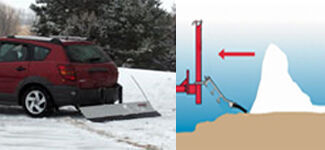
82 x 14 Residential plow with thick rubber cutting edge self-adjusts up and down to smoothly clear a path on any terrain. Aluminum blade stays in straight-ahead position, and makes plowing your driveway as easy as pulling forward or backing out.
Features:
- Lightweight, user-friendly plow allows for quick and easy snowplowing with no controls or hydraulics
- Self-adjusting plow frame allows up and down movement over rough terrain
- Safe for use on grass, concrete, gravel, brick and other uneven surfaces
- Practical design does not block headlights in either plow or transport position
- Effortless installation on the front or back of your vehicle
- Designed for use on 2" front or rear trailer hitches (sold separately)
- Durable construction
- Rust-resistant aluminum blade
- Long-lasting, heavy-duty rubber cutting edge
- Complete kit includes plow blade with blade markers, fixed 2" shank assembly, push frame, hardware kit, and interceptor
- Made in the USA
Specs:
- Application: SUVs, trucks, and minivans with a 2" front- or rear-mounted hitch receiver
- Must have 8" to 14" clearance under the receiver
- Overall blade dimensions: 82" wide x 14-1/2" tall
- Rubber cutting edge dimensions: 6" tall x 1" thick
- Blade weight: approximately 68 lbs
- Plow mounting frame: 31" wide
- Warranty:
- 1-Year for plow parts
- 3-Year for rubber cutting edge
Snowplow Installation
Front or rear mount? Versatility is the SnowSport LT's middle name.
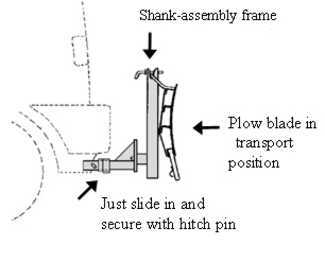
Installation is quick and simple - just slide the included shank assembly into your 2" hitch receiver and secure with pin.
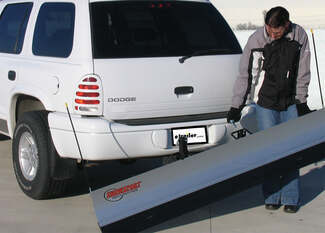
Once the plow frame is connected, attach the blade by lifting one end at a time onto the frame's holders. The lightweight aluminum blade construction makes lifting or adjusting an easy, one-person job. Secure the blade in either the transport or plowing position with the plow's snap pins. The low-profile design won't block your headlights, and the transport position is secure enough for highway travel.
How to Plow
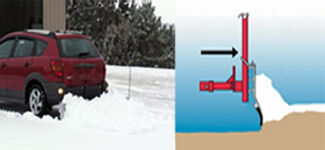
If using with a rear-mount receiver, simply lower the blade to plow position and back up as usual. For a front-mounted plow blade, just drive forward with the blade in the plow position. The unique design takes the hassle out of plowing: This device has no hydraulics or complicated wiring. The push frame on the shank assembly allows the blade to move along the grade of the terrain for easier, more efficient plowing. The heavy-duty rubber cutting edge is effective yet turf friendly, collecting snow and squeegeeing slush without digging into the ground.
When you are ready to reverse your driving direction, the blade lies back, skimming over the surface of the ground until you change direction again to plow.
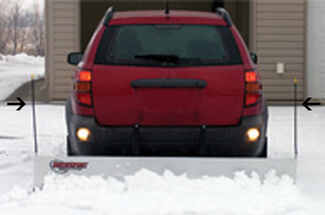
Handy blade markers extend vertically from the ends of the plow to help you see where you are plowing.
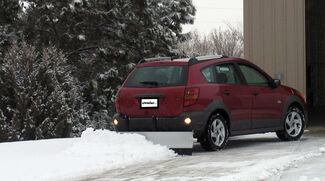
With the SnowSport LT, plowing snow is as easy as backing out of your driveway. Once you are finished plowing, simply lift the blade, refasten it in the transport position and head off for work or errands.
80664 Agri-Cover SnowSport LT Snowplow for 2" Hitches - 82" Wide Blade
California residents: click here
Curt Front Mount Trailer Hitch Receiver - Custom Fit - 2"
part number: 31374
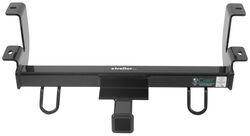
Easily attach a variety of accessories to the front of your vehicle with this fully welded, corrosion-resistant trailer hitch receiver. Perfect for winches, spare tire carriers and more.
Features:
- Front-mount hitch provides attachment point for hitch-mounted accessories
- Winch, spare tire carrier, snowplow, cargo carrier and more
- No more blindly backing trailer in - just hook it up and drive it forward
- Custom fit is designed specifically for your vehicle
- Precision, robotic welding maximizes strength and improves fit
- Easy, bolt-on installation - no welding required
- Complete hardware kit and installation instructions included
- Lifetime technical support from the experts at etrailer.com
- Gloss black powder coat finish over steel resists corrosion
- Sturdy, square-tube design
- Assembled in USA
Specs:
- Line pull: 9,000 lbs
- Vertical load: 500 lbs
- Gross trailer weight: 5,000 lbs
- Receiver opening: 2" x 2"
- Pin hole diameter: 5/8"
- Limited lifetime warranty
etrailer.com Technical Support
At etrailer.com we're committed to the products we sell, and to our customers. Our experienced and knowledgeable staff are available via both phone and email to address your questions and concerns for the lifetime of your hitch. The technicians at etrailer perform hitch installations on a daily basis, making them a valuable resource for do-it-yourselfers. The one-on-one, personal service you'll receive comes straight from an expert in the towing and automotive field. We've installed it, we've wired it and we've towed with it, so whatever your question, we can answer it.
31374 Curt Front-Mount Trailer Hitch Receiver
Video of Agri-Cover SnowSport LT Snowplow for 2" Hitches - 82" Wide Blade


Videos are provided as a guide only. Refer to manufacturer installation instructions and specs for complete information.

Video Transcript for Curt Front Mount Trailer Hitch Installation - 2017 Ram 1500
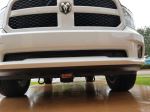
Hi there Ram owners. Bayner 2017 Ram 1500. We're gonna be taking a look at and showing you how Curt's front mount hitch. And this is what our front hitch looks like when it's installed. The cross tube's gonna be hidden behind our front bumper here. We will be able to see the receiver here at the front and the center, and you'll be able the to see the tow hooks that come attached to your front hitch.
And I'd like that the tow hooks are attached to the hitch here because you actually will remove your tow hooks if you have 'em present here to install this hitch. So it's cool that they've got 'em on here, so that way you can still utilize that functionality after installing your hitch. And the hitch offers a 500 pound tongue weight and that's the force going down on top of our receiver. And 500 pounds should be more than enough for most of the things you're intending on using this for. If you're gonna be using it for bike rack and cargo carriers, you should have no problem putting a four-bike rack, fully loaded up on here.
You do wanna keep in mind that, with tongue weight, that's the weight of anything placed in the receiver plus anything on it. So if it was like a cargo carrier, that'd be the weight of the cargo carrier plus the weight of any gear you're putting on the cargo carrier. It's also should be enough too. If you're using it for an over the cab extender, you can put that on there to help support some ladders and the weight as well. Just keep in mind 500 pounds is the maximum you got for your tongue weight.
It all offers a 5,000 pound gross towing capacity and that's how much that it can pull. A lot of people like to use these for moving trailers around in their driveway. If you've got a spot that you like to put your trailer really close to your house, that might be kind of a difficult spot to back into. If you take your ball out of the back and slide it into your front hitch here, having your steer axle right next to the ball, makes it significantly easier. You get a lot more fidelity with moving your trailer around, making it way easier to get it parked into a tight spot without any issues.
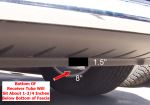
It also offers a 9,000 pound line pull, which is useful for winch guys out there. A lot of people like to put a winch on these and with 9,000 pounds, that should be more than enough for anything you're planning on using your winch for. If your truck gets stuck, you should be able to pull yourself out with that. If you get a winch installed on here then you should be able to pull out most of your buddies with that as well. I do like that it's got the tow hooks on here too. So if you do install a winch, you can utilize those tow hooks too in assistance to wrap it around a tree and hook on there to help pull yourself out. Or again, you can use those to help pull somebody else out if you're using the truck to do so. So it really opens up the versatility of your Ram. You'll secure your accessories to your hitch using 5/8 inch Ascent hitch pining clip. Now, one doesn't come included with the hitch, but we've got plenty available here at etrailer. And I also I recommend locking ones, so you can protect your investments. If we take a look at those tow hook attachments, it's got a very large opening so you should be able to fit just about any kind of chain or tow strap that you need to on there. And it's not overly thick, so if you do have a smaller one, it can still attach on there as well. So now I've got some measurements for you to help you when deciding on accessories. From the center of our hitch pin hole to the edge of our front bumper, we're measuring right at about 8 inches. And that's important when determining if your accessories will contact the bumper when inserted into your receiver and if it has any kind of storage position that it folds up whether it will contact the bumper when placed into that storage position. And from the ground to the top inside edge of our receiver tube, we're measuring right at about 16 inches. This is important when determining if you need to drop, a rise, or a shake on your accessories. And it's also useful to know about the clearance that you've got here at the front of your truck for maybe if you're gonna do any off-roading and things like that so you know kind of what you're gonna be able to clear. All right, now we've covered some of the features of our hitch. Why don't you fall along with me in the shop here and we'll show you how to get it installed It is a pretty easy install. There is a little bit of drilling required, but I would say this is something you could probably do in your driveway in about a half an hour. So yeah, let's get her up in the air here and we'll show you how to do it. And you could easily do this laying on the ground though. All right, guys, we're gonna begin our installation here at the front of the vehicle. So underneath, right here on each side, you may or may not have a tow hook present. Now, this is where they would attach if you did have them. We don't have any in this location on ours, so we don't need to remove 'em, but it's kind of a thing you wanna look at, remove the bolt and tow hook if it is present there. The next thing we're gonna do, once you get your tow hooks out of the way, is we're gonna prepare our hardware. So take the hex head bolts that come in your kit and the conical tooth washers. Place one conical tooth washer on each of the hex head bolts and we want the teeth to face away from the head of the bolt. And at this point now, you're probably gonna wanna grab yourself an extra set of hands because we're gonna lift this up and we're gonna bolt it right in our front hitch, right in where our tow hooks used to be. So I'm gonna go grab an extra set of hands here to help me do it 'cause it is pretty heavy. So I do recommend having somebody there with you. So now we've got an extra set of hands here. We're gonna lift our hitch up into position and we've got those bolts that we had prepared. We'll then take our bolts with the harbor we prepared and we're just gonna feed those up through the bottom of our hitch and thread 'em right into those factory weld nuts in the bottom of the frame. So now we're just gonna grab a 19-millimeter socket and we're gonna go ahead and just snug these up, there we go, just so it touches the bottom of the frame, 'cause we're gonna have to drill out the remaining holes that attaches our hitch. So now we're gonna drill out our remaining holes. That's gonna be these holes here. So you just got one on each side that you need to drill. So we kind of butted this up. That way it's leaning up against the bottom of the frame. We're gonna use a 1730 seconds drill bit to drill out this hole. Let's get that started up in there. I wanna try to drill the hole in the center. And what I usually like to do, is that I kind of just mark where the center is with my 1730 seconds. It's such a large bit. It's hard to kind of get it to start and drill through. We'll switch to a smaller size to give us a pilot hole and then step it up to that 1730 seconds. I just like using that 1730 seconds to kind of get my center mark. There we go. I'll just switch back and step it on up. All right guys, now we're gonna feed our hardware in. So we're gonna hit the coiled wire that comes in our kit here. We're gonna take the coiled end and we're gonna go up through the hole that we had just drilled out. And we did drill this on the other side as well. If we drilled this one, we just repeated the same process over on the other side to drill it out. We're feeding this up through this hole towards the back and there's this kind of rectangular opening right here. This is what we're trying to achieve. So I'm just kind of sticking my finger in there, kind of poking it around, so I'm seeing if I can find the coiled wire. And there it is. And we'll just pull it out. I like to take the other end here without the coil and just put a little 90 bend in it. That just helps keep the coiled wire from falling through this direction. We'll now grab our hardware. The spacer that comes into your kit here, we'll fly it over the coiled bend. You can just poke that into the frame and then on the side of our coiled end, we're gonna use the carriage bolt that comes in our kit and we're just gonna thread it right into this coiled end. And then push it into the frame, pull our coiled wire until our bolts drop down through the opening. We can then remove our coiled wire and install the nut. After you remove your coiled wire, do be careful not to push the bolt back up into the frame 'cause it can be difficult to retrieve. And then just carefully thread this on there. One of the things you can do to help from pushing it up, is you put it a little bit of side pressure on the bolt. So I'm pushing it towards the front of the vehicle. That'll keep it from wanting to go upwards. I wanna just get that on there and we're gonna feed in the hardware on the other side the same way. We can now go back and tighten our hardware. We're gonna use a 19-millimeter socket for these as well to the other side. And then we'll swap out for our cork range and torque all of the hardware to the specifications outlined in our instructions. Do keep in mind that the carriage bolts that we fed into the frame are gonna be a different torque than the ones up at the front. And then you may need an extension for the one that's up a little bit higher in order to torque these. All right. Now that we've got all the hardware torqued down, that will complete our installation. We're ready to load up our favorite accessories up here and hit the road. And that completes our installation of CURT's front mount hitch on our 2017 Ram 1500..
Customer Reviews
Agri-Cover SnowSport LT Snowplow for 2" Hitches - 82" Wide Blade - SS98GV
Curt Front Mount Trailer Hitch Receiver - Custom Fit - 2" - 31374
Average Customer Rating: 4.8 out of 5 stars (65 Customer Reviews)
82 x 14 Residential plow with thick rubber cutting edge self-adjusts up and down to smoothly clear a path on any terrain. Aluminum blade stays in straight-ahead position, and makes plowing your driveway as easy as pulling forward or backing out. Easily attach a variety of accessories to the front of your vehicle with this fully welded, corrosion-resistant trailer hitch receiver. Perfect for winches, spare tire carriers and more.by: Wayne03/23/2018
2014 Ram1500
If I could mark it at 4.5 stars I would. I like it the hitch.
I think it hangs down too low, only 8" off the pavement. I did not like to have to take off the tow hooks to install the hitch. I did like the idea of I sold the tow hooks for almost as much as I paid for the hitch.
I had to buy a hitch extender. ( I do not see the extender I bought on etrailer listed any more.) The extender put the hitch out far enough to clear the grill guard that I had installed. My goal was to have a place to mount my 8,000 pound winch. I can now slide the winch in the front receiver or the back factory receiver. I can now pull the truck out from either front or back.


by: Danny08/22/2019
This front mount hitch was just what we needed to haul our bikes when camping with the slide in camper. We had to take the bikes and a bike hitch off each time we had to get in the camper when we stopped. This front mount hitch saved us from having to do that. Also use it for a carrier to carry extra luggage. It came fast and it was very easy to install, just as advertised.


by: Paul06/18/2020
Front Hitch for 2014 Ram 1500
Using for surf fishing rod holder
Exact fit, Easy well explains instruction and etrailer web site video helpful too.
Took 30-45 mins including drilling holes needed for this install. Very Happy!!
Thank you.


by: Jason11/21/2017
Installation was easy and the product is an excellent looking addition to my truck

by: Bill06/30/2017
Easy install, great fit, excellent instructions and fast shipping.


Bill

6/30/2018
Ive used this several times and it works great. It is a little low, but I use a Curt Hitch Haul with a angled shank.
by: Deb04/22/2019
Good North American made hitch. Clearance from tow hoops to ground a consideration. Bent one hoop back but only because the old logging road was that bad.


by: Paul10/18/2017
This worked out pretty well- drove it for the first time since installed it and it definitely has an affect on how the vehicle feels (I guess the added weight to the front end ) I wouldn't say bad but different. The hitch went on easy, had to trim a very small bit of the air dam maybe a quarter inch. I was worried it would have a impact on the aesthetics of the truck but I think it looks pretty awesome - also the price was the best I could find on the net


by: James 03/23/2024
Fast delivery, easy installation, fair price
by: Edward 04/20/2024
Works as designed!
by: Steven 04/17/2021
I am very happy with my Curt front mount trailer hitch receiver which I use for my rod and cooler holder for surf fishing. It is well constructed and assures me of many years of use. I would recommend Curt to anyone who would like a well built front hitch.

Steven
4/18/2022
Works great for my surf rod rack on my 2012 Ram pickup.
by: Robert 11/10/2023
Quality product with clear installation instructions
by: Chuckie11/26/2019
This front receiver hitch is just what I needed for parking my boat in a very narrow location next to my residence---much shorter turning base having the hitch on the front of the vehicle vs the rear.
This product took just over an hour to install and was very easy with a "second" pair of hands.
will do the same on my next truck

Charles
12/24/2020
Used it several times this past year===I have a very small space to park my boat next to my residence-instead of using the rear hitch I use the front-it is much easier using the front hitch. Seasons Greeting and stay safe.
by: Scott 09/18/2022
I live in the city. So our yards are really not designed to put a travel trailer in. I am using this front mounted hitch to swing my Trailmanor 3124KS our the back yard. Much cheaper option than a powered trailer jockey. Plus I can mount bike carrier, winch etc to the front with no problems.
by: Rick C09/05/2017
Chevrolet Suburban
have had a curt front hitch before(98 Suburban) so was familiar with it.
pretty easy install.
hate loosing the factory tow hooks!!!! need to find a way around that.

Rick C.
9/5/2018
no problem with product as far as manufacturing and quality. have on a 4x4 Ram 1500. hangs too low,drags if u cross the smallest ditch etc. also mounts to far in and when you put carrier into hitch it butts up against bumper and will not go in far enough to put the pin thru. havent been able to use it, just havent had time to take it off.
by: Robert09/09/2020
Easy to install. Works great with my home plow. Don't have to back up with trailers around the yard, precision trailering from the front. My only gripe is that if you buy a new truck to install this front mount hitch you will need two bolts unless you can fish out the existing bolts with a magnet. Save the fish wire that comes with the mount.
by: Scott 07/23/2023
2019 Ram 1500 Classic
Perfect fit. Fishing wire made the install very easy. Took one person less than 30 minutes to complete.
by: Mark 07/07/2020
Product was an easy install, shipping was fast and customer service is always outstanding!
The hitch is barely noticeable and it didn’t need to cut the fascia.

Mark
7/8/2021
Works as advertised. Very easy to install didnt have to cut any bumper plastic. Holds up to the impact of having a plow connected to it.
by: Bennett 09/02/2023
Arrived on time and the hitch fit perfectly. Good quality.
by: Jeff 11/21/2022
2017 Ram1500
I wanted a front-mounted receiver hitch so I could push my travel trailer into its narrow parking spot. Backing in was challenging - I have a narrow curving driveway with rock walls on both sides.
I had a service garage install it for me - and it works great!
It does sit rather low so I have to lower my trailer's hitch to its lowest point so I can connect it to my truck.
by: David 12/27/2023
Fast delivery!
by: Dan 06/22/2022
Fit perfectly and works just like it should. Makes pushing my travel trailer into the barn much easier. The only thing that I would improve is to make it where I could still keep the factory tow hooks..
by: Ron 01/17/2024
2017 Ram1500
Very fast service
by: James10/04/2016
I was a little surprised with the snow plow. I thought it was going to be hydraulic/electric. It does okay, going on flat and slight declines. Inclines not so good. I also. Bought a rear trailer hitch. Very pleased with it.
by: Mark03/05/2018
Perfect fit and installs as stated in the instructions. Trimming the valance is very minor, however it does not have to be done. Frame steel is real so don't go cheap on a drill bits.
Marcus
3/5/2019
Working out great. Used for surf fishing basket. Does reduce ground clearance a hard two inches.
by: Thumper09/07/2017
Great construction. Realtively easy to install, but I would prefer U-bolts to drilling in the frame and fishing bolts through!

Thumper
9/7/2018
It needs to be a few inches higher, so it’s bearly flush belke the bumper. It grabs the oavement in low dios in the road. It’s mounted to a RAM CREW CAB 4WD
25
65
Show More Reviews Ask the Experts about this Snow Plow
Do you have a question about this Snow Plow?
- Recommended Front Mount Hitch for a 2013 Ram 1500
- Yes, we do! To add a front hitch to your 2013 Ram 1500 you will want the Curt item # 31374. This front hitch is custom fit and bolts to your Ram with included hardware.
Please note that this hitch only fits the 4WD models. There is no option to add a front hitch to a 2WD 2013 Ram 1500.
I have linked an installation video below to help you get this hitch set up.
view full answer... - Ground Clearance of Front Mounted Receiver Installed on 2009 Ram 1500 2WD
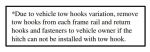
- According to Curt, their # 31374 front mounted receiver isn't recommended for 2WD models because of their lower ride height. My Curt representative also told me that there might be differences in the front suspension members that would interfere with the hitch.
The Draw-Tite # 65062 which is indeed very similar to the Curt model will sit so that the underside of the receiver tube will sit about 1-3/4 inches below the bottom of the bottom of the bumper fascia. In Draw-Tite's opinion,
view full answer... - Recommended Front Mount Hitch for 2017 Ram 1500
- The Curt Front Mount Trailer Hitch # 31374 referenced in your question is confirmed to fit your 2017 Ram 1500, as long as it is the 4WD model. This custom-fit hitch will allow you to easily attach a variety of accessories to the front of your truck with its 2 inch receiver. It features a 500 pound vertical load limit and a 9,000 pound line pull capacity.
I have attached the installation instructions that you can also take a look at. The complete hardware kit is included.
view full answer... - Line Pull Capacity of Curt Front Receiver # 31374 on 2012 Ram 1500 Versus Capacity of OEM Tow Hooks
- I do not have any information regarding the capacity of the OEM tow hooks. The 9000 lb line pull refers to the fact that the receiver is capable of pulling 9000 lbs in a straight line from the receiver opening (not at an angle from side to side or up and down). In order to install the receiver, the OEM tow hooks would need to be removed.
I do not have a photo of the receiver installed on a vehicle, as we have not yet had the opportunity to install one, but if you look at the installation
view full answer... - Do Front Tow Hooks Need to be Removed to Install Front Mount Trailer Hitch on 2018 Ram 1500
- Yes, the factory tow hooks of your 2018 Ram 1500 will need to be removed when installing the Curt Front Mount Trailer Hitch Receiver # 31374.
view full answer... - Front Mounted Hitch for a 2021 Ram 1500 Classic Warlock Model
- I just spoke with my rep at Curt and confirmed that their Curt Front Mount Trailer Hitch Receiver item # C87FR does fit the Warlock model of your 2021 Ram 1500 Classic. This is going to be the best and only option available for your model of truck. I have linked the installation instructions below.
view full answer... - Actual Vertical Load Weight Rating for Curt Front Mount Trailer Hitch Receiver 31374
- I went to our warehouse to confirm the vertical load/tongue weight rating of the Curt Front Mount Trailer Hitch Receiver # 31374. The safety sticker on the hitch indicates as vertical load rating of 500-lbs. This hitch is a confirmed fit on the 4WD 2016 Ram 1500.
view full answer... - Can Tow Hooks Stay in Place Using Curt Front Mount Receiver 31374 on a 2014 Ram 1500 4x4
- It is possible to retain tow hooks on the truck by using Draw-Tite front hitch # 65062. But the tow hooks apparently varied in design so some may still have to be removed. Draw-Tite does not specify which ones can be retained. I have linked a video showing an example installation of this hitch for you.
The Curt front mount receiver # 31374 was not designed or tested for installation with the tow hooks sandwiched between the frame and the hitch so I cannot recommend that installation
view full answer... - Comparing Curt and Draw-Tite Front Mount Trailer hitches For 2021 Ram 1500 Classic
- For your 2021 Ram 1500 Classic 4WD I recommend going with the Curt # 31374 over the Draw-Tite # 65062 simply due to the Curt hitch having built in recovery points where the Draw-Tite does not. Since the Draw-Tite may require you to remove your factory tow hooks if you have them, that can leave you without a solid recovery point which is less than ideal.
We have also found that the powder coat finish Curt uses tends to hold up better over time keeping the hitch looking good, but more
view full answer... - Front Mounted Hitch Fit for 2016 Ram 1500 2WD
- The Curt hitch # 31374 you mentioned is not a fit for 2WD vehicles. Instead you will want to use the Draw-Tite Front Mount Trailer Hitch Receiver - Custom Fit - 2" # 65062 which is a confirmed fit for your truck. I've linked a video to further assist.
view full answer... - Will Curt Front Hitch 31374 Fit a 2WD Ram 1500
- The Curt Front Mount Trailer Hitch Receiver # 31374 fits an 2009-2018 Ram 1500, a 2019-2021 Ram 1500 excluding the Rebel or a diesel, and 2019-2022 Ram 1500 Classic excluding the Warlock. Curt has it listed as only fitting the 4WD models so I wouldn't try to use it with a 2WD Ram pickup.
If you have a 2WD then you can use the Draw-Tite Front Hitch Receive # 65062 which is listed to fit a 2009-2018 Ram 1500 and then a 2019-2021 Ram 1500 Classic. This fits both the 2WD and 4WD model types.
view full answer... - Do Tow Hooks of 2014 Ram 1500 Have to Come Off to Install Curt Front Hitch
- The tow hooks of your 2014 Ram 1500 4WD have to be removed to install the Curt trailer hitch part # 31374 as they interfere with where the hitch would need to install. The good news is that this hitch comes with two safety hook loops which can be used if you were to ever have a need for the tow hooks.
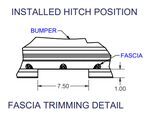
view full answer... - How Much Of The Fascia Needs To Be Cut When Installing Curt Front Hitch # 31374 On A 2018 Ram 1500
- When installing the Curt Front Mount Hitch # 31374 on your 2018 Ram 1500, fascia trimming is optional. The fascia will flex with installation of the hitch. I will attach a diagram showing what you should cut off below of the fascia if you decide to go in that direction. The Curt front mount hitch has an easy, bolt-on installation with no welding required. The hitch is manufactured in The USA.
I linked an installation video below of the Curt Front Mount Hitch being installed onto a 2017
view full answer... - Does Curt Front Mount Trailer Hitch Receiver Fit 2017 Ram 1500 Big Horn 4x4
- Yes it does! I checked with the manufacturer, and the Curt Front Mount Trailer Hitch Receiver # 31374 will fit your 2017 Ram 1500 Big Horn 4x4.
view full answer... - Replacement Mounting Hardware For A Curt Front Mount Hitch # 31374 On A 2018 Ram 1500
- When replacing the hardware for your Curt Front Mount Hitch # 31374 you will need The Replacement Hardware Kit # RHK.
When on the product page there will be two boxes that you will have to fill out. The first one you will type in 31374. The second box has a drop down arrow. Click it and select Curt and then your order is ready to be placed.
I attached a review video link below.
view full answer... - Replacement Hardware For Curt 31374 Front Mounted Trailer Hitch
- Hey Kevin,
The hardware for your Curt Front Mount Trailer Hitch Receiver # 31374 can be purchased by entering in 31374 into the 'Hitch Item Number' box above the add to cart button on the # RHK product page. You can also reach out to Curt directly to get replacement hardware.
view full answer... - Replacement Hardware for Curt Trailer Hitch 31374
- We have replacement install hardware for all of the hitches we carry including the Curt # 31374 you mentioned with the part # RHK. The number you mentioned is a Curt part number but our RHK comes with the same hardware.
view full answer... - Do Factory Tow Hooks of a 2014 Ram 1500 Have to Be Removed to Install Front Hitch
- The Curt Hitch # 31374 is confirmed to fit your 2014 Ram 1500 4x4. It will require the removal of the factory tow hooks, but this hitch has loops on either side of the hitch opening that could be used as tow hooks.
view full answer... - What Size Drill Bit Is Required to Install Curt Front Hitch # 31374
- You will need to use a 17/32 inch drill bit to install the Curt hitch part # 31374 that you referenced. You may not have one currently since this is not a super popular size, but check with your local hardware store and they should have one.
view full answer... - Front Mount Trailer Hitch That Fits 2018 Ram 1500 Tradesman 4WD
- I checked with the manufacturer and since you have a 4WD I can confirm for you that the Curt Front Mount Trailer Hitch # 31374 will fit your 2018 Ram 1500 Tradesman.
view full answer...
Info for these parts were:

Expert Research:
Mike L

Expert Research:
Michael H

Expert Research:
Reno H

Expert Research:
Jameson C

Expert Research:
Adam R

Written by:
Lindsey S

Video Edited:
Jacob T

Test Fit:
Randy B

Test Fit:
David F

Updated by:
Wilson B

Updated by:
Kristina F

Updated by:
Isabelle B

Video by:
Zach D
At etrailer.com we provide the best information available about the products we sell. We take the quality of our information seriously so that you can get the right part the first time. Let us know if anything is missing or if you have any questions.


Product Experts Available Now!
Call 1-800-940-8924
Jason
11/24/2018
All the products from this order have held up to the abuse ive put them through. Unfortunately/fortunately last month i acquired a new ram 2500, and will be buying new accessories from etrailer soon! Your customer service is great and prices are even better!!